Dyson 405864-01 User manual

Category
Vacuum cleaners
Type
User manual

This manual is also suitable for

User manual
SV12 JN.00000 PN.000000-00-00
00.00.00 VERSION NO.01
Contents
In the box
Getting started
Caring for your floors
Charging your machine
Emptying your bin
Cleaning your bin
Clearing blockages
Washing filter A
Washing filter B
Clearing obstructions from your
Motorbar™ cleaner head
Clearing blockages from your
Hair screw tool
Washing your Fluffycleaner head
brush bar
Cleaning your tools
Looking after your machine
click
click
The Dyson machine
with the bin, wand and
cleaner head.
Dyson V8 logo
Motorbar™ cleaner head
De-tangling vanes
automatically clear
wrapped hair from the
brush bar as you clean.
In the box
Your machine will come with one or more of these
cleaner heads – not all will be included.
Vacuum cleaner
Charger
Charges your vacuum
with or without a dock.
Wall dock
The Dyson cordless
vacuum drops into the
wall-mounted charging
dock, ready for your
next clean.
Wand
Crevice tool
Engineered for precise
cleaning around tricky
edges and into hard-to-
reach narrow spaces.
Two tools in one –wide
nozzle and brush,
for quick switching
between cleaning and
dusting tasks around
your home or car.
Combination tool Hair screw tool
De-tangling conical
brush bar spirals hair
off and into the bin.
Motor-driven cleaning
for smaller spaces.
Some tools may not be included.
You can buy additional tools at www.dyson.com.
Fluff y™ cleaner head
Soft woven nylon removes
large debris, while
anti-static carbon fiber
filaments extract fine
dust from hard floors.
Soft dusting brush
Enclosed in a skirt
of soft nylon bristles
for gentle, vacuum-
assisted dusting of
delicate objects
and surfaces.
Fabric and
mattress tool
Removes dust, dirt
and allergens from
mattresses and
upholstery.
Mini motorized tool
Motorized brush bar,
concentrated in
a smaller head to
remove stubborn
dirt from mattresses,
upholstery and stairs.
Stubborn dirt brush
Stiff nylon bristles
dislodge ground-in dirt
from coarse carpets,
high traffic areas and
car interiors.
Extension hose
Adds up to 24 in of
flexible reach to any tool
attachment, to clean up
high or down low in your
home or car.
Main body
showing the
handle and
bin attached.
A brush bar located inside
the cleaner head and
a suction control slider
located on the front.
A rectangular dock that
needs to be fixed to
a wall with screws.
The charger is a one
piece unit with the plug,
connector end and cable.
The narrow connector end at the top, this connects to the bin
and the wider end at the bottom that connects to the cleaner
head or tool.
A long tool
with an
angled end.
This tool has
a combination
of brush head
and crevice tool
together in one
unit. The brush
head slides down
the crevice tool
when needed.
A small cleaner head
with an angled body
housing the motor and
an electrical connector
to attach to the wand or
directly to the machine.
A soft fluffy brush bar
housed within the
cleaner head. There is
an electrical connecter
end that can attach to
the end of the wand or
directly to the machine.
Pliable bristles and
felt bumper strip on
a narrow, tapered tool.
A wide,
triangular
shaped
nozzle.
A small cleaner head
with a body housing the
motor and an electrical
connector to attach to
the wand or directly to
the machine. A short nozzle with
stiff bristles on the
underside.
A flexible hose
engineered from
tough wire and
durable plastic.
Getting started
Pull trigger to start cleaning
Two power modes
Toggle between Powerful mode – for
longer suction – and MAX mode, for
stronger suction. Just hold down the
trigger and slide the control back
and forth.
Switch accessories quickly
The quick-release tools click into place,
and release in moments by simply
depressing the release switch.
Clean awkward spaces
Remove the wand and connect your
chosen tool directly to the inlet pipe
to use the vacuum as a handheld.
click
click
Motorbar™ cleaner head
De-tangling vanes
automatically clear
wrapped hair from the
brush bar as you clean.
Pointers to demonstrate
that the tools can be
connected directly to the
main body or to the end
of the wand.
Diagram showing the
connection of the wand
onto the main body,
with the wand release
button aligned with the
top of the main body.
The power mode button is located
on the top of the machine between
the bin and filter. Slide to the left for
powerful cleaning and to the right
for max mode.
A brush bar located inside the
cleaner head and a suction
control slider located on the front.
Caring for your floors
Check that the underside of the cleaner head or tool is clean and free from
any objects that may cause damage.
Before vacuuming your flooring, rugs, and carpets, check the manufacturer’s
recommended cleaning instructions.
The brush bar on your machine can damage certain flooring. Some rug
materials may fuzz if a rotating brush bar is used when vacuuming. If this
happens, we recommend vacuuming without the motorized floor tool and
consulting with your flooring manufacturer.
1
2
5 hrs
click
Battery LEDs
Charging LEDs
During use, high charge.
Charging, low charge.
Charging, medium charge.
Charging, nearly full.
Fully charged.
Battery fault.
Charger fault.
During use, medium charge.
During use, low charge.
Empty.
4.5 hrs4.5 hrs
1
2
5 hrs
click
1
2
5 hrs
click
1
2
5 hrs
click
1
2
5 hrs
click
1
2
5 hrs
click
Charging your machine
Fully charge your machine before your first use. Connect to charger either
directly or in the dock.
A full charge will take approximately 4.5 hours. While your battery
is charging, the LEDs will flash with the current level of charge.
These lights will turn off once your machine is fully charged.
clik
1
click
One light flashing
alternately red and blue.
Two flashing blue lights on
the side of the battery.
No lights illuminated on
the side of the battery.
Three flashing blue lights
on the side of the battery.
One flashing blue light on
the side of the battery.
One flashing red LED.
All LEDs lit with
a solid blue light.
Two LEDs lit with
a solid blue light.
One LED lit with
a solid blue light.
One blue LED flashing.
The LED lights
are located on
the side of the
battery unit.
The charger connected
from the power supply
using the wall dock.
Insert the charging cable into the charging point at the back of
the vacuum, at the bottom of the handle. Plug the cable into
a wall socket to begin charging.
clik
clik
clik
clik
Emptying your bin
Empty as soon as the dirt reaches the MAX level – don’t overfill. Using your
machine when the dirt is above the MAX line may affect the performance
and require more frequent filter washing.
Close the bin
Push down on the cyclone until it slides into position.
Push the bin base upwards until it closes securely.
Cover your bin tightly in a dustproof bag while you empty. Remove the bin
carefully, seal the bag tightly and dispose.
Remove the wand from your machine.
Hold your machine over the bin and pull the bin release catch upwards.
The cyclone will slide up and the bin base will open.
Release the dirt
Minimize dust contact
clik
clik
click
The bin release catch
is located on the top
of the cyclone where it
joins the main body of
your machine.
The MAX mark on the bin
of the machine, showing
that the dirt should not be
filled over the Max mark
when the machine is at
the angle of normal use.
1
Empty your bin as soon as the dirt reaches the MAX mark.
You may need to clean the filter more often if you use your machine
with a full bin.
Cleaning your bin
Remove the wand from your machine.
Hold your machine over a bin and pull the bin release catch upwards.
The cyclone will slide up and the bin base will open.
Empty your bin
Pull the bin release catch upwards. The cyclone will slide up and the bin base
will open.
Locate the cyclone release button behind the cyclone and push to remove the
cyclone from your machine.
Remove the cyclone
Pull back on the red catch located on the base, slide the bin down and pull it
off your machine.
Remove the bin
Wipe your bin with a damp, lint-free cloth. Don’t put the bin in a dishwasher
or use detergents, polishes or air fresheners.
Make sure the bin is completely dry before replacing.
Clean the bin
Align the tabs on the bin with the grooves on the main body and slide it
upwards until it clicks into place.
Replace the bin
Slide the cyclone into the grooves of the main body and push down until it is
in position.
Push the bin base up until it clicks firmly shut.
Replace the cyclone
1
2
3
2
1
2
1
3
2
The cyclone release
button is located on
the main body and is
visible once the bin
release button has
been activated. The
button to remove the
bin is located on the
bottom of the handle.
Clearing blockages
Disconnect your machine from the charger before looking for blockages.
Be careful not to touch the trigger and be aware of sharp objects.
Leave your machine to cool down before looking for blockages.
Don’t use your machine when looking for blockages as this could cause injury.
Your machine is fitted with an automatic cut-out. If any part
of it is blocked, your machine’s motor will pulse and won’t
function until the blockage has been cleared.
With the wand
removed from the
machine, check for
blockages at both
ends of the wand.
Lift the filter out of the top of the cyclone.
Tap to remove excess dust and debris.
Align the arrow on the top of the filter with the bin release button.
Push down to fit securely in place.
Washing filter A
Wash your filter
Dry your filter
Reassemble your machine
Remove your filter
Leave your filter to dry for at least 24 hours in a well-ventilated, warm place.
Do not dry your filter in a tumble-dryer or near a naked flame.
Important: your filter must be completely dry before you put it back into the
machine. Your machine could be damaged if used with a damp filter.
Hold the open end of the filter under a running tap, until the water runs clear.
Turn the filter upside down and tap it to remove excess water.
Run water over the outside of the filter until the water runs clear.
Squeeze and twist with both hands to make sure the excess water is removed.
The filter has a top with
five arms that fit onto
the cyclone body.
The filter will only fit
correctly if the arms
are aligned and the
arrow on the top is
pointing towards
the main body of
the machine.
Twist off your filter
Wash your filter
Shake out the water
Twist your filter counter-clockwise and pull it away from your machine.
Place your filter on your machine, aligned in the open position.
Twist clockwise until it clicks securely into position.
Washing filter B
Dry your filter
Leave your filter to dry for at least 24 hours in a well-ventilated, warm place.
Do not dry your filter in a tumble-dryer or near a naked flame.
Important: your filter must be completely dry before you put it back into the
machine. Your machine could be damaged if used with a damp filter.
Reassemble your machine
Wash the inside of the filter under cold, running water, rotating the filter to
make sure all the inside is clean.
Repeat until the water runs clear.
Empty the filter and shake firmly to remove excess water.
Keep shaking it until there’s no water coming from the filter.
Place your filter, with the open end facing up, to dry.
The filter is placed
under the tap with the
water flowing into the
open end of the filter.
Replace your brush bar
Your Motorbar™ cleaner head doesn’t have a washable brush bar.
To maintain optimum performance, check your brush bar regularly
and clear any obstructions.
Make sure your machine is disconnected from the charger and take care not
to touch the trigger.
Clearing obstructions from your
Motorbar™ cleaner head
Look for obstructions
Clear any debris from your brush bar.
Check inside the cleaner head and remove any debris or blockages.
Your Motorbar™ cleaner head and brush bar aren’t washable.
Wipe over with a damp lint-free cloth.
Don’t put any part of your machine in a dishwasher or use detergents,
polishes or air fresheners.
Press the cleaner head release button on the end of the wand. Place the
cleaner head upside down.
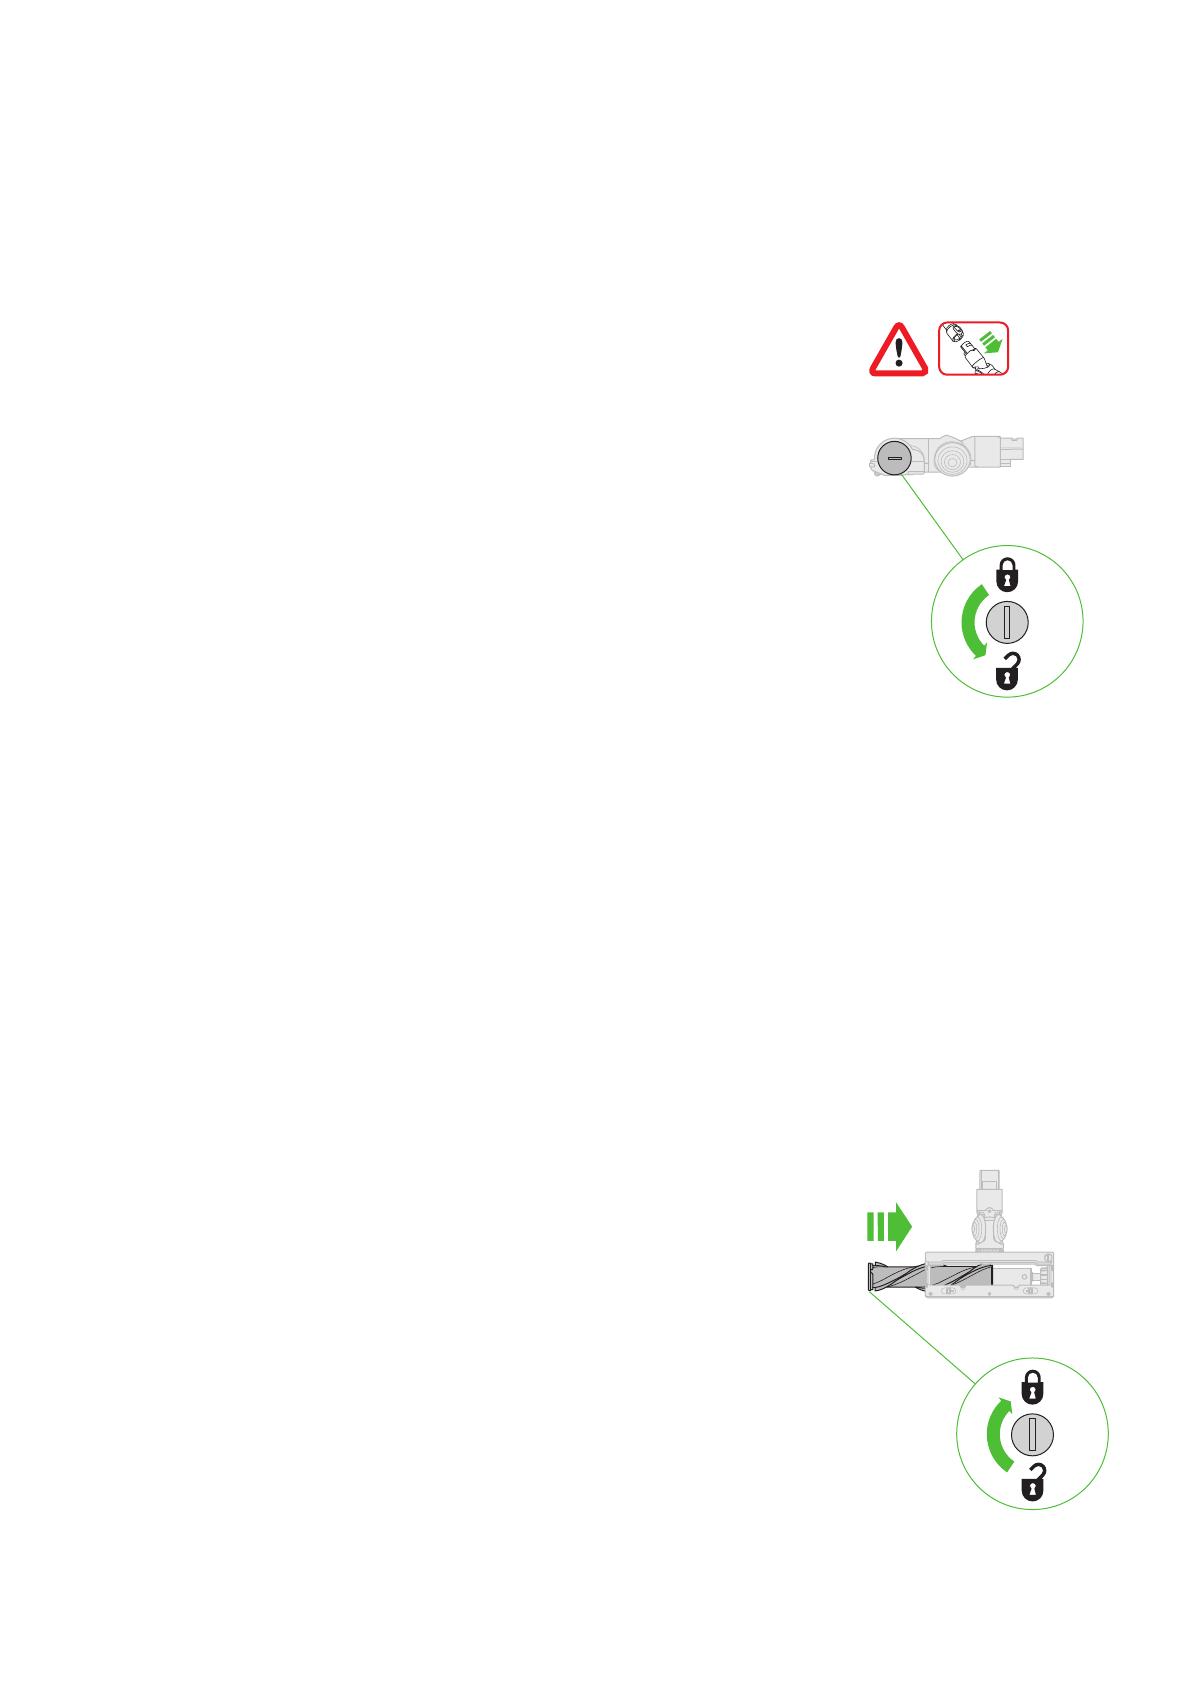
Use a coin to unlock the end cap.
Twist the end cap and remove it from your brush bar. Don’t wash the end cap.
Slide your brush bar out of the cleaner head.
Remove your brush bar
1
1
1
1
1 2 3
Push the end cap back on to your brush bar and slide it back into the
cleaner head.
Turn the end cap clockwise into the locked position.
Your cleaner head isn’t washable and should only be wiped over with
a damp lint-free cloth.
The brush bar reinserted into the
cleaner head and the end cap rotated
to the locked position.
The removal of
the brush bars
showing the lock
in a horizontal
position and the
unlock symbol in the
6 oclock position
and the lock symbol
in the 12 o’clock
position.
Remove the cover and brush bar
Look for obstructions
Reassemble Hair screw tool
Your Hair screw tool doesn’t have a washable brush bar. To maintain optimum
performance, check your brush bar regularly and clear any obstructions.
Make sure your machine is disconnected from the charger and take care not to
touch the trigger.
Remove the Hair screw tool from the wand or machine.
Push the base plate open. Press the red lever down to release the cleaner
head cover.
Pull the cleaner head cover off the main body of the tool.
Pull your brush bar firmly to remove it from the main body.
Check and remove any obstructions from all three parts of your
Hair screw tool.
Your Hair screw tool isn’t washable. Wipe over with a damp lint-free cloth.
Don’t put any part of your machine in a dishwasher or use detergents,
polishes or air fresheners.
Put your brush bar back into position and press firmly until it clicks back into
position.
Check the red locking lever is in the unlocked position. Align the cleaner
head cover with the guide on the main body. Push it down until it clicks into
position.
Push the red locking lever up until it clicks into position and push the base
plate back into place.
Clearing blockages from your
Hair screw tool
Slide the housing
back on to the brush
bar and push the
lever on the back of
the Hair screw tool
upwards to lock.
The location of the
lever to release the
brush bar is located
at the back of the
Hair screw tool.
Replace your brush bar
Remove your brush bar
Wash and dry your brush bar
Don’t put any part of your machine in a dishwasher or use detergents,
polishes or air fresheners.
Press the cleaner head release button on the end of the wand. Place the
cleaner head upside down.
Push the end cap up fully and pull the brush bar out of the cleaner head.
Remove the end cap from the brush bar. Don’t wash the end cap.
Before replacing, check that your brush bar is completely dry.
Reattach the end cap to your brush bar.
Slide your brush bar into the cleaner head. Push the end cap back down to
the closed position.
2
3
1
2
1
2
3
1
2
1
2
3
1
2
1
Washing your Fluffy
cleaner head brush bar
Your Fluffycleaner head has a washable brush bar. To maintain optimum
performance, check and wash your brush bar regularly.
Make sure your machine is disconnected from the charger and take care not
to touch the trigger.
Hold your brush bar under running water and gently rub to remove any lint
or dirt.
Remove as much excess water as possible, run your hand down the length
of the brush bar to squeeze out the water.
Stand your brush bar upright, with the closed end at the top. Leave to dry
completely for at least 24 hours.
The brush bar
has an open
end and
a closed end.
Stand upright,
with the closed
end facing
upwards, to dry.
The end cap
is located at
the side of the
cleaner head.
Push this
upwards to
unlock the brush
bar. Don’t wash
the end cap.
The end cap
should be
attached to the
cleaner head
at an angle less
than 90°, any
angle greater
than this will not
allow the end
cap to close.
The two ends of the main
brush bar showing the
closed in end being the
correct one to have facing
upwards when leaving the
brush bar to dry.
The brush bar reinserted
into the cleaner head
and the end cap rotated
to the locked position.
Cleaning your tools
Don’t put any part of your machine in a dishwasher or use detergents,
polishes or air fresheners.
Wipe with a damp, lint-free cloth, without touching the connector end.
Make sure your tools are completely dry before using.
Crevice toolCombination tool Hair screw tool Soft dusting brush
Fabric and
mattress tool
Mini motorized tool Stubborn dirt brush
Extension hose
Looking after your machine
To always get the best performance from your machine, its important to
clean it regularly and check for blockages.
Look after your machine
Look after your battery
Your serial numbers
You can register your machine using the serial number found on the bottom
of your machine.
If your machine is dusty, wipe with a damp lint-free cloth.
Check for blockages in the cleaner head, tools and main body of your machine.
Wash your filter regularly and leave to dry completely.
Don’t use detergents or polishes to clean your machine.
You can find your serial numbers on your machine, battery and charger.
Use your serial number to register.
To get the best performance and life from your battery, use Powerful
suction mode.
Your machine won’t operate or charge if the ambient temperature is below
C (4F). This is designed to protect both the motor and battery.
  • Page 1 1
  • Page 2 2
  • Page 3 3
  • Page 4 4
  • Page 5 5
  • Page 6 6
  • Page 7 7
  • Page 8 8
  • Page 9 9
  • Page 10 10
  • Page 11 11
  • Page 12 12
  • Page 13 13
  • Page 14 14
  • Page 15 15

Dyson 405864-01 User manual

Category
Vacuum cleaners
Type
User manual
This manual is also suitable for

Ask a question and I''ll find the answer in the document

Finding information in a document is now easier with AI