Rayburn COALBROOKDALE GS3i User guide
- Category
- Stoves
- Type
- User guide
This manual is also suitable for

WARNING
This information is a copy of an original
archive, therefore Aga cannot be held
responsible for its continued accuracy.

WP 10/94 EOPI 510661
Users
Instructions
Consumer Protection Act 1987
As manufacturers and suppliers of cooking and heating products, in
compliance with Section 10 of the Consumer Protection Act 1987.
We take every care to ensure, as far as is reasonably practical, that
these products are so designed and constructed as to meet the
general safety requirement when properly used and installed. To this
end, our products are thoroughly tested and examined before
despatch.
IMPORTANT NOTICE: Any alteration that is not approved by Aga-
Rayburn could invalidate the approval of the appliance, operation of
the warranty and could affect your statutory rights.
Control of Substances - Health and Safety
Important
This appliance may contain some of the materials that are indicated
It is the Users/Installers responsibility to ensure that the necessary
personal protective clothing is worn when handling where
applicable, the pertinent parts that contain any of the listed materials
that could be interpreted as being injurious to health and safety, see
below for information.
Firebricks, Fuel beds, Artificial Fuels - when handling use
disposable gloves.
Fire cement - when handling use disposable gloves.
Glues and Sealants - exercise caution - if these are still in liquid form
use face mask and disposable gloves.
Glass Yarn, Mineral Wool, Insulation Pads, Ceramic Fibre,
Kerosene/Gas Oil - may be harmful if inhaled. May be irritating to
skin, eyes, nose and throat. When handling avoid contact with skin
or eyes. Use disposable gloves, face-masks and eye protection.
After handling wash hands and other exposed parts. When
disposing of the product, reduce dust with water spray, ensure that
parts are securely wrapped.
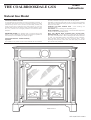
THE COALBROOKDALE GS3i
Natural Gas Model
DESN 510712

Dear Customer
Your gas stove is for use on natural gas only and must
not be used on any other gas. It must be installed by a
competent person (e.g A CORGI Registered Installer) in
accordance with the Installation Instructions and
operated in accordance with these Users Instructions. If
so it should provide many years of safe and efficient
operation.
Please complete the separate guarantee card and return
it to us within 28 days of purchase. This will enable us to
record the details of your purchase and keep you advised
of any future developments.
We thank you for purchasing our product and trust it will
provide many years of excellent service.
The components of this appliance are guaranteed for one
year. We agree to repair free of charge or, at our option
replace the appliance or parts thereof which may prove to
be defective within one year of purchase.
Please retain your purchase receipt. Our Service Engineer
will need to see this in the event of a claim under
warranty.
Your Coalbrookdale GS3i is a natural gas stove.
Due to the newness, the stove may give off a slight smell
for a short period after commissioning. This is quite
normal and will disappear after a few hours of operation,
open doors and windows if required.
The installation of the stove must be carried out by a
competent person (e.g. CORGI Registered Installer) in
accordance with the installation instructions and the
current Gas Safety (Installation and Use) Regulations
1994. Failure to install the appliance correctly could lead
to prosecution.
Before installation of your stove your installer should
check that the chimney is sound free from obstruction
and clean. If a brick chimney is to be used for the gas
stove it MUST be swept prior to the installation.
The hearth under the stove should never be covered with
combustible flooring or material. Do not obstruct the
space beneath the stove.
WARNING: DO NOT OPERATE THE STOVE WITH THE
GLASS PANELS IN THE DOOR OR SIDES CRACKED OR
BROKEN. THE DOOR MUST ALWAYS BE CLOSED
USING THE TOOL PROVIDED.
The Coalbrookdale GS3i has been designed similar to a
solid fuel stove to relevant safety standards, but during
use, many parts of the appliance can become HOT to
touch. We recommend that you provide and secure a
fireguard complying with BS.6539 when the room is used
by elderly, infirm or young persons.
Any alteration after the initial installation must be in
accordance with the requirements of the Installation and
Servicing Instructions. Clarification of combustible
material clearances, hearth dimensions, shelf heights and
fluing requirements are detailed in the section ‘Location’
and the ‘Flue’.
This appliance should be checked on a regular basis to
ensure continued clearance of combustion products and
that there is no accumulation of soot etc. It is
recommended that the appliance is inspected/serviced
annually by a competent person (e.g A CORGI Registered
Installer).
To ensure safe operation of the appliance the room
containing the stove must have purpose provided
ventilation such as an air brick or door grill. This serves to
replace the air used in the combustion process and it is
particularly important that the vent remains free from
obstruction at all times. Therefore you should have
periodic checks to ensure that the ventilation is free from
obstructions.
Combustible furniture or material MUST NOT be placed
closer than 1.5m in front of the stove.
It is NOT recommended to have any material, such as
curtains, above the appliance or to within 1.5m of the
sides.
Clothing or other flammable materials should NOT be
placed on the stove.
Blown vinyl wallpaper or similar materials which have a
raised pattern, are easily affected by heat and may scorch
or discolour if placed too close to a heating appliance.
Please bear this in mind when installing this stove and
when re-decorating.
The door tool must be stored in a safe place out of the
reach of children.
The appliance should under NO circumstances be utilized
for solid fuel.
GUARANTEE
IMPORTANT NOTES
2

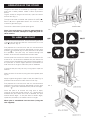
The gas to the stove is controlled by a pilot light. control
knob and a safety feature called a flame supervision
device.
To gain access to the gas control knob, open the control
access door (Fig. 1).
The tap knob bezel is marked with position for (OFF) (●).
PILOT (★) and a graduated section for minimum, and
maximum gas rate (fig. 2).
The stove is fitted with a piezo spark ignitor.
Note: If the main burner or pilot are extinguished for
any reason, DO NOT attempt to relight the pilot for
three minutes.
Open the control access door. Ensure that the glass door
is closed and locked and that the control knob is in the
OFF (●) position (fig. 2).
Fully depress the control knob and turn anti-clockwise
(keeping the control knob fully depressed) until the pilot
position ( ) is reached (fig. 2). If the pilot has not lit repeat
the operation. The pilot may be viewed through the
bottom of the window towards the left hand side.
Once the pilot is lit continue to hold in the control knob for
a further 10 - 15 seconds to establish the pilot. When the
control knob is released the pilot should remain alight. If
the pilot fails to remain alight repeat the procedure but
hold the knob in longer to allow the pilot to establish.
If required the pilot may be lit by a long spill or taper as
follows:
Open the door of the stove (using the tool supplied) (see
Fig. 3).
Apply a lighted long spill or taper to the pilot (See Fig. 4)
positioned at the front LH side of the burner tray.
Fully depress the control knob and turn anti-clockwise
(keeping the control knob fully depressed) until the pilot
position ( ) has been reached and the pilot should light.
Once the pilot is lit remove the long spill or taper,
continue to hold the control knob for 10 - 15 seconds to
establish the pilot. When the knob is released, the pilot
should remain alight - if the pilot fails to remain alight,
repeat the procedure, but hold the knob in longer.
When pilot is established close the door (using the
tool supplied).
3
OPERATION OF THE STOVE
TO LIGHT THE PILOT
FIG. 1
FIG. 2
FIG. 3
FIG. 4

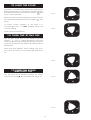
If the pilot is not already alight, light the pilot as described.
Slightly depress and turn the control knob anti-clockwise
from the pilot position to the maximum position ( ) (see
Fig. 5). The fire will ignite.
Adjust the heat output as required by turning the control
knob clockwise towards the minimum position ( ) (see
Fig. 6).
To ensure correct operation of the stove it is
recommended that it is NOT operated below the
minimum setting.
Close the control access door.
Turn the gas control knob to the minimum gas rate
position ( ) (Fig. 7), slightly depress the knob and
continue turning to the pilot position (★) (Fig. 8). The fire
will go out and the pilot will remain lit and may be left on
permanently.
When turning off appliance some ‘popping’ may occur,
this is quite normal as it is the residual gas being burnt
off.
Turn the stove off as described. Depress the control
knob, turn to the off (●) (Fig. 9) and the pilot will go out.
4
TO LIGHT THE STOVE
TO TURN THE STOVE OFF
TO TURN THE STOVE
AND PILOT OFF
FIG. 5
FIG. 6
FIG. 7
FIG. 8
FIG. 9

Cleaning should be carried out when the stove is turned
OFF and is cold.
The exterior of the stove can be cleaned with a vacuum
cleaner, or dusted with a soft brush, either dry or
moistened by drawing the bristles over a damp cloth.
A cloth is not recommended as it can leave fibres behind.
The flame effect of the stove may deposit some soot on
the coals, or back of the stove. This is quite normal and
need not be cleaned off but if desired can be removed by
carefully using a soft brush.
WARNING: DO NOT USE A VACUUM CLEANER
Remove the coals for cleaning and replace as described.
Ensure that the stove and pilot are turned OFF and
that the stove is cold.
Open the door of the stove. (Using the tool supplied).
(Fig. 3).
In time, due to expansion and contraction the ‘coals’ may
settle. The settlement of the ‘coals’ may cause minor
abrasions and expose some white spots. These white
spots, usually add realism to the stove when in operation.
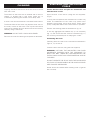
Position the blanking plates as illustrated in fig. 10.
If the clay aggregate has settled ‘top up’ as necessary
(fig. 11) and ensure that the ceramic turbulators (fig. 11)
are correctly positioned prior to relaying the ‘coals’.
Positioning the Coals
Carefully place the coals on the coal bed as illustrated in
Figs 12, 13, 14 and 15.
Close the door and lock (using the tool supplied).
WARNING: USE ONLY THE SIMULATED COALS AND
AGGREGATE SUPPLIED WITH THE APPLIANCE TO
BUILD THE BED. UNDER NO CIRCUMSTANCES USE
EXTRA COALS OR PUT ANY OTHER MATERIAL ON THE
FUEL BED.
DO NOT OPERATE THE STOVE WITH THE DOOR OPEN
OR IF ANY OF GLASS PANELS IN THE DOOR OR SIDES
ARE CRACKED OR BROKEN.
Hands should be washed after handling coals. (if gloves
are not used).
5
CLEANING
REMOVING AND REPLACING
COALS

6
LAYING THE FUEL BED
FIG. 10
FIG. 11
FIG. 12

7
FIG. 13
FIG. 14
FIG. 15

8
MAINTENANCE
HEAT OUTPUT (GROSS)
REPLACEMENT ITEMS
Maximum Setting Minimum Setting
7.1 kW 2.25 kW
ITEM MAKERS PART
NUMBER
Control Knob HG4M999413
Coals Pack HG4M420674
Turbulator FG4M 420450
Aggregate Pack TCLY417047
Door Tool HS9M 47520 COMP
f you require any of the below user replacement items or
if you have any difficulty with the fire, consult your
original supplier quoting the stoves name. Coalbrookdale
GS3i and the Serial No (found on the Data Plate on inside
of glass door).
Serial No.
The appliance should be serviced annually by a
competent person (e.g. CORGI registered installer).
Manufactured By
Aga-Rayburn
Station Road, Ketley, Telford, Shropshire, TF1 5AQ
Telephone (01952) 642000 Fax (01952) 641961
For further advice or information contact
your local distributor/stockist
With Aga-Rayburn’s policy of continuous product improvement, the
Company reserves the right to change specifications and make
modifications to the appliance described and illustrated at any time.
-
 1
1
-
 2
2
-
 3
3
-
 4
4
-
 5
5
-
 6
6
-
 7
7
-
 8
8
-
 9
9


Rayburn COALBROOKDALE GS3i User guide
- Category
- Stoves
- Type
- User guide
- This manual is also suitable for
Ask a question and I''ll find the answer in the document
Finding information in a document is now easier with AI
Related papers
Other documents
-
AGA Coalbrookdale Severn GSi3 Gas Installation guide
-
-
-
-
-
-
-
 Hunter,R.F EX5 4RJ User manual
-
-
