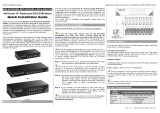
Trendnet TK-204K User manual
- Category
- KVM switches
- Type
- User manual
This manual is also suitable for

Copyright ©2004. All Rights Reserved. TRENDware International, Inc.
TRENDnet
TRENDware, USA
What's Next in Networking
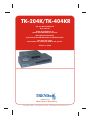
TK-204K/TK-404KR
Version 11.30.04
2/4 port DVI-KVM Switch
User’s Guide
Guide de l'utilisateur du
Switch audio DVI-KVM à 2/4 ports
Diese Benutzeranleitung
2/4-facher DVI-KVM-Umschalter mit Audiofunktion
Esta guía del usuari
Conmutador con audio DVI-KVM de 2/4 puertos

Table of Contents
English ......................................................................................................
Specifications ............................................................................................
Troubleshooting ........................................................................................
1
1
2
3
7
4
8
1. Prepare for Installation ......................................................................
2. Introduction .......................................................................................
3. Installation .........................................................................................
4. Operation ..........................................................................................

Thank you for purchasing TRENDnet's TK-204K/404KR 2/4 port DVI-KVM
Switch. This guide will help you set up your KVM switch. Following the
installation instructions should be quick and easy. If you run into problems,
please refer to the Troubleshooting section of this guide. If you need further
technical support, please visit www.TRENDNET.com or call technical support
by phone.
Verify Package Contents
Please make sure you have everything in the box:
The TK-204K/404KR 2/4-Port DVI KVM Switch with Audio is compatible with
virtually all computers and operating systems. You only need to have one set
LCD monitor, PS/2 keyboard, PS/2 mouse, microphone and speakers.
1
1. Prepare for Installation
English UG
English
TK-204K or 404KR
User’s Guide
Power Adapater (DC 9V 1A)
2 or 4 DVI KVM cables
with audio
TRENDnet
TRENDware, USA
What's Next in Networking
TK-204K/TK-404KR
Version 11.30.04
2/4 port DVI-KVM Switch
User’s Guide
Guide de l'utilisateur du
Switch audio DVI-KVM à 2/4 ports
Diese Benutzeranleitung
2/4-facher DVI-KVM-Umschalter mit Audiofunktion
Esta guía del usuari
Conmutador con audio DVI-KVM de 2/4 puertos

2
2. Introduction
The TK-204K/404KR DVI-KVM Switch is a 2/4-port DVI-KVM Switch for
multimedia-enabled computers. The TK-204K/404KR allows you to operate 2/4
computers using only one monitor, PS/2 keyboard, PS/2 mouse, set of
speakers, and microphone.
Hardware Support
The TK-204K/404KR DVI-KVM Switch is compatible with the PC platform. The
TK-204K/404KR is also compatible with virtually all PS/2 mice, including
Microsoft Intellimouse, IntelliMouse Explorer, Microsoft Optical Mouse and
Logitech Net Mouse.
Software Support
The TK-204K/404KR DVI-KVM Switch does not require any drivers or software.
It is compatible with the following operating systems: Windows
98SE/ME/2000/XP, Linux, and others.
Plug-N-Play
The TK-204K/404KR DVI-KVM Switch connects to your computers via the PS/2
interface for convenient Plug-and-Play functionality.
Front-panel buttons and Hot-Key Commands
There are two methods to control your KVM Switch for PC selection. You can
use the front-panel push buttons or the Hot-Key commands to switch between
your computers quickly and easily.
With full-sized features crammed into a space-conserving size, TRENDnet's
TK-204K/404KR KVM Switch is perfect for use at home or in the office.
English

3
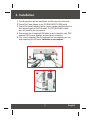
3. Installation
1. Turn off computers and their peripherals, and disconnect all power cords.
2. Connect the Power Adapter to your TK-204K/404KR DVI-KVM switch.
3. Connect the shared keyboard, monitor, mouse, speakers and microphone to
their respective ports on the KVM switch. The TK-204K/404KR’s inputs
are color-coded for your convenience.
4. Connect each set of integrated KVM cables to each computer's video, PS/2
keyboard, PS/2 mouse, speakers, and microphone connectors.
5. Turn on both computers. After the computers boot up completely, you may
begin operating the KVM switch. Installation is now complete.
English
4
4
2
3

4
To switch between computers, you use the front-panel push buttons or hot-key
commands.
Hot-Key Commands
A keyboard hot-key command consists of three keystrokes:
Please see the next page for more detail.
Hot-Key command = ScrLk + ScrLk + Command key(s)
After pressing the ScrLk key, you have 2 seconds to press the ScrLk key again.
You then have another 2 seconds to press a command key. If you do not press
a key within 2 seconds, the switch will exit hot-key mode.
For complete Hot-Key commands, please see reverse page.
4. Operation
English

5
Command
Hot-Keys
Description
Front-Panel
Buttons
Quick Reference Sheet for TK-204K/TK-404KR
Select PC Channel
(Joint-select PC
port/hub port control/
audio&mic,
if binding is enabled)
Select Audio&Mic
Channel
(Joint-select PC port
& audio/mic, if binding
is enabled)
Previous PC channel
Bind PC & Audio/Mic
Switching
[Default]
Unbind PC &
Audio/Mic Switching
Autoscan Beep
Sound On/Off
Next lower PC
channel
Autoscan
Autoscan with
Programmable
Delay Time
Reset Console
Mouse
Next higher PC
channel
Stop Autoscan
ScrLk ScrLk X
+ +
(x is a top-row number key)
x = 1~2 / x = 1~4 for PC channel number
ScrLk ScrLk
+ +
(Arrow up)
ScrLk ScrLk
+ +
(Arrow down)
ScrLk ScrLk
+ +
(Back Space)
ScrLk ScrLk
+ +
B
ScrLk ScrLk
+ +
S
ScrLk ScrLk
+ +
End
Press any key on keyboard
Press the corresponding
button to select the active
PC channel
Select the active Audio&Mic
channel
(Joint-select PC &
audio&mic channel, if binding
is enabled)
Select the active PC channel
(Joint-select PC port /audio&
mic , if binding is enabled)
Toggle between the previous
channel and current channel
Enable the binding of PC port
and audio&mic switching.
(Once this feature is enabled,
any pc and/or audio&mic
switching is bound together)
[Factory Default]
Disable the binding of PC port
and audio&mic switching
Toggle on/off the beep sound
for switching confirmation
while autoscanning
Select the next lower
connected channel
Autoscan through every
connected channel for quick
screen browsing of each
channel
(default delay time = 5 sec )
Autoscan with a user-defined
delay time within a range of
5 ~ 100 seconds
Reset mouse on the console
side
Select the next higher
connected channel
Terminate Autoscan.
Press the push button
to switch to the next
channel
English
ScrLk ScrLk
+ + +
S X
x = 0~9
1>10” ; 2>20” ; 3>30” ; 4>40” ; 5>50”
6>60” ; 7>70” ; 8 >80” ; 9>90” ; 0>100”
Fy = F5~F6/Fx=F5~F8 (Fy is a function key)
y = 1~2 / y = 1~4 for audio/mic channel
number
ScrLk ScrLk
+ +
Fy
ScrLk ScrLk
+ +
Q
ScrLk ScrLk
+ +
W
- - -
- - -
- - -
- - -
- - -
- - -
- - -
- - -
- - -
- - -

6
English
NOTE
1. A PS/2 Keyboard is required for proper hotkey function. If you use a USB
keyboard, hotkey feature is disabled.
2. Note that (x) denotes a number key for the selected port number (x = 1 or 2).
Currently only the top row number keys are available for hotkeys. Do not use
the number pad for hotkey commands.
3. When binding the PC ports, port binding is enabled by the hotkey sequence:
ScrLk + ScrLk + Q. All PC ports are bound together. To remove this binding,
use the hotkey sequence: ScrLk + ScrLk + W.
4. Normally, you should have no problems with mouse hot-plugging on a Plug-
and-Play OS. However, a non-PnP OS only performs hardware detection
while booting up - that is why the mouse will lock sometimes.
Mouse Troubleshooting on a non-PnP OS (Linux, Windows NT 4.0):
If you experience mouse lock when hot-plugging mouse on a non-PnP OS
such as Linux or WinNT 4.0, just hit one of the following hotkey commands for
mouse reset according to your mouse configuration on the non-PnP OS:
Hot-Key convention:
The hotkey notation for example (ScrLk + ScrLk + X.) denotes that you should
hit the individual key consecutively one at a time, not simultaneously.

7
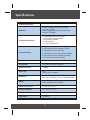
Specifications
Computer Connections:
2 (TK-204K) or 4 (TK-404KR)
KVM Cable:
2 sets of integrated 1.2M (ft) DVI-KVM Cables
with Audio. (TK-204K)
4 sets of integrated 1.8 M (5.9ft) DVI-KVM Cables
with Audio. (TK-404KR)
Console Port Connectors:
1 x PS/2 keyboard 6-pin mini din female
1 x PS/2 mouse 6-pin mini din female
1 x DVI-I Single Link female
1 x 3.5mm audio jack
1 x 3.5mm microphone jack
PC Port Connectors:
2 x PS/2 keyboard 6-pin mini din female (TK-204K)
2 x PS/2 mouse 6-pin mini din female (TK-204K)
2 x DVI-I Single Link female (TK-204K)
4 x PS/2 keyboard 6-pin mini din female (TK-404KR)
4 x PS/2 mouse 6-pin mini din female (TK-404KR)
4 x DVI-I Single Link female (TK-404KR)
Port Selection:
Digital Display Resolution:
Push Button and Hot-Key Commands
1600 x 1200
Auto-Scan Intervals:
5 seconds
Power Type:
PS/2
Optional 9V DC, 1A Adapter
Dimensions:
140 x 86 x 45 mm (5.51 x 3.38 x 1.77inches)(TK-204K)
220 x 100 x 45mm (8.66 x 3.94 x 1.77 inches)(TK-404KR)
Weight:
Approx. 520g (1.8 Oz) (TK-204K)
Approx. 1000g (35.2 Oz) (TK-404KR)
0º ~ 40ºC (32º ~104º F)Operating Temperature:
-20º ~ 60ºC (-4º ~ 140º F)Storage Temperature:
0%~90%, Non-Condensing
Humidity:
FCC and CECertifications:

8
Technical Support Hours
7:00AM ~ 6:00PM, Monday through Friday
Pacific Standard Time (except holidays)
Contact Technical Support
Telephone: +1-310-626-6252
Fax: +1-310-626-6267
Website: www.TRENDNET.com
E-mail: [email protected]
Troubleshooting
Q1:
A1:
Q2:
A2:
Q3:
A3:
Q4:
A4:
I have the KVM switch connected properly but my keyboard and mouse doesn't
function. Why?
Make sure that the following connections are properly made:
1. Connection of PS/2 mouse and PS/2 keyboard to the DVI-KVM switch.
2. Connection of DVI-KVM cables to the DVI-KVM switch.
3. Connection of DVI-KVM cables to the PCs.
Can I connect and disconnect the PS/2 cables while the computers are turned on?
Yes, you can connect or disconnect the PS/2 cables while the computers are turned on
because the PS/2 interface is Plug-and-Play.
Will the KVM switch restore the keyboard settings when switching between computers?
Yes, the KVM switch will restore the custom keyboard settings for each computer. (Cap
lock, Num key, etc.)
How do I switch from one computer to another with the KVM switch?
The TK-204K/TK-404KR supports Push button and Hot-Key commands, so you can
switch PCs by pressing the Push button on the KVM switch or by using the Hot-Key
commands listed on the reverse side of this page.
If you have further questions, please contact Trendware's Technical Support Department.
Certifications
This equipment has been tested and found to comply with FCC and CE Rules. Operation is
subject to the following two conditions:
(1) This device may not cause harmful interference.
(2) This device must accept any interference received.
Including interference that may cause undesired operation.

Copyright ©2004. All Rights Reserved. TRENDware International, Inc.
TRENDnet
TRENDware, USA
What's Next in Networking
@
Product Warranty Registration
Please take a moment to register your product online.
Go to TRENDware’s website at http://www.TRENDNET.com
TRENDware International, Inc.
3135 Kashiwa Street
Torrance, CA 90505
http://www.TRENDNET.com
-
 1
1
-
 2
2
-
 3
3
-
 4
4
-
 5
5
-
 6
6
-
 7
7
-
 8
8
-
 9
9
-
 10
10
-
 11
11


Trendnet TK-204K User manual
- Category
- KVM switches
- Type
- User manual
- This manual is also suitable for
Ask a question and I''ll find the answer in the document
Finding information in a document is now easier with AI
Related papers
-
Trendnet TK-423K Quick Installation Guide
-
-
-
-
-
-
Trendnet TK-409K User guide
-
Trendnet TK-204UK Reference guide
-
Trendnet TK-205K Quick Installation Guide
-
Trendnet TK400K User manual
Other documents
-
Digitus DC-11802 Datasheet
-
Planet KVM-401 User manual
-
AirLink AKVM-2 User manual
-
 Rackmount Solutions PS/2 User manual
-
-
Airlink101 AKVM-4 User manual
-
 Eusso UKS8102-P2B Owner's manual
-
-
 StarTech.com 4 Port StarView Dual DVI USB KVM Switch w/ Audio User manual
-
 Star Tech Development SV211KUSB User manual


