Page is loading ...

Metal & Wooden Gate
Instruction Manual
THE ILLUSTRATIONS SHOWN IN THIS MANUAL ARE FOR REFERENCE ONLY. THE MANUFACTURER
RESERVES THE RIGHT TO CHANGE ANY SPECIFICATION OR FEATURE WITHOUT FURTHER NOTICE.
IMPORTANT! READ AND FOLLOW THESE INSTRUCTIONS CAREFULLY AND KEEP FOR FUTURE REFERENCE
CONFORMS TO EN1930:2011
6
-
24
months

IMPORTANT! READ AND FOLLOW THESE INSTRUCTIONS
CAREFULLY AND KEEP FOR FUTURE REFERENCE
Introduction
Please read the instructions thoroughly to ensure proper installation. Please immediately inspect the safety gate upon receipt. If you see
any damage, do not assemble gate and please go to back page of the instruction booklet for website or Consumer Relations
Representative information. Adult assembly required and keep away from children, due to small components and choking hazard.
Important Information
There is a gap between the gate frame and handle. This is not a defect. The gap on the gate will close once it is properly mounted.
Please check the gate on a regular basis to ensure gate and parts are all in proper working order. If the gate is used at top of stairs, it
must be placed on the landing above the top stair. When using at top of stairs, gate must open away from stairs. If the gate is used at the
bottom of the stairs, please place towards the front of the lowest stair. The safety barrier must not be fitted across windows. Ensure gate is
attached between two clean and structurally sound surfaces. Ensure appropriate fixings are used for drywall, wood, brick, etc. If wall plugs
provided with the gate do not secure to the wall satisfactorily, consult with a hardware store for the suitable wall plug application. If
additional parts are required for this gate, please go to back page of the instruction booklet for website or Consumer Relations
Representative information. Do not use this gate at top or bottom of stairs without using all four wall cups. For maximum safety, use four
Wall Cups with Sticky Pads and Screws when installing the gate in all locations. In some openings, only two top wall cups can be fitted.
Disclaimer
Any safety gate which has been subjected to misuse, abuse, abnormal use, excessive wear and tear, improper assembly, negligence,
environmental exposure, alteration or accident, or has had its serial number altered or removed invalidates any/all claims against
the manufacturer. Any damage to property during installation of the safety gate is the sole responsibility of the end user.
WARNING!
WARNING - To prevent serious injury or death, securely install gate or enclosure and use according to manufacturer’s instructions.
WARNING - Never leave child unattended when using this product.
WARNING - Incorrect installation can be dangerous.
WARNING - Do not use the safety barrier if any components are damaged or missing.
WARNING - The safety barrier must not be fitted across windows.
WARNING - Never use with a child able to climb over or dislodge/open the safety barrier, which may cause danger.
WARNING - Never install this product on glass doors. Install this product against reliable doors or walls.
WARNING - If the safety barrier is used at the bottom of the stairs, it should be positioned at the front of the lowest tread possible.
WARNING - To prevent injury, do not put any goods which can be grabbed by children or pets near this product.
WARNING - Before using this product, carefully inspect for any loose parts and whether any parts need to be tightened.
WARNING - Make sure the product to be installed is horizontal and flat on the floor.
WARNING - This product is intended for use with children from 6 to 24 months or small to medium pets.
WARNING - Regularly check that the safety barrier is properly installed and secure.
WARNING - Any additional or replacement parts should be obtained from Kmart Australia Ltd.
WARNING - Barrier must be fitted between rigid surfaces such as plaster board, timber or hardwall.
WARNING - Always check that the safety barrier is correctly closed.
WARNING - Use only with the locking/latching mechanism securely engaged.
WARNING - This safety barrier is for domestic use only.
WARNING - Never use without wall cups.
WARNING - This safety barrier has a manual closing system.
WARNING - This safety barrier must be fitted between a rigid surface such as doorways or walls along with wall cups secured with screws.

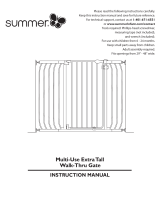
74CM
70.6CM
77~82CM
46CM
61.7CM 74 C M
4.6CM
46.8CM
70.6CM
69.3CM

77 cm Minimum
82 cm Maximum
ect installation and for future reference. ase
’ section found on the first page of the illustrations overleaf.
you notice any damage or any parts missing, do not
the smaller parts may present a
. the gate is used at the top
om the stairs. the gate is used at the
he safety barrier must not be fitted across windows.
e used for drywall, wood,
consult with a hardware store for
the stairs it should not be positioned below the top level.
the lowest tread possible. Your
Safety barriers should be checked
eplacement parts should only be obtained from
ave a child unattended .
en will develop physically and
ect installation and for futue reference.
the illustrations overleaf.
the smaller parts may present a
s windows.
consult with a hardware store for
the lowest tread possible. Your
Safety barriers should be checked
eplacement parts should only be obtained from
ave a child unattended .
en will develop physically and
Push all the way into the square tube. Screw mounting bolts and adjuster screws
together and then place into mounting
holes in each corner of the gate.
IMPORTANT: Gate must be installed in a structurally sound opening. Ensure mounting surface
(wall, door frame, stair posts, etc.) is strong, rigid and has an even surface.
This Way Up

The gate should be resting on the floor.
If there is a gap, it must be less than 5mm
between the gate and floor.
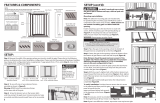
Place the gate in the opening and ensure the bottom rail is completely flat on the floor and the
wall cups are directly above each other. Then mark the position of each wall cup on the wall and
stick the cups in position using the adhesive pads. For added security, fix each cup to the wall
using a small Phillips head screwdriver (not included) and screws provided. Align gate with wall
cups and tighten adjuster screws by turning clockwise, starting with the bottom and then the top.
Tighten equally until there is only a 1mm gap in the locking mechanism. Regularly check tension of
all mounting
bolts and adjust if required.
When you unpack the gate, you may notice a gap at the gate opening - this is normal with
pressure mounted gates and the gap will disappear when it is installed correctly.
Gate
Floor

3cm -
6cm
3cm -
6cm
Use your thumb to depress button. Lift handle upwards.
With part G in neutral position, the gate will open in both directions. However when engaging
part G, it will act as a stopper and the gate will only be able to open in one direction.
G

9
77cm - 82cm MAX
124cm - 131cm 131cm - 138cm
1
2

Keycode 42967859
MADE IN CHINA
FOR AU / NZ: IMPORTED FOR KMART
STORES IN AUSTRALIA AND NEW ZEALAND.
KMART CUSTOMER SERVICE
AU: 1800 124 125 NZ: 0800 945 995
/