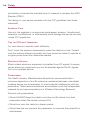
LG UK G-Pad 7.0 LTE US Cellular User guide
- Category
- Smartphones
- Type
- User guide
This manual is also suitable for

User Guide
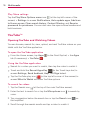
This guide helps you to get started using your tablet.
ENGLISH
• Some of the contents of this manual
m
ay
n
ot
a
pply
t
o
y
our
t
ablet,
depending on the software and your
s
ervice
p
rovider.
• Google™, Google Maps™, Gmail™,
Y
ouTube™,
G
oogle
H
angouts™
a
nd
Google Play™ are trademarks of
Google, Inc.
MFL68701701 (1.0)

• Copyright ©2014 LG Electronics, Inc. All rights reserved. LG and the LG
logo are registered trademarks of LG Group and its related entities. All
other trademarks are the property of their respective owners.
• U.S. Cellular
®
Customer Care 1-888-944-9400

3
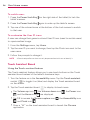
Contents
Contents ..................................................................................................3
Getting to know your tablet ...................................................................6
Your Home screen ................................................................................ 16
Google account setup ..........................................................................37
Connecting to Networks and Devices ............................................... 38
Contacts ............................................................................................... 43
Email ..................................................................................................... 46
Camera and Video ............................................................................... 55
Multimedia ........................................................................................... 64
Utilities...................................................................................................74
The web ................................................................................................ 89
Settings ................................................................................................ 95
Tablet software update ......................................................................120
Troubleshooting ...................................................................................121
Safety ...................................................................................................122
Limited Warranty Statement .............................................................148

4
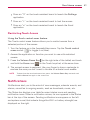
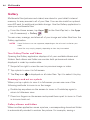
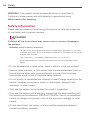
WARNING Violation of the instructions may cause serious injury or
death.
WARNING: This product contains chemicals known to the State of California to cause cancer and
birth defects or other reproductive harm. Wash hands after handling.
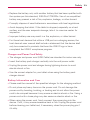
Never use an unapproved battery since this could damage the tablet and/
or battery and could cause the battery to explode.
Never place your tablet in a microwave oven as it will cause the battery to
explode.
Do not dispose of your battery near fire or with hazardous or flammable
materials.
When riding in a car, do not leave your tablet or set up the hands-free kit
near the air bag. If wireless equipment is improperly installed and the air
bag is deployed, you may be seriously injured.
Do not use the tablet in areas where its use is prohibited. (For example:
aircraft)
Do not expose the battery charger or adapter to direct sunlight or use it in
places with high humidity, such as a bathroom.
Do not use harsh chemicals (such as alcohol, benzene, thinners, etc.) or
detergents to clean your tablet. This could cause a fire.
Do not drop, strike, or shake your tablet severely. It may harm the internal
circuit boards of the tablet.
Do not use your tablet in high explosive areas as the tablet may generate
sparks.
Do not damage the power cord by bending, twisting, pulling, or heating.
Do not use the plug if it is loose as it may cause electric shock or fire.
Do not place any heavy items on the power cord. Do not allow the power
cord to be crimped as it may cause electric shock or fire.
Do not handle the tablet with wet hands while it is being charged. It may
cause an electric shock or seriously damage your tablet.
Do not disassemble the tablet.
Do not place or answer calls while charging the tablet as it may
short-circuit the tablet and/or cause electric shock or fire.

5
Make sure that no sharp-edged items, such as animal’s teeth or nails,
come into contact with the battery. This could cause a fire.
Store the battery out of reach of children.
Be careful that children do not swallow any parts (such as earphone,
connection parts of the tablet, etc.) This could cause asphyxiation or
suffocation resulting in serious injury or death.
Unplug the power cord and charger during lightning storms to avoid
electric shock or fire.
Only use the batteries and chargers provided by LG. The warranty will not
be applied to products provided by other suppliers.
Only authorized personnel should service the tablet and its accessories.
Faulty installation or service may result in accidents and consequently
invalidate the warranty.
Your tablet is an electronic device that generates heat during normal
operation. Extremely prolonged, direct skin contact in the absence of
adequate ventilation may result in discomfort or minor burns. Therefore,
use care when handling your tablet during or immediately after operation.
Use and store your tablet in temperatures between 0°C/32°F and
45°C/113°F, if possible. Exposing your tablet to extremely low or high
temperatures may result in damage, malfunction, or even explosion.

6
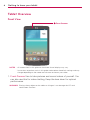
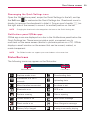
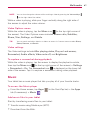
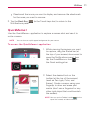
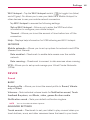
Getting to know your tablet
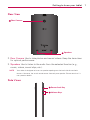
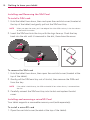
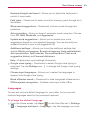
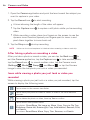
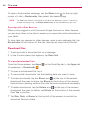
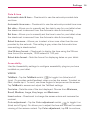
Tablet Overview
Front View
Front Camera
NOTES • All screen shots in this guide are simulated. Actual displays may vary.
• Instructions to perform tasks in this guide are based on the default settings and may
change depending on the mode and software version on your tablet.
1. Front Camera Use to take pictures and record videos of yourself. You
can also use this for video chatting. Keep the lens clean for optimal
performance.
WARNING! Placing a heavy object on the tablet or sitting on it can damage the LCD and
touchscreen functions.

7
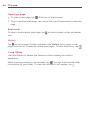
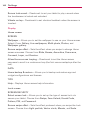
Getting to know your tablet
Rear View
Rear Camera
Speakers
2. Rear Camera Use to take photos and record videos. Keep the lens clean
for optimal performance.
3. Speakers Use to listen to the audio from the selected function (e.g.,
music, videos, sound clips, etc.).
NOTE Your tablet is designed to have two speaker openings on the back side for aesthetic
reasons. However, the actual sound comes from only one speaker. Please note that it’s
not a product defect.
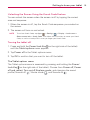
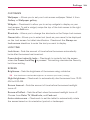
Side Views
Volume Keys
Power/Lock Key

8
Getting to know your tablet
4. Power/Lock Key Press to lock/unlock the screen. Press and hold to turn
the tablet on/off, restart it, activate/deactivate airplane mode, and change
the sound settings.
5. Volume Keys Press to adjust the media volumes. If the Shortcut setting
is enabled, you can press and hold both keys at the same time to access
the QuickMemo+ application. When the Shortcut key setting is enabled
and the screen is off, you can also press and hold the Volume Down
Key or Volume Up Key to access the Camera application.
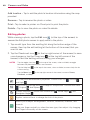
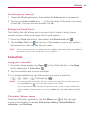
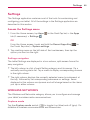
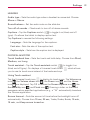
Top and Bottom Views
Infrared
(IR) LED
Card Slots
Headset
Jack
Microphone
USB/Charging
Port
Top Bottom
6. Microphone Records your voice and is used for voice-activated
functions.
NOTE Make sure that the microphone is not blocked when recording a video or audio clip.
7. Headset Jack Use to plug in an optional listening accessory, such as
headphones to listen to music.
8. Infrared (IR) LED Used as a sensor for the Quick Remote application.
9. Card Slots Use to insert your SIM card and a microSD card. A valid SIM
card is required to have access to the mobile network. Insert a microSD
card to store your personal data files (e.g., music, videos, photos, etc.).
NOTE Make sure that the microphone is not blocked when recording a video or audio clip.
10. USB/Charging Port Use to connect the USB cable to the tablet for use
with the Charger power adapter, your PC, or other compatible
accessories.
TIP! If the tablet freezes up and stops working, press and hold the Power/Lock Key (on the
right side of the tablet) for about 8 seconds until the screen turns off. Wait a few
seconds, then turn the tablet back on.

9
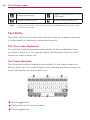
Getting to know your tablet
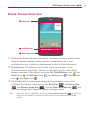
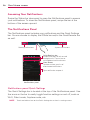
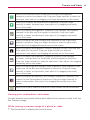
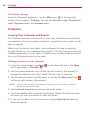
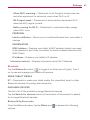
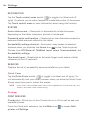
Home Screen Overview
QuickTap bar
Touch keys bar
Status bar
11. Status bar Shows device information, including the time, status icons
(such as signal strength, battery power, connections, etc.), and
notification icons. It also provides access to the Notifications panel.
12. QuickTap bar Provides icons for quick, one-touch access to the
functions used most often. This bar is displayed on all of the Home
screen canvases. The default icons are the QuickMemo+ icon
, the
Email icon
, the Browser icon , the Gallery icon , the Camera
icon , the Apps icon .
13. Touch keys bar Provides easy navigation anywhere you are in the
software. By default, the keys are the Back Key
, the Home Key
, the Recent Apps Key , and the Dual window Key , but
you can change them (see the Display settings menu).
TIP! When you open an application, touch and hold the Recent Apps Key (in the Touch
keys bar at the bottom of the touchscreen) to check for the application's available
options.

10
Getting to know your tablet
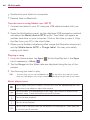
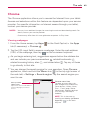
The Battery and Power
Your tablet has an internal, rechargeable battery that is not removable. It
should only be replaced by LG or an authorized LG repair center. You should
never try to open or take apart this tablet yourself. Opening the tablet can
cause damage that will void your warranty.
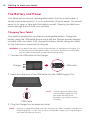
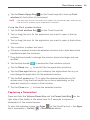
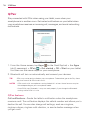
Charging Your Tablet
Your tablet is powered by an internal, rechargeable battery. Charge the
battery using the USB cable (power cord) and the Charger (power adapter)
included with your tablet. Fully charge the battery before using your tablet
for the first time to maximize its life cycle.
WARNING! If the touchscreen won't function while the tablet’s in the process of charging, this
may be due to an unstable power supply. If this occurs, disconnect the USB cable
from the tablet or unplug the Charger from the power outlet.
1. Connect the USB cable to the Charger.
USB cableCharger
2. Insert the other end of the USB cable into the USB/Charging Port.
USB Cable
NOTE Correctly orient the cable's plug
with the USB/Charging Port. The
port and/or the plug can be
damaged if you attempt to insert it
incorrectly.
3. Plug the Charger into an electrical outlet.
NOTE Use only an approved charging accessory to charge your tablet. Improper handling of the
USB/Charging Port, as well as the use of an incompatible charger, may cause damage to
your tablet and void the warranty.

11
Getting to know your tablet
To View the Battery Charge Level
1. From the Home screen, touch and hold the Recent Apps Key (in
the Touch keys bar) > System settings > About tablet > Battery.
2. The right side of the screen displays the battery status (charging or
discharging) and percent of remaining charge.
Optimizing Battery Life
You can extend your battery’s life between charges by reducing the screen
brightness and screen timeout to conserve your battery’s energy. Also,
some features run constantly in the background whether or not you’re
using them. Turn off features until you need to use them. For example, you
can turn off radio communications (Wi-Fi, Bluetooth, GPS, etc.) and
automatic syncing (Gmail™, Calendar, etc.).
NOTE Allowing other devices to use your tablet's hotspot connection will also drain your
battery more quickly.
To monitor and control what uses the battery
Some applications you’ve downloaded may consume high amounts of
battery power. While using your downloaded apps, check the battery
charge level and monitor the battery usage by your applications.
1. From the Home screen, touch and hold the Recent Apps Key
(in
the Touch keys bar) > System settings > About tablet > Battery >
Battery use.
2. The right side of the screen displays battery usage details and includes a
usage graph as well as a list of applications or services using battery
power from the greatest amount to the least.
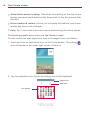
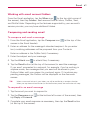
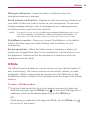
Tablet Cards
Your tablet has two card slots located along the top edge. The slot toward
the back of the tablet is for your required SIM card and the slot toward the
front of the tablet accommodates an optional microSD card.
A valid SIM card is required in order to use the mobile network.
A microSD card is an optional accessory that provides additional,
portable storage space for your personal files.

12
Getting to know your tablet
Installing and Removing the SIM Card
To install a SIM card:
1. Hold the tablet face down, then and open the card slot cover (located at
the top of the tablet) and gently pull out the SIM card tray.
NOTE When you open the cover, you'll see edge of the silver SIM card tray in the slot closest
to the back of the tablet.
2. Insert the SIM card into the tray with the logo face up. Push the tray
back into the slot until it's secured in the slot, then close the cover.
To remove the SIM card
1. Hold the tablet face down, then open the card slot cover (located at the
top of the tablet).
2. Gently pull the SIM card tray out of its slot, then remove the SIM card
from the tray.
NOTE If the tablet is held face up, the SIM card could fall out when the tray is removed from
the slot.
3. Carefully reinsert the SIM card tray into its slot and replace the slot
cover.
Installing and removing a microSD Card
Your tablet supports a removable memory card (sold separately).
To install a microSD card
1. Open the card slot cover (located at the top of the tablet).

13
Getting to know your tablet
NOTE The slot closest to the touchscreen is the microSD card slot (the slot with the silver tray
is for the SIM card).
2. Position the microSD card with the gold strips facing toward the back of
the tablet. Slide the microSD card into the slot until it clicks into place
and replace the cover.
Removing a microSD Card
To remove your microSD card
1. From the Home screen, touch and hold the Recent Apps Key (in
the Touch keys bar) > System settings > Storage > Unmount SD card.
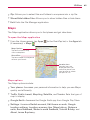
NOTE Settings are displayed in a split-screen format with the menus on the left and
corresponding selections on the right.
2. Push the microSD card inward until you hear (and feel) a click, then
carefully slide the card out of the slot and replace the cover.
NOTE Pushing the card inward releases it from the slot and partially ejects it for easy removal.
W
ARNING! Do not remove the microSD card without unmounting it first. Otherwise, it may
damage the microSD card, as well as your tablet, and the data stored on the microSD
card may be corrupted.
Formatting the microSD Card
WARNING! All of the files stored on your microSD card are deleted when you format the card.
Back up any data stored on it before formatting.
1. From the Home screen, touch and hold the Recent Apps Key (in
the Touch keys bar) > System settings > Storage.
2. Tap Erase SD card (in the submenu), then tap the Erase SD card
button.

14
Getting to know your tablet
3. If you set an unlock pattern, enter it, then tap Erase everything. The
card will then be formatted and ready to use.
Powering Your Tablet On/Off
It’s important to fully charge the battery before turning on your tablet for the
first time to maximize its life cycle.
Turning the tablet on
Press and hold the Power/Lock Key
on the right side of the tablet for a
couple of seconds until the screen turns on.
The default Lock screen
If you don’t use the tablet for a while, your tablet will enter timeout to
conserve battery power. Timeout turns off the backlight and locks the
screen. The default Lock screen is Swipe. To unlock the tablet:
1. Turn the screen on.
Press the Power/Lock Key
on the right side of the tablet.
OR
Quickly double-tap the center of the screen (KnockON).
NOTE If Knock Code is set as the screen lock, double-tapping the screen when it is off will
display the Knock Code entry screen.
2. The Swipe Lock screen will appear. From the center
of the screen, swipe in any direction to unlock it.
To use a Swipe Lock screen shortcut, swipe the
shortcut icon (at the bottom of the screen) in any
direction. The screen will unlock and launch the
application.
NOTE The Swipe Lock screen simply locks the screen to prevent
unintentional actions. For more security to guard against
unauthorized use, you can set an unlock requirement (such as
a Knock Code, a pattern, a PIN, a password, or use face
recognition) that will need to be entered to unlock it. Please
refer Setting a screen lock on page 23 for more information.

15
Getting to know your tablet
Unlocking the Screen Using the Knock Code Feature
You can unlock the screen when the screen is off by tapping the correct
area and sequence.
1. When the screen is off, tap the Knock Code sequence you created on
the screen.
2. The screen will turn on and unlock.
NOTE To activate Knock Code, tap Apps > Settings > Display > Lock screen >
Select screen lock > Knock Code. Then follow the instructions to create your Knock
Code, as well as a backup PIN in case you forget your Knock Code.
Turning the tablet off
1. Press and hold the Power/Lock Key (on the right side of the tablet)
until the Tablet options menu appears.
2. Tap Power off in the Tablet options menu.
3. Tap OK to confirm that you want to turn off the tablet.
The Tablet options menu
The Tablet options menu is accessed by pressing and holding the Power/
Lock Key
(on the right side of the tablet). Choose from Power off, Power
off and restart, Turn on/off Airplane mode, and changing the sound
profile (Sounds off
, Vibrate mode , and Sounds on .

16
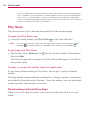
Your Home screen
The Home Screen
The Home screen is comprised of multiple canvases. Simply swipe your
finger to the left or right to view them. You can set its background
wallpaper, add additional canvases, and customize the items on each Home
screen canvas.
The QuickTap bar (located at the bottom of all of the Home screen
canvases) provides, one-touch access to the functions used most often.
The Status bar (located at the top of all of the tablet’s screens) displays
status icons and allows access to the Notifications panel.
The Touch keys bar (located at the bottom of all of the tablet’s screens)
has icons for easy tablet navigation.
NOTE The Status bar and the Touch keys bar are not displayed on the Camera application's
viewfinder screen.
Status bar
Shows device status
information, including the
time and icons for battery
power, Wi-Fi signal strength,
notifications, and more. It also
provides access to the
Notifications panel.
QuickTap bar
Provides easy, one-touch
access to the functions used
most often.
Back Key
Backs up one step. For example,
returns to the previous screen or
closes pop-up items (e.g., dialog
boxes, and the on-screen keyboard).
Touch and hold to access Dual
window.
Dual Window Key
Displays two application
windows at the same time.
Home Key
Returns to the Home screen (or
returns to your default Home
screen canvas from any of the
extension canvases). Touch and
hold it to access Google Now.
Recent Apps Key
Displays a list of your open
applications. Touch and hold it to
access the Options menu for
the current application or screen.

17
Your Home screen
Customizing the Home Screen
You can customize your Home screen to provide convenient access by
adding apps, widgets, and downloads to any of its canvases. You can also
personalize your Home screen to reflect your personal style by setting the
wallpaper background and setting customized images for its icons.
To add items on your Home screen:
To add apps and/or widgets:
1. Touch and hold an empty part of the Home screen.
2. Tap the Apps or Widgets tab (at the bottom of the screen).
3. Tap the item you want (to place it automatically) or manually drag it to
the desired canvas location and lift your finger.
4. You can continue adding items, then tap the Home screen when you've
finished.
NOTE To add an application icon to the Home screen from the Apps screen, touch and hold the
application you want to add and drag it to the desired location.
To remove an item from your Home screen:
Touch and hold the Home screen item you want to remove, drag it to the
Remove icon
(at the top of the screen), then lift your finger.
To change the look of your Home screen
From the Home screen, touch and hold the Recent Apps Key (in the
Touch keys bar) > Home screen settings to access the following to
personalize your Home screen.
Wallpaper: Sets the Home screen background. Choose from Gallery,
Live Wallpapers, Multi-photo, Photos, and Wallpaper gallery.
Screen swipe effect: Sets how the items on the Home screen canvases
slide from one to the next. Choose from Slide, Breeze, Accordion,
Panorama, Carousel, Layer, and Domino.

18
Your Home screen
Allow Home screen looping: Checkmark this setting so that the Home
screen canvases rotate continuously (loops back to the first canvas after
the last).
Home backup & restore: Allows you to backup and restore your Home
screen app layout and wallpaper.
Help: Tap to view help information about customizing the Home screen.
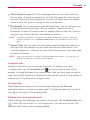
Customizing application icons on the Home screen
You can customize each application icon with images from your Gallery.
1. Touch and hold an application icon on the Home screen. The editing
icon will appear in the upper right corner of the icon.
2. Tap the application icon (while the editing icon is still displayed).
Icon gallery
Delete icon
New icon

19
Your Home screen
3. Choose your icon image.
Tap an icon image from your Icon gallery, then tap OK.
OR
Tap the New icon
to create a custom icon image. When you create
an icon image, you customize its size and crop its image. Created
icons are displayed in your Icon gallery.
NOTE You can delete a custom icon image from your Icon gallery by tapping the Delete icon
(at the top right corner of the Icon change screen).
Organizing your Home screen
You can move the items on the Home screen canvases and create folders
to organize your Home screen.
Drag an icon to move it.
Drag one application icon over another icon to create a folder with both
of the applications in it. Drag additional icons on the folder to add more
items to the folder.
Home screen views
You can view your Home screen in different ways.
Home screen dual view – Touch and hold an empty spot on the Home
screen to display your Home screen canvases on top and the
Applications screen on the bottom. This view can be used to add items
to your Home screen canvases.
Home screen clean view – Pinch out on the Home screen to hide all of
the items on it. You can see your wallpaper with no obstructions.
Home screen canvas mini view – Pinch in on the Home screen to
display a miniature view of all of your Home screen canvases. This view
can be used to manage your Home screen canvases.

20
Your Home screen
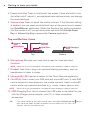
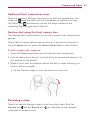
Using the touchscreen
Your touchscreen provides an excellent way to interact with and use your
Android™ device. With the touch of your finger, you can download and use
available applications, make menu selections, and access data saved to
your tablet.
The following terms are used for describing the different available gestures
using the touchscreen:
Tap or touch
A single finger tap selects items, links, shortcuts, and letters on the
on-screen keyboard.
NOTES • To select an item, tap the center of the icon, being careful not to touch any other icons.
• Use the tip of your finger to touch the option you want, but don't press too hard; the
touchscreen is sensitive enough to pick up a light, yet firm touch.
Touch and hold
Touch and hold an item on the screen by touching it and not lifting your
finger until an action occurs. For example, to open a contact’s available
options, touch and hold the contact in the Contacts list until the Context
menu opens.
Drag
Touch and hold an item for a moment and then, without lifting your finger,
move your finger on the screen until you reach the target position. For
example, you can drag items on the Home screen to reposition them.
Swipe, slide, or flick
Move your finger quickly across the surface of the screen, without pausing
when you first touch it (so you don’t drag an item instead). For example,
you can browse through the different Home screens by swiping to the left
or right, slide the screen up or down to scroll through a list, or remove an
application from the Recent Apps screen by flicking its graphic off the
screen.
Page is loading ...
Page is loading ...
Page is loading ...
Page is loading ...
Page is loading ...
Page is loading ...
Page is loading ...
Page is loading ...
Page is loading ...
Page is loading ...
Page is loading ...
Page is loading ...
Page is loading ...
Page is loading ...
Page is loading ...
Page is loading ...
Page is loading ...
Page is loading ...
Page is loading ...
Page is loading ...
Page is loading ...
Page is loading ...
Page is loading ...
Page is loading ...
Page is loading ...
Page is loading ...
Page is loading ...
Page is loading ...
Page is loading ...
Page is loading ...
Page is loading ...
Page is loading ...
Page is loading ...
Page is loading ...
Page is loading ...
Page is loading ...
Page is loading ...
Page is loading ...
Page is loading ...
Page is loading ...
Page is loading ...
Page is loading ...
Page is loading ...
Page is loading ...
Page is loading ...
Page is loading ...
Page is loading ...
Page is loading ...
Page is loading ...
Page is loading ...
Page is loading ...
Page is loading ...
Page is loading ...
Page is loading ...
Page is loading ...
Page is loading ...
Page is loading ...
Page is loading ...
Page is loading ...
Page is loading ...
Page is loading ...
Page is loading ...
Page is loading ...
Page is loading ...
Page is loading ...
Page is loading ...
Page is loading ...
Page is loading ...
Page is loading ...
Page is loading ...
Page is loading ...
Page is loading ...
Page is loading ...
Page is loading ...
Page is loading ...
Page is loading ...
Page is loading ...
Page is loading ...
Page is loading ...
Page is loading ...
Page is loading ...
Page is loading ...
Page is loading ...
Page is loading ...
Page is loading ...
Page is loading ...
Page is loading ...
Page is loading ...
Page is loading ...
Page is loading ...
Page is loading ...
Page is loading ...
Page is loading ...
Page is loading ...
Page is loading ...
Page is loading ...
Page is loading ...
Page is loading ...
Page is loading ...
Page is loading ...
Page is loading ...
Page is loading ...
Page is loading ...
Page is loading ...
Page is loading ...
Page is loading ...
Page is loading ...
Page is loading ...
Page is loading ...
Page is loading ...
Page is loading ...
Page is loading ...
Page is loading ...
Page is loading ...
Page is loading ...
Page is loading ...
Page is loading ...
Page is loading ...
Page is loading ...
Page is loading ...
Page is loading ...
Page is loading ...
Page is loading ...
Page is loading ...
Page is loading ...
Page is loading ...
Page is loading ...
Page is loading ...
Page is loading ...
Page is loading ...
Page is loading ...
-
 1
1
-
 2
2
-
 3
3
-
 4
4
-
 5
5
-
 6
6
-
 7
7
-
 8
8
-
 9
9
-
 10
10
-
 11
11
-
 12
12
-
 13
13
-
 14
14
-
 15
15
-
 16
16
-
 17
17
-
 18
18
-
 19
19
-
 20
20
-
 21
21
-
 22
22
-
 23
23
-
 24
24
-
 25
25
-
 26
26
-
 27
27
-
 28
28
-
 29
29
-
 30
30
-
 31
31
-
 32
32
-
 33
33
-
 34
34
-
 35
35
-
 36
36
-
 37
37
-
 38
38
-
 39
39
-
 40
40
-
 41
41
-
 42
42
-
 43
43
-
 44
44
-
 45
45
-
 46
46
-
 47
47
-
 48
48
-
 49
49
-
 50
50
-
 51
51
-
 52
52
-
 53
53
-
 54
54
-
 55
55
-
 56
56
-
 57
57
-
 58
58
-
 59
59
-
 60
60
-
 61
61
-
 62
62
-
 63
63
-
 64
64
-
 65
65
-
 66
66
-
 67
67
-
 68
68
-
 69
69
-
 70
70
-
 71
71
-
 72
72
-
 73
73
-
 74
74
-
 75
75
-
 76
76
-
 77
77
-
 78
78
-
 79
79
-
 80
80
-
 81
81
-
 82
82
-
 83
83
-
 84
84
-
 85
85
-
 86
86
-
 87
87
-
 88
88
-
 89
89
-
 90
90
-
 91
91
-
 92
92
-
 93
93
-
 94
94
-
 95
95
-
 96
96
-
 97
97
-
 98
98
-
 99
99
-
 100
100
-
 101
101
-
 102
102
-
 103
103
-
 104
104
-
 105
105
-
 106
106
-
 107
107
-
 108
108
-
 109
109
-
 110
110
-
 111
111
-
 112
112
-
 113
113
-
 114
114
-
 115
115
-
 116
116
-
 117
117
-
 118
118
-
 119
119
-
 120
120
-
 121
121
-
 122
122
-
 123
123
-
 124
124
-
 125
125
-
 126
126
-
 127
127
-
 128
128
-
 129
129
-
 130
130
-
 131
131
-
 132
132
-
 133
133
-
 134
134
-
 135
135
-
 136
136
-
 137
137
-
 138
138
-
 139
139
-
 140
140
-
 141
141
-
 142
142
-
 143
143
-
 144
144
-
 145
145
-
 146
146
-
 147
147
-
 148
148
-
 149
149
-
 150
150
-
 151
151


LG UK G-Pad 7.0 LTE US Cellular User guide
- Category
- Smartphones
- Type
- User guide
- This manual is also suitable for
Ask a question and I''ll find the answer in the document
Finding information in a document is now easier with AI
Related papers

Other documents
-
LG LGV411 Owner's manual
-
 LG VK VK700 Verizon Wireless User guide
-
LG G-Pad G-Pad F2 8.0 Sprint User guide
-
 LG MS MS659 Metro PCS User guide
-
LG Optimus Optimus L70 User guide
-
-
 LG MS Optimus F60 Metro PCS User guide
-
 LG VK G-Pad 7.0 LTE Verizon Wireless User guide
-
LG G VISTA User manual
-
LG VS VS450PP Verizon Wireless User guide


