Century C15 M4 Semi-Auto Rifle Owner's manual
- Type
- Owner's manual
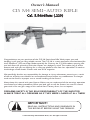
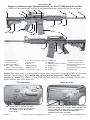
Century C15 M4 Semi-Auto Rifle is a semi-automatic rifle chambered for the 5.56x45mm (.223) cartridge. It features an adjustable T-6 stock, a birdcage muzzle break, and comes with one 30 rd. magazine. The C15 M4 is a modern sporting rifle that is suitable for a variety of shooting applications, including target shooting, plinking, and self-defense. It is a reliable and accurate rifle that is easy to use and maintain.
Century C15 M4 Semi-Auto Rifle is a semi-automatic rifle chambered for the 5.56x45mm (.223) cartridge. It features an adjustable T-6 stock, a birdcage muzzle break, and comes with one 30 rd. magazine. The C15 M4 is a modern sporting rifle that is suitable for a variety of shooting applications, including target shooting, plinking, and self-defense. It is a reliable and accurate rifle that is easy to use and maintain.


-
 1
1
-
 2
2
-
 3
3
-
 4
4
-
 5
5
-
 6
6
-
 7
7
-
 8
8
-
 9
9
-
 10
10
-
 11
11
-
 12
12
-
 13
13
-
 14
14
-
 15
15
-
 16
16
-
 17
17
-
 18
18
-
 19
19
-
 20
20


Century C15 M4 Semi-Auto Rifle Owner's manual
- Type
- Owner's manual
Century C15 M4 Semi-Auto Rifle is a semi-automatic rifle chambered for the 5.56x45mm (.223) cartridge. It features an adjustable T-6 stock, a birdcage muzzle break, and comes with one 30 rd. magazine. The C15 M4 is a modern sporting rifle that is suitable for a variety of shooting applications, including target shooting, plinking, and self-defense. It is a reliable and accurate rifle that is easy to use and maintain.
Ask a question and I''ll find the answer in the document
Finding information in a document is now easier with AI
Related papers
-
Century AK Semi-Auto Rifle, Cal. 5.45×39mm Owner's manual
-
-
-
-
-
-
-
-
-
Other documents
-
Skytech II K9LSTTX1061 User manual
-
Browning BL-22 Owner's manual
-
-
Beretta ARX 100 User manual
-
Remington 798 User manual
-
-
-
-
-