Mantis 31445 Operating instructions

Type
Operating instructions
DERAILLEUR GEARED BICYCLES
Includes 20”, 24”, 26” Wheel Mountain Bikes
Assembly is the same for men and women’s bikes.
Getting Started
Open the carton from the top and remove the bicycle. Remove the straps
and protective wrapping from the bicycle. Inspect the bicycle and all
accessories and parts for possible shortages. It is recommended that the
threads and all moving parts be lubricated prior to installation. Do not
discard packing materials until assembly is complete to insure that no
required parts are accidentally discarded. Assemble your bicycle following
the steps that pertain to your model. NOTE: Your bicycle may be equipped
with different style components than the ones illustrated.
Handlebars
Remove the protective cap from the handlebar stem wedge and loosen
the Allen key bolt using the 6mm Allen key. Some models may use a
13mm hexagonal bolt instead of an Allen key bolt. Place the handlebar
stem into the top of the head tube, ensuring that all cables are free of
tangles. Tighten the stem bolt observing the minimum insertion mark and
checking that the forks and the handlebars are facing forward. Check the
headset for smooth rotation and the top nut is secured tightly. Loosen the
6mm Binder Bolt and rotate the handlebar. Retighten the Binder Bolt to
ensure the handlebar does not rotate in the stem. NOTE: Some bicycles
may be equipped with a stem that has an adjustable angle. In addition
to the normal assembly, these stems will require angling the stem to the
desired position, and securely tightening the 6mm angle bolt located in
the front of the stem bolt. Failure to do this may cause loss of steering
control.
Warning: Over-tightening the stem bolt or the headset
assembly may cause damage to the bicycle and/or injury
to the rider.
Minimum Insertion
Mark
Stem Wedge Bolt
Head Tube
Handlebar Binder Bolt
Top Nut
Wedge
The stem must be inserted so that the minimum insertion
mark cannot be seen.
24
ASSEMBLY
25
ASSEMBLY
Tighten all bolts that clamp the shifters, brakes levers, and bar end to the handlebar
using a 5mm Allen key or Phillips head screwdriver.
(Figure 1) Handlebar with Twist Shifter.
(Figure 2) Top mounted thumb shifter.
Failure to properly tighten clamping bolts may cause sudden
movement of the component resulting in loss of steering control.
1.
Bar end (5mm Allen key)
Shifter binder bolt
(2.5 Allen key)
Brake lever binder bolt
(5mm Allen key)
2.
Shift binder
bolt (Phillips
head or 5mm
Allen key)
26
ASSEMBLY
Forks
There are two different types of forks that range in styles and dimensions.
One type is a rigid fork (Figure 1) consisting of stationary tubing with
curved blades. The other type is a suspension fork (Figure 2) consisting
of stanchion tubes riding on elastomers or springs inside of a straight fork
leg. This mechanism acts as a shock absorber with a specified amount
of travel that varies between models. Some suspension forks are not
adjustable and are very difficult to disassemble. If service is needed on a
suspension fork, consult a professional bicycle repair technician.
Do not attempt to disassemble a suspension fork yourself.
Consult a professional bicycle repair technician.
Check the tightness of the headset and the fork. Rotate the fork checking
for smoothness. If it feels like the fork is binding, then an adjustment will
need to be made to the headset. Move the fork in a push/pull manner
checking for tightness. If any play is detected, loosen the top nut,
adjust the bearing cup, and retighten the top nut. Recheck the rotation
and tightness. If necessary, readjust until a smooth rotation is achieved
without backward or forward movement. If your bike is equipped with a
suspension fork, check that the fork compresses and rebounds smoothly.
To do this, place the fork dropouts against the ground, push and release
the handlebar. The fork will generally compress 1-2” and rebound quickly.
Most elastomer type forks will gradually soften with use.
Steering Tube
Crown
Brake Boss
Blade
Drop-out
1
Steering Tube
Brake Boss
Fork Blade
Drop-out
Brake Bridge
Crown
2
27
ASSEMBLY
Seat and Seat Post
Attach the seat to the seat post by inserting the smaller end of the seat post
into the seat clamp and tighten. Insert the larger end of the seat post into
the seat tube of the bicycle frame observing the minimum insertion mark on
the seat post. Turn the adjusting nut of the Quick Release seat bolt to ensure
the locking lever is moved to the closed position with a firm action. Turn the
bicycle upside down and rest in on the seat and handlebars.
NOTE: Comfort bicycles may be equipped with a suspension seat post (See
Diagram-bottom left). Some suspension posts can be adjusted for stiffness
using the preload adjusting screw. Turning the 6mm Allen screw Clockwise
will decrease travel and make the suspension stiffer, while turning the
6mm Allen screw Counter-clockwise will increase travel and make the
suspension less rigid.
Note: In addition to normal assembly, please be aware that the preload
adjusting screw must be flush with the bottom of the post.
Failure to do this may cause irreparable damage.
The seat post must be inserted so that the minimum
insertion mark cannot be seen. The quick release
mechanism must be tightened securely to prevent a sudden
shift of the seat when riding Failure to do this may cause
loss of bicycle control.
Seat
Clamp
Seat
Post
Quick
Release
Adjusting
Nut
Attach
Seat Here
Boot
Minimum
Insertion
Mark
Insert this
end into
frame
28
ASSEMBLY
Pedals & Crank Set
Look for the letters “R” for right, and “L” for left, stamped on each pedal
spindle. Start each pedal spindle by hand to avoid stripping the threads.
Tighten with a 15mm narrow open-ended wrench. Note that the right
hand pedal attaches to the chainwheel side crank arm with a right-hand
(clockwise) thread. The left pedal attaches to the other crank arm and
has a left-hand (counter-clockwise) thread. It is very important that you
check the crank set for correct adjustment and tightness before riding your
bicycle. New cranks may become loose with initial use; refer to p. 82-85
for proper crank set adjustment and maintenance. Once the pedals have
been installed, remove the dust caps from the center of each crank arm.
Using a 14mm socket wrench, tighten the spindle nuts securely (approx.
350 in. lbs) and replace the dust caps.
Attachment of an incorrect pedal into a crank arm will
cause irreplaceable damage.
Dust
Cap
29
ASSEMBLY
Front Wheel
Check the wheel hub before attaching in to the fork by rotating the threaded
axle. It should be smooth with no lateral movement. Insert the front wheel
into the fork dropouts. Tighten the wheel nuts using the appropriate 14mm
or 15mm wrench. Spin the wheel nuts using the appropriate 14mm or 15mm
wrench. Spin the wheel checking for trueness. Some bicycles have quick
release wheel axles, turn the adjusting nut so the locking lever is moved to the
closed position with a firm action. At the halfway closed position of the quick
release lever, you should start to feel some resistance to this motion. If the
quick release lever is moved to the closed position with no resistance,
clamping strength is insufficient. Move the quick release lever to the open
position, tighten the quick release adjusting nut, and return the quick release
lever to the closed position.
Correct Quick Release Axle Setting
1. Place bike upside down, resting on the seat and handlebars.
2. To set, turn the lever to the open position so that the curved part faces
away from the bicycle.
3. While holding the lever in one hand, tighten the adjusting nut until it
stops.
4. Pivot the lever towards the closed position. When the lever is halfway
closed, there must be firm resistance to turn it beyond that point. If
resistance is not firm, open the lever and tighten the adjusting nut in a
clockwise direction.
5. Continue to pivot the lever all the way to the closed position so that the
Hub
Hub
Axle
Quick Release
Axle
Adjusting
Nut
Quick
Release
Lever
Spring
Closed Position
Open Position
30
ASSEMBLY
Front Brake
Determine which type of brake your bike is equipped with and refer to
the appropriate assembly instructions. For more information on brake
adjustment and maintenance.
Cantilever Brakes – Link Wire
If fitted with cantilever type brakes, insert the brake cable into the link wire
lead, and notch the cable end into the slot of the left brake cable under the
tabbed washer. Squeeze both brake arms together so the brake shoes hit
the rim, pull all slack out of the brake cable, and tighten the anchor bolt.
With the cable fitted, the straddle holder should sit 10 – 20mm above the
reflector bracket. Adjust the brake shoes using a 10mm wrench so that
they are parallel with the rim and are positioned 1-2mm away from the
rim. Several adjustments may be necessary to achieve the correct brake
position.
curved part of the lever faces the bicycle.
5. The wheel is tightly secured when the serrated surfaces of the quick
release clamping parts actually begin to cut into the bicycle frame/fork
surfaces.
6. Note that the same procedure applies when operating a quick release
seat post binder mechanism.
Warning – Correct adjustment of the quick release is
vitally important to avoid an accident caused by loose
wheel.
1. Install the cable into
the link wire.
2. Set the cable into
the straddle holder.
1
2
Cantilever
Brakes
Cable
End
31
ASSEMBLY
3
3. Temporarily tighten the cable so
that the link wire is at the position in
the illustration.
1
2
1
2
5. Secure one of the shoes at a time.
The adjustment of the shoe clearance is
not necessary at this time.
Shoe fixing nut tightening torque:
7.84 - 8.82 Nm (70 - 78 in. lbs.)
1 mm
10 mm wrench
5 mm Allen key
Cable Anchor Bolt
To u ch i n g
End cap
Cut off any unnecessary
cable, attach an end cap,
and hook it onto the
notched part of the nut
which secures the shoe.
Cable Casing Holder
Link Wire
32
ASSEMBLY
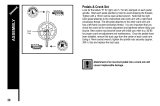
Cantilever Brakes – Straddle Cable
The length of the straddle cable, the height of the straddle hanger and
the brake pad-to-caliper arm position all have an effect on braking
power. Generally, the straddle cable should be high enough, however,
to adequately clear the tire (and any debris that may stick to the tire) or
to fit over the front reflector hanger. The straddle cable length (when
adjustable) is set to transfer as much force to the brake pads as possible.
For the most efficient transfer of force, the straddle cable and the line
between the cantilever pivot and the cable anchor should form a right
angle (90 degrees). If the force is not at a right angle, part of the force
gets wasted in pulling on the brake post, which has no effect on braking.
V-Style Brakes
Take the brake noodle from the parts box and slide the cable through
the larger opening. The cable housing will then seat into the end of the
noodle. Slide the cable through the cable lead on the end of the left brake
arm, this will cause the noodle to fit into the lead. Slip the brake cable
boot over the cable and position it between both brake arms. Next, loosen
the 5mm anchor bolt at the end of the right brake arm and slide the cable
under the retaining washer. Pull the slack out of the cable making sure
a distance of 39mm or more remains between the end of the lead and
the start of the anchor bolt. Once the cable is secured to the brake arms,
engage the brake lever several times, checking the position of the brake
shoes at the rim. The brake shoes should be 1mm away from the rim
when in a relaxed position. When the brake lever is engaged, the brake
shoe should hit the rim flush (never the tire) with the front touching slightly
before the rear. If this position is not achieved, adjustments to the brake
shoe are required. Loosen the brake shoe hardware and reposition the
brake shoe. It may take several shoe and cable adjustments before the
required position is accomplished.
Straddle
Cable
Brake
Brake Cable
Straddle Hanger
Straddle Cable
Cable
Anchor
Caliper Arm
Pinch Bolt
Pivot
90
o
Brake
Noodle
Outer
Cable
Lead
Brake
Cable
Boot
Anchor
Bolt
Brake
Arm
Tension
Screw
Brake
Shoe
Pivot
Bolt
33
ASSEMBLY
V - Brake
If fitted with V-Brakes, insert the brake body into
the center spring hole in the frame mounting
boss, and then secure the brake body to the
frame with the link fixing bolt.
1
While holding the shoe against the rim, adjust the
amount of shoe protrusion by interchanging the
position of the B washers (i.e. 6 mm and 3 mm) so that
dimension A is kept at 39 mm or more.
2
5 mm Allen key
Washer
Link
fixing
bolt
Stopper pin
Spring
hole
39 mm or more
A
3 mm washer B 6 mm washer B
Washer A
Shoe fixing link
Washer A
Washer
Shoe fixing nut
34
ASSEMBLY
While holding the shoe against the
rim, tighten the shoe fixing nut.
3
Adjust the balance with the spring
tension adjustment screws.
5
Depress the brake lever about 10 times as
far as the grip to check that everything is
operating correctly and that the shoe
clearance is correct before using the brakes.
6
Pass the inner cable through the inner
cable lead. Set the cable with a clearance
of 1mm between each brake pad and the
rim, tighten the cable fixing bolt.
4
5 mm Allen key
5 mm Allen key
1mm 1mm
1 mm
Spring tension
adjustment screw
Spring tension
adjustment screw
Depress about
10 times
1 mm 1 mm
shoe fixing nut
35
ASSEMBLY
Check your Brakes
Press each brake lever to make sure that there is no binding and that the brake pads press hard enough on the rims to stop the bike.
The brake pads should be adjusted so they are 1mm to 2mm away from the rim when the brakes are not applied. Brake pads should
be centered on the rim and the rear portion of each brake pad should be about 0.5 – 1.0mm farther from the rim than the front portion
of the brake pad.
Do not ride the bicycle until the brakes are functioning properly.
To test, apply the brakes while trying to push the bike forward to
make sure they will stop the bicycle.
Brake pad aligned with the rim surface Pad and rim should be parallel.
Direction of rim
rotation
0.5 - 1.0 mm
1- 2 mm
36
ASSEMBLY
Disk Brakes
If fitted with a front disc brake, the components should already be
attached. However, please check all connections before attempting to ride
the bicycle. Secure tightly the 6 bolts that hold the disc to the front wheel
hub and the 2 bolts that hold the brake mechanism to the fork. Insert the
front rim into the fork dropouts ensuring that the disc fits into the brake
mechanism between the enclosed brake pads. Secure the front rim to the
bicycle by tightening the quick release mechanism and clamping the lever
to the closed position.
Next, attach the cable to the brake lever by inserting the cable end into
the cable end holder after the barrel adjuster and lock nut slots have
been aligned with the cable end holder. After the cable is secured to the
lever, rotate the barrel adjuster and lock nut so the slots no longer line up.
Ensure the cable housing seats appropriately into the end of the barrel
adjuster and check for any kinks or damage.
Slide the exposed brake cable through the rotating rod located on the
caliper body and seat the housing into the same stop. Insert the cable into
spring and spring boot.
Next, slide the cable through the cable anchor and pull all the slack out.
Secure the cable in place by tightening the bolts that comprise the anchor
assembly. Some disc brakes will have a centering device while others are
a free-floating mechanism. If your caliper body is equipped with centering
bolts, apply the brake lever after the cable has been connected. While
engaging the lever, tighten the centering bolts securely. This will center the
caliper body on the disc.
DISC GETS HOT! Severe injury could result from contact
with the hot disc! Mind your legs, as well as your hands.
Barrel Adjuster
Brake Cable
Housing
Cable
Insertion
Slot
Brake Cable Cable End
Holder
Brake Type
Selector
Brake Lever
Lock Nut
Brake Pads
C Clip
Actuating Arm
Rotating Rod
Cable Anchor
Bolt
Caliper
Mounting
Bolt with
spacers
Caliper
Mounting
Bolt with
spacers
37
ASSEMBLY
These brakes require breaking in! Ride and use the brakes gently for 13 miles before
using the brakes in downhill conditions, for sudden stops, or any other serious braking.
Please be aware that your brake system will change in performance throughout the
wear-in process. The disc brake should be cleaned before the first ride using rubbing
alcohol. NEVER use oil or similar products to clean your disc brake system.
Fork Leg
Brake Cable
Housing
Rotating
Rod
Cable Boot
with Spring
inside
Cable Anchor
Bolt
Caliper
Body
Actuating
Arm
Caliper Mounting
Bolts with spacers
Quick Release
lever
Fork Drop Out
Disc
Disc Mounting
Bolts
Hub
Centering Bolt
Centering Bolt (inside)
38
ASSEMBLY
DERAILLEUR
Although the front and rear derailleurs are initially adjusted at the factory,
you will need to inspect and readjust both prior to riding the bicycle.
Rear Derailleur
Begin by shifting the rear shifter to largest number indicated, disconnect
the cable from the rear derailleur cable anchor bolt, and place the chain
on the smallest sprocket.
Adjust the High limit screw so the guide pulley and the smallest sprocket
are lined up vertically. Reconnect the cable, pull out any slack, and
retighten the anchor bolt securely. Shift through the gears, making sure
each gear achieved is done quietly and without hesitation. If necessary,
use the barrel adjuster to fine-tune each gear by turning it the direction
you want to chain to go. For example, turning counter-clockwise will
tighten cable tension and direct the chain towards the wheel. Shift the
rear shifter to the gear one and place the chain on the largest cog. Adjust
the Low limit screw in quarter turn increments until the guide pulley and
the largest cog are aligned vertically. Again, shift through each gear
several times, checking that each gear is achieved smoothly. It may take
several attempts before the rear derailleur and cable is adjusted properly.
Ensure all bolts are secured tightly and the chain does
not fall off in either direction.
Guide Pulley
Cable Adjuster
Adjustment
Screws
Freewheel Outer side of Top Gear
Pulley Adjustment
Screw
Tension Pulley
High Gear
Adjustment Screw
Low Gear
Adjustment
Screw
Barrel
Adjuster
Rear Derailleur Side View
H
L
39
ASSEMBLY
Front Derailleur
Shift both shifters to the smallest number indicated and place the chain
on the corresponding cog and chainwheel. Disconnect the front derailleur
cable from the cable anchor bolt. Check the position of the front derailleur; it
should be parallel with the outer chainwheel and clear the largest chainwheel
by 3-5mm when fully engaged.
With the chain on the smallest chainwheel in front and the largest cog
in back, adjust the Low limit screw so the chain is centered in the front
derailleur cage. Reconnect the cable, pull any slack out, and tighten the
anchor bolt securely. Shift the front shifter to the largest chainwheel. If the
chain does not go onto the largest chainwheel, turn the high limit screw in
1/4 turn increments counter-clockwise until the chain engages the largest
chainwheel. If the chain falls off the largest chainwheel, and into the pedals,
you will need to turn the High limit screw in 1/4 turn increments clockwise
until the chain no longer falls off. Shift through every gear, using the barrel
adjusters to fine-tune each transition. The barrel adjuster for the front
derailleur is located on the front shifter where the cable comes out of the
shifter. Clockwise will loosen the cable tension and direct the chain closer to
the frame while counter-clockwise will tighten the cable tension and direct
the chain away from the frame.
Do not ride a bicycle that not shifting properly.
Overlooking proper adjustments may cause irreparable
damage to the bicycle and/or bodily injury.
Low Adjusting Screw
Cable Anchor Bolt
Outer Chainguide
Inner Chainguard
High Adjusting
Screw
Chainguide
clearance of
1-3mm
40
ASSEMBLY
Dual Suspension
Dual suspension bikes are equipped with a front fork as well as a
rear suspension generally located below the seat. The piston works
in conjunction with a spring to allow the bike to rotate on a pivot point.
Ensure all attaching hardware is secured and there is no lateral movement
of the rear triangle. The amount of rear suspension travel can be
adjusted by turning the adjustment plate. By turning the adjustment plate
clockwise, you will increase spring tension and decrease travel, while
turning counter-clockwise you will decrease spring tension and increase
travel.
There must be enough tension on the spring to hold
the spring in place. Failure to do this may cause the
mechanism to fail.
Anchor bolt
Spring plate
Spring
Piston
Adjusting plate
41
ASSEMBLY
Rear Pivots
The pivots assembly is a simple mechanism that allows the rear triangle to
move up and down in combination with a rear suspension. Size, shape,
and compounds will vary between models; however, operating principles
are the same. A shaft will pivot inside of two bushings secured in place
with bolts. Pivots should be kept clean and free from grime and should be
disassembled and regreased at least once a riding season. Please note the
drive side crank arm must be removed from the spindle before attempting
to work on the pivot. Some models have two small (2.5mm) Allen bolts on
the underside of the bottom bracket shell. These must be removed before
attempting to disassemble the pivot. After disassembling and cleaning,
the shaft of the pivot assembly should be lightly coated with lithium-based
grease, as well as the bushings and the threads of the attaching hardware.
Please remember: Never use WD-40 to grease components. It is a
degreaser that will not provide required lubrication and has a tendency to
attract dust.
1. Pivot Assembly
2. Bottom Bracket Cup & Lockring
3. Rear Triangle
1
1
2
2
3
3
1.Attaching Bolt
2.Bushing
3.Shaft
1
2
3
42
ASSEMBLY
Accessories
If your bike is supplied with a water bottle and cage, attach the cage to the
bicycle using the Allen bolts provided.
Some bikes come equipped with a saddlebag or frame bag. The
saddlebag installs under the seat with the zipper facing the rear wheel.
Undo the straps that wrap around the bag, thread them through the rails
underneath the seat and secure around the bag. The smaller strap wraps
around the seat post. Frame bags install at the apex of the top and seat
tubes. Secure the straps around each tube.
NOTE: The frame bag straps must not bind the cables. The straps must
go around the frame only.
Other: Some 20” and 24” model bicycles come with a rear derailleur guard
to protect the rear derailleur from damage. To install, remove the rear
wheel axle nut on the drive side, install the rear derailleur guard over the
axle with the U-shaped guard pointing down, and retighten the axle nut.
The guard will sit between the frame and the axle nut.
If provided with a handlebar mounted reflector, this reflector must be
mounted as close to the center of the handlebar as possible.
Reflectors
Attach the white reflector to the front reflector bracket and secure to the
handlebar or fork using the hardware provided. Attach the red reflector to
the rear reflector bracket and secure to the frame or seat post, depending
on the bracket style, with the hardware provided.
Tighten both rear wheel axle nuts and the quick release
mechanism securely. Failure to do this may cause the
rear wheel to dislodge from the frame dropouts resulting
in serious damage or injury.
Saddle Bag
Frame Bag
Reflector
Reflector
Reflector
Water bottle and cage
43
ASSEMBLY
Final Check
After all adjustments have been made, shift through every gear several times at
varying speeds. This will ensure all your adjustments are correct and will allow
you to pinpoint any trouble areas. If you encounter any problems, refer to the
appropriate section and make any necessary adjustments.
Check the tire pressure and inflate each tube to the recommended psi as
stated on the sidewall of the tire.
Check that the kickstand operates smoothly and the kickstand bolt is secured
tightly.
Finally, examine the bicycle. Make sure all accessories are attached and all
quick releases, nuts and bolts have been tightened securely.
Correct maintenance of your bicycle will ensure many years of happy riding.
Service your bicycle regularly by referring to the relevant sections of the
manual, OR take it to a professional bicycle shop.
Remember: Always wear helmet and obey all traffic laws.
Do not over-inflate the tires.
  • Page 1 1
  • Page 2 2
  • Page 3 3
  • Page 4 4
  • Page 5 5
  • Page 6 6
  • Page 7 7
  • Page 8 8
  • Page 9 9
  • Page 10 10
  • Page 11 11
  • Page 12 12
  • Page 13 13
  • Page 14 14
  • Page 15 15
  • Page 16 16
  • Page 17 17
  • Page 18 18
  • Page 19 19
  • Page 20 20

Mantis 31445 Operating instructions

Type
Operating instructions

Ask a question and I''ll find the answer in the document

Finding information in a document is now easier with AI