
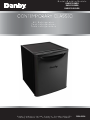
All Refrigerator
Toda refrigeradora
Tout réfrigérateur
Model•Modèle•Modelo
Danby Products Limited, Ontario, Canada N1H 6Z9
Danby Products Inc., Findlay, Ohio, USA 45840
DAR017A3WDB
DAR017A3BDB
DAR017A3BSLDB
2016.01.14

DO NOT RETURN THIS UNIT TO THE RETAILER
WITHOUT FURTHER INSTRUCTIONS
Dear valued customer, we hope your Danby product purchase fulfills all
your requirements. Your satisfaction is our priority!
Please contact us at our toll free consumer service number for any inquiries
you may have about your new unit.
NE PAS RETOURNER CET APPAREIL CHEZ LE
DÉTAILLANT SANS CONSIGNES SUPPLÉMENTAIRES
Cher(ère) client(e) important(e), nous espérons que votre produit Danby
répond à tous vos besoins. Votre satisfaction est notre priorité!
Veuillez nous contacter au numéro gratuit de service après-vente, si
vous avez des questions quelconques à propos de votre nouvel appareil.
NO DEVUELVA ESTA UNIDAD A LA TIENDA SIN
INSTRUCCIONES ADICIONALES
Estimado cliente, esperamos que el producto Danby que ha comprado
satisfaga completamente sus necesidades. Su satisfacción
es nuestra prioridad!
Por favor, contáctenos gratuitamente a nuestro número de Servicio al
Cliente para cualquier pregunta que tenga sobre su nuevo electrodoméstico.
1-800-263-2629
(1-800-26-DANBY)
Danby 28.08.2014

CONTENTS
TABLE DES MATIÈRES
ALL REFRIGERATOR
Owner’s Use and Care Guide ........................................1-9
• Welcome
• Important Safety Information
• Features
• Installation Instructions
• Operation Instructions
• Care and Maintenance
• Troubleshooting
• Warranty
TOUT RÉFRIGÉRATEUR
Guide d’utilisation et d’entretien du propriétaire......10-18
• Bienvenue
• Consignes de sécurité importantes
• Caractéristiques
• Consignes d’installation
• Consignes d’utilisation
• Soins et entretien
• Dépannage
• Garantie
REFRIGERADOR SOLO
Guía de utilización y cuidado para el propietario.....19-27
• Bienvenido
• Importantes instrucciones de seguridad
• Características
• Instrucciones de instalación
• Instrucciones operativas
• Cuidado y mantenimiento
• Solución sugerida
• Garantía
Model • Modèle • Modelo
DAR017A3WDB / DAR017A3BDB / DAR017A3BSLDB
CAUTION:
Read and follow all safety rules and operating
instructions before fi rst use of this product.
PRÉCAUTION :
Veuillez lire attentivement les consignes de
sécurité et les instructions d’utilisation avant
l’utilisation initiale de ce produit.
PRECAUCIÓN:
Lea y observe todas las reglas de seguridad y
las instrucciones de operación antes de usar
este producto por primera vez.
ÍNDICE

1
Thank you for choosing Danby
We know you’re excited. We are too! However, the more familiar you are with your new appliance, the better experience you will
have. We therefore strongly suggest that you read this Owner’s Manual before plugging in your new appliance. It contains
important operational information that will help you make full use of the technical features available in your Danby appliance. The
manual also contains information designed to enhance operating reliability and safety, as well as tips to maintaining your new
appliance so that it brings you happiness for years to come.
Please visit www.danby.com to access self-service tools, FAQs and more. Should you need additional assistance, please call
1-800-26-DANBY (1-800-263-2629).
Note: You will need the below information to obtain service under warranty.
To receive service, you must provide the original receipt.
Model Number:
Serial Number:
Date of Purchase:
NEED HELP?
Before you call for service, here are a few things you can do to help us serve you
better:
Read this Owner’s Manual:
It contains instructions to help you use and maintain your appliance properly.
If you received a damaged appliance:
Immediately contact the retailer (or builder) that sold you the appliance.
Save time and money:
Check the Troubleshooting section at the end of the guide before calling. This section
helps you solve common problems that may occur.
If you do need service, you can relax, knowing help is only a phone call away.
Tel: 1-800-26-
(1-800-263-2629)

Important Safety Information
READ AND FOLLOW ALL SAFETY INSTRUCTIONS
This appliance must be grounded. In the event of an electrical short circuit, grounding reduces the risk of
electrical shock by providing an escape wire for the electrical current.
ELECTRICAL REQUIREMENTS
WARNING
ELECTRICAL RATING: The serial rating plate indicates the
voltage and frequency the unit is designed for.
Due to possible variations in line voltage (caused by overloading of circuits), it is advisable to install a separate fuse cir-
cuit from the meter panel. This will help to eliminate current fl uctuation which might cause motor trouble.
IMPORTANT WARNING
An empty refrigerator is a very dangerous attraction to children. Remove either the gasket or lid from
unused appliances, or take some other action that will guarantee it harmless.
DANGER: Risk of child entrapment. Before you throw away your old refrigerator:
• Take off doors.
• Leave the shelves in place so that children may not easily climb in.
DON’T WAIT! DO IT NOW!
WARNING! EXPLOSION HAZARD!
Risk of fi re or explosion due to puncturing of refrigerant tubing. Do not use sharp objects to aid in
defrost. Please handle with care. Keep fl ammable materials and vapors such as gasoline away from
the refrigerator. Use nonfl ammable cleaner.
Disposal of this unit should be in accordance with federal and local regulations.
Please ensure that component parts shall be replaced with like components and that servicing shall be done by
factory authorized service personnel, so as to minimize the risk of possible ignition due to incorrect parts or
improper service.
GROUNDING INSTRUCTIONS
This appliance is equipped with a cord having a grounding wire with a grounding plug. The plug must be plugged into an
outlet that is properly installed and grounded.
WARNING - Improper use of the grounding plug can result in a risk of electric shock. Consult a qualifi ed electrician or
service agent if the grounding instructions are not completely understood, or if doubt exists as to whether the appliance is
properly grounded.
DO NOT USE AN EXTENSION CORD
Use an exclusive 115V wall outlet. Do not connect your refrigerator to extension cords or together with another appliance
in the same wall outlet. Do not splice the cord.
SAVE THESE INSTRUCTIONS!
2

Important Safety Information
READ AND FOLLOW ALL SAFETY INSTRUCTIONS
• Try not to open the door too often, especially when the weather is hot and humid. Once you open the door, close it as
soon as possible.
• Every now and then check if the appliance is suffi ciently ventilated (adequate air circulation behind the appliance).
• Set the thermostat from cooler to warmer settings whenever possible (depending on how loaded the appliance is,
ambient temperatures etc.).
• Before loading the appliance with packages of hot food, make sure that they are cooled to ambient temperature.
• Ice and frost layers increase energy consumption, so clean the appliance as soon as the frost layer is 3-5 mm thick.
• If the gasket is damaged or the door seal is poor, energy consumption is substantially higher. To restore effi ciency,
replace the gasket.
• Always consider instructions stated in this manual.
• This unit is not designed for outside installation, including installation anywhere that is not temperature controlled
(including garages, porches, carports, etc.).
ENERGY SAVING TIPS
The refrigerator system of the appliance is fi lled with refrigerant and insulating substances which should be separately
treated and processed. Call your nearest authorized service agent or specialized servicing centre. If you are unable to
locate one, contact your local authorities or your distributor. Be careful not to damage any tubes that may be on the rear
wall of the appliance.
DISPOSING OF YOUR OLD APPLIANCE
SAVE THESE INSTRUCTIONS!
3
Before connecting the appliance to an electrical power supply, let it stand for 2 hours. This will reduce the possibility of
malfunctions in the cooling system due to transport handling.
BEFORE FIRST USE
• This appliance is not intended for use by persons (including children) whose physical, sensory or mental capabilities
may be different or reduced, or who lack experience or knowledge, unless such persons receive supervision or train-
ing to operate the appliance by a person responsible for their safety.
• Children should be supervised to ensure that they do not play with the appliance.
• Do not use extension cords or ungrounded (two prongs) adapters.
• If the supply cord is damaged, it must be replaced by the manufacturer, its service agent or similar qualifi ed person in
order to avoid hazard.
• WARNING Keep ventilation openings, in the appliance enclosure or in the built-in structure, clear of obstruction.
• WARNING Do not use mechanical devices or other means to accelerate the defrosting process, other than those
recommended by the manufacturer.
• WARNING Do not damage the refrigerant circuit.
• WARNING Do not use electrical appliances inside the food storage compartments of the appliance, unless they are
of the type recommended by the manufacturer.
• This unit is 45 cm (17.70 inches) wide by 51 cm (20.10 inches) high by 52 cm (20.5 inches) deep, please make sure
that you leave the minimum amount of space between the unit and all surrounding walls and vents (see location sec-
tion). Do not cover any of the ventilation openings with any material as the unit needs adequate space to breathe.

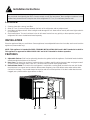
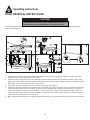
Installation Instructions
1. Select a place with a strong, level fl oor.
2. Allow 12.7 cm / 5 inches of space between the back of the refrigerator and any adjacent wall.
3. Avoid direct sunlight and heat. Direct sunlight could damage the unit. Heat sources nearby will cause higher electrici-
ty consumption.
4. Avoid moist places. Too much moisture in the air will cause frost to form very quickly on the evaporator, and your
refrigerator will have to be defrosted more frequently.
LOCATION
Remove exterior and interior packaging, wipe the outside thoroughly with a soft dry cloth and the inside with a luke-
warm, wet cloth. Avoid placing the unit in a narrow recess or near any heat source, direct sunlight or moisture. Let air
circulate freely around the unit. Keep the rear of the refrigerator 12.7 cm / 5 inches away from the wall.
1. Adjustable Shelves: Shelf can be optionally placed on the guides inside the appliance. Perishable foods should be
stored towards the back/rear of the shelves.
2. Door Liner: The door liner consists of various shelves or holders used for storing cheese, butter and yogurt as well
as other smaller packages, tubes, cans etc. The lower shelf is used for storing large bottles.
3. Defrost Water Outlet: The interior of the refrigerator is cooled with a cooling plate mounted in the rear wall. Under
the plate there is a channel and an outlet for defrost water. Regularly check the defrost water outlet and the drain
channel for blockage. They should always be kept free and clear of food particles. If the drain outlet does become
clogged, use a plastic straw or pipe-cleaner to clear it.
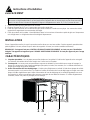
FEATURES
Place the appliance fi rmly on a solid base. Some appliances have adjustable feet on the front side; use them to level the
appliance (some models only).
NOTE: This appliance is intended for FREE-STANDING INSTALLATION ONLY, and is NOT intended to be built-in.
This appliance is approved for INDOOR USE ONLY and is NOT intended for outdoor operation.
INSTALLATION
4
1 23

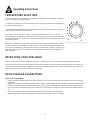
Operating Instructions
TEMPERATURE SELECTION
DEFROSTING YOUR APPLIANCE
There is no need to defrost the refrigerator, because ice deposits on the inner back wall are defrosted automatically.
Ice build-up on the inner back wall during the compressor operation will defrost automatically (when the compressor has
cycled off). Defrost water collects inside the drain passing through the drain outlet in the inner back wall into a drain pan
situated above the compressor from where it evaporates.
FOOD STORAGE SUGGESTIONS
Fresh Food Compartment
• Never cover food compartment shelves with aluminum foil or any other shelf covering material which may prevent air
circulation.
• Always remove porous store wrapping paper from meats, poultry and fi sh. Meats should be wrapped individually and
placed in a dish for storage. Wrap fi sh and poultry in foil or heavy waxed paper. Most fi sh should be used the same
day of purchase. Packaged meats such as ham, bacon, dried beef, or frankfurter, store best in their original packag-
es.
• Allow warm foods to cool to room temperature before placing them in the refrigerator.
• Always cover open dishes of food, especially leftovers. Use leftovers within 2 or 3 days.
5
The temperature of the refrigerator is controlled by setting the thermostat knob (on the ceil-
ing of the cabinet) to a desired setting.
To start the refrigerator, turn the temperature control knob to the position corresponding to
the desired cooling setting.
The refrigerator temperature will vary depending on the quantity of food stored and on the
frequency with which the door is opened.
To turn the control to the “OFF” position, rotate the control knob to the “OFF” position. If
the refrigerator is not going to be used for long time periods, disconnect the plug and leave
the door partially open. This will help to prevent mold/mildew from accumulating inside the
refrigerator cabinet.
Changes in ambient room temperature will affect internal refrigerator temperatures, adjust
the thermostat knob accordingly. In the OFF position, the appliance does not operate (cool-
ing system is switched off,) yet the power supply is not interrupted (the light is on when you
open the refrigerator door.) Temperature in the refrigerator is dependent on how often the
door is opened.
Max
Min
OFF

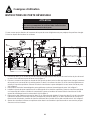
DOOR REVERSAL INSTRUCTIONS
CAUTION
To avoid personal injury to yourself and/or property, we recom-
mend someone assist you during the door reversal process.
If you fi nd the direction of opening the door on your appliance inconvenient, you can change it by following the steps
shown in the diagrams.
Operating Instructions
6
1. Remove the two (2) screws from the back of the worktop, lift the back of the worktop slightly and pull the worktop
forward, this will remove the worktop. See Figure 1.
2. Remove the left or right door strip cover (depending on which side you are moving the door to) and the left or right
hinge cover, then remove the two (2) upper hinge screws and remove the upper hinge. Remove the hinge pin from the
door, move it to the other side of the door. See Figure 2.
3. Loosen the upper door spindle and remove the door assembly. See Figure 2.
4. Install the upper door spindle to the opposite side of the upper hinge, place the upper hinge onto the other side of the
cabinet, install the door strip cover and the hinge cover to the opposite side of where you removed it. See Figure 4.
5. Loosen the adjustable foot and remove the two (2) screws around it. Remove the two (2) bottom hinge screws, re-
move the bottom hinge. Reinstall the foot and two (2) screws where the bottom hinge used to be. Install the bottom
hinge where the foot used to be. See Figure 5.
6. Make necessary adjustments to the upper hinge and bottom hinge, reinstall the worktop in reverse order of removing
it.

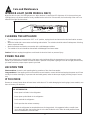
Care and Maintenance
SOME IMPORTANT RULES FOR THE CORRECT USE OF
THE REFRIGERATOR
• Never place hot foods in the refrigerator.
• Never place spoiled foods in the refrigerator.
• Don’t overload the refrigerator.
• Don’t open the door unless necessary.
• Should the refrigerator be stored without use for long periods, it is suggested, after a careful clean-
ing, to leave the door ajar to allow the air to circulate inside the unit in order to avoid possible forma-
tions of condensation, mold or odors.
• Turn the temperature control to the “OFF” or “0” position, unplug the unit and remove the food and interior accesso-
ries.
• Wash the inside with a warm water and baking soda solution. The solution should be about 2 tablespoons of baking
soda to a quart of water.
• Wash the baskets and interior accessories with a mild detergent solution.
• The outside of the unit should be cleaned with mild detergent and warm water.
Caution: Failure to unplug the appliance could result in electrical shock or personal injury.
CLEANING THE APPLIANCE
Most power failures are corrected within a few hours and should not affect the temperature of your refrigerator and/or
freezer if you minimize the number of times the door is opened. If the power is going to be off for a longer period of time,
you need to take the proper steps to protect your food.
POWER FAILURE
Short vacations: Leave the unit operating during vacations of less than three weeks.
Long vacations: If the appliance will not be used for several months, remove all food and unplug the power cord. Clean
and dry the interior thoroughly. To prevent odor and mold growth, leave the door open slightly, blocking it open if neces-
sary.
VACATION TIME
Remove or securely fasten down all loose items inside the unit. To avoid damaging the leveling legs (some models), turn
them all the way into the base.
IF YOU MOVE
7
INTERIOR LIGHT (SOME MODELS ONLY)
When the door is open, the LED light turns on. When the door is closed, the LED light turns off. In the event that your
LED light burns out, please contact a Danby certifi ed service technician. Please note, the functionality of the unit is not
affected if the light has burned out.
OFF

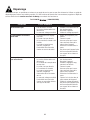
Troubleshooting
Occasionally, a minor problem may arise, and a service call may not be necessary - use this troubleshooting guide for
a possible solution. If the unit continues to operate improperly, call an authorized service depot or Danby’s Toll Free
Number for assistance.
Tel: 1-800-26- (1-800-263-2629)
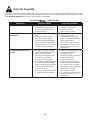
PROBLEM POSSIBLE CAUSE SOLUTION
Does not work • No power to unit
• Power cord is unplugged
• Wrong voltage is being used
• Check connection of power
cord to power source
• Plug in the unit
• Use proper voltage
Refrigerator runs continuously • Temperature set too low (too
cold)
• Door is not closed
• Hot food inserted
• Door opened too long or too
often
• Close proximity to heat
source or direct sunlight
• Set temperature higher
(warmer)
• Close door securely
• Be sure food is at room tem-
perature before inserting
• Minimize door openings/du-
ration
• Do not place unit close to
heat sources or direct sun-
light
Internal temperature not cold
enough
• No power to unit
• Power cord is unplugged
• Temperature control set too
high (too warm)
• Door is not closed
• Hot food inserted
• Door opened too long or too
often
• Air fl ow obstruction
• Wrong voltage is being used
• Close proximity to heat
source or direct sunlight
• Check connection of power
cord to power source
• Plug in unit
• Check setting and change as
needed
• Close door securely
• Be sure that food is at room
temperature
• Minimize door openings/du-
ration
• Allow room for air to circulate
around the unit
• Use proper voltage
• Do not place unit close to
heat sources or direct sun-
light
8

LIMITED IN-HOME APPLIANCE WARRANTY
This quality product is warranted to be free from manufacturer’s defects in material and workmanship, provided that the unit is used under the normal operating
conditions intended by the manufacturer.
This warranty is available only to the person to whom the unit was originally sold by Danby Products Limited (Canada) or Danby Products Inc. (U.S.A.) (hereafter
“Danby”) or by an authorized distributor of Danby, and is non-transferable.
TERMS OF WARRANTY
Plastic parts, are warranted for thirty (30) days only from purchase date, with no extensions provided.
First Year
During the rst twelve (12) months, any functional parts of this product found to be defective, will be repaired or replaced, at warrantor’s
option, at no charge to the ORIGINAL purchaser.
To obtain
Danby reserves the right to limit the boundaries of “In Home Service” to the proximity of an Authorized Service Depot. Any app liance
Service
requiring service outside the limited boundaries of “In Home Service” , it will be the consumer’s responsibility to transport the appliance (at
their own expense) to the original retailer (point of purchase) or a service depot for repair. See “Boundaries of In Home Serv ice” below.
Contact your dealer from whom your unit was purchased, or contact your nearest authorized Danby service depot, where service
must be performed by a qualied service technician.
If service is performed on the units by anyone other than an authorized service depot, or the unit is used for commercial appli cation, all
obligations of Danby under this warranty shall be void.
Boundaries of
If the appliance is installed in a location that is 100 kilometers (62 miles) or more from the nearest service center your unit must be
In Home Service
delivered to the nearest authorized Danby Service Depot, as service must only be performed by a technician qualied and certif ied for
warranty service by Danby. Transportation charges to and from the service location are not protected by this warranty and are t he
responsibility of the purchaser.
Nothing within this warranty shall imply that Danby will be responsible or liable for any spoilage or damage to food or other c ontents of this appliance, whether due
to any defect of the appliance, or its use, whether proper or improper.
EXCLUSIONS
Save as herein provided, Danby, there are no other warranties, conditions, representations or guarantees, express or implied, m ade or intended by Danby or its
authorized distributors and all other warranties, conditions, representations or guarantees, including any warranties, conditio ns, representations or guarantees
under any Sale of Goods Act or like legislation or statue is hereby expressly excluded. Save as herein provided, Danby shall no t be responsible for any damages
to persons or property, including the unit itself, howsoever caused or any consequential damages arising from the malfunction o f the unit and by the purchase of
the unit, the purchaser does hereby agree to indemnify and hold harmless Danby from any claim for damages to persons or propert y caused by the unit.
GENERAL PROVISIONS
No warranty or insurance herein contained or set out shall apply when damage or repair is caused by any of the following:
1) Power failure.
2) Damage in transit or when moving the appliance.
3) Improper power supply such as low voltage, defective house wiring or inadequate fuses.
4) Accident, alteration, abuse or misuse of the appliance such as inadequate air circulation in the room or abnormal operating con ditions
(extremely high or low room temperature).
5) Use for commercial or industrial purposes (ie. If the appliance is not installed in a domestic residence).
6) Fire, water damage, theft, war, riot, hostility, acts of God such as hurricanes, oods etc.
7) Service calls resulting in customer education.
8) Improper Installation (ie. Building-in of a free standing appliance or using an appliance outdoors that is not approved for out door application).
Proof of purchase date will be required for warranty claims; so, please retain bills of sale. In the event warranty service is required, present this document to our
AUTHORIZED SERVICE DEPOT.
Danby Products Limited
PO Box 1778, Guelph, Ontario, Canada N1H 6Z9
Telephone: (519) 837-0920 FAX: (519) 837-0449
Danby Products Inc.
PO Box 669, Findlay, Ohio, U.S.A. 45840
Telephone: (419) 425-8627 FAX: (419) 425-8629
04/09
1-800-263-2629
Warranty Service
In-home
During the first twelve (12) months, any functional parts of this product found to be defective, will be
repaired or replaced, at warrantor’s option, at no charge to the ORIGINAL purchaser.
It will be the consumer’s responsibility to transport the appliance (at their own expense) to the original
retailer (point of purchase) or a service depot for repair. Contact your dealer from whom your unit was
purchased, or contact your nearest authorized Danby service depot, where service must be performed
by a qualified service technician. If service is performed on the unit by anyone other than an authorized
service depot, or the unit is used for commercial application, all obligations of Danby under this warranty
shall be void.
First Year
To obtain
service
LIMITED APPLIANCE WARRANTY
This quality product is warranted to be free from manufacturer’s defects in material and workmanship, provided that the unit is
used under the normal operating conditions intended by the manufacturer.
This warranty is available only to the person to whom the unit was originally sold by Danby Products Limited (Canada) or
Danby Products Inc. (U.S.A.) (hereafter “Danby”) or by an authorized distributor of Danby, and is non-transferable.
TERMS OF WARRANTY
Plastic parts, are warranted for thirty (30) days only from purchase date, with no extensions provided.
Nothing within this warranty shall imply that Danby will be responsible or liable for any spoilage or damage to food or other
contents of this appliance, whether due to any defect of the appliance, or its use, whether proper or improper.
EXCLUSIONS
Save as herein provided, by Danby, there are no other warranties, conditions, representations or guarantees, express or
implied, made or intended by Danby or its authorized distributors and all other warranties, conditions, representations or
guarantees, including any warranties, conditions, representations or guarantees under any Sale of Goods Act or like legislation
or statute is hereby expressly excluded. Save as herein provided, Danby shall not be responsible for any damages to persons
or property, including the unit itself, howsoever caused or any consequential damages arising from the malfunction of the unit
and by the purchase of the unit, the purchaser does hereby agree to indemnify and hold harmless Danby from any claim for
damages to persons or property caused by the unit.
GENERAL PROVISIONS
No warranty or insurance herein contained or set out shall apply when damage or repair is caused by any of the following:
1) Power failure.
2) Damage in transit or when moving the appliance.
3) Improper power supply such as low voltage, defective house wiring or inadequate fuses.
4) Accident, alteration, abuse or misuse of the appliance such as inadequate air circulation in the room or abnormal operating
conditions (extremely high or low room temperature).
5) Use for commercial or industrial purposes (ie. If the appliance is not installed in a domestic residence).
6) Fire, water damage, theft, war, riot, hostility, acts of God such as hurricanes, floods etc.
7) Service calls resulting in customer education.
8) Improper Installation (ie. Building-in of a free standing appliance or using an appliance outdoors that is not approved for
outdoor application).
Proof of purchase date will be required for warranty claims; so, please retain bill of sale. In the event warranty service is
required, present this document to our AUTHORIZED SERVICE DEPOT.
Warranty Service
Carry-In
Danby Products Limited
PO Box 1778, Guelph, Ontario, Canada N1H 6Z9
Telephone: (519) 837-0920 FAX: (519) 837-0449
Danby Products Inc.
PO Box 669, Findlay, Ohio, U.S.A. 45840
Telephone: (419) 425-8627 FAX: (419) 425-8629
1-800-263-2629
07/13

10
Merci d’avoir choisi Danby
Nous savons que vous êtes excité. Nous sommes aussi! Cependant, le plus que vous vous familiarisez avec votre
nouvel appareil, le mieux va être votre expérience. Nous suggérons donc de lire ces instructions avant connecter votre
nouvel appareil. Ce manuel contient des informations opérationnel important qui vous aidera à faire un usage pleine de les
caractéristiques techniques disponibles dans votre appareil Danby. Le manuel contient également des informations conçu
pour améliorer la fiabilité et la sécurité de votre appareil ainsi que des conseils pour le maintien, pour vous assurez des annees
de bonheur.
Se il vous plaît visitez www.danby.com pour accéder les outils libre-service, FAQ et plus encore. Si jamais vous avez besoin
d'aide supplémentaire, s’il vous plaît appelez 1-800-26-Danby (1-800-263-2629). S’il vous plaît ayez votre facture d’achat, le
numéro de modèle, et le numéro de série près durant l'appel.
Remarque : Ces renseignements seront nécessaires si votre appareil a besoin d’entretien ou pour les demandes de
renseignements généraux. Pour bénéficier d’une opération de maintenance ou de dépannage, le reçu
original sera exigé.
Numéro de modèle :
Numéro de serie :
Date d’achat :
BESOIN D’ASSISTANCE ?
Veuillez trouver quelques conseils avant de faire appel à nos services, cela
nous aidera à mieux vous servir :
Lisez ce guide :
Il comprend des instructions pour l’utilisation et l’entretien adapté de votre
appareil.
Si votre nouvel appareil est endommagé :
Contactez immédiatement le revendeur (ou le fabricant).
Gagnez du temps et de l’argent :
Avant de faire appel à nos services, consultez à nouveau la section
« Dépannage ». Cette section vous aidera à résoudre des problèmes courants.
Si une réparation est nécessaire, ne vous inquiétez pas, la solution est au
bout du fil.
Tel: 1-800-26-
(1-800-263-2629)

Consignes de sécurité importantes
PRENDRE CONNAISSANCE DE TOUTES LES INFORMATIONS
RELATIVES À LA SÉCURITÉ AVANT D’UTILISER LE PRODUIT
Veuillez vous assurer que les pièces de rechange sont remplacées par des pièces similaires, et que l’entretien
soit effectué par un technicien agréé par l’usine, afi n réduire le risque d’incendie à cause de mauvaises pièces
ou d’entretien mal fait.
Cet appareil doit être mis à la terre. En cas de courtcircuit, la mise à la terre réduit les risques de décharge
électrique en fournissant un échappatoire au courant électrique. L’appareil est muni d’un cordon électrique
comprenant un fi l de mise à la terre et une fi che de terre.
CONDITIONS ÉLECTRIQUES
ATTENTION
ÉNERGIÉ ÉLECTRIQUE : Le voltage et la fréquence requis pour
ce réfrigérateur sont indiqués sur la plaque d’identifi cation.
Dû aux variations possibles sur la ligne de voltage (causé par une surcharge des circuits) il est recommandé d’installer
un circuit séparé avec fusibles à partir du panneau compteur. Ceci aidera à éliminer les fl uctuations du courant qui peu-
vent endommager le moteur.
AVERTISSEMENT IMPORTANT!
Un réfrigérateur vide peut représenter un attrait dangereux aux enfants. Retirer le joint d’étanchéité, les loquets,
les couvercles ou portes des appareils ménagers inutilisés, ou prenez d’autres mesures qui assureront que
l’appareil ne posera aucun danger.
DANGER : Risque de piéger un enfant. Avant de mettre votre vieux congélateur ou réfrigérateur au rebut :
• Enlever les portes.
• Laisser les tablettes en place afi n que les enfants ne puissent pas facilement y entrer.
N’ATTENDEZ PAS! FAITES-LE IMMÉDIATEMENT!
AVERTISSEMENT! DANGER D’EXPLOSION!
Risque d’incendie ou d’explosion causé par la perforation de tuyaux frigorigènes. Ne jamais utiliser un objet
pointu pour assister au dégel. Manipuler avec soin. Garder les matériaux et vapeurs infl ammables comme de
l’essence loin du réfrigérateur. Utiliser un nettoyant ininfl ammable.
La mise au rebut de cet item doit être faite selon les lois locales et fédérales.
MISE À LA TERRE
L’appareil est muni d’un cordon électrique comprenant un fi l de mise à la terre et une fi che de terre. Branchez la fi che
dans une prise de courant correctement installée et mise à la terre.
AVERTISSEMENT - Une fi che de mise à la terre mal branchée peut entraîner un risque d’incendie, de choc électrique
ou de blessures aux personnes qui utilisent l’appareil. Si vous n’êtes pas certain que l’appareil est correctement mis à la
terre, consultez un préposé du service qualifi é.
N’UTILISER JAMAIS DE FIL DE RALLONGE
Brancher le réfrigérateur à son propre curcuit de 115V. N’utilisez pas de rallonge électrique pour brancher votre réfrigéra-
teur. Ne branchez pas le réfrigérateur à une prise femelle multiple qui sera également utilisée pour d’autres appareils
électriques. N’épissez pas le cordon électrique.
CONSERVEZ CES INSTRUCTIONS!
11

• Essayez de ne pas ouvrir la porte trop fréquemment, surtout lorsque les conditions météorologiques sont chaudes et
humides. Une fois la porte ouverte, fermez-la dès que possible.
• Vérifi ez de temps en temps si l’appareil est suffi samment ventilé (si l’air circule bien derrière l’appareil).
• Réglez le thermostat dès que possible pour que les paramètres passent d’une valeur élevée à moins élevée (en
fonction du volume de l’appareil occupé pas les aliments, de la température de la pièce, etc.).
• Avant de mettre au réfrigérateur des emballages contenant des aliments frais, assurez-vous qu’ils sont refroidis à la
température de la pièce.
• La présence de couches de glace et de givre augment la consommation d’énergie; nettoyez l’appareil dès que
l’épaisseur de la couche de givre atteint 3 à 5 mm.
• Lorsque le joint d’étanchéité est endommagé ou que la porte ne ferme pas hermétiquement, la consommation
d’énergie est considérablement plus élevée. Afi n de rétablir l’effi cacité replacez le joint d’étanchéité.
• Il convient de toujours prendre en compte les directives fi gurant dans le guide d’utilisation.
• Cet appareil n’a pas été conçu pour une installation extérieur, incluant l’installation dans un endroit qui n’a pas une
température contrôlée (y compris les garages, les vérandas, les abris de voitures, etc.).
CONSEILS RELATIFS AUX ÉCONOMIES D’ÉNERGIE
Le système frigorifi que de l’appareil contient un fl uide frigorigène et des substances isolantes qui doivent être trans-
formés et traités séparément. Appelez votre réparateur autorisé ou centre de réparations spécialisé le plus proche. Si
vous êtes dans l’impossibilité d’en trouver un, contactez les autorités ou le distributeur de votre localité. Prenez soin de
ne pas endommager les tubes situés sur la paroi arrière de l’appareil.
ÉLIMINATION DES APPAREILS USÉS
CONSERVEZ CES INSTRUCTIONS!
Consignes de sécurité importantes
PRENDRE CONNAISSANCE DE TOUTES LES INFORMATIONS
RELATIVES À LA SÉCURITÉ AVANT D’UTILISER LE PRODUIT
12
Avant de brancher l’appareil à l’alimentation électrique, laissez-le reposer pendant environ 2 heures. Ce qui réduira la
possibilité que le système de refroidissement présente des dysfonctionnements en raison de la manutention au cors du
transport.
AVANT LA PREMIÈRE UTILISATION
• Ce dispositif n’est pas désigné d’être utilisé par des personnes (y compris enfants) dont le développement et capac-
ité physique, sensoriel ou mental estdifférente ou réduite, ou par les personnes qui manquent expérience ou con-
naissance sauf si ces personnes sont surveillés ou formés par une personne responsable de leur sécurité.
• Les enfants doivent être surveillés pour s’assurer qu’ils ne jouent pas avec l’appareil.
• Ne pas utiliser de rallonges et des adaptateurs (avec 2 prises) qui ne sont pas de mise à la terre.
• Pour éviter les risques, si le cordon est endommagé, il doit être remplacé par le fabricant, son agent de service ou
une personne qualifi ée.
• AVERTISSEMENT Les prises d’air de l’enceinte de l’appareil ou de la structure encastré doivent être dégagées en
tout temps.
• AVERTISSEMENT Ne pas utiliser d’appareils mécaniques ou autres moyens pour accélérer le dégiverage que ceux
recommandés par le fabricant.
• AVERTISSEMENT Ne pas endommager le circuit frigorigène.
• AVERTISSEMENT Ne pas utiliser d’appareils électriques à l’intérieur du compartiment de conservation des aliments
de cet appareil, sauf s’ils sont du type recommandé par le fabricant.
• Cette unité est 45 cm (17,7 pouces) de large par 51 cm (20,1pouces) de haut par 52 cm (20,5 pouces) de profond-
eur; S’il vous plaît assurez-vous de laisser le dégagement minimum d’entre l’appareil et tous les murs environnants
et les ouvertures (voir l’emplacement). Ne couvrez pas les ouvertures de ventilation avec un matériau parce que
l’unité a besoin d’espace de respiration adéquate.

Instructions d’installation
1. Choisir un place qui a un plancher fort et à niveau.
2. Éloigner l’appareil de 12,7 cm / 5 pouces des murs arrière et de côté.
3. Éviter les rayons de soleil et la chaleur directs qui peuvent affecter la surface en acrylique. Les sources de chaleur
rapprochées augmentent la consommation d’énergie.
4. Éviter les endroits très humides. L’humidité élevée dans l’air occasionne la formation rapide de gèle sur l’évaporateur
et le réfrigérateur. Le réfrigérateur devra être dégivré fréquemment.
EMPLACEMENT
Enlevez les emballages extérieurs et intérieurs. Essuyez complètement l’extérieur avec un linge doux sec et l’in-
térieur avec un linge humide tiède. Il ne faut jamais situer l’appareil dans un recoin étroit, proche d’une source d’air
chaud. L’air doit circuler à l’entour de l’appareil. Eloigner le réfrigérateur au moins 12, 7 cm / 5 pouces du mur.
1. Clayettes ajustables : Les clayettes peuvent être situées sur les guides à l’intérieur de l’appareil selon votre goût.
Les aliments périssables doivent être rangés vers l’arrière sur les clayettes.
2. Contre-porte : La contre-porte comporte divers supports ou tablettes qui sont utilisés pour ranger le fromage, le
beurre et le yogourt ainsi que d’autres emballages plus petits, les tubes, les canettes, etc. La tablette inférieure est
utilisée pour ranger les grosses bouteilles.
3. Orfi ce d’évacuation de l’eau de dégivrage : L’intérieur du réfrigérateur est refroidi à l’aide d’une plaque de refroid-
issement montée sur la paroi arrière. Un conduit et l’orifi ce d’évacuation de l’eau de dégivrage sont logés sous cette
plaque. Vérifi ez régulièrement que l’orifi ce d’évacuation de l’eau de dégivrage et le conduit d’égouttement ne sont
pas bloqués. Ils doivent constamment être propres et exempts de tout débris d’aliments. Si l’orifi ce d’égouttement
s’obstrue, utilisez une paille en plastique pour la nettoyer.
CARACTÉRISTIQUES
Placez l’appareil de manière à ce qu’il repose de manière ferme sur une base solide. Certains appareils possèdent des
pieds réglables à l’avant; utilisez-les pour mettre les appareils à niveau (sur certains modèles seulement).
REMARQUE : Cet appareil est pour L’INSTALLATION AUTONOME SEULEMENT, et n’est pas pour l’installation
intégrée. Cet appareil est approuvé pour L’USAGE D’INTÉRIEUR SEULEMENT et n’est pas approuvé pour l’usage
extérieur.
INSTALLATION
13
1 23

SÉLECTION DE LA TEMPÉRATURE
DÉGIVRER VOTRE APPAREIL
Consignes d’utilisation
Nul besoin de dégivrer le réfrigérateur car les dépôts de glace se formant sur la paroi arrière intérieure sont dégivrés de
manière automatique.
L’accumulation de glace sur la paroi arrière intérieure occasionnée par le fonctionnement du compresseur sera automa-
tiquement éliminée par le dégivrage (lorsque le compresseur aura terminé son cycle). L’eau de dégivrage s’accumule
dans la gouttière d’évaporateur, passant de l’orifi ce d’égouttement situé dans la paroi arrière intérieure au plateau de
dégivrage situé au-dessus du compresseur, où elle s’évapore.
RANGEMENTS DES ALIMENTS
Compartiments pour aliments frais
• Ne jamais recouvrir les clayettes du compartiment de papier d’aluminium ou autres matériaux ca ceci peut empêcher
la circulation d’air.
• Enlever toujours les emballages perméables du marchand qui recouvrent la viande, volaille et le poisson. Les vian-
des doivent être emballées individuellement, et déposées dans un récipient pour le rangement. Emballer la volaille
ou le poisson dans du papier aluminium ou du papier ciré épais. Faites cuire la plupart de sorte de poissons le jour
de l’achat. Les viandes emballées par le marchand, telles que le jambon, le bacon, le boeuf sec, ou les saucisses
fumées se rangent très bien dans leur emballage.
• Laisser refroidir les aliments à la température de la pièce avant de les ranger dans le réfrigérateur.
• Toujours recouvrir les aliments, surtout les restants. Utiliser les restants avant 2 à 3 jours.
14
La température du réfrigérateur est contrôlée en réglant le bouton du thermostat (plafond
du meuble) au niveau désiré.
Pour démarrer le réfrigérateur, tournez le bouton de réglage de la température à la posi-
tion correspondant au niveau de refroidissement désiré.
La température du réfrigérateur variera en fonction de la quantité d’aliments entreposés
et de la fréquence à laquelle la porte est ouverte.
Pour tourner le bouton en position « ARRÊT » (OFF), réglez le bouton de réglage sur
la position « OFF ». Si le réfrigérateur n’est pas utilisé pendant de longues périodes,
débranchez-le de la prise et laissez la porte entrouverte. Cela contribuera à réduire l’ac-
cumulation de moisissures à l’intérieur du réfrigérateur.
Les changements de température de la pièce infl uent sur la température interne du ré-
frigérateur (réglez le bouton du thermostat au niveau approprié). L’appareil ne fonctionne
pas lorsqu’il est réglé sur la position « ARRÊT » (OFF) (le système de refroidissement
est mis hors tension), mais l’alimentation n’est pas interrompue (la lumière s’allume
lorsque vous ouvrez la porte du réfrigérateur). La température interne du réfrigérateur
dépend également de la fréquence à laquelle la porte est ouverte.
Max
Min
OFF

INSTRUCTIONS DE PORTE RÉVERSIBLE
Consignes d’utilisation
ATTENTION
Afi n d’éviter de vous blesser ou de causer des dégâts matériels,
nous vous recommandons de solliciter l’aide d’autrui lors des
manœuvres liées à l’inversion de la porte.
Si vous trouvez que la direction de l’ouverture de la porte de votre réfrigérateur est peu pratique, elle peut être changée.
Suivez les étapes décrites dans les schémas.
15
1. Enlevez les deux (2) vis du dos du plan de travail, levez légèrement le dos du plan de travail et tirez le plan de travail
en avant. Cela enlèvera le plan de travail. Voir la fi gure 1.
2. Enlevez le couvercle de la porte en bande du côté gauche ou droit (selon le côté vers lequel vous changez l’ouverture
de la porte) et le couvercle de la charnière gauche ou droit. Puis enlevez les deux (2) vis de charnière supérieures et
enlevez la charnière supérieure. Enlevez l’axe de la charnière de la porte et déplacez-le vers l’autre côté de la porte.
Voir la fi gure 2.
3. Desserrez la broche de l’assemblage de porte supérieure et enlevez l’assemblage de porte. Voir la fi gure 2.
4. Installez la broche de porte supérieure sur le côté opposé de la charnière supérieure, placez la charnière supérieure
sur l’autre côté de l’armoire. Installez le couvercle de la porte en bande et le couvercle de la charnière sur le côté
opposé du côté duquel vous les avez enlevés. Voir la fi gure 4.
5. Desserrez le pied réglable et enlevez les deux (2) vis autour du pied réglable. Enlevez les deux (2) vis de la charnière
inférieure et enlevez la charnière inférieure. Réinstallez le pied et les deux (2) vis dans l’endroit d’où la charnière in-
férieure avait été enlevée. Installez la charnière inférieure dans l’endroit d’où le pied avait été enlevé. Voir la fi gure 5.
6. Ajustez les charnières inférieure et supérieure selon besoin et réinstallez le plan de travail en reversant les pas que
vous avez suivi en l’enlever.

Soins et entretien
• Tournez le thermostat à « OFF » ou « 0 », débranchez l’appareil et retirez les accessoires intérieurs.
• Lavez l’intérieur au bicarbonate de soude dilué dans de l’eau chaude. La solution doit contenir 2 cuillerées à soupe
de bicarbonate de soude pour un litre d’eau.
• Lavez les accessoires intérieurs avec une solution de détergent non abrasif.
• L’extérieur de l’appareil doit être nettoyé à l’aide d’un détergent doux dilué dans de l’eau chaude.
Mise en garde : Ne pas débrancher le réfrigérateur-congélateur pourrait vous exposer à un risque de choc électrique ou
de blessure corporelle.
NETTOYAGE DE L’APPAREIL
La plupart des pannes de courant ne durent que quelques heures et ne devraient pas modifi er la température de votre
réfrigérateur et/ou congélateur si vous réduisez au minimum le nombre de fois où la porte est ouverte. Si le courant reste
coupé pendant une longue période, il faut prendre des mesures pour protéger les aliments dans l’appareil.
PANNE D’ÉLECTRICITÉ
Des vacances de courte durée : Laissez l’appareil fonctionner normalement pendant des vacances de moins de trois
semaines.
Des vacances de longue durée : Si l’appareil ne sera pas utilisé pendant plusieurs mois, videz-le de tous ses aliments
et débranchez la fi che d’alimentation. Nettoyez et asséchez minutieusement l’intérieur. Pour éviter les odeurs et le dével-
oppement de moisissures, laissez la porte entrouverte : la coincer au besoin.
PÉRIODE DE VACANCES
Enlever ou immobiliser toutes les pièces amovibles (c’-à-d les clayettes) à l’intérieur du réfrigérateur. Serrer les vis à
nivellement à la base afi n de ne pas les endommager (sur certains modèles).
DÉMENAGEMENT
IMPORTANTES CONSIGNES DE SÉCURITÉ POUR L’UTILISATION DU CONGÉLATEUR
• Ne jamais ranger d’aliments chauds dans le congélateur.
• Ne jamais placer des aliments pourris dans le réfrigérateur.
• Ne jamais surcharger l’appareil.
• Ouvrir le couvercle seulement si nécessaire.
• Pour un rangement prolongé de l’appareil, il est suggéré de laver l’appareil, de laisser la
porte ouverte afi n de fournir une circulation d’air à l’intérieur du meuble et d’éviter le dévelop-
pement de condensation, de moisi et d’odeurs.
16
Lorsque la porte est ouverte, la lumière LED sera allumé. Lorsque la porte est fermée, la lumière LED sera éteint. Dans
le cas où votre lumière LED brûle, s’il vous plaît contacter un technicien de service certifi é par Danby pour remplacer la
bande de LED. S’il vous plaît noter, la fonctionnalité de l’appareil n’est pas affectée si la lumière a brûlé.
LUMIÈRE INTÉRIEURE (SEULEMENT SUR CERTAINS MODÈLES)
O
FF

PROBLEME CAUSE PROBABLE SOLUTION
Ne fonctionne pas • Pas de tension à l’unité
• Le cordon d’alimentation est
débranché
• Le mauvais voltage est utilisé
• Vérifi ez la connexion du cor-
don d’alimentation
• Branchez l’appareil
• Utilisez le voltage approprié
Le réfrigérateur fonctionne
sans arrêt
• La température est réglage
trop haut
• La porte n’est pas fermée
• De la nourriture chaude a été
insérée
• La porte est ouverte trop
souvent / longtemps
• Proximité d’une source de
chaleur ou source de soleil
• Régler la température plus
élevée
• Fermez la porte
• Assurez-vous que la nour-
riture est frais avant de la
placer dans l’appareil
• Minimisez l’ouverture de la
porte
• Ne placez pas l’appareil près
d’une ou exposition directe
aux rayons de la chaleur et
du soleil
La température interne n’est
pas assez froide
• Pas de tension à l’unité
• Le cordon d’alimentation est
débranché
• Le contrôle de la température
est trop bas
• La porte n’est pas fermée
• La nourriture est chaude
• La porte est ouverte trop
souvent / longtemps
• Obstruction de la circulation
de l’air
• Le mauvais voltage est utilisé
• Proximité d’une source de
chaleur ou exposition directe
aux rayons du soleil
• Vérifi ez la connexion du cor-
don d’alimentation
• Branchez l’appareil
• Vérifi ez le réglage et aug-
mentez-le au besoin
• Fermez la porte
• Assurez-vous que la nour-
riture est frais avant de la
placer dans l’appareil
• Minimisez l’ouverture de la
porte
• Laissez l’air circuler dans la
pièce autour de l’appareil
• Utilisez le voltage approprié
• Ne placez pas l’appareil près
d’une ou exposition directe
aux rayons de la chaleur et
du soleil
Dépannage
De temps en temps, un problème est mineur et un appel de service peut ne pas être nécessaire. Utilisez ce guide de
dépannage pour trouver une solution possible. Si l’unité continue de fonctionner incorrectement, appelez un dépôt de
service autorisé ou le numéro sans frais de Danby pour obtenir de l’assistance.
Tel: 1-800-26- (1-800-263-2629)
17
Page is loading ...
Page is loading ...
Page is loading ...
Page is loading ...
Page is loading ...
Page is loading ...
Page is loading ...
Page is loading ...
Page is loading ...
Page is loading ...
Page is loading ...
Page is loading ...
-
 1
1
-
 2
2
-
 3
3
-
 4
4
-
 5
5
-
 6
6
-
 7
7
-
 8
8
-
 9
9
-
 10
10
-
 11
11
-
 12
12
-
 13
13
-
 14
14
-
 15
15
-
 16
16
-
 17
17
-
 18
18
-
 19
19
-
 20
20
-
 21
21
-
 22
22
-
 23
23
-
 24
24
-
 25
25
-
 26
26
-
 27
27
-
 28
28
-
 29
29
-
 30
30
-
 31
31
-
 32
32


Danby DAR017A3BSLDB Installation guide
- Type
- Installation guide
- This manual is also suitable for
Ask a question and I''ll find the answer in the document
Finding information in a document is now easier with AI
in other languages
- français: Danby DAR017A3BSLDB Guide d'installation
- español: Danby DAR017A3BSLDB Guía de instalación
Related papers
-
Danby DAR033A1BBUD2 Owner's manual
-
Danby DAR044A6MBDB Owner's manual
-
-
-
-
Danby DCR016A1BBSL Owner's manual
-
-
Danby DAR044A6BSLDBO Owner's manual
-
Danby DAR044A6MDB Owner's manual
-
Danby DBMR02624WD43 Owner's manual
