Toro Groundsmaster 7200 Series Traction Unit User manual
- Category
- Lawnmowers
- Type
- User manual

FormNo.3428-854RevA
Groundsmaster
®
7210Series
TractionUnit
ModelNo.30487TC—SerialNo.403440001andUp
ModelNo.30487TE—SerialNo.400000000andUp
ModelNo.30495—SerialNo.403440001andUp
ModelNo.30495TC—SerialNo.403440001andUp
Registeratwww.Toro.com.
OriginalInstructions(EN)
*3428-854*A

ThisproductcomplieswithallrelevantEuropean
directives;fordetails,pleaseseetheseparate
product-specicDeclarationofConformity(DOC)
sheet.
ItisaviolationofCaliforniaPublicResourceCode
Section4442or4443touseoroperatetheengineon
anyforest-covered,brush-covered,orgrass-covered
landunlesstheengineisequippedwithaspark
arrester,asdenedinSection4442,maintainedin
effectiveworkingorderortheengineisconstructed,
equipped,andmaintainedforthepreventionofre.
Theenclosedengineowner'smanualissupplied
forinformationregardingtheUSEnvironmental
ProtectionAgency(EPA)andtheCaliforniaEmission
ControlRegulationofemissionsystems,maintenance,
andwarranty.Replacementsmaybeorderedthrough
theenginemanufacturer.
WARNING
CALIFORNIA
Proposition65Warning
Dieselengineexhaustandsomeofits
constituentsareknowntotheStateof
Californiatocausecancer,birthdefects,
andotherreproductiveharm.
Batteryposts,terminals,andrelated
accessoriescontainleadandlead
compounds,chemicalsknownto
theStateofCaliforniatocause
cancerandreproductiveharm.Wash
handsafterhandling.
Useofthisproductmaycauseexposure
tochemicalsknowntotheStateof
Californiatocausecancer,birthdefects,
orotherreproductiveharm.
Introduction
Thismachineisaride-on,rotary-bladelawnmower
intendedtobeusedbyprofessional,hiredoperators
incommercialapplications.Itisprimarilydesigned
forcuttinggrassonwell-maintainedlawnsinparks,
sportselds,andoncommercialgrounds.Itisnot
designedforcuttingbrush,mowinggrassandother
growthalongsidehighways,orforagriculturaluses.
Usingthisproductforpurposesotherthanitsintended
usecouldprovedangeroustoyouandbystanders.
Readthisinformationcarefullytolearnhowtooperate
andmaintainyourproductproperlyandtoavoid
injuryandproductdamage.Youareresponsiblefor
operatingtheproductproperlyandsafely.
Visitwww.Toro.comforproductsafetyandoperation
trainingmaterials,accessoryinformation,helpnding
adealer,ortoregisteryourproduct.
Wheneveryouneedservice,genuineT oroparts,or
additionalinformation,contactanAuthorizedService
DealerorT oroCustomerServiceandhavethemodel
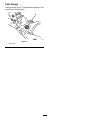
andserialnumbersofyourproductready.Figure1
identiesthelocationofthemodelandserialnumbers
ontheproduct.Writethenumbersinthespace
provided.
Important:Withyourmobiledevice,youcan
scantheQRcodeontheserialnumberdecal(if
equipped)toaccesswarranty,parts,andother
productinformation.
g241316
Figure1
1.Modelandserialnumberlocation
ModelNo.
SerialNo.
Thismanualidentiespotentialhazardsandhas
safetymessagesidentiedbythesafety-alertsymbol
(Figure2),whichsignalsahazardthatmaycause
seriousinjuryordeathifyoudonotfollowthe
recommendedprecautions.
g000502
Figure2
1.Safety-alertsymbol
©2018—TheToro®Company
8111LyndaleAvenueSouth
Bloomington,MN55420
2
Contactusatwww.Toro.com.
PrintedintheUSA
AllRightsReserved

Thismanualalsouses2wordstohighlightinformation.
Importantcallsattentiontospecialmechanical
informationandNoteemphasizesgeneralinformation
worthyofspecialattention.
3

Contents
Safety.......................................................................5
GeneralSafety...................................................5
SafetyandInstructionalDecals..........................5
Setup......................................................................12
1RaisingtheRollBar.......................................12
2InstallingtheCuttingUnit...............................12
3AdjustingtheLeft,FrontCaster
Wheel............................................................12
4CheckingtheTirePressure............................13
5InstallingWeights(forCE
Compliance)..................................................14
6CheckingtheFluidLevels..............................15
7InstallingtheDecal(CEMachines
Only).............................................................15
ProductOverview...................................................15
Controls...........................................................15
Specications..................................................18
Attachments/Accessories.................................19
BeforeOperation.................................................19
BeforeOperationSafety...................................19
AddingFuel......................................................20
CheckingtheEngine-OilLevel..........................21
CheckingtheCoolingSystem...........................21
CheckingtheHydraulicSystem........................21
AdjustingtheRollBar.......................................21
UsingtheSafety-InterlockSystem....................22
PositioningtheSeat..........................................23
ChangingtheSeatSuspension.........................24
UnlatchingtheSeat..........................................24
DuringOperation.................................................24
DuringOperationSafety...................................24
OperatingtheParkingBrake.............................26
StartingtheEngine...........................................26
DrivingtheMachine..........................................27
ShuttingOfftheEngine.....................................28
OperatingtheMower........................................28
AdjustingtheHeightofCut...............................29
OperatingTips.................................................29
AfterOperation....................................................30
GeneralSafety.................................................30
PushingtheMachine........................................30
HaulingtheMachine.........................................31
LoadingtheMachine........................................32
Maintenance...........................................................33
MaintenanceSafety..........................................33
RecommendedMaintenanceSchedule(s)...........33
DailyMaintenanceChecklist.............................35
Lubrication..........................................................36
GreasingtheBearingsandBushings................36
ServicingtheCutting-UnitGearbox
Lubricant.......................................................36
EngineMaintenance...........................................37
EngineSafety...................................................37
CheckingtheAirCleaner..................................37
ServicingtheAirCleaner..................................38
ServicingtheEngine-Oil...................................38
FuelSystemMaintenance...................................40
ServicingtheWaterSeparator.........................40
DrainingtheFuelT ank......................................40
InspectingtheFuelLinesand
Connections..................................................41
BleedingtheFuelSystem.................................41
BleedingAirfromtheInjectors..........................41
ElectricalSystemMaintenance...........................42
ElectricalSystemSafety...................................42
ServicingtheBattery.........................................42
StoringtheBattery............................................42
CheckingtheFuses..........................................42
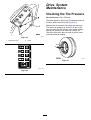
DriveSystemMaintenance..................................43
CheckingtheTirePressure...............................43
ReplacingtheCasterWheelsand
Bearings........................................................44
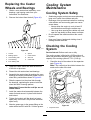
CoolingSystemMaintenance..............................44
CoolingSystemSafety.....................................44
CheckingtheCoolingSystem..........................44
CleaningtheRadiator.......................................45
BrakeMaintenance.............................................45
AdjustingtheParking-BrakeInterlock
Switch...........................................................45
BeltMaintenance................................................46
CheckingtheAlternator-BeltTension................46
ControlsSystemMaintenance.............................47
AdjustingtheControl-LeverNeutral-Interlock
Switch...........................................................47
AdjustingtheControl-LeverNeutral
Return...........................................................47
AdjustingtheTractionDriveforNeutral.............48
AdjustingtheMaximumGroundSpeed.............50
AdjustingtheTracking......................................51
HydraulicSystemMaintenance...........................52
HydraulicSystemSafety...................................52
HydraulicFluidCapacity...................................52
HydraulicFluidSpecication.............................52
CheckingtheHydraulicSystem........................52
ChangingtheHydraulicFluidAnd
Filter..............................................................53
Cleaning..............................................................53
CleaningUndertheCuttingUnit........................53
WasteDisposal.................................................53
Storage...................................................................54
StorageSafety..................................................54
PreparingtheMachineforStorage...................54
PreparingtheEngine........................................54
4

Safety
Thismachinehasbeendesignedinaccordancewith
CENstandardANSIB71.4-2017andISOEN5395
whenyouinstalltheproperCEKitsandcompletethe
setupprocedures.
GeneralSafety
Thisproductiscapableofamputatinghandsand
feetandofthrowingobjects.Alwaysfollowallsafety
instructionstoavoidseriouspersonalinjury.
•Readandunderstandthecontentsofthis
Operator’sManualbeforestartingtheengine.
•Useyourfullattentionwhileoperatingthe
machine.Donotengageinanyactivitythat
causesdistractions;otherwise,injuryorproperty
damagemayoccur.
•Donotoperatethemachinewithoutallguards
andothersafetyprotectivedevicesinplaceand
functioningproperlyonthemachine.
•Keepyourhandsandfeetawayfromrotating
parts.Keepclearofthedischargeopening.
•Keepbystandersandchildrenoutoftheoperating
area.Neverallowchildrentooperatethemachine.
•Shutofftheengine,removethekey(ifequipped),
andwaitforallmovementtostopbeforeyouleave
theoperator’sposition,Allowthemachinetocool
beforeadjusting,servicing,cleaning,orstoringit.
Improperlyusingormaintainingthismachinecan
resultininjury.Toreducethepotentialforinjury,
complywiththesesafetyinstructionsandalways
payattentiontothesafety-alertsymbol
,which
meansCaution,Warning,orDanger—personalsafety
instruction.Failuretocomplywiththeseinstructions
mayresultinpersonalinjuryordeath.
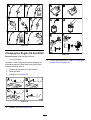
SafetyandInstructionalDecals
Safetydecalsandinstructionsareeasilyvisibletotheoperatorandarelocatednearanyarea
ofpotentialdanger.Replaceanydecalthatisdamagedormissing.
decaloemmarkt
Manufacturer'sMark
1.Indicatesthebladeisidentiedasapartfromtheoriginal
machinemanufacturer.
decalbatterysymbols
BatterySymbols
Someorallofthesesymbolsareonyourbattery.
1.Explosionhazard6.Keepbystandersaway
fromthebattery.
2.Nore,opename,or
smoking
7.Weareyeprotection;
explosivegasescan
causeblindnessandother
injuries.
3.Causticliquid/chemical
burnhazard
8.Batteryacidcancause
blindnessorsevereburns.
4.Weareyeprotection.9.Flusheyesimmediately
withwaterandgetmedical
helpfast.
5.ReadtheOperator's
Manual.
10.Containslead;donot
discard
5

decal93-6696
93-6696
1.Storedenergyhazard—readtheOperator'sManual.
decal93-6697
93-6697
1.ReadtheOperator's
Manual.
2.AddSAE80w-90(API
GL-5)oilevery50hours.
decal106-6754
106-6754
1.Warning—donottouchthehotsurface.
2.Cutting/dismembermenthazard,fanandentanglement
hazard,belt—stayawayfrommovingparts.
decal106-6755
106-6755
1.Enginecoolantunder
pressure.
3.Warning—donottouchthe
hotsurface.
2.Explosionhazard—read
theOperator'sManual.
4.Warning—readthe
Operator'sManual.
decal106-9206
106-9206
1.Wheeltorquespecications
2.ReadtheOperator'sManual.
decal106-9290
106-9290
1.Inputs5.Inseat
9.Outputs13.Start
2.Notactive
6.Powertakeoff(PTO)10.Powertakeoff(PTO)
14.Power
3.Hightemperatureshutdown
7.Parkingbrakeoff11.Start
4.Hightemperaturewarning8.Neutral
12.Energizetorun(ETR)
6

decal107-1866
107-1866
Note:Thismachinecomplieswiththeindustrystandard
stabilitytestinthestaticlateralandlongitudinaltestswiththe
maximumrecommendedslopeindicatedonthedecal.Reviewthe
instructionsforoperatingthemachineonslopesintheOperator’s
Manualaswellastheconditionsinwhichyouwouldoperatethe
machinetodeterminewhetheryoucanoperatethemachineinthe
conditionsonthatdayandatthatsite.Changesintheterraincan
resultinachangeinslopeoperationforthemachine.Ifpossible,
keepthecuttingunitsloweredtothegroundwhileoperatingthe
machineonslopes.Raisingthecuttingunitswhileoperatingon
slopescancausethemachinetobecomeunstable.
1.Sliding/lossofcontrolhazard;tippinghazard,drop-offs—do
notturnathighspeeds;turnatlowspeeds;donotuseon
slopesnearopenwater;donotuseonslopesgreaterthan
15°;stayawayfromdrop-offs.
2.Warning—iftherollbarislowered,donotweartheseatbelt;
iftherollbarisraised,weartheseatbelt.
3.Warning—donotusedualrampswhenloadingontoa
trailer;use1rampwideenoughforthemachine;usea
rampwithaslopelessthan15°.
decal107-3069
107-3069
1.Warning–thereisnorolloverprotectionwhentherollbaris
down.
2.Toavoidinjuryordeathfromarolloveraccident,keepthe
rollbarintheraisedandlockedpositionandweartheseat
belt.Lowertherollbaronlywhenabsolutelynecessary;do
notweartheseatbeltwhentherollbarisdown.
3.ReadtheOperator'sManual;driveslowlyandcarefully.
7

decal110-8253
110-8253
1.PTO–Off4.Continuous-variable
setting
2.PTO—On5.Slow
3.Fast
decal110-8254
110-8254
1.Engine–Stop3.Engine—Start
2.Engine—Run
decal110-9796
110-9796
1.ReadtheOperator'sManualforinformationonfuses.
decal133-5618
133-5618
8

decal110-8252
110-8252
1.ReadtheOperator'sManual.
3.Hydraulicoil5.Enginecoolant
2.Parkingbrake4.Fuel6.Engineoil
decal110-9781
110-9781
1.Warning—readtheOperator'sManual.
2.Poisonhazard;causticliquid/chemicalburnhazard—keepchildrenawayfromthebattery.
3.Warning—donottouchthehotsurface.
4.Cutting/dismembermenthazard,fan;entanglementhazard,belt—stayawayfrommovingparts.
5.Hydraulicuidunderpressurehazard;highpressuresprayhazard;highpressureuidhazard,injectionintothebody—wear
handandskinprotection.
9

decal120-9195
120-9195
Note:Thismachinecomplieswiththeindustrystandardstabilitytestinthestaticlateralandlongitudinaltestswiththemaximum
recommendedslopeindicatedonthedecal.ReviewtheinstructionsforoperatingthemachineonslopesintheOperator’sManualas
wellastheconditionsinwhichyouwouldoperatethemachinetodeterminewhetheryoucanoperatethemachineintheconditions
onthatdayandatthatsite.Changesintheterraincanresultinachangeinslopeoperationforthemachine.Ifpossible,keepthe
cuttingunitsloweredtothegroundwhileoperatingthemachineonslopes.Raisingthecuttingunitswhileoperatingonslopescan
causethemachinetobecomeunstable.
1.Warning—readtheOperator’sManual;donotoperatethe
machineunlessyouaretrained.
8.Warning—wearhearingprotection.
2.Cutting/dismembermenthazard,mowerblade—keep
bystandersaway;donotcarrypassengersonthemachine.
9.Disengage
3.Sliding/lossofcontrolhazard;tippinghazard,drop-offs—do
notmowneardrop-offs;keepawayfromdrop-offs;donotturn
athighspeeds;turnatlowspeeds.
10.Engage
4.Tippinghazard—weartheseatbeltwhenarollbarisinplace;
donotweartheseatbeltwhentherollbarislowered.
11.Parkingbrake
5.Thrownobjecthazard—keepbystandersaway;lowerthe
deectorbeforeusingthemachine.
12.Starttheengine—Cleangrassanddebrisfromthemower
beltandpulleys,disengagethePTO,setthedriveinneutral,
engagetheparkingbrake,turnthekeytopoweronthe
mower,andturnthekeyfullytostarttheengine.
6.Warning—engagetheparkingbrake,shutofftheengine,and
removethekeybeforeleavingthemachine.
13.ReadtheOperator’sManual.
7.Cutting/dismembermenthazardofhandsorfeet,mower
blade—removethekeyandreadtheOperator’sManual
beforeperformingmaintenance;stayawayfrommovingparts;
keepallguardsandshieldsinplace.
decal120-9196
120-9196
1.Forward
3.Slow
5.Reverse
7.ReadtheOperator's
Manualformore
informationonthehydraulic
uid.
2.Fast4.Neutral6.Towvalvelocation;torque
thetowvalvesto5.65to
7.91N∙m(50to70in-lb).
10

decal127-6519
127-6519
1.Transportposition
2.Heightofcut
11

Setup
LooseParts
Usethechartbelowtoverifythatallpartshavebeenshipped.
ProcedureDescription
Qty.
Use
1
Nopartsrequired
–
RaisetheROPS.
2
CuttingunitInstallationInstructions
1Installthecuttingunit.
3
Nopartsrequired
–
Adjusttheleft,frontcasterwheel.
4
Nopartsrequired
–
Checkthetirepressure.
5
Nopartsrequired
–
Installweights.
6
Nopartsrequired
–
Checkthehydraulicuid,engineoil,
andcoolantlevels.
7
Production-yeardecal1
Installthedecal(CEMachinesOnly).
MediaandAdditionalParts
Description
Qty.
Use
Operator'sManual
1
Reviewitbeforeoperatingthemachine.
Engineowner'smanual1
Useittoreferenceengineinformation.
Ignitionkeys2
Starttheengine.
1
RaisingtheRollBar
NoPartsRequired
Procedure
Raisetherollbar;refertoAdjustingtheRollBar(page
21).
2
InstallingtheCuttingUnit
Partsneededforthisprocedure:
1
CuttingunitInstallationInstructions
Procedure
InstallthecuttingunitusingtheInstallationInstructions
forthatcuttingunit.
12

3
AdjustingtheLeft,Front
CasterWheel
NoPartsRequired
Procedure
Adjusttheleft,frontcasterwheeltotheoutside
positionfor72-inchcuttingunitsandtotheinside
positionfor60-inchand62-inchcuttingunits.
4
CheckingtheTirePressure
NoPartsRequired
Procedure
Checkthetirepressure;refertoCheckingtheTire
Pressure(page43).
Important:Maintainpressureinalltiresto
ensureagoodquality-of-cutandpropermachine
performance.Donotunderinatethetires.
13

5
InstallingWeights(forCECompliance)
NoPartsRequired
Procedure
Machineswith183cm(72inch)decksinstalledandnootherattachmentsdonotneedaddedweighttomeet
CEstandards.However,youmayneedtopurchaseandinstalladditionalweightdependingonthemowerdeck
size/typeandtheattachmentsthatyouinstallonthemachine.Thefollowingtableliststhevariousattachment
congurationsandtheadditionalfrontweightneededforeachmodel:
AttachmentConguration
WeightRequiredwitha
157.5cm(62inch)Base
Deck(30457)
WeightRequiredwitha
183cm(72inch)Base
Deck(30353)
WeightRequiredwitha183
cm(72inch)Side-discharge
(30481)
Groundsmaster7200/7210
TractionUnitwithnoAdded
Attachments
10kg(22lb)0kg(0lb)0kg(0lb)
Groundsmaster7200/7210
TractionUnitandHardCanopy
34kg(75lb)9.5kg(21lb)15kg(33lb)
Groundsmaster7200/7210
TractionUnit,HardCanopy,
andRoadLightKit
32.2kg(71lb)28.5kg(63lb)10kg(22lb)
Groundsmaster7200/7210
TractionUnit,HardCanopy,
RoadLightKit,andJackStand
18kg(40lb)17kg(37lb)10kg(22lb)
Groundsmaster7200/7210
TractionUnit,HardCanopy,
andJackStand
14kg(31lb)10kg(22lb)10kg(22lb)
Groundsmaster7200/7210
TractionUnit,RoadLightKit,
andJackStand
0kg(0lb)0kg(0lb)0kg(0lb)
Groundsmaster7200/7210
TractionUnitandRoadLight
Kit
11.3kg(25lb)0kg(0lb)0kg(0lb)
Groundsmaster7200/7210
TractionUnitandJackStand
0kg(0lb)0kg(0lb)0kg(0lb)
ContactyourauthorizedTorodistributortoobtaintheappropriatekitsandweightsforyourmachine.
14

6
CheckingtheFluidLevels
NoPartsRequired
Procedure
1.Checkthehydraulic-uidlevelbeforestarting
theengine,refertoCheckingtheHydraulic
System(page52).
2.Checktheengine-oillevelbeforestartingthe
engine,refertoCheckingtheEngine-OilLevel
(page38).
3.Checkthecoolingsystembeforestartingthe
engine;refertoCheckingtheCoolingSystem
(page44).
7
InstallingtheDecal(CE
MachinesOnly)
Partsneededforthisprocedure:
1Production-yeardecal
Procedure
OnmachinesrequiringCEcompliance,installthe
production-yeardecalincludedinthelooseparts
(Figure3).
g278244
Figure3
ProductOverview
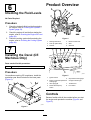
g020877
Figure4
1.Parking-brakelever4.Motion-controllever
2.Fuelcap(bothsides)5.Seat
3.Rollbar
6.Seatbelt
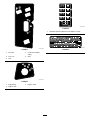
g004492
Figure5
1.Ignitionswitch
5.Oil-pressurewarninglight
2.Engine-coolant-temperature
warninglight
6.Charge-indicatorlight
3.Glow-pluglight
7.Throttlelever
4.Power-takeoff(PTO)
switch
8.Hourmeter
Controls
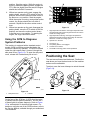
Becomefamiliarwithallthecontrolsbeforeyoustart
theengineandoperatethemachine(Figure4and
Figure5).
15

Motion-ControlLevers
Themotion-controlleverscontroltheforwardand
rearwardmotionsaswellastheturningofthe
machine.RefertoDrivingtheMachine(page27).
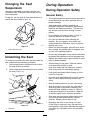
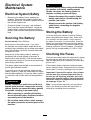
Parking-BrakeLever
Wheneveryoushutofftheengine,engagetheparking
braketopreventaccidentalmovementofthemachine.
Toengagetheparkingbrake,pulltheparking-brake
leverrearwardandup(Figure6).T oreleasethe
parkingbrake,pushtheparking-brakeleverforward
anddown.
g020866
Figure6
1.Parking-brakelever
IgnitionSwitch
Theignitionswitchhas3positions:OFF,ON/PREHEAT,
andSTART.
ThrottleLever
Thethrottlelevercontrolsthespeedoftheengine,
thespeedoftheblades,and,inconjunctionwith
motion-controllevers,thegroundspeedofthe
machine.Movingthethrottleleverforwardtowardthe
FASTpositionincreasestheenginespeed.Moving
itrearwardtowardtheSLOWpositiondecreasesthe
enginespeed.Alwaysrunthemachinewiththe
throttleintheFASTpositionwhencuttinggrass.
Power-Takeoff(PTO)Switch
Thepower-takeoff(PTO)switchstartsandstopsthe
mowerblades.
Glow-Plug-IndicatorLight(Orange
Light)
Theglow-plug-indicatorlight(Figure5)turnsonwhen
youturntheignitionswitchtotheONposition.It
remainsonfor6seconds.Whenthelightturnsoff,
youcanstarttheengine.
HourMeter
Thehourmeterrecordsthenumberofhoursthat
youoperatethemachinewiththekeyswitchinthe
RUNposition.Usethesetimesforschedulingregular
maintenance.
Engine-Coolant-Temperature
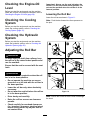
WarningLight
Thislightilluminatesandthecuttingbladesstopif
theengine-coolanttemperatureishigh.Ifyoudonot
stopthemachineandthecoolanttemperaturerises
another11°C(20°F),theengineshutsoff.
Important:Ifthemowerdeckshutsdownand
thetemperaturewarninglightison,pushthe
PTOknobdown,drivetoasafe,atarea,move
thethrottlelevertotheSLOWposition,move
themotion-controlleversintotheNEUTRAL-LOCK
position,andengagetheparkingbrake.Idlethe
engineforseveralminuteswhileitcoolstoasafe
level.Shutofftheengineandcheckthecooling
system;refertoCheckingtheCoolingSystem
(page44).
ChargeIndicator
Thechargeindicatorilluminatesifelectricalcharging
systemisoperatingaboveorbelowthenormal
operatingrange(Figure5).Checkand/orrepairthe
electricalchargingsystem.
Oil-PressureWarningLight
Theoil-pressurewarninglightglowsiftheengine-oil
pressuredropsbelowasafelevel(Figure5).Ifthe
oilpressureislow,shutofftheengineanddetermine
thecause.Repairtheengine-oilsystembeforeyou
starttheengineagain.
16


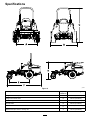
Groundclearance15cm(6inches)
Weight,with72-inchSide-DischargeCuttingunit(30354or30481)934kg(2,060lb)
Weight,with60-inchSide-DischargeCuttingunit(30456)900kg(1,985lb)
Weight,with72-inchBaseCuttingunit(30353)876kg(1,932lb)
Weight,with62-inchBaseCuttingunit(30457)855kg(1,884lb)
Note:Specicationsanddesignaresubjectto
changewithoutnotice.
Attachments/Accessories
AselectionofT oroapprovedattachmentsandaccessoriesisavailableforusewiththemachinetoenhance
andexpanditscapabilities.ContactyourAuthorizedServiceDealerorauthorizedT orodistributororgoto
www.T oro.comforalistofallapprovedattachmentsandaccessories.
Toensureoptimumperformanceandcontinuedsafetycerticationofthemachine,useonlygenuineT oro
replacementpartsandaccessories.Replacementpartsandaccessoriesmadebyothermanufacturerscouldbe
dangerous,andsuchusecouldvoidtheproductwarranty.
Operation
Note:Determinetheleftandrightsidesofthe
machinefromthenormaloperatingposition.
BeforeOperation
BeforeOperationSafety
GeneralSafety
•Neverallowchildrenoruntrainedpeopleto
operateorservicethemachine.Localregulations
mayrestricttheageoftheoperator.Theowner
isresponsiblefortrainingalloperatorsand
mechanics.
•Becomefamiliarwiththesafeoperationofthe
equipment,operatorcontrols,andsafetysigns.
•Shutofftheengine,removethekey(ifequipped),
andwaitforallmovementtostopbeforeyouleave
theoperator’sposition,Allowthemachinetocool
beforeadjusting,servicing,cleaning,orstoringit.
•Knowhowtostopthemachineandshutoffthe
enginequickly.
•Checkthatoperator-presencecontrols,safety
switches,andguardsareattachedandfunctioning
properly.Donotoperatethemachineunlessthey
arefunctioningproperly.
•Beforemowing,alwaysinspectthemachineto
ensurethattheblades,bladebolts,andcutting
assembliesareingoodworkingcondition.
Replacewornordamagedbladesandboltsinsets
topreservebalance.
•Inspecttheareawhereyouwillusethemachine
andremoveallobjectsthatthemachinecould
throw.
FuelSafety
•Useextremecareinhandlingfuel.Itisammable
anditsvaporsareexplosive.
•Extinguishallcigarettes,cigars,pipes,andother
sourcesofignition.
•Useonlyanapprovedfuelcontainer.
•Donotremovethefuelcaporllthefueltank
whiletheengineisrunningorhot.
•Donotaddordrainfuelinanenclosedspace.
•Donotstorethemachineorfuelcontainerwhere
thereisanopename,spark,orpilotlight,such
asonawaterheaterorotherappliance.
•Ifyouspillfuel,donotattempttostarttheengine;
avoidcreatinganysourceofignitionuntilthefuel
vaporshavedissipated.
19

AddingFuel
FuelSpecication
•Neverusekeroseneorgasolineinsteadofdiesel
fuel.
•Nevermixkeroseneorusedengineoilwiththe
dieselfuel.
•Neverkeepfuelincontainerswithzincplatingon
theinside.
•Donotusefueladditives.
PetroleumDiesel
Cetanerating:40orhigher
Sulfurcontent:Lowsulfur(<500ppm)orultra-low
sulfur(<15ppm)
FuelTable
Dieselfuelspecication
Location
ASTMD975
No.1-DS15
No.2-DS15
USA
EN590EuropeanUnion
ISO8217DMX
International
JISK2204GradeNo.2
Japan
KSM-2610
Korea
•Useonlyclean,freshdieselfuelorbiodieselfuels.
•Purchasefuelinquantitiesthatcanbeusedwithin
180daystoensurefuelfreshness.
Usesummer-gradedieselfuel(No.2-D)at
temperaturesabove-7°C(20°F)andwinter-grade
fuel(No.1-DorNo.1-D/2-Dblend)belowthat
temperature.
Note:Useofwinter-gradefuelatlowertemperatures
provideslowerashpointandcoldowcharacteristics
whicheasesstartingandreducesfuellterplugging.
Usingsummer-gradefuelabove-7°C(20°F)
contributestowardlongerfuelpumplifeandincreased
powercomparedtowinter-gradefuel.
UsingBiodiesel
Thismachinecanalsouseabiodiesel-blendedfuelof
uptoB20(20%biodiesel,80%petrodiesel).
Sulfurcontent:Ultra-lowsulfur(<15ppm)
Biodieselfuelspecication:ASTMD6751or
EN14214
Blendedfuelspecication:ASTMD975,EN590,
orJISK2204
Important:Thepetroleumdieselportionmust
beultra-lowsulfur.
Observethefollowingprecautions:
•Biodieselblendsmaydamagepaintedsurfaces.
•UseB5(biodieselcontentof5%)orlesserblends
incoldweather.
•Monitorseals,hoses,gasketsincontactwithfuel
astheymaydegradeovertime.
•Fuellterpluggingmayoccurforatimeafteryou
converttobiodieselblends.
•Formoreinformationonbiodiesel,contactyour
authorizedT orodistributor.
FuelTankCapacity
43.5L(11.5USgallons)
FillingtheFuelTank
Important:Thefueltanksareconnected,butthe
fueldoesnottransferquicklyfromonetanktothe
other.Itisimportantwhenllingthatyoupark
onalevelsurface.Ifyouparkonahill,youmay
inadvertentlyoverllthetanks.
Important:Donotoverllthefueltanks.
Important:Donotopenthefueltankswhen
parkedonahill.Thefuelcouldspillout.
g031802
Figure9
Note:Ifpossible,llthefueltanksaftereachuse.
Thisminimizesbuildupofcondensationinsidethe
fueltank.
20
Page is loading ...
Page is loading ...
Page is loading ...
Page is loading ...
Page is loading ...
Page is loading ...
Page is loading ...
Page is loading ...
Page is loading ...
Page is loading ...
Page is loading ...
Page is loading ...
Page is loading ...
Page is loading ...
Page is loading ...
Page is loading ...
Page is loading ...
Page is loading ...
Page is loading ...
Page is loading ...
Page is loading ...
Page is loading ...
Page is loading ...
Page is loading ...
Page is loading ...
Page is loading ...
Page is loading ...
Page is loading ...
Page is loading ...
Page is loading ...
Page is loading ...
Page is loading ...
Page is loading ...
Page is loading ...
Page is loading ...
Page is loading ...
Page is loading ...
Page is loading ...
Page is loading ...
Page is loading ...
-
 1
1
-
 2
2
-
 3
3
-
 4
4
-
 5
5
-
 6
6
-
 7
7
-
 8
8
-
 9
9
-
 10
10
-
 11
11
-
 12
12
-
 13
13
-
 14
14
-
 15
15
-
 16
16
-
 17
17
-
 18
18
-
 19
19
-
 20
20
-
 21
21
-
 22
22
-
 23
23
-
 24
24
-
 25
25
-
 26
26
-
 27
27
-
 28
28
-
 29
29
-
 30
30
-
 31
31
-
 32
32
-
 33
33
-
 34
34
-
 35
35
-
 36
36
-
 37
37
-
 38
38
-
 39
39
-
 40
40
-
 41
41
-
 42
42
-
 43
43
-
 44
44
-
 45
45
-
 46
46
-
 47
47
-
 48
48
-
 49
49
-
 50
50
-
 51
51
-
 52
52
-
 53
53
-
 54
54
-
 55
55
-
 56
56
-
 57
57
-
 58
58
-
 59
59
-
 60
60


Toro Groundsmaster 7200 Series Traction Unit User manual
- Category
- Lawnmowers
- Type
- User manual
Ask a question and I''ll find the answer in the document
Finding information in a document is now easier with AI
Related papers
-
Toro Z Master Professional 7000 Series Riding Mower, With 52in Rear Discharge Mower User manual
-
Toro Z580-D Z Master, With 132cm TURBO FORCE Side Discharge Mower User manual
-
Toro Z Master Professional 7000 Series Riding Mower, With 52in Rear Discharge Mower User manual
-
-
Toro Z Master Professional 7000 Series Riding Mower, With 72in TURBO FORCE Side Discharge Mower User manual
-
-
-
-
Toro Z580-D Z Master, With 52in TURBO FORCE Side Discharge Mower User manual
-
