Page is loading ...

Forward this manual to all operators.
Failure to operate this equipment as
directed may cause injury and/or
property damage.
INSTALLATION AND OPERATION MANUAL
“The Benchmark Of Quality”
Bend - Pak Inc.
1645 Lemonwood Drive
Santa Paula, CA 93060, U.S.A
Tel: 805 933 9970 - Fax: 805 933 9160
SHIPPING DAMAGE CLAIMS
When this equipment is shipped, title passes
to the purchaser upon receipt from the carrier.
Consequently, claims for the material(s) dam-
aged in shipment must be made by the pur-
chaser against the transportation company at
the time the shipment is received.
BE SAFE
Your new ranger hose reels are designed and
built with safety in mind. However, your over-
all safety can be increased by proper training
and thoughtful operation on the part of the
operator. DO NOT operate or repair this
equipment without reading this manual and
the important safety instruction shown inside.
SPRING REWIND
HOSE REEL
(Standard / Premium)
MODELS
RH-33SL, RH-50SL,
RH-50PL, RH-50PM,
RH-50PH

UPON DELIVERY
1. Carefully remove all packaging material.
2. Inspect the equipment and all parts for any signs of concealed shipment or
storage damages.
3. Remember to report any shipping damage to the carrier and make a notion on
the delivery receipt.
IMPORTANT SAFETY TIPS
Be sure to read all warning labels and the instruction manual prior to operation of this
equipment.
Keep hands and body clear of all pinch points.
Use proper eye protection when assembling and operation of the hose reel.
Assemble the hose reel on a clean workbench.
Make sure the incoming line pressure does not exceed the rated operating pressure for
your model of hose reel.
Use soap and water when checking for leaks.
This equipment is to be used by professional personnel only. Keep children away from
the work area.
Warning: Exposure to skin directly to pressurized air or fluid could result in
severe bodily injury.
SPECIFICATIONS / FEATURES
Model End- Fittings
In / Out
PSI Hose
Capacity
Type of
Application
Shipping
Weight
RH-33SL
3/8" 300 33 Air / Water 33lbs / 15Kg
RH-50SL
3/8" 300 50 Air / Water 50lbs / 23Kg
RH-50PL
3/8" 300 50 Air / Water 55lbs / 25Kg
RH-50PM
3/8" 3000 50 Air/Water/Oil 57lbs / 26Kg
RH-50PH
3/8" 4000 50 Air/Water/Oil/Grease 59lbs / 27Kg

ASSEMBLY INSTRUCTION
Installation of Reel:
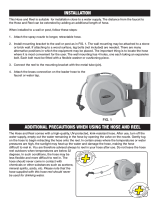
Note: For overhead ceiling mounting: install at least 10 feet above the floor.
1. The reel has four 1/2” (12.7mm) drilled holes for mounting on a suitable flat
surface.
2. The reel is supplied with a loose guide roller bracket. The bracket position may
be changed depending on the reel mounting position (Fig. 1 shows the typical
mounting positions). If bracket position needs to be changed do the following:
i. Pull out some hose and let the reel latch.
ii. Remove the bolts that attach the guide roller bracket to the support
post.
iii. Rotate guide roller bracket to correct position, replace the bolts and
tighten.
3. Using the four holes in the base, mount the reel in the desired location. Be
sure to use appropriate hardware to tighten securely.
4. Apply Teflon tape or equivalent to supply line thread, attach to reel inlet and
tighten. The other end of the incoming line could be connected to the desired
supply source.
5. If hose has been supplied with reel: Apply Teflon tape or equivalent to outlet
fitting on reel hose, then attach the desired tool of nozzle. Check connection
for leakage.
6. If the hose stopper requires adjustment, pull the hose from the reel and allow to
latch at desired length. Loosen stopper to a position close to the hose guide.
Tighten the stopper bolts and unlatch the reel.
Wall
Floor
Ceiling
Models:
RH-33SL
RH-50SL
Wall Floor Ceiling
Models:
RH-50PL
RH-50PM
RH-50PH
Fig. 1

Installation of Hose:
1. Securely stabilize the reel.
2. Facing the swivel fitting side of reel: Turn the drum clockwise by hand, until the
rewind spring is tight and the drum has latched. As an extra precaution while
installing a new hose, secure the drum in a latched position.
3. Insert end of the hose through guide roller bracket and feed through the opening
in the center of the drum hub.
4. Screw fitting into swivel and tighten.
Note: To avoid damage to the swivel, use a wrench to support the swivel fitting
while tightening the hose.
5. Attach hose stopper at the other end of hose near the outlet fitting.
6. Carefully release drum latch and slowly allow hose to wind onto the reel.
Note: Final spring tension adjustment is accomplished by adding wraps of hose around
the drum. (to increase tension) or taking off wraps of hose (to decrease tension). Refer
to : Adjustment of Spring Tension.
OPERATION INSTRUCTIONS
Check reel for correct operation by slowly pulling out the hose . A “clicking” noise will be
heard every half revolution of the drum.
To latch the reel, pull out the hose and allow it to retract after hearing the first, second or
third “click”.
To unlatch, slowly pull out the hose until the “clicking” noise stops and then let the hose
retract until the hose stop rests against the hose guide.
Note: To avoid damage to the reel, always hold on to the hose while it is rewinding.
Periodically check the hose condition for wear or damage and check the swivel fitting for
leakage. Replace any worn, damaged or leaking parts.

MAINTENANCE INSTRUCTIONS
Adjustment of Spring Tension:
1. Pull out approximately 6 feet (2m) of hose and allow the drum to latch.
2. Remove hose stopper from hose and feed hose back through guide.
3. Wrap the pulled hose one time around the drum to increase tension or un-
wrap hose one time from around the drum to decrease tension.
4. Re-insert hose through guide and install stopper onto hose end.
5. Unlatch the drum and check the tension. Pull hose from reel and adjust stop
per position if necessary.
Replacement of Swivel Seal:
Note: There are two types of swivel arrangements.
1. Turn off and disconnect supply line from swivel inlet.
2. Remove swivel assembly from reel axil.
3. Hold fitting body in a vise and remove brass tube from body and remove swiv-
el nut from tube.
Models RH-33SL and RH-50SL: Remove circlip from swivel and take apart.
Note: You may want to remove swivel from reel hose end, but this is not
necessary unless a new swivel is being installed.
4. Replace the seals and reassemble the swivel.
5. Re-connect the swivel thread fitting with axil.
6. Re-connect inlet supply line. Always use Teflon tape or equivalent when
threading brass fittings.

Replacement of Hose:
1. Turn off supply to reel.
2. Pull out all the old hose and lock the reel in position.
Caution: Make sure reel drum is surely locked and cannot rotate back.
3. Remove the two hose clamps from hose.
4. Carefully disconnect hose from swivel joint on side of reel or male fitting in
axle center and remove old hose.
5. Feed new hose through guide and opening in drum and connect swivel. Re-
install two hose clamps on the inside and outside of the drum flange. Install the
stopper on the other end of the hose in the same position as before.
6. Carefully release the drum latch and slowly allow the hose to wind onto the
reel.
Note: Final spring adjustment is accomplished by adding or removing wraps
of hose around the drum (Details see spring tension adjustment).
Spring Canister Warning:
If the rewind spring fails for any reason the manufacturer strongly recommends the
replacement of the spring canister be carried out by professional personnel.
MANUFACTURER’S LIMITED WARRANTY
The manufacturer warrantees this hose reel against defects in material an craftman-
ship, for a period of 12 months from date of purchase.
Hose, if supplied with reel, O-rings, plastic rollers and rubber stoppers are deemed to
be normal wear items; not warranted.
Manufacturers liability is limited to replacement or repair of defective material within the
warranty period, when returned freight should be prepaid to the distributor or designat-
ed service depot.
The warranty does not cover damages caused by an accident, misuse or faulty instal-
lation.
The reel must be installed and maintained in compliance with the instructions.


/