Canon MD130 User manual

Category
Camcorders
Type
User manual

This manual is also suitable for

PUB.DIE-273
PAL
Digital Video Camcorder
Instruction Manual
Please read also the following instruction manual
(electronic version on PDF file).
• Digital Video Software
E
Digital Video Software
Versi on 23
Instruction Manual
English
Introduction
Prerparations
Basic
Functions
Advanced
Functions
Editing
Functions
External
Connections
Additional
Information
Mini
Digital
Video
Cassette
2
Introduction
Cleaning the Video Heads
Digital video camcorders record video signals on the tape in very thin lines (as thin as
1/8 of the width of a hair). The following symptoms may appear if the video heads
become dirty even a little.
Mosaic or other blocky video artifacts (Fig. 1) or banding
(Fig. 2) appear on the picture during playback.
Sound becomes distorted, or there is no sound during
playback.
The message “HEADS DIRTY, USE CLEANING CASSETTE”
appears.
If such symptoms appear, clean the video heads with the Canon
DVM-CL Digital Video Head Cleaning Cassette* or a
commercially available dry cleaning cassette.
If the symptoms reappear shortly after the cleaning, the
videocassette may be defective. Stop using it.
* Availability differs from area to area.
Video heads may become dirty under the following conditions:
When using the camcorder in humid or hot places.
When using cassettes with damaged or dirty tape.
When using the camcorder in dusty places.
When using the video heads without cleaning them for a long time.
NOTES
Before you make important recordings, clean the video heads and make a test recording first. We
also recommend cleaning the video heads after use, before storing the camcorder.
Do not use wet type cleaning cassettes as this may damage the camcorder.
Even after cleaning the video heads you may not be able to play back correctly tapes that were
recorded with dirty video heads.
Fig. 1
Fig. 2
Introduction
3
Important Usage Instructions
WARNING!
TO REDUCE THE RISK OF ELECTRIC SHOCK, DO NOT REMOVE COVER (OR
BACK). NO USER SERVICEABLE PARTS INSIDE. REFER SERVICING TO
QUALIFIED SERVICE PERSONNEL.
WARNING!
TO REDUCE THE RISK OF FIRE OR ELECTRIC SHOCK, DO NOT EXPOSE THIS
PRODUCT TO RAIN OR MOISTURE.
CAUTION:
TO REDUCE THE RISK OF ELECTRIC SHOCK AND TO REDUCE ANNOYING
INTERFERENCE, USE THE RECOMMENDED ACCESSORIES ONLY.
CAUTION:
DISCONNECT THE MAINS PLUG FROM THE SUPPLY SOCKET WHEN NOT IN USE.
The Mains plug is used as the disconnect device. The Mains plug shall remain readily operable to
disconnect the plug in case of an accident.
While using the compact power adapter, do not wrap it or cover it with a piece of cloth, and do not
place it in confined narrow spaces. Heat may build up, the plastic case may deform and it could
result in electric shock or fire.
CA-590E identification plate is located on the bottom.
Using any device other than the Compact Power Adapter CA-590E may damage the
camcorder.
European Union (and EEA) only.
This symbol indicates that this product is not to be disposed of with your household
waste, according to the WEEE Directive (2002/96/EC) and your national law. This
product should be handed over to a designated collection point, e.g., on an authorized
one-for-one basis when you buy a new similar product or to an authorized collection site
for recycling waste electrical and electronic equipment (EEE). Improper handling of this
type of waste could have a possible negative impact on the environment and human health due
to potentially hazardous substances that are generally associated with EEE. At the same time,
your cooperation in the correct disposal of this product will contribute to the effective usage of
natural resources. For more information about where you can drop off your waste equipment for
recycling, please contact your local city office, waste authority, approved WEEE scheme or your
household waste disposal service. For more information regarding return and recycling of WEEE
products, please visit
www.canon-europe.com/environment
.
(EEA: Norway, Iceland and Liechtenstein)
4
Introduction
About this Manual ........................................................................................... 7
Getting to Know the Camcorder
Supplied Accessories...................................................................................... 9
Components Guide ....................................................................................... 10
Screen Displays ............................................................................................13
Preparations
Getting Started
Charging the Battery Pack............................................................................ 17
Installing the Backup Battery ........................................................................ 19
Inserting and Removing a Tape ....................................................................19
Inserting and Removing a Memory Card ......................................................20
Preparing the Camcorder.............................................................................. 20
The Wireless Controller ............................................21
Adjusting the LCD Screen.............................................................................21
Using the Menus
Selecting a FUNC. Menu Option...................................................................22
Selecting an Option from the Setup Menus ..................................................23
First Time Settings
Changing the Language................................................................................ 24
Changing the Time Zone...............................................................................24
Setting the Date and Time ............................................................................ 25
Basic Functions
Recording
Recording Movies .........................................................................................26
Recording Still Images on the Memory Card ................................................27
Recording Movie Clips on the Memory Card ................................................28
Zooming........................................................................................................ 29
Quick Start Function......................................................................................29
Playback
Playing Back Movies.....................................................................................30
Returning to a Pre-marked Position..........................31
Locating the End of the Last Scene..............................................................32
Locating Scenes by Recording Date ........................ 32
Playing Back Still Images and Movie Clips from a Memory Card .................33
Magnifying the Playback Image.................................................................... 34
Advanced Functions
Menu Options Lists
FUNC. Menu................................................................................................. 35
Setup menus................................................................................................. 37
Camera Setup (Digital Zoom, Image Stabilizer, etc.)..........................37
VCR Setup (Recording Mode, TV Type, etc.).....................................38
Audio Setup (Audio Mode, Wind Screen, etc.) ................................... 39
Card Operations (Initialization, Erase All Images, etc.) ...................... 39
Display Setup (LCD Brightness, Language, etc.) ...............................40
Table of contents
5
Introduction
System Setup (Beep, etc.) ..................................................................41
Date/Time Setup .................................................................................42
Recording Programs
Using the Recording Programs .....................................................................43
: Changing the Shutter Speed and Special Scene Programs....................44
Adjusting the Picture: Exposure, Focus and Color
Manual Exposure Adjustment........................................................................45
Manual Focus Adjustment .............................................................................46
White Balance ...............................................................................................47
Image Effects.................................................................................................48
Audio Recording and Playback
Audio Recording Mode..................................................................................48
Audio Playback Modes ..................................................................................49
Recording Options using the Memory Card
Selecting the Size and Quality of Still Images ...............................................50
Selecting the Size of Movie Clips on the Memory Card ................................51
Capturing a Still Image while Recording Movies ...........................................51
Capturing a Still Image or Movie Clip from the Playback Picture ..................52
Automatic Focus Priority................................................................................52
Other Functions
Data Code .....................................................................................................53
LED Light.............................................................................54
Self Timer ......................................................................................................54
Digital Effects.................................................................................................54
Editing Functions
Still Image Options
Erasing Still Images.......................................................................................58
Protecting Still Images...................................................................................59
Initializing the Memory Card..........................................................................60
External Connections
Connecting to a TV or VCR
Connection Diagrams ....................................................................................61
Playback on a TV Screen..............................................................................63
Recording to a VCR or Digital Video Recorder .............................................63
Digital Video Dubbing ..........................................................64
Audio Dubbing...............................................................................................65
Connecting to a Computer
PC Connection Diagrams ..............................................................................67
Transferring Video Recordings......................................................................68
Transferring Still Images or Movie Clips – Direct Transfer ............................68
Transfer Orders .............................................................................................70
Connecting to a Printer
Printing Still Images – Direct Print .................................................................71
Selecting the Print Settings ...........................................................................72
Print Orders ...................................................................................................74
6
Additional Information
Trouble?
Troubleshooting ............................................................................................76
List of Messages........................................................................................... 79
Do’s and Don’ts
Handling Precautions.................................................................................... 82
Maintenance/Others......................................................................................85
Using the Camcorder Abroad .......................................................................86
General Information
System Diagram (Availability differs from area to area)................................87
Optional Accessories .................................................................................... 88
Specifications................................................................................................90
Index .............................................................................................................92
7
Introduction
Thank you for purchasing the Canon MD160/MD150/MD140/MD130. Please read this
manual carefully before you use the camcorder and retain it for future reference.
Should your camcorder fail to operate correctly, refer to the
Troubleshooting
table
( 76).
Conventions Used in the Manual
IMPORTANT: Precautions related to the camcorder’s operation.
NOTES: Additional topics that complement the basic operating procedures.
POINTS TO CHECK: Restrictions that apply if the function described is not
available in all operating modes (the operating mode to which the camcorder should be
set, etc.).
: Reference page number.
: Option or feature that applies to or is available only with a specific model.
“Screen” refers to the LCD and the viewfinder screen.
The photos included in the manual are simulated pictures taken with a still camera.
Note that unless indicated otherwise, illustrations in this manual refer to the
model.
About the Joystick and the Joystick Guide
The mini joystick allows you to control many of the camcorder’s operations and to
make selections and changes in the camcorder’s menus.
About this Manual
Push the joystick up, down, left or right ( , ) to select an
item or change settings.
Press the joystick itself ( ) to save the settings or confirm an
action. On menu screens, this is indicated by the joystick icon .
First Time Settings
Changing the Language
The language for on-screen and menu
displays can be changed. The list of
available languages depends on the
region where you purchased the
camcorder.
Default value
1 Press .
2 Select ( ) the icon and press
( ) to open the setup menus.
3 Select ( ) [DISPLAY SETUP/ ]
and press ( ).
4 Select ( ) [LANGUAGE] and press
().
5 Select ( ) the desired option and
press ( ).
6 Press to close the menu.
NOTES
If you changed the language by mistake,
follow the mark next to the menu item to
First Time Settings
DISPLAY SETUP/
LANGUAGE
ENGLISH
FUNC.
(24)
Language Set A
English, German, Spanish, French, Italian, Polish,
Russian, Simplified Chinese and Japanese.
Language Set B
English, Simplified Chinese, Traditional Chinese
and Korean.
FUNC.
FUNC.
Brackets [ ] and capital letters are used to refer to menu
options as they are displayed on screen. Menu options in
boldface indicate the default setting (for example [ON],
[OFF]).
Buttons and switches to be operated
Menu item shown at its default position
Names of buttons and switches other than the joystick are
indicated within a “button” frame (for example ).
FUNC.
8
The functions assigned to the joystick change according to the operation mode. You can
display the joystick guide to remind you of the joystick’s functions in each operating mode.
About the Operating Modes
The camcorder’s operating mode is determined by the positions of the switch and the
/ switch. In the manual, indicates that a function is available in the operating
mode shown and indicates that the function is not available. When no operating mode
icons are given, the function is available in all operating modes.
Trademark Acknowledgements
is a trademark.
The SD logo is a trademark. The SDHC logo is a trademark.
Windows
®
is a registered trademark of Microsoft Corporation in the United States and/or
other countries.
Macintosh and Mac OS are trademarks of Apple Computer, Inc., registered in the United
States and other countries.
Other names and products not mentioned above may be trademarks or registered
trademarks of their respective companies.
Recording movies: Playing back movies: Recording still images:
Playing back still images:
Operating Mode Switch
/
Switch Icon Display Operation
CAMERA
(Tape)
Recording movies
on the tape
26
PLAY
Playing movies
from the tape
30
CAMERA
(Memory card)
Recording still images
or movie clips on the
memory card
27
PLAY
Playing back still images
or movie clips from the
memory card
33
EXP
FOCUS
EXP
FOCUS
Getting to Know the Camcorder
9
Introduction
Getting to Know the Camcorder
* Includes the electronic version of the
Digital Video Software
instruction manual on PDF file.
Supplied Accessories
CA-590E Compact
Power Adapter
(incl. power cord)
BP-2L5 Battery Pack Lithium Button Battery
CR1616
STV-250N Stereo Video
Cable
WL-D85 Wireless
Controller
Lithium Button Battery
CR2025 for Wireless
Controller
IFC-300PCU
USB Cable
DIGITAL VIDEO
SOLUTION DISK
Software CD-ROM*
Getting to Know the Camcorder
10
Names of buttons and switches other than the
joystick are indicated within a
button frame (for
example ).
Components Guide
Left side view
Front view
Right Side View
Lens cover switch ( 26, 27)
( open, closed)
CARD access indicator ( 27, 28)/
CHARGE indicator ( 17)
Speaker
Memory card slot ( 20)
AV terminal ( 61)
USB terminal ( 67)
DV terminal ( 61, 67)
Terminal cover
Grip belt ( 20)
Strap mount
(89)
Lock button
switch ( 8)
QUICK START button ( 29)
Remote sensor ( 21)
LED light (assist lamp) ( 54)
Stereo microphone
FUNC.
11
Getting to Know the Camcorder
Introduction
Names of buttons and switches other than the
joystick are indicated within a
button frame (for
example ).
Back view
Top view
Bottom view
Viewfinder ( 20)
Dioptric adjustment lever ( 20)
BATT. (battery release) switch ( 17)
LCD screen ( 21)
Backup battery compartment ( 19)
Start/stop button ( 26, 28)
Serial number, Battery attachment unit
(17)
DC IN terminal ( 17)
D.EFFECTS button ( 54)/
P.SET button ( 71)
FUNC. button ( 22, 35)
Joystick ( 7)
PHOTO button ( 27)
Zoom lever ( 29)
Mode switch ( 43)
Easy recording
Recording programs
/
(tape/card) switch ( 8)
Cassette compartment
(19)
OPEN/EJECT switch
(19)
Cassette compartment cover
( 19)
Tripod socket
(27)
FUNC.
Getting to Know the Camcorder
12
Wireless Controller WL-D85
WIRELESS CONTROLLER WL
-
D85
START/
STOP
PHOTO
ZOOM
CARD
DATE SEARCH
REW
PLAY
FF
STOP
PAUSE
SLOW
AUDIO DUB.
ZERO SET
MEMORY
TV SCREEN
START/STOP button ( 26)
CARD –/+ buttons ( 33)
DATE SEARCH / buttons ( 32)
REW button ( 30)
button ( 30)
PAUSE button ( 30)
SLOW button ( 30)
AUDIO DUB. button ( 65)
ZERO SET MEMORY button ( 31)
PHOTO button ( 27)
Zoom buttons ( 29)
PLAY button ( 30)
FF button ( 30)
STOP button ( 30)
button ( 30)
button ( 30)
TV SCREEN button ( 40)
13
Getting to Know the Camcorder
Introduction
Screen Displays
Recording Movies
Zoom ( 29), Exposure ( 45)
Recording program ( 43)
White balance ( 47)
Image effect ( 48)
LED light ( 54)
Digital effects ( 54)
Condensation warning ( 85)
Still image quality/size
(simultaneous recording) ( 51)
Shutter speed ( 44)
Playing Movies
Self timer ( 54)
Exposure adjustment ( 45)
Manual focus ( 46)
Image stabilizer ( 38)
Recording mode ( 38)
Tape operation
Time code (hours : minutes : seconds)
Remaining tape
Remaining battery charge
Widescreen 16:9 mode ( 38)
Wind screen off ( 39)
Audio recording mode ( 48)
Remote sensor off ( 41)
Backup battery warning
Level marker ( 40)
Recording reminder
Operating mode ( 8)
Audio playback mode ( 49)
Search function display
END SEARCH ( 32)/DATE SEARCH
*
(32)
* only.
Movie size for capturing video on the
memory card ( 52)
Quality/size for capturing still images ( 52)
Playback time
(hours : minutes : seconds : frames)
Joystick guide ( 7)
Data code ( 53)
Getting to Know the Camcorder
14
Tape operation
Record, Record pause,
Stop, Eject,
Fast forward, Rewind,
Playback, Playback pause,
Reverse playback pause,
x1 Playback (normal speed),
x1 Reverse playback (normal speed),
x2 Playback (double speed),
x2 Reverse playback (double speed),
Fast forward playback,
Rewind playback,
Slow playback,
Slow reverse playback,
Frame advance,
Frame reverse,
/ Date search ( 32),
/ Zero set memory ( 31)
Remaining tape
Indicates the remaining time of the tape in
minutes. “ moves during recording.
When the tape reaches its end, the display
changes to “ END”.
When the time left is less than 15
seconds, the remaining tape time may not
appear.
Depending on the type of tape, the
remaining time displayed may not be
correct. In any case, you will be able to
record on the tape the number of minutes
that appears on the videocassette’s label
(for example, 85 minutes).
Remaining battery charge
When “ ” starts flashing in red replace
the battery pack with a fully charged one.
When you attach an empty battery pack,
the power may turn off without displaying
“”.
Depending on the conditions under which
the camcorder and the battery pack are
used, the actual battery charge may not be
indicated accurately.
Backup battery warning
flashes in red when the lithium button
battery is not installed, or when it needs to
be replaced.
Recording reminder
The camcorder counts from 1 to 10
seconds when you start recording. This is
helpful to avoid scenes that are too short.
15
Getting to Know the Camcorder
Introduction
Recording Still Images
Zoom ( 29), Exposure ( 45)
Recording program ( 43)
White balance ( 47)
Image effect ( 48)
LED light ( 54)
Digital effects ( 54)
Movie clip size (movie recorded on the
memory card) ( 27)
Still image quality/size ( 50)
Self timer ( 54)
Number of still images available on the
memory card
Movie recording time available on the
memory card
Wind screen off ( 39)
AF frame ( 52)
Joystick guide ( 7)
Camcorder shake warning ( 37)
Viewing Still Images
Slideshow ( 34)
Image protection mark ( 59)
Image number ( 42)
Current image /Total number of images
Still image size
Data code ( 53)
Movie clip length (movie recorded on the
memory card)
16
Getting to Know the Camcorder
Number of still images available on the memory card
Depending on the recording conditions, the number of available still images displayed
may not decrease even after a recording has been made, or may decrease by 2 still
images at once.
Card Access Display
” is displayed next to the number of images available while the camcorder is writing
on the memory card.
Movie recording time on the memory card
Indicates the remaining time in hours : minutes. At less than 1 minute, the remaining time
will be displayed in 10-second steps, at less than 10 seconds in 1-second steps.
Depending on the recording conditions, the actual remaining time may not be indicated
accurately.
Getting Started
Preparations
17
Preparations
Getting Started
Charging the Battery Pack
The camcorder can be powered with a
battery pack or directly using the compact
power adapter. Charge the battery pack
before use.
1 Turn off the camcorder.
2 Attach the battery pack to the
camcorder.
Press the battery pack lightly and
slide it down until it clicks.
3 Connect the power cord to the
compact power adapter.
4 Plug the power cord into a power
outlet.
5 Connect the compact power adapter
to the camcorders DC IN terminal.
The CHARGE indicator starts
flashing. The indicator will stay on
when the charging is completed.
You can also use the compact power
adapter without attaching a battery
pack.
When the compact power adapter is
connected, even if a battery is
attached its power will not be
consumed.
O
NCE
THE
BATTERY
IS
FULLY
CHARGED
1 Disconnect the compact power
adapter from the camcorder.
2 Unplug the power cord from the
power outlet and the compact
power adapter.
T
O
REMOVE
THE
BATTERY
PACK
Press to release the battery
pack. Lift the battery pack and then
pull it out.
Getting Started
Remove the battery
terminal cover before
attaching the battery
BATT. switch
CHARGE
indicator
DC IN
terminal
BATT.
Getting Started
18
IMPORTANT
You may hear some noise from the compact
power adapter during use. This is not a
malfunction.
We recommend charging the battery pack in
temperatures between 10 C and 30 C.
Outside the temperature range of 0 C to
40 C, the charging will not start.
Do not connect to the camcorder’s DC IN
terminal or to the compact power adapter any
electrical equipment that is not expressly
recommended for use with this camcorder.
To prevent equipment breakdowns and
excessive heating, do not connect the supplied
compact power adapter to voltage converters for
overseas travels or special power sources such
as those on aircraft and ships, DC-AC inverters,
etc.
NOTES
The CHARGE indicator also serves as a
rough estimate of the battery charge status.
Continuously on: Battery fully charged.
Flashes approx. twice per second: Battery over
50% charged.
Flashes approx. once per second: Battery less
than 50% charged.
The charging time will vary depending on the
surrounding temperature and the battery pack’s
initial charge condition. In cold places, the
effective usage time of the battery will
decrease.
We recommend that you prepare battery
packs 2 to 3 times longer than you think you
might need.
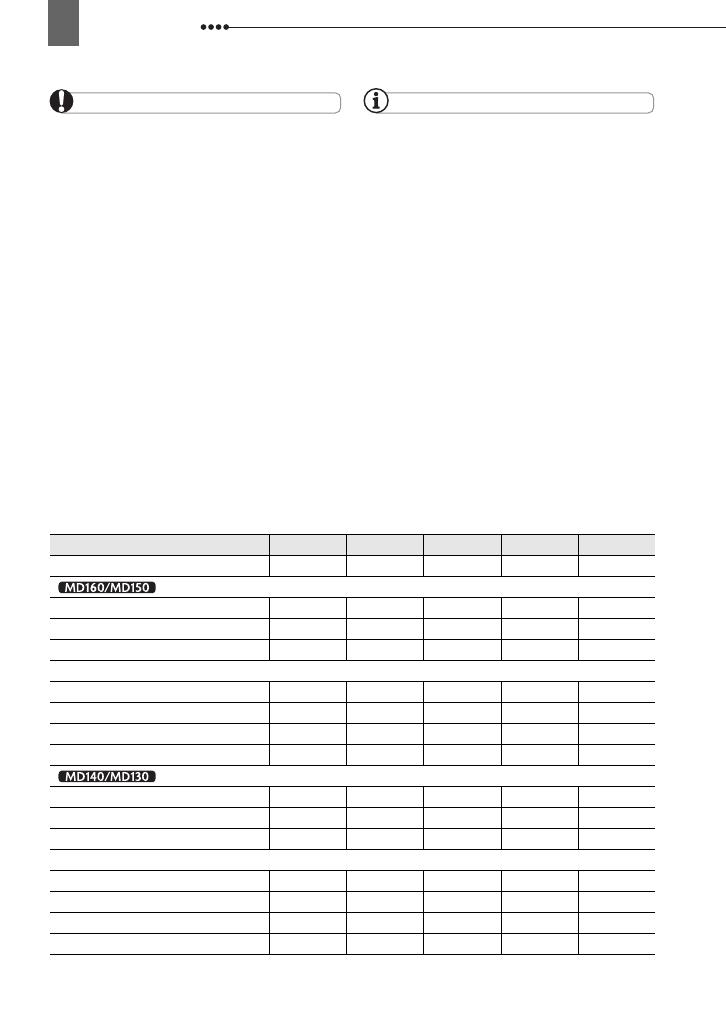
Charging, Recording and Playback Times
The times given in the table below are approximate and vary depending on the actual
charging, recording or playback conditions.
* Approximate times for recording with repeated operations such as start/stop, zooming, power on/off.
Battery Pack BP-2L5 NB-2L NB-2LH BP-2L12 BP-2L14
Charging Time 145 min. 150 min. 160 min. 240 min. 285 min.
Maximum Recording Times
Viewfinder 95 min. 105 min. 125 min. 225 min. 275 min.
LCD [NORMAL] 90 min. 105 min. 125 min. 225 min. 275 min.
LCD [BRIGHT] 90 min. 105 min. 125 min. 215 min. 265 min.
Typical Recording Times*
Viewfinder 50 min. 55 min. 70 min. 120 min. 150 min.
LCD [NORMAL] 50 min. 55 min. 70 min. 120 min. 150 min.
LCD [BRIGHT] 45 min. 50 min. 65 min. 115 min. 140 min.
Playback Times 105 min. 120 min. 145 min. 255 min. 310 min.
Maximum Recording Times
Viewfinder 105 min. 120 min. 145 min. 250 min. 305 min.
LCD [NORMAL] 100 min. 120 min. 145 min. 245 min. 300 min.
LCD [BRIGHT] 95 min. 110 min. 135 min. 230 min. 280 min.
Typical Recording Times*
Viewfinder 60 min. 65 min. 80 min. 135 min. 165 min.
LCD [NORMAL] 55 min. 65 min. 80 min. 130 min. 165 min.
LCD [BRIGHT] 50 min. 60 min. 75 min. 125 min. 155 min.
Playback Times 110 min. 125 min. 150 min. 265 min. 320 min.
Getting Started
Preparations
19
Installing the Backup Battery
The backup battery (lithium button battery
CR1616) allows the camcorder to retain the
date, time (
24) and other camcorder
settings while the power source is
disconnected. Connect a power source to
the camcorder when replacing the backup
battery to retain the settings.
1 If a battery pack is attached, remove
it first.
2 Open the backup battery cover.
3 Insert the backup battery with the
+ side facing out.
4 Close the cover.
NOTES
The backup battery has a life span of about a
year. flashes in red to inform you that it
needs to be replaced.
Inserting and Removing a Tape
Use only videocassettes marked with the
logo.
1 Slide fully in the
direction of the arrow and open the
cassette compartment cover.
The cassette compartment opens
automatically.
2 Insert the cassette.
Insert the cassette with the window
facing the grip belt.
To remove a cassette pull it straight
out.
3 Press the mark on the
cassette compartment until it clicks.
4 Wait for the cassette compartment
to retract automatically and close
the cassette compartment cover.
OPEN/EJECT
Getting Started
20
IMPORTANT
Do not interfere with the cassette
compartment while it is opening or closing
automatically, or attempt to close the cover
before the cassette compartment has fully
retracted.
Be careful not to get your fingers caught in
the cassette compartment cover.
NOTES
If the camcorder is connected to a power
source, cassettes can be inserted/removed
even if the switch is set to
.
Inserting and Removing a Memory Card
You can use commercially available
SDHC memory cards, SD memory
cards or MultiMedia cards (MMC) with
this camcorder.
1 Turn off the camcorder.
2 Open the memory card slot cover.
3 Insert the memory card straight all
the way into the memory card slot.
4 Close the cover.
Do not force the cover closed if the
memory card is not correctly inserted.
T
O
REMOVE
THE
MEMORY
CARD
First push the memory card once to
release it, and then pull the card out.
IMPORTANT
Make sure to initialize all memory cards
before using them with this camcorder for the
first time ( 60).
Memory cards have front and back sides that
are not interchangeable. Inserting a memory
card facing the wrong direction can cause a
malfunction of the camcorder.
NOTES
Proper operation cannot be guaranteed for all
memory cards.
About SDHC Memory Cards: SDHC (SD
High Capacity) is the new type of SD memory
cards with capacities over 2 GB. Please note
that the specifications of SDHC memory cards
are different from those of regular SD cards and
you will not be able to use memory cards of
over 2 GB with devices that do not support
SDHC. However, SDHC devices (including this
camcorder) are backward compatible and you
can use regular SD cards with them.
Preparing the Camcorder
1 Turn on the camcorder.
2 Move the lens cover switch down to
to open the lens cover.
  • Page 1 1
  • Page 2 2
  • Page 3 3
  • Page 4 4
  • Page 5 5
  • Page 6 6
  • Page 7 7
  • Page 8 8
  • Page 9 9
  • Page 10 10
  • Page 11 11
  • Page 12 12
  • Page 13 13
  • Page 14 14
  • Page 15 15
  • Page 16 16
  • Page 17 17
  • Page 18 18
  • Page 19 19
  • Page 20 20
  • Page 21 21
  • Page 22 22
  • Page 23 23
  • Page 24 24
  • Page 25 25
  • Page 26 26
  • Page 27 27
  • Page 28 28
  • Page 29 29
  • Page 30 30
  • Page 31 31
  • Page 32 32
  • Page 33 33
  • Page 34 34
  • Page 35 35
  • Page 36 36
  • Page 37 37
  • Page 38 38
  • Page 39 39
  • Page 40 40
  • Page 41 41
  • Page 42 42
  • Page 43 43
  • Page 44 44
  • Page 45 45
  • Page 46 46
  • Page 47 47
  • Page 48 48
  • Page 49 49
  • Page 50 50
  • Page 51 51
  • Page 52 52
  • Page 53 53
  • Page 54 54
  • Page 55 55
  • Page 56 56
  • Page 57 57
  • Page 58 58
  • Page 59 59
  • Page 60 60
  • Page 61 61
  • Page 62 62
  • Page 63 63
  • Page 64 64
  • Page 65 65
  • Page 66 66
  • Page 67 67
  • Page 68 68
  • Page 69 69
  • Page 70 70
  • Page 71 71
  • Page 72 72
  • Page 73 73
  • Page 74 74
  • Page 75 75
  • Page 76 76
  • Page 77 77
  • Page 78 78
  • Page 79 79
  • Page 80 80
  • Page 81 81
  • Page 82 82
  • Page 83 83
  • Page 84 84
  • Page 85 85
  • Page 86 86
  • Page 87 87
  • Page 88 88
  • Page 89 89
  • Page 90 90
  • Page 91 91
  • Page 92 92
  • Page 93 93
  • Page 94 94

Canon MD130 User manual

Category
Camcorders
Type
User manual
This manual is also suitable for

Ask a question and I''ll find the answer in the document

Finding information in a document is now easier with AI