Integra DTR-50.7 Owner's manual

Category
AV receivers
Type
Owner's manual
E
n
DTR-60.7/DTR-50.7
Basic Manual
The Basic Manual includes information needed
when starting up and also instructions for
frequently used operations. The Advanced
Manual has more detailed information and
advanced settings.
CONTENTS
Front Panel .......................................................................... 3
Display .................................................................................4
Rear Panel...........................................................................5
Step 1: Connections .............................................. 6
1 Connecting speakers........................................................6
Speaker layout ..............................................................6
Height speaker types ....................................................7
Instructions on how to connect speakers ...................... 8
2 Connecting the TV and players ........................................ 9
HDMI cable connection ................................................. 9
Connecting Components without HDMI ...................... 10
3 Other connections .......................................................... 11
Step 2: Initial Setup ............................................. 12
1 AccuEQ Room Calibration .............................................12
2 Source Connection .........................................................13
3 Remote Mode Setup ......................................................14
4 Network Connection ....................................................... 14
Step 3: Playing Back ........................................... 15
1 Basic operations .............................................................15
Remote controller parts name .....................................15
2 Network Functions ..........................................................16
3 AirPlay
®
..........................................................................16
4 AM/FM Radio .................................................................17
5 Multi-zone .......................................................................17
Making Multi-zone Connection ....................................17
Performing Multi-zone Playback .................................18
6 Quick Setup menu ..........................................................19
7 Other useful functions ....................................................20
Troubleshooting ................................................................. 21
Specifications ....................................................................22
Table of image resolutions .................................................23
Resolutions supported by HDMI ........................................23
Supplied Accessories .......................................... Back cover
En-2
Features
DTR-60.7/DTR-50.7:
Equipped with 7 ch amplifier
Supports playback in Dolby Atmos format and has Dolby
Surround listening mode
Supports playback in DTS:X format and has DTS
Neural:X listening mode
THX Select2 Plus certified
Equipped with 4K compatible HDMI IN/OUT jacks
Equipped with 2 HDMI output jacks
Supports the HDMI Standby Through function which
allows transmission from players to the TV in standby
state
Supports HDCP2.2 (supported by HDMI IN1 to IN5/
HDMI OUT MAIN/SUB)
Supports ARC (Audio Return Channel)
Supports variety of network functions such as Internet
Radio, DLNA, AirPlay, etc.
Bi-Amping capability
A/V Sync Function to correct deviation of audio and
video
Multi-zone function (Zone 2 and Zone 3) which allows
you to play something in the main room while enjoying
a different source in a separate room (Video and audio
can also be output to Zone 2 through HDMI)
Music Optimizer™ for compressed digital music files
Phase Matching Bass System
Automatic speaker setup available using supplied
calibrated microphone (AccuEQ Room Calibration)
Supports playback of MP3, WMA, WMA Lossless,
FLAC, WAV, Ogg Vorbis, Apple Lossless, DSD, Dolby
TrueHD via network and USB storage device (the
supported formats will differ depending on the use
environment)
DTR-60.7:
The two front channels have parallel push-pull circuits
for reproducing powerful bass
Equipped with a high-class toroidal transformer as an
independent power source for the audio circuitry
En-3
12496578
O
N
SQRP
3
F
GH IJ
LM
K
(Australian models)
Front Panel
1
z
On/Standby button: Turns the unit on or into standby
mode.
2
Hybrid Standby indicator: Lights if the unit enters
standby mode when the HDMI Standby Through, USB
Power Out at Standby or Network Standby function is
enabled.
3
DTS:X indicator: Lights when playing DTS:X.
4
Dolby Atmos indicator: Lights when playing Dolby
Atmos.
5
HDMI Out button: Allows you to select the HDMI jack to
output video signals.
6
Remote control sensor: Receives signals from the
remote controller.
7
Tone, Tone Level buttons: Adjusts the high tone and
low tone. Press the Tone button repeatedly to select
the item to adjust from "Bass", "Treble" and "Phase
Matching Bass", and press the Tone Level buttons to
adjust.
8
Display
9
Listening Mode button: Allows you to select the
listening mode.
F
Dimmer button (North American models): Switches
the brightness of the display.
RT/PTY/TP button (Australian models): Can be used
when receiving the station transmitting text information.
G
Memory button: Registers a radio station.
H
Tuning Mode button: Switches the tuning mode.
I
Display button: Switches the information on the
display.
J
Setup button: Used when making settings.
K
Cursor buttons, Tuning
jl
button, Preset
dc
button
and Enter button: Moves the cursor and confirms the
selection. When listening to AM/FM broadcasting, tune
in to the station with Tuning
jl
or select the registered
station with Preset
dc
.
L
Return button: Returns the display to the previous
state.
M
Master Volume: Allows you to adjust the volume.
N
Zone2/Zone3/Off button: Controls the multi-zone
function.
O
Whole House Mode, Off button: Controls the WHOLE
HOUSE MODE function to play the same source in all
the multi-zone connected rooms.
En-4
P
Phones jack: Stereo headphones with a standard plug
are connected.
Q
Setup Mic jack: The supplied speaker setup
microphone is connected.
R
Input selector buttons: Switches the input to be
played.
S
AUX Input HDMI jack: A HD camera or such other
device is connected.
4
FG
5
3
12
76
98
Display
1
Speaker/Channel display: Displays the output channel
that corresponds to the selected listening mode.
2
Z2/ Z3: Lights when the output to Zone 2/ Zone 3 is set
to on.
3
Lights according to the type of input digital audio signals
and the listening mode.
4
Stays lit when Music Optimizer is enabled.
5
Lights when playing NET or USB.
6
"NET": Lights when "NET" input is selected and the unit
is connected to the network. It will flash if the connection
is not correct.
"USB": Lights when input is "NET" and USB is
connected and selected. It will flash if the connection is
not correct.
"HDMI": Lights when HDMI signals are input and the
HDMI input is selected.
"DIGITAL": Lights when digital signals are input and the
digital input is selected.
"MUTING": Flashes when muting is on.
"ANALOG": Lights when analog signals are input and
the analog input is selected or when HDMI and digital
signal inputs are not assigned.
"SLEEP": Lights when the sleep timer is set.
7
Lights in the following conditions.
"RDS" (Australian models): Receiving RDS
broadcasting.
"AUTO": Tuning mode is auto.
"
TUNED
": Receiving AM/FM radio.

flashes
while tuning is automatically performed.
"FM STEREO": Receiving FM stereo.
8
"Bi AMP": Using bi-amp.
9
Stays lit when headphones are connected.
F
Displays various information of the input signals.
Pressing Display displays the type of input digital
signals and the listening mode.
G
Shows the volume level.
En-5
21 3 4 5 6 78 9 FGHI
KL MN
J
Rear Panel
1
RI REMOTE CONTROL jack: An Onkyo product with RI
jack can be connected and synchronized with this unit.
2
DIGITAL IN COAXIAL/OPTICAL jacks: Digital audio
signals are input.
3
RS232 port: Connected to the home control system.
(
)
4
USB port: A USB storage device is connected so that
music files stored in it can be played. Connect a USB
device with a USB cable to supply it with power.
5
ETHERNET port: Used for LAN connection
6
VIDEO IN/OUT jacks: Composite video signals input/
output jacks.
7
HDMI IN/OUT jacks: Digital video signals and audio
signals are transmitted between the unit and the
connected devices.
8
COMPONENT VIDEO IN/OUT jacks: Component video
signals input/output jacks.
9
TUNER AM/FM(75 ) terminal: The supplied antennas
are connected.
F
HDBaseT™ IN/OUT jack: HDMI input signals are
output via the Ethernet cable. As they are covered with
a seal when shipped, remove it when you use the ports.
Do not use the ports to connect the Ethernet port of
network device. (
)
G
IR IN A/B, IR OUT jack: Connected to the multiroom
remote control kit. (
)
H
12V TRIGGER OUT A/B/C jack: Allows you to connect
a device with 12V trigger input jack to enable link
operation between the device and the unit. (
)
I
PRE/LINE OUT ZONE 2/ZONE 3 jack: Audio output
jack connected to the power amplifier and pre-main
amplifier for multi-zone playback in a separate room.
J
AC INLET: The supplied
power cord is connected.
K
GND terminal: The ground wire of the turntable is
connected.
L
AUDIO IN jacks: Analog audio signals are input.
M
PRE OUT jacks: A power amplifier or subwoofer with
built-in amplifier is connected.
N
Speaker terminals: Speakers are connected. To use
the Multi-zone function, connect the speakers in the
separate room to the ZONE2 speaker terminals.
Special devices or cable connections are necessary to use the
3
,
F
,
G
and
H
functions. Contact the specialized stores for more
information.
Step 1:
Connections
En-6
1
Connecting speakers
Speaker layout
#
$
%
&
'
7
8
9
G
H
F
"
Important: The power cord must be connected only after all other connections are completed.
" #
Front speakers
$
Center speaker
% &
Surround speakers
'
Subwoofer
7 8
Back speakers
9 F
Height speakers (Front High)
G H
Height speakers (Rear High)
5.1 ch:
"#$%&'
7.1 ch:
"#$%&'
78
, or
"#$%&'
9F
, or
"#$%&'
GH
To enjoy the Dolby Atmos listening mode, height speakers or back speakers need to
be installed. There are a variety of height speakers apart from this type. See the next
section "Height speaker types" for details.
Characteristics of speaker types
"#
output front stereo sound and
$
outputs center sound such as dialogs and
vocals.
%&
create back sound field.
'
reproduces bass sounds and creates rich
sound field.
Connecting
78
,
9F
, or
GH
speakers
enables playback in 7.1 ch configuration.
78
(back) speakers improve sense of
envelopment created by back sound field
as well as seamlessness of back sounds,
providing more natural sound experiences
in the sound field.
9F
and
GH
(height)
speakers produce surround effects on
a height plane. Note that this unit can
perform optimal sound field processing
for the type of height speakers actually
installed and registered in Initial Setup.
You can connect both back speakers and
height speakers at the same time, but you
can only output audio from one of these at
a time. When connected at the same time,
you can switch speakers to prioritize in the
Quick Setup menu that appears when you
press the Q button on the remote controller
(Speaker Layout function). For details, see
"6 Quick Setup menu" of "Step 3: Playing
Back".
The speaker setting is 7.1 channels at
the time of purchase. You can change it
manually or by using automatic speaker
setting.
To use the multi-zone function, see
"5 Multi-zone" in "Step 3: Playing Back".
Important: Connect speakers with 4 Ω to
16 Ω impedance. You have to change the
setting if any of the speakers have 4 Ω or
more to less than 6 Ω impedance. Using
a speaker with less impedance than the
setting may result in failure. You can set
up by viewing the guidance displayed on
the TV screen. Select the item with the
cursor buttons of the remote controller
and press Enter to confirm your selection.
To return to the previous screen, press
Return. Press RCV and then Setup on
the remote controller. Select "2. Speaker"
- "Configuration" - "Speaker Impedance"
and change the default value from
"6ohms" to "4ohms".
Step 1:
Connections
Step 1:
Connections
En-7
'
Subwoofer with built-
in power amplifier
8
Right back
7
Left back
$
Center
#
Front R
"
Front L
A speaker configuration
where only one back
speaker is connected is
not supported.
&
Surround R
%
Surround L
9G
Height L
FH
Height R
Make correct connection between the unit's jacks and
speaker's jacks (+ to + and - to -).
Height speaker types
Installing speakers in ceiling
a b
dc
e f
a b
Top front
c d
Top middle
e f
Top Rear
Ceiling speakers, etc. are used for maximizing effects in
Dolby Atmos or Dolby Surround listening mode. Install
Top Front speakers so that they are positioned at a point
between directly above the listening position and directly
above the front speakers. Install Top Middle speakers so
they are directly above the listening position. Install Top
Rear speakers so they are positioned at a point between
directly above the listening position and directly above the
back speakers. You can select
ab
,
cd
, or
ef
on this
unit. For connection with the unit, use the HEIGHT speaker
terminals.
Dolby Laboratories recommends placing the speakers
as described in "Installing speakers in ceiling" to obtain
the best Dolby Atmos effect.
Step 1:
Connections
En-8
Using Dolby Enabled Speakers
g
i
h
j
k l
g h
Dolby Enabled Speaker (Front)
i j
Dolby Enabled Speaker (Surround)
k l
Dolby Enabled Speaker (Back)
A Dolby Enabled Speaker is specially designed to be used
as a Height speaker. There are two types of Dolby Enabled
Speakers; types placed on top of other speakers such as
front speakers and surround speakers (
), and types that
are integrated with the normal speakers. Dolby Enabled
Speakers placed with their diaphragms facing toward the
ceiling create higher effect in the Dolby Atmos and Dolby
Surround listening modes by providing sounds echoing
off the ceiling. You can select
gh
,
ij
, or
kl
on this
unit. For connection with the unit, use the HEIGHT speaker
terminals.
You can put
kl
on top of back speakers, but even if you connect both
back speakers and
kl
speakers at the same time, you can only output
audio from one of these at a time.
When playing Dolby Atmos, the speakers required depend
on how you have setup your back speakers or height
speakers. The following shows speaker combinations.
1 Back
2 Front High
3 Rear High
4 Top Front
5 Top Middle
6 Top Rear
7 Dolby Enabled Speaker (Front)
8 Dolby Enabled Speaker (Surround)
9 Dolby Enabled Speaker (Back)
Connection
pattern
Front
Center
Surround
Back or Height
Required
Optional
Connection of a subwoofer is optional.
Instructions on how to connect speakers
Cut and remove the plastic coating from the end of the
speaker cable, twist the core and connect it to the terminal.
Make correct connection between the unit's jacks and
speaker's jacks (+ to + and - to -) for each channel. If
connection is wrong, a bass sound may become poor due
to reverse phase. Up to two subwoofers with built-in power
amplifier can be connected to the SUBWOOFER jacks.
Set the cut-off filter selection switch of the subwoofer to
DIRECT. If the subwoofer does not have a cut-off filter
selection switch but has a cut-off frequency adjusting dial,
turn it to the maximum frequency. If your subwoofer does
not have built-in power amplifier, you can connect a power
amplifier between the unit and the subwoofer.
Short-circuiting the + cable and - cable or contacting
the cable core to the rear panel of the unit may cause
failure. Also do not connect two or more cables to one
speaker terminal or one speaker to several terminals.
When using commercially available banana plugs:
tighten the speaker terminals to the end and then insert
the banana plugs. Do not insert the core of speaker cable
directly into the hole for banana plug of speaker terminal.
(North American model)
Step 1:
Connections
En-9
2
Connecting the TV and players
HDMI
IN
HDMI
OUT
HDMI
OUT
HDMI
OUT
HDMI
OUT
HDMI
OUT
TV
Blu-ray Disc/
DVD player
Streaming media player, etc.Satellite/Cable
set-top box, etc.
Game console
Personal computer
HDMI cable
To use the ARC function, connect to the ARC
compatible HDMI jack of the TV and make an
appropriate setting on the unit. See "2 Source
Connection" of "Step 2: Initial Setup".
HDMI cable connection
Refer to the above figure and connect the player to the
HDMI jack on the back of this unit. For example, connect
a Blu-ray Disc Player to the HDMI IN1 (BD/DVD) jack.
To play the player, press the Input Selector button on the
remote controller with the same name as the jack to which
you connected the player so that the input on the unit is
selected.
To connect the TV and the unit, connect the HDMI OUT
MAIN jack of the unit and the HDMI IN jack of the TV
using an HDMI cable. With this connection, it becomes
possible to display the setting screen of the unit on the
TV or transmit video/audio signals from the player to the
TV. If your TV supports ARC (Audio Return Channel), it
is possible to play the TV sound with the AV receiver's
speakers with this connection only. If your TV does not
support ARC, you need, in addition to the HDMI OUT MAIN
jack connection, a digital optical cable connection between
the digital audio out optical jack of the TV and the DIGITAL
IN OPTICAL jack of the unit or an analog audio cable
connection between the audio output jack of the TV and the
AUDIO IN TV jack of the unit.
DIGITAL
OPTICAL
OUT
AUDIO
OUT
TV
Audio connection with a TV not supporting ARC
Select an appropriate connection
for your TV.
The unit supports the HDMI Standby Through function that
allows transmission from players to the TV even if the unit
is in standby. You have to modify the settings to enable
the input selection link with CEC (Consumer Electronics
Step 1:
Connections
En-10
Control) compliant device, connection with ARC compatible
TV, and HDMI Standby Through function. See "2 Source
Connection" of "Step 2: Initial Setup".
Another TV can be connected to the HDMI OUT
SUB jack. In this case, press the HDMI Out button
on the main unit several times to display "SUB" or
"MAIN+SUB" and select the output method. You have to
modify the settings to enable the CEC functions, such
as ARC, for the TV connected to the HDMI OUT SUB
jack. Set "Step 3: Playing Back" - "6 Quick Setup menu"
- "Control TV" to "SUB".
To enjoy HDCP2.2 protected video, connect the player
to one of the HDMI IN1 to IN5 jacks and connect
the HDMI output jack on this unit and to a HDCP2.2
compatible HDMI input jack on the TV. You will be
unable to view images protected by HDCP2.2 if your TV
does not have a HDCP2.2 compatible input jack.
To play 4K or 1080p video, use a high speed HDMI
cable or high speed HDMI with Ethernet cable.
Connecting Components without HDMI
If your AV component does not have HDMI jack, use an
available jack of your component for cable connection with
this unit.
It is possible to change assignment of the input jacks and input selector
buttons. For how to make settings, see "1. Input/Output Assign" in
"Advanced Settings (Setup Menu)" in the Advanced Manual.
4
321
5
Video signal connection
The unit has a video upconversion function. For details,
see the next section.
1
A TV with component video input jacks or a player with
component video output jacks can be connected.
Only images input through the COMPONENT VIDEO IN jacks can be
output through the COMPONENT VIDEO OUT jacks.
Component video cable
Its transmitted video has higher quality than
that of composite video cable.
2
A TV with composite video input jacks or a player with
composite video output jacks can be connected.
Only images input through the VIDEO IN jack (composite) can be
output through the VIDEO OUT jack.
Composite video cable
Audio signal connection
3
A player with a digital audio out jack can be connected.
Digital optical cable (OPTICAL)
The DIGITAL IN OPTICAL jack of the unit has
a cover. Push in the cable against the cover
as it is turned inside.
Digital coaxial cable (COAXIAL)
4
A player with analog audio out jacks can be connected.
When using jacks
1
and
2
for video input, connect
to the audio input jacks corresponding to the jacks
connected at
1
and
2
. (For example, when video input
connection is to the
1
BD/DVD jack, the audio input
connection should also be to the
4
BD/DVD jacks.)
Analog audio (RCA) cable
5
Connect a turntable that uses an MM type cartridge
and does not have a built-in audio equalizer. If the
connected turntable has a built-in audio equalizer,
connect it to the
4
analog audio input jack.
If it uses an MC type cartridge, install an audio equalizer compatible
with MC type cartridge between the unit and the turntable by
connecting it to the
4
analog audio input jack. For details, refer to
the turntable's instruction manual.
If the turntable has a ground wire, connect it to the GND terminal of
this unit. If connecting the ground wire increases noise, disconnect it.
Step 1:
Connections
En-11
Video upconversion function
Video signals input to the VIDEO IN jack or the
COMPONENT VIDEO IN jacks will be upconverted
to HDMI signals and then output from the HDMI
output jack.
AV Receiver
When you upconvert video signals input to the
COMPONENT VIDEO IN jacks and output them
from the HDMI OUT jack, set the output resolution of
the player to 480i or 576i. If the input has 480p/576p
or higher resolution, a message prompting you to
change the resolution setting will appear. If your
player does not support 480i or 576i output, use the
VIDEO IN jack.
If multiple video signal inputs are put into one input
system, HDMI signal output is prioritized.
3
Other connections
AM/FM antenna connections
Connect the antennas to listen to AM/FM broadcast. When
listening to the broadcast for the first time, adjust the
antenna position and orientation to get the best reception.
AM loop
antenna
(supplied)
Indoor FM antenna
(supplied)
Fix with a tack on the
wall.
(North American
models)
(Australian models)
Assemble the AM loop antenna (supplied).
Network connection
You can enjoy Internet radio, DLNA and AirPlay by
connecting the unit to LAN. Connect the Ethernet cable to
the Ethernet port of the router.
Internet radio
Router
NAS
Headphones connection
Connect stereo headphones with a standard plug (1/4 inch
or φ6.3 mm) to the Phones jack on the front panel. Sound
from the speakers will be off while you are using the
headphones.
If you selected any other listening mode than Stereo,
Mono and Direct, connecting headphones will switch the
listening mode to Stereo.
Power cord
This model includes a removable power cord. Connect
the power cord to AC INLET of the unit and then connect
to the outlet. Always disconnect the outlet side first when
disconnecting the power cord. When the unit is turned on, a
large instantaneous current may flow affecting functionality
of the computer and other devices, so it is recommended to
use a separate outlet.
Step 2:
Initial Setup
En-12
"Initial Setup" automatically starts on the television when
you first turn the unit on.
Language Select
English
Deutsch
Français
Español
Italiano
Nederlands
Svenska
˹୫
Initial Setup
Exit
SETUP
Settings proceed in the following order:
1 AccuEQ Room Calibration
Automatic calibration for optimum speaker settings
2 Source Connection
Checking that each input source is connected correctly
HDMI link function settings
3 Remote Mode Setup
Settings required to operate other AV Components with
the Remote Controller
4 Network Connection
Checking network connections
Firmware update notification: If the unit is connected via LAN and there
is firmware update available, the "Firmware Update Available" message will
appear. To execute updating, select "Update Now" with the cursor buttons of
the remote controller and press Enter.
When "Completed!" appears, press
z
On/Standby on the main unit to turn
the unit into standby mode. Then updating will be completed. (The unit
automatically turns itself into standby mode after about 3 minutes even if
you don't press
z
On/Standby, and updating will be complete.)
Before Start
Setup is performed as a series of responses to questions
asked by the unit. Select the item with the cursors of the
remote controller and press Enter to confirm your selection.
To return to the previous screen, press Return.
Switch the input on the TV to that assigned to the unit.
Select the language first. Next, a summary of the initial
settings is displayed. Select "Yes" in this screen and press
Enter on the remote controller.
Welcome to initial setup.
Have you connected all the speakers and devices?
Before starting, please connect speakers and sources.
Now, would you like to start initial setup?
1st Step : AccuEQ Room Calibration
2nd Step : Source Connection
3rd Step : Remote Mode Setup
4th Step : Network Connection
Yes
No
Initial Setup
Exit
SETUP
Re-doing initial setup: If you terminate the
procedure on the way or change the setting made in
the initial setup and want to call up the setup wizard
again, press RCV and then Setup on the remote
controller, select "8. Miscellaneous" - "Initial Setup",
and press Enter.
1
AccuEQ Room Calibration
The test tone coming from each speaker will be measured
to enable setting of the number of speakers, volume
level, each speaker's optimum crossover frequencies,
and distance from the primary listening position, and also
enable correction of distortion caused by the room acoustic
environment.
You cannot return to the previous screen during speaker
setup, even if you press Return.
1. Place the speaker setup microphone.
AccuEQ Room Calibration
This step you can automatically calibrate
your room to get correct surround sound.
Would you like to calibrate your room now
or later?
Do it Now
Do it Later
Initial Setup
Exit
SETUP
When the above screen is displayed, before starting
the procedure, place the supplied speaker setup
microphone at the measurement position by referring
to the following figure.
Listening area
Measurement position
with microphone
Step 2:
Initial Setup
Step 2:
Initial Setup
En-13
Correct measurement will not be possible if the microphone is held
by hand. Measurement is not possible if headphones are being used.
The subwoofer sound may not be detected since it is extremely
low frequencies. Set the subwoofer volume to around the half of its
maximum volume.
Measurement may be interrupted if there is ambient noise or radio
frequency interference. If this occurs, close the window and turn off
the home appliance and fluorescent light.
2. After placing the microphone at the measurement
position, select "Do it Now" with the cursors and
press Enter.
3. When "Please plug microphone that came in a
box with AV receiver" is displayed, connect the
microphone to the Setup Mic jack of the unit.
Setup Mic jack
Calibration
microphone
4. Set the speakers you have connected and the type
of Height Speakers.
AccuEQ Room Calibration
Speaker Channels
Subwoofer
Height Speaker
Bi-Amp
Powered Zone2
7.1ch
Yes
-----
No
No
Next
ENTER
Select how many speakers you have.
When the screen above is displayed, set the items with
the cursors on the remote controller. The image on the
screen changes as you choose the number of channels
in "Speaker Channels", so refer to it when performing
the settings. After completing all the settings, press
Enter on the remote controller.
After this, follow the guidance displayed on the TV screen.
When the cursor is on an item, the content of the item
will be shown in the lower part of the screen.
5. The test tones sound from the connected speakers
and automatic speaker setting starts.
Measurement will be made three or more times for each
speaker. It takes several minutes to be completed. Keep
the room as quiet as possible during measurement. If
any of the speakers do not produce the test tone, check
for disconnection.
During measurement, each speaker outputs the test
tones at a high volume. Be careful of sound leak
that may disturb your neighbors, or be careful not to
frighten young children.
6. When the measurement is completed, the
measurement result is displayed.
Press
t
/
u
on the remote controller to check the
settings. Press Enter with "Save" selected. To have the
settings reflected for all the speakers, select "On (All
Channels)" in the next screen and press Enter on the
remote controller.
Select "On (Except Front Left / Right)" to disable just
the front speakers.
If there is an error message, follow the on-screen
instruction to remove the error cause. If the
subwoofer was not detected, turn the volume of the
subwoofer up to maximum and then select "Retry".
About THX playback
THX recommends setting the speakers manually if
you use THX-certified speakers or playing back with
THX listening modes.
THX recommends setting the crossover frequency
to "80Hz(THX)" manually.
Due to the electrical complexities and the
interaction with the room, you may notice irregular
results when setting the level or distance of each
speaker. If this happens, THX recommends
setting the speakers and the subwoofer manually.
7. When "Please unplug setup microphone." is
displayed, disconnect the microphone.
2
Source Connection
You can check the connections for each of the inputs and
configure the HDMI link function.
1. When the Source Connection start screen is
displayed, select "Yes, Continue" with the cursors
and press Enter.
Source Connection
This step will start to check if the
co nnections were made correctly.
Wo uld you like to continue?
Yes. Continue
No. Skip
Initial Setup
Exit
SETUP
2. Select the desired input to check the connection and
press Enter.
Start playback of the selected device. If connection is
correct, video/audio of the input source selected on the
unit will be played.
3. After checking the connection, select "Yes" with the
cursors and press Enter.
If you select "No" and press Enter, the error cause
will be displayed. Follow the guidance to remove the
error cause and check the connection again.
4. Select "Yes" with the cursors and press Enter on the
remote controller to check the connection of other
inputs or select "No, Done Checking" and press
Enter to skip.
If you select "Yes", you will return to the screen of
step 2.
If you select "No, Done Checking", you will proceed to
step 5.
5. Settings for the CEC link function.
To enable the HDMI link function with CEC compatible
equipment, select "Yes", then select "Yes" again in the
next screen.
Step 2:
Initial Setup
En-14
The following CEC-compatible devices are found;
Do you wish to turn on the CEC link?
xxxxxxxxxxx
Yes
No
Source Connection
Exit
SETUP
If you select "Yes", the connection with ARC compatible
TV and HDMI Standby Through function will be set to
"On" and enabled.
3
Remote Mode Setup
Remote Mode Setup
Preprograming remote will give you control
of other devices from AV receiver remote.
Would you like to setup your remote to
control your devices? This may take a while
depending on what and how many you have
connected. You can always come back to remote
setup from setup “7-2 Remote Mode Setup”.
Yes, Continue
No, Skip
Initial Setup
Exit
SETUP
You can enable operation of the other components using
the remote controller of the unit. When the Remote Mode
Setup start screen is displayed, select "Yes, Continue"
with the cursors and press Enter on the remote controller.
Follow the guidance to select the desired Remote Mode
button and in the keyboard screen, enter the first three
characters of the brand name of the device you are going
to program and search for the remote control code. The
guidance will also explain how to set the remote controller.
4
Network Connection
Network Connection
Do you want to connect network connection ?
It gives you network services that our AV
receiver support. If you wish to skip this step .
select “No. Skip” .
Ye s
No, Skip
Initial Setup
Exit
SETUP
You can check the network connection. When the Network
Connection start screen is displayed, select "Yes" with the
cursors and press Enter on the remote controller. If you
select "Yes" in the next screen, you can view the Ethernet
cable connection status.
If connection is successful
"Successfully Connected" is displayed on the screen.
MAC Address xxxxxxxxxxx
IP Address, Subnet Mask, Gateway, DNS Server
Gateway Ping
Internet Service Test
Successfully connected.
Next
Network Connection
Exit
SETUP
If this is not displayed, try doing the setting again.
Privacy policy
A confirmation screen asking you to agree to the privacy
policy is displayed during network setting. Select "Yes" and
press Enter to indicate agreement.
To improve our products and services of Onkyo Corporation,
Onkyo may collect information about your receiver usage.
To know more about what type of information we collect and
how we use it please review Onkyo’s Privacy Policy at
http://www.onkyo.com/privacy/
I have read Onkyo’s Privacy Policy and agree to its terms.
Yes
No
ONKYO PRIVACY STAT EMENT
Terminating initial setup
After finishing the initial setup, keep "Finished" selected
and press Enter on the remote controller. Connection and
setting of the unit is now complete.
Audio output of connected players
To enjoy digital surround sound including Dolby
Digital and DTS, audio output should be set to
"Bitstream output" on the connected Blu-ray Disc
Player or other device. Depending on the settings
on the Blu-ray Disc Player there may be cases when
Dolby TrueHD, Dolby Atmos, and DTS-HD Master
Audio audio is not output according to the format of
the source. In this case, in the Blu-ray Disc Player
settings try setting "BD video supplementary sound"
(or secondary sound) to "Off". Change the listening
mode after changing the setting to confirm.
Step 3:
Playing Back
En-15
1
Basic operations
To control the unit: The remote controller of this
unit has the remote mode function for controlling
other devices. You cannot control this unit when the
remote controller is in the remote mode other than
RECEIVER mode (for controlling this unit). Be sure
to press the
2
RCV button to select the RECEIVER
mode before starting operation.
1. Turning the power on.
Press
1
z
Receiver on the remote controller to turn the
power on.
Switch the input on the TV to that assigned to the
unit. Use the TV's remote controller.
2. Select the input on the unit.
Press the
3
Input Selector button with the same name
as the jack used for connection. Press TV to listen the
TV's sound. You can also use the input selector buttons
on the main unit.
Input will automatically be selected if the TV or player
is CEC compliant and connected to the unit with
HDMI cable.
3. Select the desired listening mode.
After pressing
2
RCV, press the
7
listening mode
buttons to switch the mode so that you can enjoy
different listening modes.
4. Adjust the volume with
G
VOL.
Remote controller parts name
1
8
9
F
I
H
G
2
3
4
5
6
7
J
1
z
Receiver button: Turns the unit on or into standby
mode.
2
RCV button: Switches the remote controller to the
mode for operating this unit.
3
Remote Mode/Input Selector buttons: Switch the
input to be played. Furthermore, by registering a
particular remote control code to a button, you can
switch the remote control mode to operate other
equipment by pressing that button.
4
Zone2, Zone3 buttons: For use when the unit is
connected with a pre-main amplifier and speakers in a
separate room and sound is played there.
5
Cursor buttons and Enter button: Moves the cursor
and confirms the selection.
6
Setup button: Displays the screen for making various
settings for this unit.
7
Listening mode buttons: Allows you to select the
listening mode.
Movie/TV button: You can select a listening mode
suitable for movies and TV programs.
Music button: You can select a listening mode suitable
for music.
Game button: You can select a listening mode suitable
for games.
THX button: You can select a THX listening mode.
For details on the listening modes, see the Advanced
Manual.
8
Dimmer button: Switches the brightness of the display.
9
Custom button: You can register a preset code to
enable operation of other devices. For how to make
settings, see the Advanced Manual.
F
Muting button: Temporarily mutes audio. Press again
to cancel muting.
G
Volume buttons: Allows you to adjust the volume. This
button also cancels the muting.
H
Return button: Returns the display to the previous
state.
I
Q button: Displays the Quick Setup menu that allows
you to quickly access the frequently used setting items
including sound quality adjustment.
Step 3:
Playing Back
En-16
J
Display button: Switches the information on the
display.
2
Network Functions
You can enjoy sources such as Internet radio by connecting
the unit to a network. For details on the operation, see the
Advanced Manual.
The operations described in this section are not
displayed on the TV when the OSD (the feature to show
information such as setting menus on the TV) language
is set to "Chinese". Operate by confirming the display on
the main unit.
Press NET on the remote controller to display the NET TOP
screen on the TV. Select the item with the cursors of the
remote controller and press Enter to confirm your selection.
To return to the previous screen, press Return.
TuneIn Radio
Pandora
Spotify
SiriusXM Internet Radio
Slacker Personal Radio
Deezer
AirPlay
Network
Internet Radio services
The unit comes preset with Internet radio services such as
TuneIn Radio. After selecting the desired service, follow
the on-screen instructions, using the cursors to select radio
stations and programs, then press Enter to play.
Network services or contents may become unavailable if
the service provider terminates its service.
Available services may vary depending on your area of
residence.
DLNA
You can play music files stored in the PC or NAS device
connected to the network. Select the server with the
cursors, select the desired music file and press Enter to
start playback.
This unit needs to be connected to the same router as a
computer or NAS device.
Home media
You can play music files in a shared folder on the PC or
NAS device connected to the network. Select the server
with the cursors, select the desired music file and press
Enter to start playback.
This unit needs to be connected to the same router as a
computer or NAS device.
USB
Play music files on a USB storage device. Connect the
USB storage device to the USB jack on the rear of the unit,
select the desired folder or music file with the cursors, and
press Enter to confirm and start playback.
3
AirPlay
®
You can enjoy the audio from iPhone
®
, iPod touch
®
, iPad
®
and PCs with iTunes.
Important: The iOS device or PC needs to be connected to
the network through the same router as this unit.
Playing music files from an iPhone, iPod
touch, or iPad
Update the OS version on your iOS device to the latest
version before connecting it to this unit.
1. Press NET on the remote controller.
2. Tap the AirPlay icon on the iPhone, iPod touch,
or iPad, select this unit from the list of devices
displayed, and click "Done".
The AirPlay icon is displayed in the control center under
iOS 7 and later. To display the control center, swipe
from the bottom of the screen of the iOS device.
If the AirPlay icon is not displayed, confirm that this unit
and the iOS device are both connected to the router
correctly.
3. Playing music files from an iPhone, iPod touch, or
iPad.
Playing music files from a computer
AirPlay is compatible with iTunes 10.2 or later.
1. Press NET on the remote controller.
2. Switch on your computer and start iTunes.
3. Click the AirPlay icon in iTunes and select this unit
from the list of devices displayed.
4. Playing iTunes music files.
If "6. Hardware"-"Power Management"-"Network
Standby" is set to "On" in the Setup menu, then once
AirPlay starts, this unit switches on automatically and
the "NET" input source can be selected. Even if this
setting is "Off", if the unit is already on then the "NET"
input source can be selected.
Information such as the name of the track is displayed
on the unit's display during AirPlay playback.
Due to the characteristics of AirPlay wireless
technology, the sound produced on this unit may slightly
be behind the sound played on the AirPlay-enabled
device.
There may be some differences in how operations are
performed depending on the iOS or iTunes version.
OSD are not displayed when the OSD language is set
Step 3:
Playing Back
En-17
to "Chinese". Operate by confirming the display on the
main unit.
Volume: The volume of this unit and the AirPlay-
enabled device are linked. Take care that the
volume doesn't become too loud when you adjust
the volume on the AirPlay-enabled device. You may
damage the unit or the speakers. Stop play on the
AirPlay-enabled device immediately if the volume
becomes too loud at any point.
4
AM/FM Radio
The Basic Manual explains the method using automatic
tuning. For manual tuning, see the Advanced Manual.
1. Press the Tuner button on the main unit several
times to select either "AM" or "FM".
2. Press Tuning Mode on the unit, so that the "AUTO"
indicator on the display lights.
3. Press Tuning
on the unit.
The automatic tuning to a radio station starts. Searching
stops when one is tuned. When tuned into a radio
station, the "
TUNED " indicator on the display lights.
The "FM STEREO" indicator lights if the radio station is
an FM radio station.
Actual display varies depending on the country or region
TUNED
FM STEREO
AUTO
Registering a radio station: You can register up to 40
of your favorite AM/FM radio stations.
1. Tune into the AM/FM radio station you want to
register.
2. Press Memory on the unit so that the preset number
on the display flashes.
3. Repeatedly press Preset
on the unit to select a
number between 1 and 40 while the preset number is
flashing (about 8 seconds).
4. Press Memory again on the main unit to register the
station.
When registered, the preset number stops flashing.
To select a preset radio station, press Preset
on
the main unit or CH +/- on the remote controller.
To delete a registered preset station, press the
Preset
button on the main unit, select the preset
number you want to delete, then while holding down the
Memory button, press the Tuning Mode button. When
deleted, the number on the display goes off.
AM/FM frequency step setting
It may be necessary for you to change the frequency
step to tune the radio in your area. Change the step
with the following procedure. Note that when this
setting is changed, all radio presets are deleted.
1 After pressing RCV on the remote controller,
press Setup.
2. Select "6. Hardware" with the cursor and press
Enter.
3. Select "Tuner" with the cursor and press Enter.
4. Select "AM/FM Frequency Step" (North American
models) or "AM Frequency Step" (Australian
models) with the cursor and select the frequency
step for your area.
5
Multi-zone
You can listen to audio in a room (called Zone 2 or Zone 3)
other than the one where this unit is located (called the
main room). You can also output video and audio to a TV in
the separate room (Zone 2) via HDMI.
Sources you can playback
External players (
1)
NET (
2)
AM/FM Radio
1 In Zone 2, you can play equipment connected to any of the HDMI
IN1 to IN5 jacks, DIGITAL IN COAXIAL/OPTICAL jacks, or AUDIO
IN jacks. Note that only analog or 2-channel PCM audio signals can
be played and that some players require audio output setting. Only
players connected to the AUDIO IN jack by analog connection can
be played in Zone 3.
2 DSD and Dolby TrueHD audio cannot be played in Zone 2/Zone 3.
Making Multi-zone Connection
There are the following three methods of connection.
Simultaneous playback in all zones is also possible.
a. Connecting a TV in a separate room
b. Connecting with an integrated amplifier or power
amplifier in a separate room
c. Connecting with speakers in a separate room
a. Connecting a TV in a separate room
You can play video and audio of the HDMI connected
player on the TV in a separate room. With an HDMI cable,
connect between the HDMI OUT SUB/ZONE 2 jack of the
unit and the HDMI IN jack of the TV in a separate room.
Main room
Zone 2
Settings are required: Press RCV and then Setup
on the remote controller, select "1. Input/Output
Assign" - "TV Out" and set the "Zone 2 HDMI"
setting to "Use".
The information for a connected device can
be displayed on the TV screen in a separate
room. Press the Zone2 button on the remote
controller to select Zone 2 and press Display.
Adjust the volume on the TV in the separate
room.
Step 3:
Playing Back
En-18
b. Connecting with an integrated amplifier or
power amplifier in a separate room
It is possible to play 2 ch source in a separate room while
7.1 ch source is being played in the main room.
Connect the PRE/LINE OUT ZONE 2 jacks or PRE/LINE
OUT ZONE 3 jacks of the unit and the line-in jacks of the
integrated amplifier in a separate room with an RCA cable.
Settings are required to listen to HDMI input
audio in Zone 2: Press RCV and then Setup on the
remote controller, select "1. Input/Output Assign"
- "TV Out" and set the "Zone 2 HDMI" setting to
"Use".
Zone 2
Main room
Zone 3
Settings are required to adjust audio using this
unit: Press RCV and then Setup on the remote
controller, select "3. Audio Adjust" - "Multi Zone"
and set the "Zone 2 Out" or "Zone 3 Out" setting
to "Variable". Be sure to make this setting if you
connect a power amplifier. If you do not, the volume
output may be big enough to cause damage.
c. Connecting with speakers in another room
Connect the speakers in another room to the ZONE2
speaker terminals of the unit using speaker cables. Note
that 5.1 ch will be the maximum (
) in the main room
during Zone 2 playback. No sound will be output from the
back speakers and height speakers.
In this case, the Dolby Atmos listening mode cannot be selected.
Main room
Zone 2
These settings are required: After connecting the
speakers, press RCV and then Setup on the remote
controller, select "2. Speaker" - "Configuration" and
set "Powered Zone 2" to "Yes".
Settings are required to listen to HDMI input
audio in Zone 2: Press RCV and then Setup on the
remote controller, select "1. Input/Output Assign"
- "TV Out" and set the "Zone 2 HDMI" setting to
"Use".
Performing Multi-zone Playback
It is possible to perform playback in the main room and a
separate room at the same time, for example by playing
the Blu-ray Disc player in the main room where the unit is
placed while playing Internet radio in a separate room. It is
also possible to perform playback only in a separate room.
With external players, it is possible to play the same
source or different sources in the main room and
separate room.
You cannot select separate network services for the
main room and another room with the "NET" input.
When listening to AM/FM broadcasting, you cannot
select different stations for the main room and separate
room. Therefore broadcasting of the same station will be
heard in the both rooms.
If you have connected the same player by HDMI in the
main room and in a separate room, input to this unit (the
main room) will be 2-channel PCM.
Playing Back
1. Press Zone2 or Zone3 on the remote controller,
point the remote controller at the main unit and
press
z
Receiver.
"Z2" or "Z3" lights on the main unit display and the multi-
zone function is enabled. (Zone 2 or Zone 3 is now on.)
2. Press Zone2 or Zone3 again on the remote
controller and press Input Selector of the input to be
played in a separate room.
If you turn the unit to standby during multi-zone
playback, the Z2/Z3 indicators are dimmed and the
playback mode is switched to playback in a separate
room only. Performing steps 1 and 2 while the unit is in
standby also switches the playback mode to playback
in a separate room only. To play the same source in
the main room and separate room, hold down Zone2 or
Zone3 for approximately 3 seconds.
Step 3:
Playing Back
En-19
To control on the main unit: press Zone2 or Zone3 and
within 8 seconds, press the input selector button of the
source to be played in the other room. To play the same
source in the main room and separate room, press Zone2
or Zone3 twice.
To adjust the audio in Zone 2 or Zone 3
To adjust the volume, press Zone2 or Zone 3 on the remote
controller and then adjust with VOL
j
/
l
. You can also
temporarily mute sound by pressing Muting. To control on
the main unit, press Zone2 or Zone 3 and within 8 seconds,
adjust with the Master Volume control.
To adjust the sound quality, press Zone2 or Zone 3 on the
main unit and press Tone several times to display "Bass",
"Treble" or "Balance" on the main unit display and adjust it
with + or -.
To turn off the function
After pressing Zone2 or Zone3 on the remote controller,
press
z
Receiver. To control on the main unit, press Zone2
or Zone3 and press
z
On/Standby.
Power consumption in standby mode increases when
the multi-zone function is being used.
While using the multi-zone function, the RI linked
system function (link between Onkyo components) is
disabled.
Pressing Input Selector on the remote controller while
you are using the remote controller for Zone 2 or Zone 3
will switch the controlled target to the main room. To
control Zone 2 or Zone 3 again, press the Zone2 or
Zone3 button to enter the Zone control mode.
WHOLE HOUSE MODE: If you press Whole House
Mode while playback is being performed in the
main room, the WHOLE HOUSE MODE is turned
on, "Z2" and "Z3" on the display light at the same
time and the playback sources of all the rooms are
switched to the same source at once.
The sources that can be played in Zone 2 can
be played in all rooms.
This function cannot be used if headphones are
connected or audio is output from the speakers
of the TV.
6
Quick Setup menu
You can perform common settings on the television screen
while playing.
1. Press Q on the remote controller.
The Quick Setup menu is displayed on the connected
TV's screen.
Quick Setup
Listening Mode
Audio
HDMI
Information
MOVIE/TV
MUSIC
GAME
THX
BD/DVD
2. Select the items with the cursors on the remote
controller and then press Enter.
To return to the previous screen, press Return.
3. Select the content with the cursors of the remote
controller.
Listening Mode: Select the listening mode from the
categories of "MOVIE/TV", "MUSIC", "GAME" and "THX".
After selecting, press Enter button to confirm.
It cannot be set when audio is played from the TV's
speakers.
Audio: You can perform various audio settings including
audio quality and speaker level adjustment.
You cannot select this item when audio is output from
the TV's speakers.
Bass, Treble: Adjust volume of the front speaker.
It cannot be set if the listening mode is Direct or THX.
Phase Matching Bass: Suppress phase shift in the
midrange to enhance bass sound. Thus smooth and
powerful bass sound can be obtained.
It cannot be set if the listening mode is Direct or THX.
Center Level, Subwoofer Level: Adjust the speaker
level while listening to the sound. The adjustment you
made will be reset to the previous status when you turn
the unit to standby mode.
Changes may not be possible depending on the
speaker settings.
This setting is not possible during MUTING or when
using headphones.
Speaker Layout: Select the speakers to prioritize when
back speakers and height speakers are connected at
the same time.
Changes may not be possible depending on the
speaker settings.
A/V Sync: If the video is behind the audio, you can
delay the audio to offset the gap. Different settings can
be set for each input selector.
It cannot be set if the listening mode is Direct.
AccuEQ Room Calibration: Enable or disable the
settings made by automatic speaker setting. If this is to
be enabled, then normally you should select "On (All
Ch)", and to disable just the front speakers you should
select "On (ex. L/R)". The setting can be separately set
to each input selector.
This setting cannot be selected if the automatic
speaker setting has not been performed.
It cannot be set if headphones are connected or the
listening mode is Direct.
Step 3:
Playing Back
En-20
Equalizer: Select "Preset1" to "Preset3" configured in
"2. Speaker" - "Equalizer Settings" in the Setup menu.
The same sound field setting is applied all ranges when
set to "Off".
It cannot be set if the listening mode is Direct.
Music Optimizer: Improve the quality of the
compressed audio. Playback sound of lossy
compressed files such as MP3 will be improved. The
setting can be separately set to each input selector.
The setting is effective in the signals of 48 kHz or
less. The setting is not effective in the bitstream
signals.
It cannot be set if the listening mode is Direct.
Late Night: Make small sounds to be easily heard. It
is useful when you need to reduce the volume while
watching a movie late night. You can enjoy the effect
only with Dolby Digital, Dolby Digital Plus, Dolby
TrueHD, and DTS sources.
Turning the unit to standby mode will set the setting
to "Off". In case of Dolby TrueHD, the setting will be
set to "Auto".
The setting cannot be used in the following cases.
If "3. Audio Adjust" - "Dolby" - "Loudness
Management" in the Setup menu is set to "Off"
when playing Dolby Digital Plus or Dolby TrueHD
When the input signal is DTS and "Dialog
Control" is other than 0 dB
Re-EQ, Re-EQ(THX): Adjust the soundtrack that was
processed to enhance its treble, in order to make it
suitable for home theater.
This function can be used in the following listening
modes: Dolby Digital, Dolby Digital Plus, Dolby
TrueHD, Multichannel, DTS, DTS-ES, DTS 96/24,
DTS-HD High Resolution Audio, DTS-HD Master
Audio, and DTS Express.
In Re-EQ(THX), the following listening modes can
be used: THX Cinema, THX Surround EX, and THX
Select2 Cinema.
Center Spread: Adjust the width of the sound field of
the front channel when playing in the Dolby Surround
listening mode.
To spread the width of the sound field to the left and
right, set to "On". To concentrate sound in the center, set
to "Off".
Depending on the speaker settings, this becomes
"Off".
Dialog Control: You can increase the dialog portion of
the audio in 1 dB steps up to 6 dB so that you can make
dialog easier to hear over background noise.
This cannot be set for content other than DTS:X.
The effect may not be selectable with some content.
HDMI :
HDMI OUT: Select the HDMI OUT jack to be used for
output.
Control TV: Set whether to enable the CEC link
function for TVs connected through one of the HDMI
OUT MAIN or SUB jacks.
Information:
Audio: Displays the audio input source, format, number
of channels, sampling frequency, listening mode, and
number of output channels.
Video: Displays information such as the video input
source, resolution, color space, color depth, 3D
information, aspect ratio, and output.
Tuner: Displays information such as the band,
frequency, and preset number. This is displayed only
when "TUNER" is selected as the input source.
7
Other useful functions
To adjust the sound quality
It is possible to enhance or moderate the bass and treble
of front speakers. Press Tone on the main unit several
times to select the desired setting from "Bass", "Treble" and
"Phase Matching Bass", and adjust with +/-.
This cannot be set if the listening mode is Direct, or
THX.
"Bass": Allows you to enhance or moderate the bass.
"Treble": Allows you to enhance or moderate the treble.
"Phase Matching Bass": Allows you to keep the clear
midrange and effectively enhance the bass.
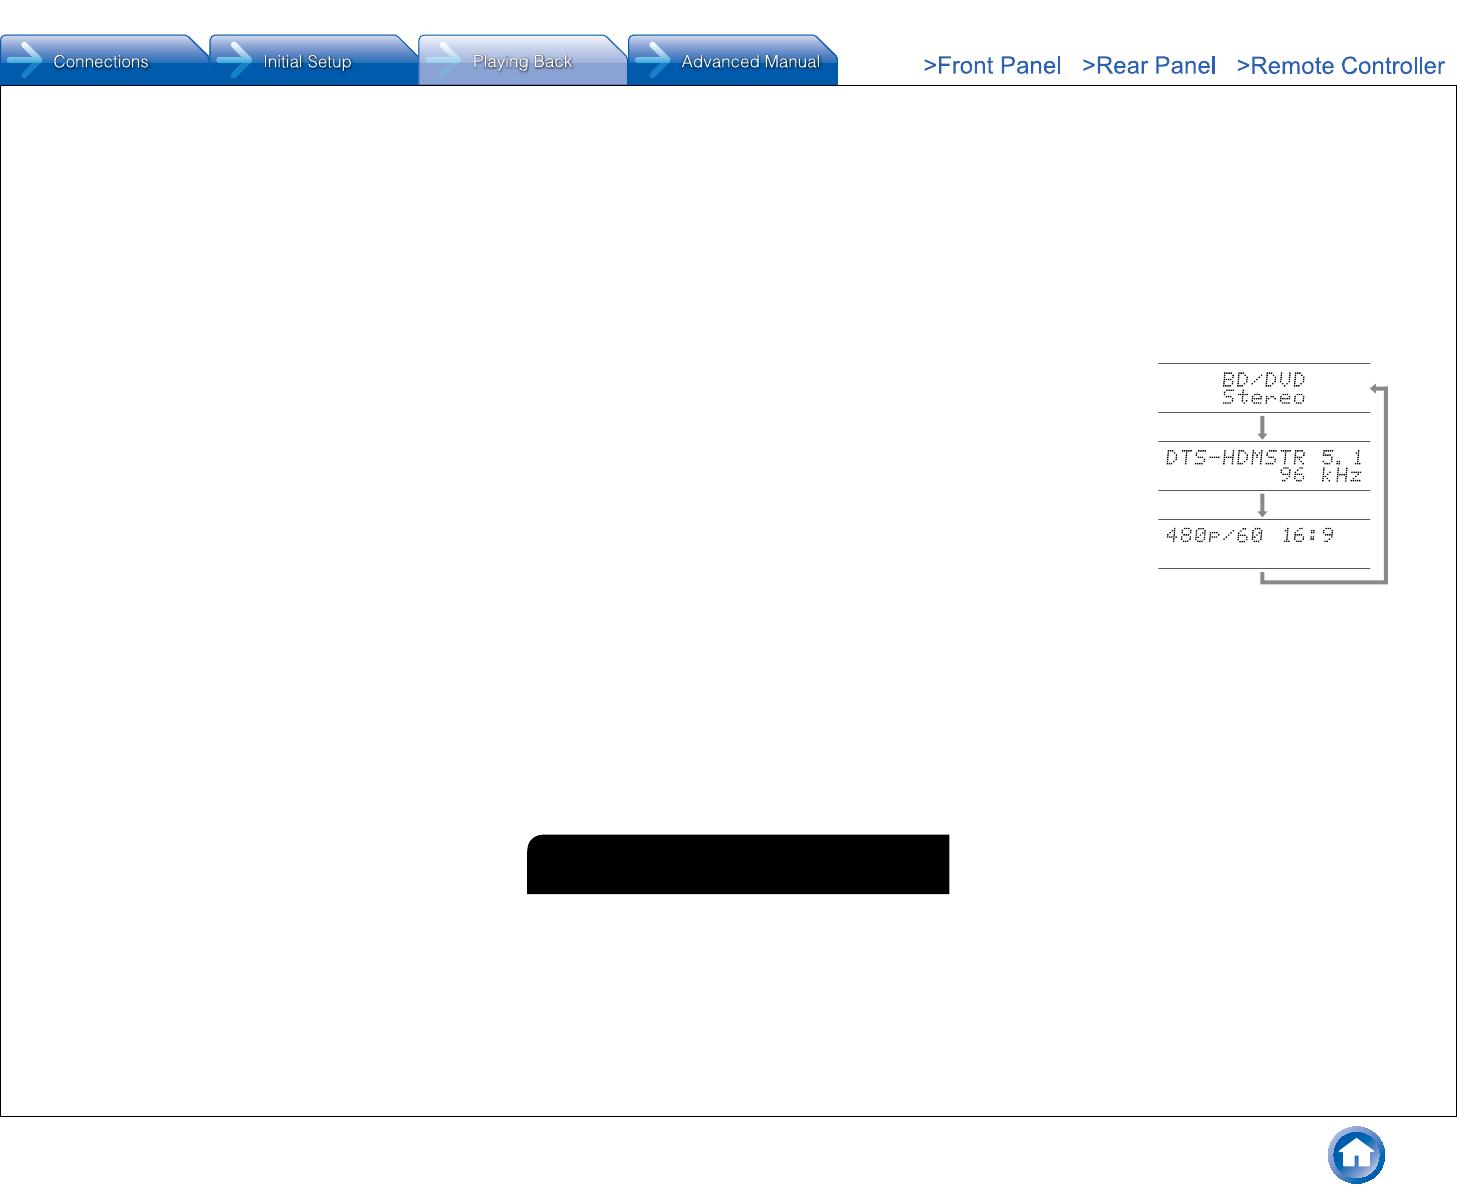
Checking the Input Format
Press Display on the remote controller several times to
switch the display of the main unit in order of:
Input source &
Listening mode
Signal format & Sampling
frequency (Audio)
Input signal resolution
(Video)
If "Dolby D 5.1" is displayed in Signal format, the
Dolby Digital 5.1 ch signals are being input. When
listening to AM/FM radio, the band, frequency and
preset number are displayed.
Playing Audio and Video from Separate Sources
It is possible to play audio and video from different sources.
For example, you can play audio from the CD player and
video from the BD/DVD player. In this case, press BD/DVD
on the remote controller and then CD. Then start playback
on the BD/DVD player and CD player. This function is
effective when an input with audio only has been selected
(CD, NET, TUNER, and PHONO in the initial setting). (
)
When NET is selected, press either the NET button then press MODE on
the remote controller.
  • Page 1 1
  • Page 2 2
  • Page 3 3
  • Page 4 4
  • Page 5 5
  • Page 6 6
  • Page 7 7
  • Page 8 8
  • Page 9 9
  • Page 10 10
  • Page 11 11
  • Page 12 12
  • Page 13 13
  • Page 14 14
  • Page 15 15
  • Page 16 16
  • Page 17 17
  • Page 18 18
  • Page 19 19
  • Page 20 20
  • Page 21 21
  • Page 22 22
  • Page 23 23
  • Page 24 24
  • Page 25 25
  • Page 26 26
  • Page 27 27
  • Page 28 28
  • Page 29 29
  • Page 30 30
  • Page 31 31
  • Page 32 32
  • Page 33 33
  • Page 34 34
  • Page 35 35
  • Page 36 36
  • Page 37 37
  • Page 38 38
  • Page 39 39
  • Page 40 40
  • Page 41 41
  • Page 42 42
  • Page 43 43
  • Page 44 44
  • Page 45 45
  • Page 46 46
  • Page 47 47
  • Page 48 48
  • Page 49 49
  • Page 50 50
  • Page 51 51
  • Page 52 52
  • Page 53 53
  • Page 54 54
  • Page 55 55
  • Page 56 56
  • Page 57 57
  • Page 58 58
  • Page 59 59
  • Page 60 60
  • Page 61 61
  • Page 62 62
  • Page 63 63
  • Page 64 64
  • Page 65 65
  • Page 66 66
  • Page 67 67
  • Page 68 68
  • Page 69 69
  • Page 70 70
  • Page 71 71
  • Page 72 72
  • Page 73 73
  • Page 74 74
  • Page 75 75
  • Page 76 76
  • Page 77 77
  • Page 78 78
  • Page 79 79
  • Page 80 80
  • Page 81 81
  • Page 82 82
  • Page 83 83
  • Page 84 84
  • Page 85 85
  • Page 86 86
  • Page 87 87
  • Page 88 88
  • Page 89 89
  • Page 90 90
  • Page 91 91
  • Page 92 92
  • Page 93 93
  • Page 94 94
  • Page 95 95
  • Page 96 96
  • Page 97 97
  • Page 98 98
  • Page 99 99
  • Page 100 100
  • Page 101 101
  • Page 102 102
  • Page 103 103
  • Page 104 104
  • Page 105 105
  • Page 106 106
  • Page 107 107
  • Page 108 108
  • Page 109 109
  • Page 110 110
  • Page 111 111
  • Page 112 112
  • Page 113 113
  • Page 114 114
  • Page 115 115
  • Page 116 116
  • Page 117 117
  • Page 118 118
  • Page 119 119
  • Page 120 120
  • Page 121 121
  • Page 122 122
  • Page 123 123
  • Page 124 124
  • Page 125 125
  • Page 126 126
  • Page 127 127
  • Page 128 128
  • Page 129 129
  • Page 130 130
  • Page 131 131
  • Page 132 132
  • Page 133 133
  • Page 134 134
  • Page 135 135
  • Page 136 136
  • Page 137 137
  • Page 138 138
  • Page 139 139
  • Page 140 140
  • Page 141 141
  • Page 142 142
  • Page 143 143
  • Page 144 144

Integra DTR-50.7 Owner's manual

Category
AV receivers
Type
Owner's manual

Ask a question and I''ll find the answer in the document

Finding information in a document is now easier with AI