Page is loading ...

1
www.KALORIK.com
AFO 46894 – 200518
SMART FRYER OVEN
120V~60Hz 1500W (12.5A)
AFO 46894
HORNO FREIDORA DE AIRE
FOUR FRITEUSE À AIR CHAUD
EN……....7
ES……...17
FR….......31

2
www.KALORIK.com
AFO 46894 – 200518
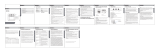
PARTS DESCRIPTION / DESCRIPTION DES
ÉLÉMENTS
8
1
2
4
7
5
6
3

3
www.KALORIK.com
AFO 46894 – 200518
ENGLISH:
1. Timer switch knob
2. Temperature control knob
3. Power indicator light
4. Oven light
5. Air fryer basket
6. Wire rack
7. Baking/drip tray
8. Removable crumb tray
ESPAÑOL:
1. Perilla de control del temporizador
2. Perilla de control de temperatura
3. Luz indicadora de encendido
4. Luz de horno
5. Cesta de fritura de aire
6. Estante de alambre
7. Bandeja de goteo / bandeja para
hornear
8. Bandeja para migas
FRANÇAIS:
1. Bouton de minuterie
2. Bouton de contrôle de la
température
3. Bouton de commutation de
fonction Voyant d'alimentation
4. Lumière de four
5. Panier de friture
6. Grille de cuisson
7. Plaque de cuisson / bac
d’égouttement
8. Ramasse-miettes amovible
1 0
1
1

4
AFO 46894 – 200518
IMPORTANT SAFEGUARDS
When using electrical appliances, basic safety precautions should
always be followed, including the following:
1. READ ALL INSTRUCTIONS.
2. Check that your mains voltage corresponds to that stated on the
appliance.
3. Do not touch hot surfaces. Use handles or knobs.
4. To protect against electrical shock, fire or personal injury, do not
immerse cord, plugs, or the appliance in water or other liquid.
5. Close supervision is necessary when any appliance is used by or near
children.
6. Unplug from outlet when not in use and before cleaning. Allow to cool
before putting on or taking off parts.
7. Do not operate any appliance with a damaged cord or plug or after
the appliance malfunctions or has been damaged in any manner.
Return the appliance to the nearest authorized service facility for
examination, repair, or adjustment.
8. The use of accessory attachments not recommended by the
appliance manufacturer may cause injuries.
9. Do not use outdoors. This appliance is for HOUSHOLD USE ONLY.
10. Do not let the cord hang over the edge of a table or counter or touch
hot surfaces.
11. Do not place on or near a hot gas or electric burner, or where it could
touch another heated oven.
12. When operating the oven keep at least four inches of space on all
sides of the oven to allow for adequate air circulation.
13. Always operate on a stable, heat resistant surface. Do not use on a
cloth-covered surface, near curtains or other flammable materials.
14. Do not place the oven near the edge of a bench or table during
operation. Ensure the surface is level, clean and free of water, flour,
etc.
15. Extreme caution must be used when moving an appliance containing
hot oil or other hot liquids.
16. Do not use the appliance for other than intended use.
17. Oversize foods or metal utensils must not be inserted in the Air Fryer
Oven as they may create a fire or risk of electric shock.
18. A fire may occur if the Air Fryer Oven is covered or touching flammable
material, including curtains, draperies, walls, and the like, when in

5
AFO 46894 – 200518
operation. Do not store any item on top of the appliance when in
operation.
19. Do not clean with metal scouring pads. Pieces can break off the pad
and touch electrical parts involving a risk of electric shock.
20. Extreme caution should be exercised when using containers
constructed of other than metal or glass.
21. Do not store any materials in this oven when not in use.
22. Do not place any of the following materials in the oven: paper,
cardboard, plastic, and the like.
23. Do not cover crumb tray or any part of the oven with metal foil. This
causes overheating of the oven.
24. Do not leave unit unattended, especially when toasting or broiling.
25. Use extreme caution when disposing of hot grease.
26. Always wear protective, insulated oven gloves when inserting or
removing items from the hot oven.
27. To disconnect, turn all knobs back to the starting position making sure
everything is OFF, then remove plug from wall outlet.
28. Do not attempt to dislodge food when the air fryer oven is plugged into
electrical outlet.
29. Do not rest cooking utensils or baking dishes on the glass door.
SAVE THESE INSTRUCTIONS
HOUSEHOLD USE ONLY
SAFETY TIPS
1. When in use, always use oven mitts or potholders when touching any
outer or inner surface of the oven, or when handling accessories.
2. To reduce risk of fire, keep oven interior clean and free of food, oil,
grease and any other combustible materials.
3. Do not use metal utensils such as knives to remove food residue from
the heating elements as this can damage the appliance as well as
lead to electrocution.
4. Do not store any materials in the oven when not in use.

6
AFO 46894 – 200518
POLARIZED PLUG INSTRUCTIONS
This appliance is equipped with a polarized plug (one blade is wider
than the other). To reduce the risk of electric shock, this plug will fit into
the polarized outlet only one way. If the plug does not properly fit into
the outlet at first, reverse it. If it still does not fit, contact a competent
qualified electrician. Do not attempt to modify the plug in any way.
SHORT CORD INSTRUCTIONS
A short power supply cord is provided to reduce the hazards resulting from
becoming entangled in or tripping over a longer cord. Extension cords may
be used if care is exercised in their use.
• The electrical rating of the extension cord should be at least that of the
appliance. If the electrical rating of the extension cord is too low, it
could overheat and burn.
• The resulting extended cord should be arranged so that it will not drape
over the countertop or tabletop where it can be pulled on by children
or tripped over.
KNOW YOUR AIR FRYER OVEN
Cook food faster than ever while reducing fat and calories with the Kalorik
Smart Fryer Oven. Using advanced Rapid Hot Air Technology, this high-
performance air fryer oven cooks food up to 30% faster — with no
preheating required. Fry all your favorite foods to crunchy, golden
perfection with little to no oil, reducing fat by up to 75%. The Kalorik Smart
Fryer Oven achieves a delightfully-crispy exterior and moist, tender interior,
so you can indulge without the guilt. Adjustable time and temperature
controls customize cooking for each dish. The appliance reaches up to
450°F, so you can even broil and toast your food. The inner oven light allows
you to easily monitor your dish while it cooks, while the included air frying
basket, baking pan, air rack, and crumb tray offer great versatility in menu
options.

7
AFO 46894 – 200518
Indicator light & Control knobs:
• The Power indicator light, located on the right side, turns red once the
timer is activated, indicating the unit is currently on. Setting the oven
timer powers the unit on and begins the cooking cycle.
• Use the temperature knob to adjust desired temperature for cooking.
• The oven button light is located on the right side, push the button to
turn on the interior oven light. The light will not work if the power is off.
• Remember to turn the temperature knob back to the starting point
after each use to make sure you are adjusting correct temperature
settings for each cooking process.
BEFORE THE FIRST USE
• Unpack the appliance and accessories and wash and wipe everything
down. Wipe the interior of the oven with a damp cloth or sponge. Dry
with a paper towel. Make sure the oven is dry before operating the
unit.
• Position the oven on a flat and heat resistant surface so that it is also
positioned at least 4 inches (10cm) away from any surrounding object.
• Unwind and plug in the power cord into the wall outlet. Place the
crumb tray inside on the bottom of the unit. Make sure unit is clean and
everything has been taken out of the oven.
• It is normal if some smoke or smell emanates from the appliance when
using it for the first time. This is not harmful. To eliminate any packing oil
that may remain after production, we recommend operating the
appliance for 20 minutes, putting the thermostat on its maximum
temperature setting.
Tips:
• Cooking rack positioning: There are 3 rack positions within the air fryer
oven. Top, middle, and bottom.
• Always place the baking pan / drip tray on the lowest level when
cooking with the basket or baking rack. The baking pan will catch any
grease or crumbs during the cooking cycle.

8
AFO 46894 – 200518
OPERATING INSTRUCTIONS
PREHEATING:
• Plug the unit into the power supply socket.
• Turn the temperature knob to the right to start preheating at desired
temperature and set the timer to 10 minutes.
• The Power light will turn on to indicate that the unit is ON.
• You can now place your food in the oven to start the cooking process
as the unit is fully preheated.
SETTINGS
AIR FRY
Air Fry is a healthy alternative to frying without the use of excess amounts of
oil. A high velocity fan and an upper heating element circulate air to
prepare a variety of foods that are both delicious and heathier than
traditional foods. This lets you cook with less fat and calories and gives the
food a lighter and less greasy taste.
Preheating is not necessary for the air frying but can be used to speed up
the cooking process. Keep in mind that preheating will interfere with
recommended cooking times. If the unit is already hot, remove 3 minutes
from the recommended cooking time.
• Place the baking pan / drip tray on the lowest level when cooking if
cooking with the basket or baking rack. The baking pan will catch
any grease or crumbs during the cooking cycle.
• Place the mesh basket or rack with food in the unit.
• Adjust the temperature knob to the desired temperature by turning
the knob to the right.
• Adjust the timer knob to the desired cooking time. Once time has
been set, the Power indicator light will turn on. The Air Fryer Oven
starts as soon as the timer is set.
• When the cooking time has elapsed, the timer bell will ring, the oven
will now turn off on its own.
• Carefully take your food out with oven mitts.

9
AFO 46894 – 200518
Notes:
- Although oil is not necessary, a small portion of oil can be sprayed on or
brushed on food for air frying. Make sure to distribute oil evenly on food.
- When cooking a large amount of food, it is recommended to flip food
halfway to ensure even cooking.
- Food will cook more evenly if cut into the same size piece.
- When air frying greasy food, grease will drain into the baking/drip tray.
As a precaution, allow hot grease to cool in the unit before removing
the baking/drip tray.
- Please note that some food release water as it cooks. When cooking
large quantities for an extended period, condensation may build up
which leaves a bit of moisture.
MORE WAYS TO COOK
In addition to air frying, the air fryer oven can be used for baking,
broiling, roasting and more. To cook using these settings, simply use the
knobs to adjust the temperature (warm – 450°F) and time (0-60 minutes)
to the settings you desire. See below for tips and recommendations:
- When using the air fryer oven, cooking times may need to be
reduced due to the convection fan’s high speed. We recommend
checking on the food about 5 to 10 minutes before the finished set
cooking time.
- The Kalorik Smart Fryer Oven can be used to cook cakes, bake
goods or roast meats as well as cook frozen meals. For best results
when baking, we recommend preheating the oven at least for 10
minutes at the desired temperature setting.
- Use the bake rack for fresh and frozen pizza.
- When making baked goods in the oven, set the baking/drip tray on
the last (bottom) rack in the air fryer oven.
- The Kalorik Smart Fryer Oven can also be used to broil your small
cuts of meat, open sandwiches, poultry, fish and vegetables. Make
sure to preheat for 10 minutes first, then set the temperature to the
highest setting (450°F) and set the tray in the first (top) rack in the air
fryer oven.

10
AFO 46894 – 200518
- Broiling usually requires shorter cooking time. It is best to watch over
food to not overcook.
- To roast vegetables and meat, we recommend setting the
temperature to 400°F.
- To use the Kalorik Smart Fryer Oven to toast, set the temperature to
450°F and place your food with the tray to set on the top (first) rack.
Be sure to flip your food halfway through the cooking cycle to
evenly toast on both sides.
- Caution: Aluminum foil is not recommended for covering the
accessories. If covered, the foil prevents the fat from dripping into the
drip tray. Grease will accumulate on the foil surface and may catch
fire. If you choose to use foil to cover the Baking Pan/Drip Tray, be sure
foil is cut to neatly fit into the pan and does not touch the wall or
heating elements.

11
AFO 46894 – 200518
AIR FRYER RECIPES
PORK CHOPS
• 4 Thick cut bone in pork chops
• 1/3 Cup olive oil
• 2 Tablespoons brown sugar
• 1 Lemon, zest and juice
• 2 1/2 Tablespoons spicy
mustard
• 1 Teaspoon coarse ground
mustard
• 4 Cloves garlic, chopped
• 2 Teaspoons dried thyme
• 1 Teaspoon granulated onion
• 1 Teaspoon liquid smoke
• 2 Teaspoons white vinegar
• 1 Teaspoon Worcestershire
sauce
• 1/2 Teaspoon parsley flakes
• Salt & pepper
In a medium mixing bowl, whisk together olive oil, brown sugar, lemon zest
and juice, both mustards, garlic, thyme, onion, liquid smoke, vinegar,
Worcestershire sauce, parsley, salt and pepper. Put the pork chops and
mixture together in large, resealable plastic bag and marinate for 3 hours
or overnight in the refrigerator. Cook on the top rack placed on the air fryer
mesh basket at 400°F for 15 minutes. Make sure the baking/drip tray is
placed on the last rack to be able to catch grease. Let rest for 5 minutes.
Serves 4.
BBQ CHICKEN DRUMSTICK
• 8 Chicken drumsticks
• 3 Tablespoons olive oil
• Salt and pepper
• BBQ sauce
Dry the chicken. Coat with olive oil, salt and pepper. Cook on the middle
rack at 420°F for 5 minutes using the air fryer mesh basket. Baste with BBQ
Sauce and cook for an additional 10 minutes at 420°F.
Serves 4.

12
AFO 46894 – 200518
ROASTED ASPARAGUS
• 2 Pounds Asparagus
• 3 Tablespoons olive oil
• 1 Tablespoon grated Parmesan
cheese
• 1/2 Teaspoon granulated garlic
• Splash of balsamic vinegar
• Salt and pepper
Coat the asparagus with olive oil, Parmesan cheese, garlic, vinegar, salt
and pepper. Cook on the top rack with a single layer at 360°F for 8 minutes
using the air fryer mesh basket.
Serves 6.
SNICKER DOODLE COOKIE
• 1/2 Cup butter
• 3/4 Cup sugar
• 1 Egg
• 3 Drops almond extract
• 1 1/2 Cups all-purpose flour
• 1 Teaspoon cream of tartar
• 1/2 Teaspoon baking soda
• 1/4 Teaspoon kosher salt
• 3 Tablespoons sugar
• 1 Tablespoon cinnamon
Start with all ingredients at room temperature. Cream together the butter,
sugar, egg and almond extract with a hand mixer until smooth. In a
separate bowl, whisk together the flour, cream of tartar, baking soda, and
salt. Add dry ingredients to the butter mixture. Roll 1 tablespoon portion
balls in the remaining sugar and cinnamon. Place a piece of parchment
paper on the baking/drip tray and place your cookies on top. Slide the
baking tray to the bottom rack. Bake 6 cookies at a time at 350°F for 10
minutes. Let rest for 5 minutes.
Makes 24 cookies.
GET MORE OUT OF YOUR PRODUCT
Browse Chef-created recipes specifically made for your Kalorik product.
Visit our website www.kalorik.com to see our extensive recipe library and
start cooking. Sign up for the Kalorik email mailing list to receive special
offers and recipes, and connect with us on social media for daily
inspiration.

13
AFO 46894 – 200518
CLEANING AND MAINTENANCE
• Make sure to clean the appliance after each use! Cleaning regularly
prevents the accumulation of grease and helps avoid unpleasant
smells.
• Make sure the unit has been turned off by switching the timer to 0 and
setting the temperature knob back to the starting point. Unplug the
appliance from the outlet and allow it to cool completely.
• Do not immerse in water or wash under running water.
• The accessories should be hand washed in hot, sudsy water. They are
not dishwasher safe.
• Do not use metal kitchen utensils or abrasive cleaning materials to
clean them, as this may damage the non-stick coating. Rinse and dry
thoroughly after cleaning.
• Inner oven light bulb may be replaced if needed.
Inside cleaning
• Wipe cavity with a damp cloth or sponge. Dry with paper towel. To
remove baked on food, pour a little cooking oil on the food and allow
to stand for five to ten minutes. This should soften the food and allow it
to be removed with absorbent paper toweling or a soft cloth.
• Clean the inside of the glass door with a damp soapy cloth. If the glass
has stubborn stains, open the door and cover the inside of the door
with a few damp paper towels. Leave for a few minutes, then remove
the towels and wipe door clean. Never use sharp utensils as scratching
may weaken it and cause it to shatter.
• Never use abrasive products in the cavity. Never immerse the
appliance in water and make sure no water or damp penetrates the
appliance except the cavity.
• Make sure no water comes on the oven door when the latter is still hot.
• Always clean the removable crumb tray after each use. Excess food
particles could cause smoking and will be hard to remove from tray. To
remove baked on grease or burnt food particles you can soak the
removable crumb tray in hot study waster. Never operate the oven
without the tray in place.

14
AFO 46894 – 200518
Outside / outside door cleaning
1. Wipe clean with a damp sponge. Wipe dry
2. NEVER use steel wool, metal scouring pads or abrasive cleaners, as
they may damage the finish.
DO NOT IMMERSE THE OVEN IN WATER OR ANY OTHER LIQUID.
TROUBLESHOOTING
Problem Possible Cause Solution
The unit
does not work
--------------------------------------------------------------------------------------------------------------------
Food not cooked
-------------------------------------------------------------------------------------------------------------------
Food is not fried
evenly
--------------------------------------------------------------------------------------------------------------------
White smoke
Coming from
the unit
------------------------------------------------------------------------------------------------------------------
French fries are
not fried evenly
1. Appliance is not plugged in.
2. You have not turned the Unit
On by setting the time and
temperature.
1. Plug power cord into
wall socket.
2. Set the temperature
and time
1. The food is overloaded.
2. The temperature is set too low.
1. Use smaller batches for
more even frying.
2. Raise temperature and
continue cooking.
Some foods need to be turned
during the cooking process.
See General Operations
in this manual
1. Oil is being used.
2. Accessories have excess
grease residue from previous
cooking.
1. Wipe down to
remove excess oil.
2. Clean the accessories
after each use.
1. Wrong type of potato being
used.
2. Potatoes not blanched
properly during preparation.
1. Use fresh, firm potatoes.
2. Use cut sticks and pat
dry to remove excess
starch.

15
AFO 46894 – 200518
WARRANTY
We suggest that you complete and return the enclosed Product
Registration Card promptly to facilitate verification of the date of original
purchase. However, return of the Product Registration Card is not a
condition of these warranties. You can also fill out this warranty card online,
at the following address: www.KALORIK.com
This KALORIK product is warranted in the U.S.A. and in Canada for 1 year
from the date of purchase against defects in material and workmanship.
This warranty is not transferable. Keep the original sales receipt. Proof of
purchase is required to obtain warranty performance.
During this period, if the KALORIK product, upon inspection by KALORIK, is
proven defective, it will be repaired or replaced, at Kalorik’s option,
without charge to the customer. If a replacement product is sent, it will
carry the remaining warranty of the original product.
This warranty does not apply to any defect arising from a buyer's or user's
misuse of the product, negligence, failure to follow KALORIK instructions
noted in the user’s manual, use on current or voltage other than that
stamped on the product, wear and tear, alteration or repair not authorized
by KALORIK, or use for commercial purposes. There is no warranty for glass
parts, glass containers, filter basket, blades and agitators, and accessories
in general. There is also no warranty for parts lost by the user.
ANY WARRANTY OF MERCHANTABILITY OR FITNESS WITH RESPECT TO THIS
PRODUCT IS ALSO LIMITED TO THE ONE YEAR LIMITED WARRANTY PERIOD.
Some states do not allow limitation on how long an implied warranty lasts
or do not allow the exclusion of incidental or consequential damages, so
the above limitations may not apply to you. This warranty gives you specific
legal rights, and you may also have other rights which vary from state to
state.
If the appliance should become defective within the warranty period and
more than 30 days after date of purchase, do not return the appliance to
the store: often, our Customer Service Representatives can help solve the
problem without having the product serviced. If servicing is needed, a
Representative can confirm whether the product is under warranty and
direct you to the nearest service location.

16
AFO 46894 – 200518
If this is the case, bring the product, or send it, postage prepaid by the user
(all Kalorik customers are responsible for the initial shipment back to the
warranty center), along with proof of purchase and a return authorization
number indicated on the outer package, given by our Customer Service
Representatives. Send to the authorized KALORIK Service Center (please
visit our website at www.KALORIK.com or call our Customer Service
Department for the address of our authorized KALORIK Service Center).
When sending the product, please include a letter explaining the nature of
the claimed defect.
If you have additional questions, please call our Customer Service
Department (please see below for complete contact information),
Monday through Thursday from 9:00am - 5:00pm (EST) and Friday from
9:00am - 4:00pm (EST). Please note hours are subject to change.
If you would like to write, please send your letter to:
KALORIK Customer Service Department
Team International Group of America Inc.
16175 NW 49th Avenue
Miami Gardens, FL 33014 USA
Or call:
Toll Free: +1 888-521-TEAM / +1 888-KALORIK
Only letters can be accepted at this address above. Shipments and
packages that do not have a return authorization number will be refused.

17
AFO 46894 – 200518
IMPORTANTES SALVAGUARDIAS
Al usar equipos eléctricos, siempre se deben tomar medidas de
seguridad básicas, que incluyen las siguientes:
1. LEA TODAS LAS INSTRUCCIONES ANTES DE USAR.
2. Compruebe que el voltaje de su hogar coincida con el que se indica
en el aparato.
3. No toque las superficies calientes. Utilice asas o perillas.
4. Para protegerse contra descargas eléctricas, incendios o lesiones
personales, no sumerja el cable, los enchufes o el aparato en agua u
otro líquido.
5. Es necesaria una supervisión estrecha cuando cualquier aparato es
utilizado por niños o cerca de él.
6. Desenchufe la toma de corriente cuando no esté en uso y antes de
limpiar. Dejar enfriar antes de ponerse o quitarse las piezas.
7. No utilice ningún aparato con un cable o enchufe dañados o después
de que el aparato no funcione correctamente o se haya dañado de
alguna manera. Devuelva el aparato a la instalación de servicio
autorizada más cercana para su examen, reparación o ajuste.
8. El uso de accesorios no recomendados por el fabricante del aparato
puede causar lesiones.
9. No lo use al aire libre. Este aparato es para USO DE CASA SOLAMENTE.
10. No deje que el cable cuelgue sobre el borde de una mesa o contador
o toque superficies calientes.
11. No coloque sobre o cerca de un quemador de gas caliente o
eléctrico, o donde pueda tocar otro horno calentado.
12. Al operar el horno mantener al menos cuatro pulgadas de espacio en
todos los lados del horno para permitir una circulación de aire
adecuada.
13. Utilice siempre sobre una superficie estable y resistente al calor. No
utilizar sobre una superficie cubierta de tela, cerca de cortinas u otros
materiales inflamables.
14. No coloque el horno cerca del borde de un banco o mesa durante el
funcionamiento. Asegúrese de que la superficie esté nivelada, limpia y
libre de agua, harina, etc.
15. Se debe extremar la precaución al mover un aparato que contenga
aceite caliente u otros líquidos calientes.
16. No utilice el aparato para otro uso que no sea el previsto.

18
AFO 46894 – 200518
17. Los alimentos de gran tamaño o los utensilios metálicos no deben
insertarse en el horno de freidora, ya que pueden crear un incendio o
riesgo de descarga eléctrica.
18. Puede producirse un incendio si el horno de freidora de aire está
cubierto o tocando material inflamable, incluyendo cortinas, cortinas,
paredes y similares, cuando está en funcionamiento. No almacene
ningún elemento encima del aparato cuando esté en funcionamiento.
19. No limpiar con almohadillas metálicas. Las piezas pueden romper la
almohadilla y tocar piezas eléctricas que implican un riesgo de
descarga eléctrica.
20. Se debe extremar la precaución cuando se utilicen recipientes
construidos de otro tipo que no sean de metal o vidrio.
21. No almacene ningún material en este horno cuando no esté en uso.
22. No coloque ninguno de los siguientes materiales en el horno: papel,
cartón, plástico y similares.
23. No cubra la bandeja de migas ni ninguna parte del horno con papel
de aluminio metálico. Esto provoca el sobrecalentamiento del horno.
24. No deje la unidad desatendida, especialmente al tostar o asar.
25. Tenga mucho cuidado al desechar grasa caliente.
26. Use siempre guantes de horno protectores y aislados al insertar o retirar
artículos del horno caliente.
27. To disconnect, turn all knobs back to the starting position making sure
everything is OFF, then remove plug from wall outlet.
28. No intente desalojar alimentos cuando el horno de la freidora de aire
este enchufado a una toma de corriente.
29. No apoye utensilios de cocina ni platos para hornear sobre la puerta
de vidrio.
CONSERVE ESTAS INSTRUCCIONES
SOLAMENTE PARA USO DOMÉSTICO
CONSEJOS DE SEGURIDAD
1. Cuando esté en uso, utilice siempre guantes de horno o cuando toque
cualquier superficie exterior o interior del horno, o cuando manipule
accesorios.
2. Para reducir el riesgo de incendio, mantenga el interior del horno
limpio y libre de alimentos, aceite, grasa y cualquier otro material de
combustible.

19
AFO 46894 – 200518
3. No utilice utensilios metálicos como cuchillos para eliminar los residuos
de alimentos de los elementos calefactores, ya que esto puede dañar
el aparato, así como conducir a la electrocución.
4. No almacene ningún material en el horno cuando no esté en uso.
INSTRUCCIONES PARA ENCHUFE POLARIZADO
Este aparato está equipado con un enchufe polarizado (una clavija es
más ancha que la otra). Para reducir el riesgo de descarga eléctrica,
este enchufe entra en el tomacorriente polarizado en un solo sentido.
Si el enchufe no entra de inicio completamente en el tomacorriente,
gire el enchufe. Si aun así no encaja, contacte a un técnico electricista
calificado. No intente modificar el enchufe de ninguna manera.
INSTRUCCIONES DEL CABLE CORTO
Se proporciona un cable corto de suministro de energía para reducir los
riesgos que resultan de enredarse o tropezarse con un cable más largo. Se
pueden utilizar cables de extensión si se tiene cuidado en su uso.
• Si se usa un cable de extensión:
• La clasificación eléctrica marcada del cable de extensión debe
ser por lo menos tan grande como la clasificación eléctrica del
aparato.
• El cable más largo debe colocarse de modo que no cuelgue
sobre la encimera o la mesa donde los niños puedan tirar de él o
tropezarse accidentalmente.
CONOZCA SU HORNO Y FREIDORA DE AIRE
Cocine los alimentos más rápido que nunca mientras reduce las grasas y
las calorías con el horno freidora de aire caliente de Kalorik Air. Con la
avanzada tecnología Rapid Hot Air, este horno de alto rendimiento cocina
los alimentos hasta un 30% más rápido, sin necesidad de
precalentamiento. Freír todos sus alimentos favoritos a crujiente,
perfección dorada con poco o ningún aceite, reduciendo la grasa hasta
en un 75%. El horno logra un exterior deliciosamente crujiente y un interior
húmedo y tierno, para que pueda disfrutar sin la culpa. Los controles
ajustables de tiempo y temperatura personalizan la cocción para cada
plato. El aparato alcanza hasta 450F, por lo que incluso puede asar y tostar

20
AFO 46894 – 200518
sus alimentos. La luz del horno interior le permite monitorear fácilmente su
plato mientras se cocina, mientras que la cesta de fritura de aire incluida,
la bandeja para hornear, el estante de aire y la bandeja de migas ofrecen
una gran versatilidad en las opciones de menú.
Luces indicadoras y mandos de control:
• La luz indicadora de encendido, situada en el lado derecho, se
vuelve rojo una vez que el temporizador está activado, lo que indica
que la unidad está encendida actualmente. La configuración del
temporizador del horno enciende la unidad y comienza el ciclo de
cocción.
• Use la perilla de temperatura para ajusta la temperatura deseada
para cocinar.
• El proceso de cocción se puede detener en cualquier momento
girando la perilla del temporizador de nuevo a 0.
• La luz del botón del horno se encuentra en el lado derecho, presione
el botón para encender la luz interior del horno. La luz no funcionara si
no se enciende la alimentación.
• Recuerde volver a girar la perilla de temperatura al punto de partida
después de cada uso para asegurarse de que está ajustando los
ajustes de temperatura correctos para cada proceso de cocción.
ANTES DEL PRIMER USO
• Desembale el aparato y los accesorios y lave y limpie todo. Limpie el
interior del horno con un paño húmedo o una esponja. Secar con una
toalla de papel. Asegúrese de que el horno esté seco antes de utilizar
la unidad.
• Coloque el horno sobre una superficie plana y resistente al calor para
que también se coloque al menos 4 pulgadas (10 cm) de distancia de
cualquier objeto circundante.
• Es normal si algo de humo o olor emana del aparato cuando se utiliza
por primera vez. Esto no es dañino. Para eliminar cualquier aceite de
embalaje que pueda permanecer después de la producción,
recomendamos utilizar el aparato durante 20 minutos, poniendo el
termostato en su ajuste de temperatura máxima.
Consejos:
• Posicionamiento del estante para hornear: el estante para hornear se
puede deslizar en cualquiera de los 3 niveles disponibles.
/