Page is loading ...

1
Owner’s Manual
3-Port USB 3.0 SuperSpeed
Hub with Keyboard/Mouse
Sharing and File Transfer
Model: U360-003-KM
PROTECT YOUR INVESTMENT!
Register your product for quicker service
and ultimate peace of mind.
You could also win an ISOBAR6ULTRA
surge protector—a $100 value!
www.tripplite.com/warranty
1111 W. 35th Street, Chicago, IL 60609 USA • www.tripplite.com/support
Copyright © 2015 Tripp Lite. All rights reserved.
15-11-229-9334BC.indd 1 12/9/2015 3:48:56 PM

2
Product Features
System Requirements
• Compact design easily fits into a laptop bag—perfect for travel
• Supports USB 3.0 SuperSpeed data transfer rates up to 5 Gbps;
backwards compatible with USB 2.0 and 1.1
• Bus-powered through USB connection
• Additional USB port connects to another computer or On-the-Go
(OTG) compliant Android™ device (USB Micro-OTG adapter included)
to share a keyboard and mouse, and transfer files
• Built-in software allows for keyboard and mouse sharing between
computers, with the cursor able to travel from one screen to the next
• Includes clipboard sharing for copy-and-pasting between computers
• Built-in GO!Bridge file transfer software transfers files on Windows and
Mac computers, plus OTG compatible Android devices
• Supports 11 languages (English, Spanish, French, German, Italian,
Russian, Simplified Chinese, Traditional Chinese, Korean, Japanese
and Portuguese) with automatic switching capabilitly to match your
operating system’s language
• Compatible with all major operating systems with a USB port (USB
3.0 port is required to achieve USB 3.0 speeds)
• Windows
®
2000 SP3, XP, Vista, 7, 8 (Excluding RT), 8.1, and 10
• Mac OS
®
X 10.6 and later
• OTG compliant device with Google Android 2.2, 3.0, 3.1 and later
Note: Android devices must install the Windroid Linker App—see GO!Bridge
section of this manual for details
• Intel Pentium II Processor / PowerPC G4 processor or higher
• 256MB RAM or higher
• At least 50MB hard disk space
15-11-229-9334BC.indd 2 12/9/2015 3:48:56 PM

3
Package Includes
Optional Accessories
Setup
• U360-003-KM
• USB 2.0 Type-A (Male) to Type-A (Male) Cable for KM Share, 4 ft.
• USB 2.0 Micro-B (Male) to Type-A (Female) OTG Adapter
• Owner’s Manual
• M100-Series Lightning Cables
• M110-Series Apple 30-Pin Cables
• U322-Series USB 3.0 Type-A to Type-B Device Cables
• U326-Series USB 3.0 Type-A to Micro-B Device Cables
1. Connect the built-in USB 3.0 cable to an available USB port on your
computer or laptop.
2. Connect USB devices to the available hub ports located on the top of
the unit.
Note: The hub is powered via the connected computer port (USB 3.0
provides up to 900mA). If you are connecting devices that require more
power than is being supplied by the connected computer port, they will need
to be powered by an external power supply.
3. To use the KM sharing and/or file transfer features, connect the
included USB cable between the SHARE port on the front of the
hub to an available USB port on a second computer, laptop or OTG
compatible Android device.
Note: A USB Micro-B OTG Adapter is provided for connecting to Android
devices).
15-11-229-9334BC.indd 3 12/9/2015 3:48:56 PM

4
Setup
Software Installation
Upon connecting the SHARE port on the front of the hub to another
computer, the built-in software will automatically install MacKMLink on
Windows computers. If the software fails to install automatically, go
to the My Computer screen and click on the MacKMLink icon to run it
manually.
On Mac computers, a MacKMLink folder will appear on the desktop.
Open the folder and run the MacKMLink file to install the software.
When prompted to Run SKLoader.exe, click to proceed.
The two computers will then recognize each other, at which time you will
be able to start using the KM sharing and file transfer features.
15-11-229-9334BC.indd 4 12/9/2015 3:48:56 PM

5
Setup
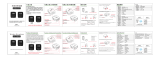
Software Settings
Once installed and recognized, a MacKMLink icon will appear in the
bottom-right of a Windows desktop interface, or in the tray at the bottom
of a Mac desktop interface. For Windows systems, right-click on the icon
to bring up the software settings menu. For Mac systems, click and hold
on the icon. The settings menu shown below will appear.
The following section provides an overview of the options in the software
settings menu.
The Position of the Other PC
Selecting this option from the software settings menu allows you to
choose where the connected computer is in relation to the computer
you are currently accessing. This will determine which side of the screen
you drag the mouse cursor off of to use on the other computer. Once
you have dragged your cursor onto the other computer, you can begin
accessing it with both the keyboard and mouse.
15-11-229-9334BC.indd 5 12/9/2015 3:48:56 PM

6
Disable the Keyboard and Mouse Temporarily
Selecting this option prevents the mouse and keyboard of the computer
you are currently accessing from being used to control the connected
computer. To reactivate keyboard and mouse control, open up the
software settings menu and choose the option Enable Keyboard and
Mouse Control.
Disable Clipboard Sharing Temporarily
When clipboard sharing is enabled, you can copy data to the clipboard of
one computer and paste it on the other computer. Selecting the Disable
Clipboard Sharing Temporarily option from the software settings menu
disables this functionality. When disabled, go back into the software
settings menu and select Enable Clipboard Share.
Preferences
When selecting this option in the software settings screen, the
Preferences Setup screen appears, allowing you to adjust settings of
the MacKMLink software. The Preferences option is only available in
Windows.
Setup
15-11-229-9334BC.indd 6 12/9/2015 3:48:57 PM

7
Setup
Keyboard and Mouse Control Switching Settings
The following section allows you to toggle the Keyboard and Mouse
control settings.
• Turn Off – Checking this option prevents you from using your
keyboard and mouse to control the other computer. When turned
off, the Disable Keyboard and Mouse Temporarily option is removed
from the software settings menu.
• Use Mouse Middle Button – This option requires that the host
computer (i.e. the computer the hub is connected to) be a Windows
computer. When selected, clicking the middle button on your mouse
will cause control of the non-host computer to switch from one
keyboard and mouse set to the other.
• Use Mouse Move Off The Edge of Screen – This option is not
available for Window to Android or Mac to Android connections.
When selected, it lets you move the mouse off of one monitor and
on to the other. When selected, you can choose from the drop-
down menu directly below where the other computer is in relation
to the computer you are currently accessing.
• Hotkey Toggle – The Hotkey Toggle defaults to [Alt][S]. When
pressing and holding [Alt][S] on the keyboard, control of the non-
host computer will switch from one keyboard and mouse set to
the other. When in the Preferences Setup screen, you can click
the Hotkey Toggle field to change it. After you have clicked on it,
you can hit a key (e.g. O, Enter, Shift, etc.) or combination of keys
(e.g. [Shift][O], [Ctrl][A], etc.) to change the hotkey used to switch
control.
Clipboard Share Options
This section allows you to turn the clipboard share feature on and off. To
turn it on, select the Auto Share option. To turn it off, select the Turn Off
option.
15-11-229-9334BC.indd 7 12/9/2015 3:48:57 PM

8
Setup
Event Notification
This section allows you to turn different notifications on and off. The
available options are:
• When Clipboard Data Is Arriving – Selects one of two types of
notifications (Play Sound and Popup a Balloon Tip) that occur when
clipboard data is being transferred from the other computer. You
can also choose for both notifications to occur. No notifications will
occur if neither is selected.
• When Clipboard Data Is Sending – Selects the Popup a Balloon
Tip option to display a balloon notification when clipboard data is
being transferred to the other computer. A notification will not occur
if it is not selected.
• When Switch Keyboard And Mouse Control to Another
Computer – Selects the Play Sound option to play a sound
notification when keyboard and mouse control is being transferred
to the other computer. A notification will not occur if it is not
selected.
Others
Other settings include:
• Resident This Application – When checked, the MacKMLink
program will automatically start up once the device is plugged in.
• Double Click the System Tray Icon to Turn On/Off Sharing
Temporarily – When selected, double-clicking the MacKMLink
icon in the lower-right corner will disable both keyboard and mouse
sharing and clipboard sharing. Double-clicking the icon again will
enable sharing.
• Send Ctrl-Alt-Del to another computer by pressing – This
setting allows you to choose a hotkey that can be performed on one
computer, which will send the Ctrl-Alt-Del command to the other
computer.
15-11-229-9334BC.indd 8 12/9/2015 3:48:57 PM

9
Setup
Android App Download QR Code
Select this option from the software settings menu to view the QR code
that can be scanned by an Android device and direct a user to the
Windroid Linker app.
Online Update
Select this option from the software settings menu to search online for
new versions of the MacKMLink software to download.
About MacKMLink
Select this option from the software settings menu to view a prompt
displaying the current version of MacKMLink installed on your computer.
Exit
Select this option from the software settings menu to close MacKMLink.
GO!Bridge
Clicking on the GO!Bridge option in the software settings menu shows
the file transfer interface, which will default to displaying the files on
the connected computer’s desktop. To use file transfer with an OTG
compatible Android device, you must first install the Windroid Linker
app. You can search for this in the Android Market or right-click on the
MacKMLink icon in your Windows or Mac computer and choose the
Android App Download QR Code option. A QR code that directs you to
the app will appear to scan with your Android device.
Note: When using an Android device to transfer files, a Windows or Mac computer
must always be the host device (i.e. the computer the hub is connected to).
15-11-229-9334BC.indd 9 12/9/2015 3:48:57 PM

10
Setup
In the information at the top of the GO!Bridge interface, the name of the
connected computer and the amount of disk space available on it will be
displayed.
In the upper-right of the Windows desktop interface is a down-arrow icon
( ). When clicked a pop-up menu will display. The down-arrow icon
and pop-up menu are not available in the Mac interface. However, the
Open Dock option from the Windows pop-up menu is available in the
Mac interface by clicking on the right-arrow option in the
icon in the
upper-right portion of the interface. The Open Dock in Mac functions the
same as in Windows, described in following section.
There are three options in this pop-up menu:
About GO!Bridge – Selecting this option displays a graphic showing the
GO!Bridge version that is currently installed.
Always On Top – Selecting this option makes the GO!Bridge interface
always display on top of other screens open in the computer. For
example, if you open your web browser, the GO!Bridge interface will
display on top of it and you will need to click the minimize button on the
interface to remove it from the screen. When enabled, go to the down-
arrow pop-up menu and click on Disable Always On Top to disable this
feature.
Open Dock – Selecting this option opens a dock to the right of the
interface, where you can drag files that you want to transfer from the
connected computer. When you have stored all of the files you wish to
transfer, you can transfer them from the dock to your computer all at
once.
15-11-229-9334BC.indd 10 12/9/2015 3:48:57 PM

11
Setup
Using GO!Bridge to Access and Transfer Files
Accessing and transferring files from the connected computer can be
done as easily as if they were on your computer. You can use your
mouse to drag-and-drop a file from the GO!Bridge interface to your
computer to copy it wherever you want. You can also right-click on
the file to pull up a menu that allows you to choose from a list of
commands, such as open, copy, rename and delete.
To navigate to different locations on the connected computer, click the
icon to the left of the address bar in the Windows interface and
select the location you wish to display. For Mac systems, drives and
places in the connected computer are displayed on the interface’s left-
hand side; simply click on the desired location to go there.
When you are done accessing and transferring files, close out the
GO!Bridge interface.
15-11-229-9334BC.indd 11 12/9/2015 3:48:57 PM

12
Warranty and Product Registration
1-YEAR LIMITED WARRANTY
TRIPP LITE warrants its products to be free from defects in materials and workmanship for a period of one
(1) year from the date of initial purchase. TRIPP LITE’s obligation under this warranty is limited to repairing
or replacing (at its sole option) any such defective products. To obtain service under this warranty, you
must obtain a Returned Material Authorization (RMA) number from TRIPP LITE or an authorized TRIPP LITE
service center. Products must be returned to TRIPP LITE or an authorized TRIPP LITE service center with
transportation charges prepaid and must be accompanied by a brief description of the problem encountered
and proof of date and place of purchase. This warranty does not apply to equipment, which has been
damaged by accident, negligence or misapplication or has been altered or modified in any way.
EXCEPT AS PROVIDED HEREIN, TRIPP LITE MAKES NO WARRANTIES, EXPRESS OR IMPLIED, INCLUDING
WARRANTIES OF MERCHANTABILITY AND FITNESS FOR A PARTICULAR PURPOSE.
Some states do not permit limitation or exclusion of implied warranties; therefore, the aforesaid limitation(s)
or exclusion(s) may not apply to the purchaser.
EXCEPT AS PROVIDED ABOVE, IN NO EVENT WILL TRIPP LITE BE LIABLE FOR DIRECT, INDIRECT, SPECIAL,
INCIDENTAL OR CONSEQUENTIAL DAMAGES ARISING OUT OF THE USE OF THIS PRODUCT, EVEN IF ADVISED
OF THE POSSIBILITY OF SUCH DAMAGE. Specifically, TRIPP LITE is not liable for any costs, such as lost
profits or revenue, loss of equipment, loss of use of equipment, loss of software, loss of data, costs of
substitutes, claims by third parties, or otherwise.
PRODUCT REGISTRATION
Visit www.tripplite.com/warranty today to register your new Tripp Lite product. You’ll be automatically entered
into a drawing for a chance to win a FREE Tripp Lite product!*
* No purchase necessary. Void where prohibited. Some restrictions apply. See website for details.
FCC Notice, Class B
This device complies with part 15 of the FCC Rules. Operation is subject to the following two conditions: (1)
This device may not cause harmful interference, and (2) this device must accept any interference received,
including interference that may cause undesired operation.
Note: This equipment has been tested and found to comply with the limits for a Class B digital device,
pursuant to part 15 of the FCC Rules. These limits are designed to provide reasonable protection against
harmful interference in a residential installation. This equipment generates, uses and can radiate radio
frequency energy and, if not installed and used in accordance with the instructions, may cause harmful
interference to radio communications. However, there is no guarantee that interference will not occur in a
particular installation. If this equipment does cause harmful interference to radio or television reception,
which can be determined by turning the equipment off and on, the user is encouraged to try to correct the
interference by one or more of the following measures:
• Reorient or relocate the receiving antenna.
• Increase the separation between the equipment and receiver.
• Connect the equipment into an outlet on a circuit different from that to which the receiver is connected.
• Consult the dealer or an experienced radio/TV technician for help.
Any changes or modifications to this equipment not expressly approved by Tripp Lite could void the user’s
authority to operate this equipment.
WEEE Compliance Information for Tripp Lite Customers and Recyclers (European Union)
Under the Waste Electrical and Electronic Equipment (WEEE) Directive and implementing
regulations, when customers buy new electrical and electronic equipment from Tripp Lite they are
entitled to:
• Send old equipment for recycling on a one-for-one, like-for-like basis (this varies depending on
the country)
• Send the new equipment back for recycling when this ultimately becomes waste
Tripp Lite has a policy of continuous improvement. Specifications are subject to change without notice.
15-11-229 93-34BC_RevA
1111 W. 35th Street, Chicago, IL 60609 USA • www.tripplite.com/support
15-11-229-9334BC.indd 12 12/9/2015 3:49:01 PM
/