
F
GB
I
E
BR
SA
FA
RC
TR
p. 4 - 8
p. 9 - 13
p. 14 - 18
p. 19 - 23
p. 24 - 28
p. 29 - 33
p. 34 - 38
p. 39 - 43
p. 44 - 49
www.moulinex.com
Service Consommateurs Moulinex
0 810 141 014
Servizio Consumatori Moulinex
02 45 71 24 16
Servicio de Atención al Cliente de Moulinex
902 312 200
Serviço Consumidores Moulinex
0800 119933
00 212 22 40 48 09
8895547-9
8008201233
Moulinex Tüketici Servisi
444 40 50
Moulinex Customer Service
UK 0845 602 1454 - Ireland (01) 47511947
±dØe ±u∞OMJf ∞ªb±W «∞e°Uzs
îb±U‹ Äf «“ ≠dË‘ ±u∞OMJf
Ref. 901247B/ JPM & Associés • marketing-design-communication • 33 (0)3 80 56 28 11 • 06/2007
NoticeZÉLIO-901247B 8/06/07 9:19 Page 1

F
GB
I
E
BR
SA
FA
RC
TR
www.moulinex.com
NoticeZÉLIO 7/06/07 14:43 Page 1

F
GB
I
E
BR
SA
FA
RC
TR
MAX
M
I
N
2
3
1a
19
23
24*
26*
27*
25*
22*
4
5
1b
11
7
13 14*
15*
15a
15b
16
18
17
20*
21*
12
10
9
8
6
NoticeZÉLIO 7/06/07 14:43 Page 2
Page is loading ...
Page is loading ...
Page is loading ...
Page is loading ...
Page is loading ...
Page is loading ...

F
GB
I
E
P
SA
FA
TR
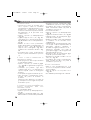
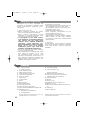
SAFETY RECOMMENDATIONS
For your safety, this appliance conforms to
the applicable standards and regulations
(Low Voltage, Electromagnetic Compatibility,
Environmental, etc. Directives).
1. CONDITIONS OF USE
• Your vacuum cleaner is an electrical
appliance: it must only be used under
normal operating conditions.
• The appliance should be used and stored
out of the reach of children. Never leave
the appliance unattended when it is
switched on.
• Always keep nozzles and tube ends well
away from eyes and ears.
• Do not vacuum wet surfaces, any water
or any kind of liquids, hot substances,
ultra-fine substances (plaster, cement,
ash, etc.) large sharp debris (glass),
dangerous products (solvents, stripping
compounds, etc.), chemical products
(acids, cleaners, etc.), inflammable or
explosive products (petrol- or alcohol-
based).
• Do not immerse the appliance in water,
project water on the appliance or store it
outdoors.
• Do not use the appliance if it has been
dropped and shows signs of damage or
functions abnormally. In this case do not
open the appliance and call our helpline
(overleaf). In this case, do not open the
appliance, but send it to the nearest
Approved Service Centre or contact
Moulinex Customer Service (see contact
particulars on last page).
2. ELECTRICAL POWER SUPPLY
• Make sure that the operating voltage of
your vacuum cleaner is the same as your
supply voltage - 230-240v.
• Unplug the appliance by removing the
plug from the power outlet:
- immediately after use,
- before changing accessories,
-
before maintenance, cleaning or changing
the dustbag.
• Do not use the appliance:
- if the supply cord is defective. Vacuum
cleaner supply cords and winding systems
must, in all cases, be replaced by our
approved Service Centre.
3. REPAIRS
Repairs should only be carried out by
specialists using original replacement parts.
It is dangerous to try to repair an appliance
by yourself.
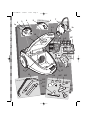
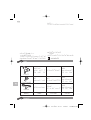
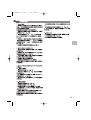
DESCRIPTION
a - Horizontal parking
b - Upright parking
On/Off pedal
Electronic power control
Automatic cable rewind pedal
Bag fill indicator
Air exit grill
Carrying handle
Bag compartment
Cover
Suction opening
Lip opening door
Engine foam-filter protection
Engine foam-filter grill protection
HEPA filter cartridge* ref. MT0001 01
Microfilter cassette*
a - Microfilter (ref. MT0001 01)
b - Grey foam filter
Your vacuum clamer is equipped either with
microfilter cassette* (a+b), or with a HEPA filter
cartridge*.
1.
2.
3.
4.
5.
6.
7.
8.
9.
10.
11.
12.
13.
14.
15.
Dustbag support
Runner for bag support
Standard accessories:
Paper bags ref. MT0001 01
Flexible tube with extra-long handle and
manual suction power regulator
Telescopic tube*
Tubes*
Floor nozzle*
Automatically adjusting floor head
Furniture nozzle*
Crevice noozle convertible to a mini-brush*
Turbobrush*
Mini turbobrush*
16.
17.
18.
19.
20.
21.
22.
23.
24.
25.
26.
27.
*Depending on model: it means special equipment
for some models or optional accessories.
9
NoticeZÉLIO 7/06/07 14:43 Page 9

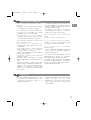
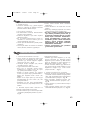
BEFORE USING FOR THE FIRST TIME
1. REMOVE PACKAGING
• Take your appliance out of its packaging.
Keep your warranty card and carefully read
the operating instructions before using your
appliance for the first time.
2. HINTS AND PRECAUTIONS
• Before each use, the supply cord should be
completely unwound.
• Do not allow it to become trapped or
pulled over sharp edges.
• If you use an electric extension cord, make
sure that it is in perfect condition and
appropriate to the power rating of your
appliance.
• Never unplug the appliance by pulling on
the cord.
• Never operate the vacuum cleaner without a
bag and without a filtration system (cassettes).
• Do not use the vacuum cleaner without a
foam filter for protection of the motor.
• Only use Moulinex bags and filters.
• Always stop and unplug your appliance
before maintenance or cleaning.
• This appliance is not designed to be used
by people (including children) with a
physical, sensory or mental impairment,
or people without knowledge or
experience, unless they are supervised or
given prior instructions concerning the
use of the appliance by someone
responsible for their safety.
• Children must be supervised to ensure
that they do not play with the appliance.
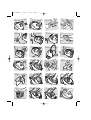
USING THE APPLIANCE
1.
ASSEMBLING THE ELEMENTS OF THE APPLIANCE
• Push the flexible hose (19) in the opening
(10) until your hear a clicking sound - fig.1.
To remove it, press the button of the hose
connector and pull - fig.2.
• Assemble the telescopic tube* (20). Adjust
it to the desired length - fig.3.
• Fit the appropriate accessory to the end
of the tube:
- For rugs and wall-to-wall carpeting: use the
head (23) with brushes lifted - fig.4.
- For parquets and smooth flooring: use the
nozzle (23) with the brush extended - fig.4.
or use the parquet nozzle* (22).
- For nooks and difficult-to-reach areas:
use the mini-brush convertible slotted
attachment* (25) in flat nozzle position.
- For furniture: use the mini-brush on the
convertible slotted attachment* (25) or the
furniture attachment* (24).
2. PLUGGING IN THE ELECTRICAL POWER
CORD AND USING THE VACUUM CLEANER
• Completely unwind the power cord, plug
in your vacuum cleaner - fig.5 and push
the on/off pedal (2) - fig. 6.
• Adjust the suction power:
-
With the electronic power selector (3)
: Turn
the button of the electronic power
regulator to adjust the suction power: to
the max position for floors and to the min
position for furniture and delicate fabrics -
fig. 7.
- With the electronic power regulator on the
power nozzle: open the selector switch flap
to manually reduce suction power
regulator, ex: fragile surfaces… - fig. 8.
3.
STORING AND TRANSPORTING THE APPLIANCE
• After use, stop your appliance by pressing
on the on/off pedal (2) and unplug it
- fig. 9.Replace the cable by pressing the
automatic cable rewind pedal
(4) - fig. 10.
• In an upright position, hook the telescopic
tube* (20) onto its storage position on the
back of the appliance (1b) - fig. 11.
• You can transport your vacuum cleaner
easily using its carrying handle (7).
• In the horizontal position, hook the floor
nozzle (23) onto its storage position at the
rear of the appliance (1a) - fig. 12.
10
NoticeZÉLIO 7/06/07 14:43 Page 10

F
GB
I
E
P
SA
FA
TR
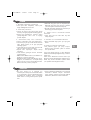
CLEANING AND MAINTENANCE
1. CHANGING THE BAG
• The bag capacity indicator (5) tells you
when the bag is full or saturated.
If you notice that your vacuum cleaner is
less efficient, select the maximum power
and by lifting the floor head off the floor. If
the indicator remains red, replace the
bag.
• Open the lid (9) of your vacuum cleaner -
fig. 13.
• Withdraw the bag support (16) - fig. 14;
Unclip the bag (18) by pressing the lever -
fig. 15, and dispose of the bag in a waste
bin - fig. 16.
• Fit a fresh bag, position it using the tongue
provided and clip it onto the bag support
- fig. 17. Slide the bag support back onto
the runners - fig. 18 place the bag inside
the compartment - fig. 19.
• Make sure that the bag is in the correct
position before closing the lid (9).
2.
CLEANING THE FOAM FILTER FOR PROTECTION
OF THE MOTOR
• The motor foam-filter protection (12) must
always be in place when in use.
• Open the lid (9). The grid (13) - fig. 20
then remove the foam-filter (12) - fig. 21.
• Shake it and clean it, every ten dustbag
changes, with tepid soapy water.
• Rinse, dry and put it back in place.
• Let the foam-filter dry (12) completely
before putting back in place.
Caution : N.B. Make sure that the foam filter
is completely dry before fitting it again.
3.CHANGE THE HEPA* FILTER CASSETTE OR THE
MICROFILTER
* ON EVERY TENTH CHANGE OF
BAG
3.1- The Hepa* filter cassette
• Open the lid (9) of your vacuum cleaner -
fig. 13.
• Remove the Hepa* filter cassette (14) -
fig. 22 and dispose of the cassette in a
waste bin.
• Fit the new Hepa* filter cassette
(ref. MT0001 01) (14) in its compartment -
fig. 23.
• Check that the Hepa* filter cassette (14) is
fitted correctly before re-closing the lid (9).
3.2- The microfilter cassette*
• Open the lid (9) of your vacuum cleaner -
fig. 13.
•
Withdraw the microfilter cassette* (15) -
fig. 22.
• Separate the grey foam filter (15b) from
the microfilter (15a).
• Dispose of the microfilter (15a) in a waste
bin and replace it with a new Microfilter
(ref. MT0001 01).
• Wash the grey foam filter (15b) with warm
soapy water (mild detergent). Squeeze it
out and leave it to dry for at least 12 hours.
Caution: Make sure that the grey foam
filter is completely dry before putting it
back in place.
• Re-fit the grey foam filter (15b) to the
microfilter (15a).
• Re-fit the microfilter cassette* in its
compartment (15) - fig. 23.
• Check that the microfilter cassette* (15) is
fitted correctly before re-closing the lid (9).
4. CLEAN THE VACUUM CLEANER
• Clean the housing of the vacuum cleaner
with a soft and humid rag and let dry.
• Clean the cover with a dry rag - fig. 24.
• Do not use abrasive or aggressive
products.
11
NoticeZÉLIO 7/06/07 14:43 Page 11

WARRANTY
• This product has been designed for
domestic use only. Any professional use,
innapropriate use or failure to comply with
the instructions, the manufacturer accepts
no responsibility and the guarantee will not
apply.
• Read the instructions for use carefully
before using your appliance for the first
time: any use which does not conform to
these instructions will absolve Moulinex
from any liability.
TROUBLESHOOTING
1.
IF YOUR VACUUM CLEANER DOES NOT START
• The appliance is not plugged-in, check
that the appliance is correctly plugged in.
2. IF THERE IS NO SUCTION
• An accessory or the tube is clogged.
Unclog the accessory tube or flexible hose.
• The lid was not closed properly: check that
the bag is properly installed and close the
lid again.
3. IF THE SUCTION OF YOUR VACUUM CLEANER
HAS DROPPED
, IT MAKES A NOISE AND
WHISTLES
• An accessory or the flexible hose is
partially clogged. Unclog the accessory
tube or flexible hose.
• The bag is full or saturated with fine dust.
Put a new bag in or empty the fabric dust
bag.
• The foam-filter is saturated. Clean the
foam-filter.
•
If the bag fill indicator is red, the filtration
system is saturated.
- The HEPA* cassette: change the Hepa*
cassette (ref. MT0001 01) and put it back in
its housing.
- The microfilter cassette*: withdraw the
microfilter from the cassette, and change it
(ref.
MT0001 01
). Wash the grey foam filter,
squeeze it out and leave it to dry for at least
12 hours. Then re-fit the cassette in its
housing.
• The electronic variable suction power
selector is in the minimum position.
Increase the power with the help of the
electronic variable suction power selector
(except if you are vacuuming delicate
fabrics).
•
If the mechanical power regulator on the
power nozzle is open, close the mechanical
power regulator.
4. IF THE BAG FILL INDICATOR REMAINS RED
• The bag is full. Put a new one.
5. IF THE FLOOR HEAD IS HARD TO MOVE
AROUND
• Open the suction regulator on the handle
or reduce power.
6. IF THE POWER CABLE DOES NOT REWIND
COMPLETELY
• The power cable is slow in reentering its
housing. Pull the cable back out and press
on the automatic cable rewind pedal.
If you have any product problems or queries,
please contact our customer Relations Team
first for expert help and advice (see the
contact details on the last page).
12
NoticeZÉLIO 7/06/07 14:43 Page 12

F
GB
I
E
P
SA
FA
TR
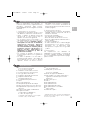
ENVIRONMENT
• In accordance with current regulations,
before disposing of an appliance no
longer needed, the appliance should be
made non-operational (by unplugging it
and cutting off the electricity supply cord).
• Environment: Directive 2002/95/EC.
Environment protection first !
i
Your appliance contains valuable materials
which can be recovered or recycled.
Ü Leave it at a local civic waste collection
point.
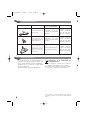
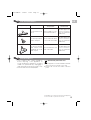
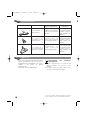
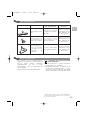
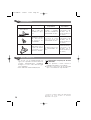
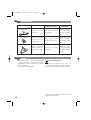
THE ACCESSORIES*
ACCESSORIES* VACUUMING PURCHASE
LOCATIONS
Floor nozzle
For hard and smooth
floors.
Moulinex Approved
S er vice Centres
(see the attached
address list).
Moulinex Approved
S er vice Centres
(see the attached
address list).
Moulinex Approved
S er vice Centres
(see the attached
address list).
To clean upholstery
fabrics in depth.
Mini turbobrush
To remove threads
and animal hairs
ingrained into mats
and carpets.
FITTING AN
ACCESSORY
Fit the hardfloor tool to
the end of the tube.
Fit the mini turbobrush
to the end of the tube.
Fit the turbobrush to the
end of the tube.
Turbobrush
*Depending on model: it means special equipment
for some models or optional accessories.
13
NoticeZÉLIO 7/06/07 14:43 Page 13
Page is loading ...
Page is loading ...
Page is loading ...
Page is loading ...
Page is loading ...
Page is loading ...
Page is loading ...
Page is loading ...
Page is loading ...
Page is loading ...
Page is loading ...
Page is loading ...
Page is loading ...
Page is loading ...
Page is loading ...
Page is loading ...
Page is loading ...
Page is loading ...
Page is loading ...
Page is loading ...
Page is loading ...
Page is loading ...
Page is loading ...
Page is loading ...
Page is loading ...

39
NoticeZÉLIO 7/06/07 14:43 Page 39

40
NoticeZÉLIO 7/06/07 14:43 Page 40

41
NoticeZÉLIO 7/06/07 14:43 Page 41

42
NoticeZÉLIO 7/06/07 14:43 Page 42

43
NoticeZÉLIO 7/06/07 14:43 Page 43
Page is loading ...
Page is loading ...
Page is loading ...
Page is loading ...
Page is loading ...
Page is loading ...
-
 1
1
-
 2
2
-
 3
3
-
 4
4
-
 5
5
-
 6
6
-
 7
7
-
 8
8
-
 9
9
-
 10
10
-
 11
11
-
 12
12
-
 13
13
-
 14
14
-
 15
15
-
 16
16
-
 17
17
-
 18
18
-
 19
19
-
 20
20
-
 21
21
-
 22
22
-
 23
23
-
 24
24
-
 25
25
-
 26
26
-
 27
27
-
 28
28
-
 29
29
-
 30
30
-
 31
31
-
 32
32
-
 33
33
-
 34
34
-
 35
35
-
 36
36
-
 37
37
-
 38
38
-
 39
39
-
 40
40
-
 41
41
-
 42
42
-
 43
43
-
 44
44
-
 45
45
-
 46
46
-
 47
47
-
 48
48
-
 49
49
-
 50
50


Moulinex MO 4011 Owner's manual
- Category
- Vacuum cleaners
- Type
- Owner's manual
Ask a question and I''ll find the answer in the document
Finding information in a document is now easier with AI
in other languages
- italiano: Moulinex MO 4011 Manuale del proprietario
- français: Moulinex MO 4011 Le manuel du propriétaire
- español: Moulinex MO 4011 El manual del propietario
- Deutsch: Moulinex MO 4011 Bedienungsanleitung
- português: Moulinex MO 4011 Manual do proprietário
- Türkçe: Moulinex MO 4011 El kitabı
Related papers
-
Moulinex MO151501 User manual
-
-
-
-
-
-
Moulinex MO182301 Owner's manual
-
-
-
Other documents
-
UFESA AS2200 Operating instructions
-
Rowenta RO4725FA Owner's manual
-
Fagor VCE306 Owner's manual
-
-
-
-
Rasonic RVC-B51/W User manual
-
Groupe Brandt VCE-506SET Owner's manual
-
-