Metabo PSE 1200 Operating instructions
- Category
- Power tools
- Type
- Operating instructions
Page is loading ...
Page is loading ...
Page is loading ...
Page is loading ...
Page is loading ...
Page is loading ...
Page is loading ...

ENGLISHen
8
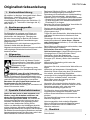
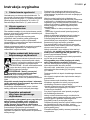
Original instructions
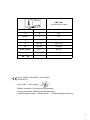
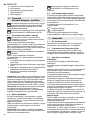
We declare under our sole responsibility: These
sabre saws, identified by type and serial number
*1), comply with all relevant requirements of the
directives *2) and standards *3). Technical file at *4)
- see page 3.
The sabre saw is suitable for sawing wood, metals,
plastics or similar materials such as hard rubber,
fibre glass, etc.
In case of use in the area of pallet repair, no claims
can be asserted.
The user bears sole responsibility for any damage
caused by unspecified use.
Generally accepted accident prevention
regulations and the enclosed safety information
must be observed.
For your own protection and for the
protection of your power tool, pay
attention to all parts of the text that are
marked with this symbol!
WARNING – Reading the operating
instructions will reduce the risk of injury.
WARNING Read all safety warnings and
instructions. Failure to follow all safety
warnings and instructions may result in electric
shock, fire and/or serious injury.
Keep all safety instructions and information for
future reference.
Pass on your power tool only together with these
documents.
Hold the power tool only on the insulated
gripping surfaces when performing tasks
where the cutting accessory could hit
concealed power lines. Cutting accessory
contacting a "live" wire may also energise metal
parts of the power tool, resulting in an electric
shock.
Dust from material such as paint containing lead,
some wood species, minerals and metal may be
harmful. Contact with or inhalation of the dust may
cause allergic reactions and/or respiratory diseases
to the operator or bystanders.
Certain kinds of dust are classified as carcinogenic
such as oak and beech dust especially in
conjunction with additives for wood conditioning
(chromate, wood preservative). Material containing
asbestos must only be treated by specialists.
- The work place must be well ventilated.
- The use of a dust mask of filter class P2 is
recommended.
Follow national requirements for the materials you
want to work with.
Pull the plug out of the plug socket before any
adjustments or servicing are performed.
Always wear protective goggles, gloves, and sturdy
shoes when working with this tool.
Ensure that the spot where you wish to work is free
of power cables, gas lines or water pipes (e.g.
using a metal detector).
When sawing water pipes, ensure that they do not
contain any water.
Wear ear muffs when working for long periods
of time. High noise levels over a prolonged period
of time may affect your hearing.
Materials that generate dusts or vapours that may
be harmful to health (e.g. asbestos) must not be
processed.
Do not reach under the workpiece while the
machine is in operation.
Do not try to saw extremely small workpieces.
Clamp the workpiece firmly. Under no
circumstances should you hold the workpiece with
your hand or foot.
Only use sharp, undamaged saw blades. Do not
use saw blades that are cracked or that have
changed their shape.
For sawing, the guide must make secure contact
with the workpiece.
Avoid inadvertent starts: always switch the tool off
when the plug is removed from the mains socket or
if there has been a power cut.
Always hold the machine with both hands at the
intended handles, take a secure stance and
concentrate on the work.
Always route the connecting cable away from the
tool towards the rear.
Danger of injury due to the sharp saw blade.
Do not touch the moving saw blade! Remove chips
and similar material only with the machine at a
standstill.
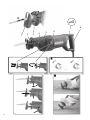
See page 2.
1Guide
2 Saw blade quick-clamping device
3 Clamping sleeve
4 Clamping lever for securing the guide
5 Forward handle
6 Rotary switch for pendulum action
7Trigger
8 Rear handle
1. Conformity Declaration
2. Specified Use
3. General Safety Instructions
4. Special Safety Instructions
5. Overview

ENGLISH en
9
Before plugging in, check to see that the rated
mains voltage and mains frequency,
as stated on the rating label, match your power
supply.
Always install an RCD with a max. trip current
of 30 mA upstream.
Australia: Always use a residual current device
(RCD) protected supply with a rated residual
current of 30 mA or less.
6.1 Inserting / replacing the saw blade
Do not touch the saw blade immediately
following operation of the tool, as it can be
extremely hot and can lead to skin burns.
For access to the saw blade quick-clamping
device (2), it must be in its outermost position.
If required: press the trigger switch (7) lightly to
move the saw blade quick-clamping device into its
outermost position.
Pull the mains plug out of the socket.
For access to the saw blade quick-clamping
device (2), adjust the guide (1) if required.
1 Turn the clamping sleeve (3) in the direction
of the arrow and hold it.
2 Insert the saw blade as far as it will go or remove
it.
3 Release the clamping sleeve (3) (the clamping
sleeve rotates back to its original position).
4 Check that the saw blade is securely seated.
Note: Should it occur that a saw blade has broken
off and it cannot be removed by hand from the saw
blade quick-clamping device, turn the clamping
sleeve in the direction of the arrow and hold.
Engage the tip of a saw blade in the broken section
and pull it out. A fine-toothed metal saw blade is
best suited for this task. See Fig. A, page 2.
Note: Should it occur that, with the saw blade
inserted, the clamping sleeve cannot be turned:
move the saw blade upwards and downwards by
hand and simultaneously turn the clamping sleeve
in the direction of the arrow.
6.2 Setting the guide
The cutting depth can be limited by shifting the
guide (1) (e.g. when sawing in front of a wall).
Occasionally shift the guide (1) to achieve even
wear of the saw blade.
Release the clamping lever (4) and shift the guide
(1) along the length of the machine. Secure the
guide again using the clamping lever.
Note: If the guide is pulled out too far, the clamping
lever cannot be closed and locked for reasons
related to safety
S
ecure the guide firmly using the clamping
lever. The clamping lever must lock into place.
6.3 Pendulum action of the saw blade
The pendulum action of the saw blade increases the
sawing power (particularly in the case of soft
materials such as wood and plastics). Furthermore,
the pendulum action reduces the stress applied to
the saw blade, as it is raised when emerging from
the workpiece.
Use the rotary switch (6) to switch the pendulum
action on and off.
Pendulum action ON
Pendulum action OFF
For particularly exact sawing cuts and for
processing metals: switch off the pendulum action.
7.1 Switching on and off
To switch on: press the trigger switch (7).
To switch off: let go of the trigger switch (7).
7.2 Stepless stroke rate setting
The stroke rate can be changed steplessly by
varying the pressure applied to the trigger switch
(7), thus adapting it to the material and working
conditions.
7.3 Working Directions
Sawing:
Use a saw blade geared to the material to be sawn.
Depending on the use case, switch the pendulum
action on or off.
Press the machine with the guide (1) against the
workpiece. Switch on the machine, and only then
guide the saw blade against the workpiece.
Do not make contact with any objects or with the
ground with the moving saw blade (danger of
recoil!)
Adapt the stroke rate to the material to the sawn.
Avoid excessive pressure on the saw blade
(particularly in the case of long saw blades).
If the saw blade jams, turn the machine off
immediately. Widen the sawn gap slightly with a
suitable tool and take out the machine.
After completing the sawing cut, switch off the
machine and only take it out of the sawn gap to
place it down once the saw blade has come to a
standstill (danger of recoil).
Plunge cuts:
Plunge cuts may only be made in soft materials
such as wood or plastic. Only use short saw blades.
Hold the machine with both hands at the intended
handles, take a secure stance and concentrate on
the work.
See Fig. B, page 2. The machine is pressed with the
edge of the guide (1) against the workpiece. The
saw blade does not make contact with the
workpiece. Switch on the machine. The corner of
the guide serves as a pivot point around which the
machine is slowly aligned, whereby the saw blade
cuts into the workpiece.
6. Initial Operation, Setting
7. Use

ENGLISHen
10
To saw tight curves: Use narrow saw blades.
Sawing metal: To increase the life of the saw
blades, apply cooling lubricant (cooling lubricant
rod 6.23443) along the cutting line.
On a regular basis, use compressed air to blow out
the machine through the rear ventilation slots.
Regularly clean the saw blade quick-clamping
device (2) and blow out with compressed air. Do not
oil or grease.
Use only genuine Metabo accessories.
See page 4.
Use only accessories which fulfil the requirements
and specifications listed in these operating
instructions.
A) Comprehensive range of saw blades for
a wide variety of materials and use cases
For complete range of accessories, see
www.metabo.com or the main catalogue.
Repairs to electrical tools must be carried out
by qualified electricians ONLY!
Contact your local Metabo representative if you
have Metabo power tools requiring repairs. For
addresses see www.metabo.com.
You can download a list of spare parts from
www.metabo.com.
Observe national regulations on environmentally
compatible disposal and on the recycling of disused
machines, packaging and accessories.
Only for EU countries: Never dispose of
power tools in your household waste! In
accordance with European Guideline
2002/96/EC on used electronic and electric
equipment and its implementation in national legal
systems, used power tools must be collected sepa-
rately and handed in for environmentally compatible
recycling.
Explanatory notes on the specifications on page 3.
Changes due to technological progress reserved.
P
1
=Nominal power input
P
2
=Power output
I=Current
n
0
=Stroke rate at idle speed
s=Stroke length
m =Weight without mains cable
Measured values determined in conformity with
EN 60745.
Machine in protection class II
~ AC Power
The technical specifications quoted are subject to
tolerances (in compliance with the relevant valid
standards).
Emission values
These values make it possible to assess the
emissions from the power tool and to compare
different power tools. Depending on the operating
conditions, the condition of the power tool or the
accessories, the actual load may be higher or lower.
For assessment purposes, please allow for breaks
and periods when the load is lower. Based on the
adjusted estimates, arrange protective measures
for the user e.g. organisational measures.
Vibration total value
(vector sum of three directions)
determined in accordance with EN 60745:
a
h, CW
=Vibration emission value
(Sawing in wood)
K
h, CW
=Unsafe (vibration)
Typical A-effective perceived sound levels
:
L
pA
=Sound-pressure level
L
WA
= Acoustic power level
K
pA
, K
WA
= Uncertainty
During operation the noise level can exceed
80 dB(A).
Wear ear protectors!
8. Tips and Tricks
9. Maintenance
10. Accessories
11. Repairs
12. Environmental Protection
13. Technical Specifications
Page is loading ...
Page is loading ...
Page is loading ...
Page is loading ...
Page is loading ...
Page is loading ...
Page is loading ...
Page is loading ...
Page is loading ...
Page is loading ...
Page is loading ...
Page is loading ...
Page is loading ...
Page is loading ...
Page is loading ...
Page is loading ...
Page is loading ...
Page is loading ...
Page is loading ...
Page is loading ...
Page is loading ...
Page is loading ...
Page is loading ...
Page is loading ...
Page is loading ...
Page is loading ...
Page is loading ...
Page is loading ...
Page is loading ...
Page is loading ...
Page is loading ...
Page is loading ...
Page is loading ...
Page is loading ...
Page is loading ...
Page is loading ...
Page is loading ...
Page is loading ...
Page is loading ...
Page is loading ...
Page is loading ...

Metabowerke GmbH
Metabo-Allee 1
72622 Nuertingen
Germany
www.metabo.com
170 26 8240 - 0315
-
 1
1
-
 2
2
-
 3
3
-
 4
4
-
 5
5
-
 6
6
-
 7
7
-
 8
8
-
 9
9
-
 10
10
-
 11
11
-
 12
12
-
 13
13
-
 14
14
-
 15
15
-
 16
16
-
 17
17
-
 18
18
-
 19
19
-
 20
20
-
 21
21
-
 22
22
-
 23
23
-
 24
24
-
 25
25
-
 26
26
-
 27
27
-
 28
28
-
 29
29
-
 30
30
-
 31
31
-
 32
32
-
 33
33
-
 34
34
-
 35
35
-
 36
36
-
 37
37
-
 38
38
-
 39
39
-
 40
40
-
 41
41
-
 42
42
-
 43
43
-
 44
44
-
 45
45
-
 46
46
-
 47
47
-
 48
48
-
 49
49
-
 50
50
-
 51
51
-
 52
52


Metabo PSE 1200 Operating instructions
- Category
- Power tools
- Type
- Operating instructions
Ask a question and I''ll find the answer in the document
Finding information in a document is now easier with AI
in other languages
- italiano: Metabo PSE 1200 Istruzioni per l'uso
- français: Metabo PSE 1200 Mode d'emploi
- español: Metabo PSE 1200 Instrucciones de operación
- Deutsch: Metabo PSE 1200 Bedienungsanleitung
- Nederlands: Metabo PSE 1200 Handleiding
- português: Metabo PSE 1200 Instruções de operação
- dansk: Metabo PSE 1200 Betjeningsvejledning
- polski: Metabo PSE 1200 Instrukcja obsługi
- svenska: Metabo PSE 1200 Bruksanvisningar
- suomi: Metabo PSE 1200 Käyttö ohjeet
Related papers
-
Metabo PowerMaxx SSE 12 BL Operating instructions
-
Metabo SSE 18 LTX BL Operating instructions
-
Metabo SSE 18 LTX BL Compact Operating instructions
-
-
Metabo SSE 1100 Operating instructions
-
Metabo STA 18 LTX Owner's manual
-
-
-
-
Other documents
-
Parkside PSTK 800 A1 Operating instructions
-
Parkside PSTK 800 B2 Operating instructions
-
Parkside PSTD 800 A1 Operating instructions
-
Parkside PSSA 20-Li A 1 Translation Of The Original Instructions
-
Parkside PSTK 730 A1 User manual
-
Hilti WSR 1200-PE Operating instructions
-
-
-
-
Parkside PTSS 1200 B1 Original Instructions Manual