Page is loading ...

DIGITAL CONVECTION OVEN
HORNO DIGITAL A CONVECCIÓN
FOUR À CONVECTION NUMÉRIQUE
OWNER’S MANUAL
MANUAL DEL USUARIO
MODE D’EMPLOI
Model/Modelo/Modèle: TO31
120 V, 60 Hz, 1200 Watts
USA: EURO-PRO Operating LLC Canada: EURO-PRO Operating LLC
94 Main Mill Street, Door 16 4400 Bois Franc
Plattsburgh, NY 12901 St. Laurent, QC H4S 1A7
Tel.: 1 (800) 798-7398
www.euro-pro.com
Copyright © Euro-Pro Operating LLC 2006

Veuillez remplir cette fiche d’enregistrement et la poster dans les dix (10) jours suivant
l’achat. L’enregistrement nous permettra de communiquer avec vous en cas d’avis sur la
sécurité du produit. En nous retournant cette fiche, vous convenez avoir lu et compris
les consignes d’utilisation et les avertissements qui les accompagnent.
RETOURNEZ À EURO-PRO Operating LLC, 4400, Bois-Franc, St-Laurent QC H4S 1A7
_
_____________________________________________________________________
Modèle de l’appareil
_
_____________________________________________________________________
Date d’achat Détaillant
_
_____________________________________________________________________
Nom du propriétaire
_
_____________________________________________________________________
Adresse Ville Prov. Code postal
SAVE THESE INSTRUCTIONS
For Household Use Only
16. Oversized foods or metal utensils must not
be inserted in a toaster oven as they may
create a fire or risk of electric shock.
17. A fire may occur if the oven is covered or
touching flammable material, including
curtains, draperies, walls and the like when in
operation. Do not place any items on the
oven during operation.
18. Extreme caution should be exercised when
using cooking or baking containers
constructed of anything other than metal or
ovenproof glass.
19. Be sure that nothing touches the top or bottom
elements of the oven.
20. Do not place any of the following materials in
the oven: cardboard, plastic, paper, or
anything similar.
21. Do not store any materials other than
manufacturer’s recommended accessories in
this oven when not in use.
22. Always wear protective, insulated oven gloves
when inserting or removing items from the hot
oven.
23. This appliance has a tempered, safety glass
door. The glass is stronger than ordinary glass
and more resistant to breakage. Tempered
glass can still break around the edges. Avoid
scratching door surface or nicking edges.
24. Do not use outdoors.
25. Do not use appliance for other than intended
use.
26. Do not place anything on the door when in
open position. Damage could occur to the
glass door.
This unit has a short power supply cord to
reduce the risk resulting from becoming
entangled in or tripping over a long cord. An
extension cord may be used if you are careful
in its use:
1. The electrical rating of the extension cord
should be at least as great as the electrical
rating of the appliance.
2. An extension cord with the power cord must
be arranged so that it will not drape over the
countertop or tabletop where they can be
pulled on by children or tripped over
accidentally.
1. Read all instructions before using your
Toaster Oven.
2. Do not touch hot surfaces. Always use
handles or knobs.
3. Close supervision is necessary when any
appliance is used by or near children.
4. To protect against electric shock, do not
immerse cord, plug or any parts of the oven
in water or any other liquids.
5. Do not let cord hang over edge of table or
counter, or touch hot surfaces.
6. Do not operate appliance with damaged
cord or plug or after the appliance
malfunctions or has been damaged in any
manner. Return appliance to EURO-PRO
Operating LLC for examination, repair or
adjustment.
7. The use of accessory attachments not
recommended by the appliance
manufacturer may cause hazard or injury.
8. Do not place on or near a hot gas or
electric burner.
9. When operating the oven, keep at least
four inches of free space on all sides of the
oven to allow for adequate air circulation.
10. Unplug from outlet when not in use and
before cleaning. Allow to cool before
putting on or taking off parts, and before
cleaning.
11. To disconnect, press the stop/cancel button
to ensure unit is off, then remove the plug.
Always hold the plug, and never pull the
cord.
12. Extreme caution must be used when
moving a drip pan containing hot oil or
other hot liquids.
13. Do not cover crumb tray or any part of the
oven with metal foil. This may cause the
oven to overheat.
14. Use extreme caution when removing the
tray, racks or disposing of hot grease or
other hot liquids.
15. Do not clean the inside of the oven with
metal scouring pads. Pieces can break off
the pad and touch electrical parts, creating
a risk of electric shock.
IMPORTANT SAFETY INSTRUCTIONS
1 Rev. 06/06C
WARNING: To reduce the risk of electric shock, this appliance has a polarized plug (one
blade is wider than the other).
This plug will fit in a polarized outlet only one way. If the plug
does not fit fully in the outlet, reverse the plug. If it still does not fit, contact a qualified
el
ectrician to install the proper outlet. Do not modify the plug in any way.
When using your Toaster Oven, basic safety precautions should always be observed,
including the following:
Modèle
TO31
36Imprimé en Chine
Modèle TO31
FICHE D’ENREGISTREMENT DU PROPRIÉTAIRE
CONSOMMATEURS CANADIENS SEULEMENT
GARANTIE LIMITÉE D’UN (1) AN
EURO-PRO Operating LLC garantit ce produit contre toute défectuosité matérielle ou de main
d’œuvre pour une période d’un (1) an à compter de la date d’achat, dans le cadre d’une utilisation
domestique normale, en vertu des conditions, exclusions et exceptions suivantes.
Si votre appareil cesse de fonctionner correctement dans le cadre d’un usage domestique normal
pendant la période de garantie, retournez-le avec ses accessoires, retour pré affranchi, à :
É.-U. : EURO-PRO Operating LLC, 94 Main Mill Street, Door 16., Plattsburgh, N.Y. 12901
Canada : EURO-PRO Operating LLC, 4400, Bois Franc, St-Laurent (Québec) H4S 1A7
Si EURO-PRO Operating LLC constate que l’appareil comporte une défectuosité matérielle ou de
main d’œuvre, EURO-PRO Operating LLC le réparera ou le remplacera sans frais de votre part.
Une preuve d’achat indiquant la date d’achat et un montant de 12,95 $ pour la manutention et
l’envoi de retour doivent être inclus.*
La responsabilité de EURO-PRO perating LLC ne se limite qu’au coût des pièces de rechange
ou de l’appareil, à notre discrétion. Cette garantie ne couvre pas l’usure normale des pièces et ne
couvre pas les appareils altérés ou utilisés à des fins commerciales. Cette garantie limitée exclut
les dommages causés par le mésusage, l’abus, la manipulation négligente ainsi que par une
manutention en transit ou un emballage inadéquats. Cette garantie ne couvre pas les
défectuosités ou dommages découlant directement ou indirectement du transport, des
réparations, des altérations ou de l’entretien apportés au produit ou à ses pièces par un
réparateur non autorisé par EURO-PRO Operating LLC.
Cette garantie couvre l’acheteur initial du produit et exclut toute autre garantie juridique ou
conventionnelle. Le cas échéant, EURO-PRO Operating LLC n’est tenue qu’aux obligations
spécifiques assumées par elle de façon expresse en vertu des conditions de cette garantie
limitée. En aucun cas EURO-PRO Operating LLC ne sera-t-elle tenue responsable de
dommages indirects de quelque nature que ce soit. Certains états ou provinces n’autorisent pas
l’exclusion ou la limitation des dommages indirects. Ainsi, la disposition ci-devant pourrait ne pas
s’appliquer à vous. Cette garantie vous confère des droits juridiques précis pouvant varier d’un
état ou d’une province à l’autre.
*Important : Emballez soigneusement l’appareil afin d’éviter tout dommage durant le
transport. Avant d’emballer l’appareil, assurez-vous d’y apposer une étiquette portant vos
nom, adresse complète et numéro de téléphone ainsi qu’une note précisant les détails de
l’achat, le modèle et le problème éprouvé par l’appareil. Nous vous recommandons
d’assurer votre colis (les dommages survenus durant le transport ne sont pas couverts par
la garantie). Indiquez « AUX SOINS DU SERVICE À LA CLIENTÈLE » sur l’emballage
extérieur. Comme nous nous efforçons en tout temps d’améliorer nos produits, les
spécifications décrites dans ce guide sont sujettes à changement sans préavis.

2
Entretien et Nettoyage
MISE EN GARDE: Assurez-vous de débrancher le four et de le laisser
refroidir avant le nettoyage.
Afin d’assurer un fonctionnement des plus sécuritaires, maintenez votre four grille-
pain exempt de graisse et d’accumulation de nourriture. Nettoyez les parois
intérieures à l’aide d’une éponge, d’un linge ou d’un tampon à récurer de nylon
humides et d’un savon doux. N’UTILISEZ PAS DE LAINE D’ACIER NI DE
NETTOYANT ABRASIF. NE GRATTEZ PAS LES PAROIS À L’AIDE D’UN
USTENSILE DE MÉTAL. CES MÉTHODES POURRAIENT ENDOMMAGER
L’AP
PAREIL.
Tous les accessoires devraient être lavés à l’eau savonneuse chaude ou au lave-
vaisselle. La porte peut être essuyée à l’aide d’une éponge humide et séchée à
l’aide d’une serviette de papier ou de tissu. Nettoyez l’extérieur à l’aide d’une
éponge humide. N’UTILISEZ PAS DE NETTOYANT ABRASIF, PUISQU’IL
POURRAIT ENDOMMAGER LA SURFACE EXTERNE.
N’UTILISEZ PAS DE LAINE D’ACIER OU DE NETTOYANT ABRASIF SUR LE
PLATEAU À CUISSON, PUISQU’ILS POURRAIENT ENDOMMAGER SON ÉMAIL.
LAISSEZ TOUTES LES PIÈCES ET SURFACES SÉCHER COMPLÈTEMENT
AVANT DE BRANCHER ET D’UTILISER L’AP
PAREIL.
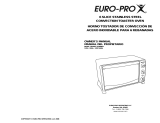
RETIREZ RÉGULIÈREMENT LE PLATEAU À MIETTES DE LA FENTEZ POUR LE
NETTOYER. (Fig. 19)
35
Fig. 19
Plateau à
miettes
Technical Specifications
Voltage: 120V., 60Hz.
Power: 1200 Watts
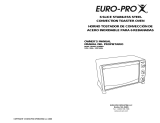
* Illustrations may differ from actual product
1. Oven Housing
2. Rotisserie Support
3. Support Guides
4. Control Panel
5. Cool Touch Handle
6. Glass Door
7. Lower Heating Elements
8. Crumb Tray
9. Wire Rack
10. Bake Pan
11. Rotisserie Handle
12. Rotisserie Assembly
(1 x rod, 2 x skewers)
13. LED Display
14. Oven Function Button
15. Toast Function Button
16. Pizza Function Button
17. Dehydrate Function Button
18. Defrost Function Button
19. Rotisserie Function Button
20. Increase Button
21. Decrease Button
22. Timer / Temperature Button
23. Clock Button
24. Light Button
25. Stop / Cancel Button
26. Start Button
Getting To Know Your Toaster Oven
CONTROL PANEL

Before Using Your Digital Convection Oven
1. Read all instructions in this manual before using your convection oven.
2. Make sure that the oven is unplugged.
3. Wash all the accessories in hot, soapy water or in the dishwasher. Also remove
the protective film on the control panel.
4. Thoroughly dry all accessories and re-assemble in oven according to your
needs.
5. Plug oven into the electrical outlet. The LED display panel will illuminate and the
oven will beep once to advise you that it is plugged in.
6. After re-assembling your convection oven, we recommend that you run the oven
at the highest temperature on the bake function for approximately 15 minutes to
eliminate any packing residue that may remain after shipping. This will also
remove all traces of odor initially present.
7. To select the bake function, press the “oven” button once. Then press the
increase button to increase the oven temperature. Once the temperature
has been selected, press the “time/temp” button to set the time. Press the
decrease button to select 15 minutes time. Once the time is set, press the “start”
button.
3
Please Note: Initial start-up operation may result in minimal smell and smoke
(about 15 minutes). This is normal and harmless. It is due to
burning off of the protective substance applied to the heating
elements in the factory.
Caution: Always use extreme care when removing wire rack, bake pan,
crumb tray or any hot object from a hot oven.
Warning: TO AVOID RISK OF INJURY OR BURNS, DO NOT TOUCH HOT
SURFACES WHEN OVEN IS IN USE. ALWAYS USE OVEN
MITTS.
Caution: Do not leave oven unattended while in operation.
Note: Always pre-heat the oven for 15 minutes before starting to cook.
Frozen meats may take considerably longer. Therefore, use of a meat
thermometer is highly recommended.
Caution: Do not leave oven plugged in when not in use.
Réglage de l’horloge
L'horloge offre deux options: affichage de
24 heures ou de 12 heures.
L'horloge peut être réglée chaque fois
que vous branchez le four grille-pain.
Pour régler l’horloge:
1. Appuyez sur le bouton Horloge une
fois : Hr24 s'affiche. Appuyez sur le
bouton une seconde fois : Hr12
s'affiche. Le mot CLOCK (Horloge)
s'affiche continuellement. (Fig. 15)
Fig. 15
2. Pour saisir l'heure, appuyez sur le
bouton Augmentation jusqu'à ce que
l'heure s'affiche. (Fig. 16)
3. Une fois l'heure sélectionnée, appuyez
sur le bouton Horloge pour modifier
les minutes. :00 clignote. (Fig. 17)
Fig. 17
Fig. 16
Utilisation de la fonction d'arrêt
1. Appuyez sur le bouton Arrêt pour
arrêter le four en fonctionnement. Le
mot PAUSE s'affiche à l'écran.
(Fig. 18)
2. Appuyez sur le bouton de
démarrage pour poursuivre.
3. Appuyez sur le bouton Arrêt pour
annuler un réglage ou la fonction
choisie.
Tailles de plateaux de cuisson
recommandées
Les tailles de plateaux de cuisson
suivantes devraient convenir à votre four
grille-pain à convection. Assurez-vous
que le plateau convient à votre four avant
de préparer votre recette.
plateau de 6 muffins
plateau à pain de 8 x 4
plateau à pain de 9 x 5
plateau rond ou carré de 8 po
plat de 1-1/2 litre – la plupart des
formats
Lorsque vous cuisinez avec des plateaux
à pain, ne les remplissez pas à plus de la
moitié.
MISE EN GARDE: Lorsque vous
retirez la grille du four, retenez-la
toujours. Ne lâchez pas le plateau tant
qu’il n’est pas bien supporté par la
grille.
Fig. 18
4. Appuyez sur le bouton augmentation
jusqu'à ce que les minutes de l'heure
s'affichent.
5. Appuyez une fois de plus sur le
bouton Horloge pour activer l'heure
choisie.
34
Mode D’Emploi
DÉCONGÉLATION
Remarque : Il n'est pas recommandé de
préchauffer le four avant la fonction de
décongélation.
Fonctionnement
1. Branchez l'appareil à l'alimentation.
2. Placez la grille sur le porte grille
désiré.
3. Appuyez sur le bouton Décongélation
pour sélectionner cette fonction.
4. Choisissez la durée désirée en
appuyant sur le bouton
Augmentation/Diminution.
5. Placez les aliments sur la grille de
cuisson.
6. Ouvrez la porte et placez les aliments
dans le four. Refermez la porte.
7. Appuyez sur le bouton de démarrage.
8. Une fois les aliments décongelés, un
bip se fera entendre 3 fois et le mot
END (FIN) apparaîtra à l'écran.
9. Appuyez sur le bouton Arrêt.
Remarque: Il n'est pas nécessaire
d'appuyer sur le bouton Minuterie pour
régler la durée avec cette fonction.

4
Using Your Toaster Oven
Please familiarize yourself with the following oven functions and accessories prior to first
use:
• Oven Button – This oven is equipped with 3 choices of cooking functions:
Bake
Convection/Fan Bake
Convection/Fan Broil
• Pizza Button – Select this button for pizza.
• Defrost Button
– Select this button to defrost frozen foods and snacks.
• Toast Button – Select this button to toast.
• Dehydrate Button
– Select this button to dehydrate foods.
• Rotisserie Button
– Select this button when using the rotisserie.
• Increase/Decrease Button – To set the time, press on the “Timer” button and the
“Time/Temp/Toast Color” buttons up or down to set the desired time.
• Clock Button – Use to set and display time.
•
Stop/Cancel Button – Press to stop oven from heating or to cancel a function
that was selected.
•
Start Button – Press to start the oven once settings, time, and temperature are
selected.
• Timer/Temp. Button – To set the temperature, press on the “Timer” button
and the “Timer/Temp.” adjust buttons up or down to set the desired temperature.
• Convection Fan – The convection fan works automatically on “Fan Bake”,
“Fan Broil” and with the “Rotisserie” functions.
• Wire Rack – For toasting, baking and general cooking for casserole dishes
and standard pans.
• Crumb Tray – Place in the slot at the bottom of the oven. Clean after every use.
• Bake Pan – For use in broiling and roasting meat, poultry, fish and various
other foods.
• Rotisserie Assembly – Use to roast a variety of meats and poultry that are very
tender and juicy inside, and browned to perfection outside.
• Rotisserie Handle – Used for removing the rotisserie rod from the oven after your
roast is done.
Convection Cooking
Convection cooking combines hot air movement by means of a fan with the regular
features (Fan Bake, Fan Broil, Rotisserie). Convection cooking provides faster cooking
in many cases than regular radiant type toaster ovens. The fan gently sends air to every
area of the food, quickly browning, crisping and sealing in moisture and flavor. It
produces more even temperature all around the food by air movement, so that food
cooks/bakes/broils evenly versus the normal ovens hot and cold spots. The convection
feature allows cooking/baking at lower temperatures, which saves energy and helps
keep the kitchen cooler. Convection air is superheated and it circulates around the food
so it cooks food significantly faster than conventional ovens.
33
Mode D’Emploi
DÉSHYDRATATION
Remarque: Il n'est pas recommandé
de préchauffer le four avant cette
fonction.
Pour une utilisation efficace de la
fonction de déshydratation :
• Les aliments doivent être placés en
une seule couche sur une grille en
FONCTION PIZZA
filet convenant à la déshydratation
(non comprise). N'utilisez pas de
plaque à biscuits : l'air doit circuler
autour des aliments.
• Une fois le procédé de séchage
commencé, ne l'arrêtez pas. Ne
laissez pas vos légumes ou fruits
refroidir avant la fin du procédé.
• Déshydratez les aliments en petites
quantités seulement.
Faites cuire vos pizza, pochettes pizza, etc.
Les récipients pouvant entrer dans votre
four sont d'un diamètre maximal de 12
pouces. N’utilisez jamais
de plastique,
carton ou autre produit semblable dans le
four.
Fonctionnement
Remarque: Il n'est pas possible de régler
la température de cette fonction.
1. Branchez l'appareil à l'alimentation.
2. Placez la grille sur le porte grille désiré.
3. Appuyez sur le bouton Pizza pour
sélectionner la fonction Pizza.
4. Choisissez la durée désirée en
appuyant sur le bouton
Augmentation/Diminution. Choisissez
la durée figurant sur l'emballage.
(Fig. 14)
Remarque: Il n'est pas nécessaire
d'appuyer sur le bouton Minuterie pour
régler la durée avec cette fonction.
AVERTISSEMENT: Assurez-vous de
débrancher le four et de le laisser
refroidir avant le nettoyage.
5. Ouvrez la porte et placez la pizza
dans le four. Refermez la porte.
6. Appuyez sur le bouton de démarrage.
7. Une fois la pizza prête, un bip continu
se fera entendre, le mot END
apparaîtra à l'écran et l'appareil
s'éteindra.
8. Appuyez sur le bouton Arrêt.
Fig. 14
• La déshydratation doit être lente afin
d'éliminer l'humidité des aliments.
• Ne mélangez pas d'aliments à forte
saveur: les saveurs passent d'un
aliment à un autre.
• Les fruits et légumes qui peuvent
brunir doivent être prétraités en les
trempant dans une solution de 3 c. à
table de jus de citron et 1 litre d'eau.
Trempez les fruits ou légumes dans
la solution pendant 30 à 60
secondes avant de les déshydrater.
• Une fois le procédé terminé, rangez
les aliments dans des contenants
hermétiques afin d'en conserver la
fraîcheur.
Fonctionnement
Remarque: Il n'est pas possible de
régler la température de cette fonction.
1. Branchez l'appareil à l'alimentation
2. Placez la grille sur le porte grille
désiré. Placez la grille de
déshydratation et les aliments sur la
grille.
3. Appuyez sur le bouton
Déshydratation pour sélectionner
cette fonction..
4. Choisissez la durée désirée en
appuyant sur le bouton
Augmentation/Diminution.
5. Ouvrez la porte et placez les
aliments dans le four. Refermez la
porte.
6. Appuyez sur le bouton de
démarrage.
7. Une fois les aliments prêts, un bip
se fera entendre continuellement et
le mot END apparaîtra à l'écran.
8. Appuyez sur le bouton Arrêt.
Remarque: Il n'est pas nécessaire
d'appuyer sur le bouton Minuterie pour
régler la durée avec cette fonction.
MISE EN GARDE: Assurez-vous de
débrancher le four et de le laisser
refroidir avant le nettoyage.

Rotisserie rod
Rotisserie Skewer
Thumbscrew
Pointed End
Square End
Operation
We recommend that you do not cook a
roast larger than 5 lbs. on the rotisserie
skewer. For larger roasts we recommend
roasting and not using the rotisserie.
Poultry should be bound in string to
prevent the chicken legs or wings from
unraveling during cooking and so that the
rotisserie assembly will rotate smoothly.
1. Insert the pointed end of the rotisserie
skewer through the rotisserie rod,
making sure the points of the rotisserie
skewer face in the same direction as
the pointed end of the rotisserie rod.
Slide rotisserie skewer towards the
square end of the rotisserie rod and
secure with the thumbscrew. (Fig. 1)
ROTISSERIE
5
For best results, it is recommended that
you pre-heat the oven for 15 minutes.
Note: The temperature setting on this
function is not adjustable.
Fig. 1
11. When the cooking process has been
completed, the unit will shut “Off”
and beep continually. “END” will
appear on the display panel. Press
stop/cancel button to turn the oven
“Off”
12. Remove the rotisserie by placing the
hooks of the rotisserie handle under
the grooves on either side of the
rotisserie rod. (Fig. 4) Lift the left
side of the rotisserie first by lifting it
up and out. Then pull the rotisserie
rod out of the drive socket and
carefully remove the roast from the
oven. Take the meat off of the
rotisserie and place on a cutting
board or platter.
13. Unplug the unit and allow it to cool
completely before cleaning.
Operating Instructions
2. Secure the food to be cooked onto the
rotisserie rod by inserting the rotisserie
skewer into the food.
3. Place the second rotisserie skewer into
the other end of the roast or poultry and
secure the rotisserie skewer with the
thumbscrew.
4. Check that the food is centered and
secured to the rotisserie rod.
5. Ensure that the crumb tray is in position
to catch the food drippings.
6. Insert the pointed end of the rotisserie
rod into the drive socket located at the
rear on the right hand side of the oven
wall. Make sure the square end of the
rotisserie rod rests on the rotisserie rod
support located at the front on the left
hand side of the oven wall. (Fig. 2)
Fig. 4
7. Close the oven door.
8. Press the rotisserie button.
9. Press the increase/decrease buttons
to adjust the desired time.
10.Press the rotisserie function button
followed by the start button. (Fig. 3)
Note: The rotisserie function button will
illuminate when switched to the “On”
position.
32
Mode D’Emploi
CAUTION: Use oven mitts and the
rotisserie handle when inserting the
rotisserie assembly into the oven as the
oven walls are hot when the oven is pre-
heated.
Right Side Rear
Left Side Front
Fig. 2
Fig. 3
Cuisson des biscuits
Pour la cuisson des biscuits, nous vous
suggérons de régler la température de
cuisson et d’utiliser une plaque à biscuits
sur la grille. (Veuillez prendre note
qu’elles ne sont pas comprise avec le
four). En outre, l’utilisation d’un papier à
cuisson sur la plaque à biscuits pourra
s’avérer utile pour certains types de
biscuits.
1. Préchauffez le four pendant 15
minutes. Placez la plaque à biscuits
sur la grille.
2. Utilisez un papier à cuisson sur la
plaque à biscuits afin de les
empêcher de coller.
3. Les plaques à biscuits, durées de
cuisson et températures peuvent
varier de celles nécessaires à
d’autres produits de cuisson.
Guide de Cuisson
Suivez les instructions se trouvant sur
l’emballage ou dans la recette pour la
durée et la température de cuisson.
GRILLE-PAIN
Faites griller le pain, les bagels, les
muffins anglais et les autres délices du
déjeuner et obtenez toujours un résultat
doré. Lorsque vous ne grillez qu’un ou
deux articles, placez la nourriture sur la
grille, au centre du four, pour des
résultats uniformes.
Remarque de Fonctionnement:
Il n'est pas possible de régler la
température de cette fonction.
1. Assurez-vous que le plateau à
miettes est en place.
2
. Placez la nourriture sur la grille.
3. Appuyez sur le bouton Grille-pain.
4. Appuyez sur le bouton
Augmentation/Diminution pour
sélectionner le degré de grille-pain.
(Fig. 11)
5. Appuyez sur le bouton de démarrage.
Le décompte ne s'affiche pas à
l'écran pendant les premières
minutes. (Fig. 12)
7. Une fois le grille-pain terminé, le four
s'éteindra, un bip continu se fera
entendre et le mot END (FIN)
apparaîtra à l'écran.
8. Appuyez sur le bouton d'arrêt.
Remarque: La grille devrait être
placée au centre du four
MISE EN GARDE: Ne laissez jamais
le four en marche sans surveillance.
Fig. 12
Fig. 13
6. La minuterie fait le décompte à partir
de 58 secondes. (Fig. 13)
Très léger
Léger
Très foncé
Moyen foncé
Foncé
Moyen
Fig. 11
Rotisserie
On/Off Switch

4. Brush food with sauces or oil, as
desired and place on bake pan.
5. After the oven has been pre-heated,
set the cooking time desired.
6. Place the bake pan on the wire rack.
7. Food should be placed as close as
possible to the top heating element
without touching it.
8. Close the oven door.
9. Press the “Start” button. The timer will
begin countdown.
10. Turn food over midway through the
prescribed cooking time.
11. When broiling time is complete, the
oven will turn “Off”, the unit will beep
continuously and “END” will appear in
the display window. Press the
“Stop/Cancel” button.
Note: Foods of irregular thickness like
chicken breasts cook more evenly when
thickest parts are on the outside edges of
the bake pan.
Note: The oven will continue to beep at
intervals at the end of the cooking cycle
until the stop/cancel button has been
pressed.
6
Broiling Guide
MEAT
RIB STEAK
T-BONE STEAK
HAMBURGER
PORK CHOPS
LAMB CHOPS
CHICKEN LEGS
FISH FILETS
SALMON STEAKS
30-35 min.
20-25 min.
20-25 min.
20-25 min.
20-25 min.
TIME
20-25 min.
20-25 min.
15-20 min.
Cooking results may vary, adjust times to
individual requirements. Also, check often
during broiling to avoid overcooking.
BROILING
For best results, it is recommended that
you pre-heat the oven for 15 minutes.
Note: The temperature setting on this
function is not adjustable.
Operation
1. Open oven door and slide the wire
rack into the middle or top rack
position depending on the thickness
of food.
2. Press the “Oven” button three (3)
times to select the (Convection) Fan
Broil” feature. The default
temperature will be displayed on the
display window. (Fig. 5)
Fig. 5
Operating Instructions
3.Press timer/temp button for the timer.
Press the increase/decrease button.
Each time the button is pressed the
time will change in one (1) minute
increments. Set at 15 minutes for
preheating. If you hold down the increase
or decrease button, the increments will
change rapidly. Press the start button.
(Fig. 6)
Fig. 6
Rotisserie Guide
Cooking results may vary, adjust times to
individual requirements. Also, check often
during cooking to avoid overcooking.
Use the rotisserie guide below ONLY for
suggested roasting times. Check the
doneness with a reliable meat
thermometer. Use an independent timer
to remind you to check the meat
temperature.
MEAT
ROAST BEEF
PORK ROAST
HA M
CHICKEN
TURKEY
35-40 min.
35-40 min.
TIME PER LB
25-30 min.
25-30 min.
25-30 min.
31
Mode D’Emploi
Fonctionnement
1. Branchez l'appareil à l'alimentation.
2. Placez la grille sur le porte grille
désiré.
3. Appuyez une fois sur le bouton
Four pour sélectionner la cuisson
sans convection ou deux fois pour
la cuisson à convection. (Fig. 9)
CUISSON
Faites cuire vos biscuits, gâteaux, tartes,
carrés au chocolat, etc. préférés. Les
récipients pouvant entrer dans votre four
sont de longueur maximale de 12
pouces. L’utilisation de sacs de cuisson
ou de récipients de verre dans le four
n’est pas recommandé. N’utilisez
jamais de plastique, carton ou autre
produit semblable dans le four.
Remarque: Placez la grille sur le porte
grille approprié.
Guide de Cuisson
VIANDE TEMP. ºF DURÉE/LB
RÔTI DE BOEUF 300-325 25-30 min.
RÔTI DE PORC 325 40-45 min.
JAMBON 300-325 35-40 min.
POULET 350 25-30 min.
DINDE 350 25-30 min.
4. Choisissez la température désirée en
appuyant sur le bouton
Augmentation/Diminution.
5. Appuyez sur le bouton Minuterie.
6. Pour régler la durée, appuyez sur le
bouton Augmentation/Diminution
jusqu'à la durée désirée. (Fig. 10)
7. Ouvrez la porte, placez les aliments
à cuire sur la grille et refermez la
porte.
8. Appuyez sur le bouton de démarrage.
9. Une fois la cuisson terminée, le four
émet continuellement un bip et le
mot END s'affiche.
10.Appuyez sur le bouton Arrêt.
11.Débranchez l'appareil et laissez-le
refroidir complètement avant de
nettoyer.
Fig. 9
Fig. 10
Fonctionnement
4. Ouvrez la porte et placez les
aliments dans le four. Appuyez sur
le bouton de démarrage.
5. Une fois la cuisson terminée, le four
s'éteindra, un bip continu se fera
entendre et le mot END (FIN)
apparaîtra à l'écran. Appuyez sur le
bouton Arrêt.
6. Débranchez l'appareil et laissez-le
refroidir complètement avant de
nettoyer.
1. Appuyez une fois sur le bouton Four
pour sélectionner la cuisson ou deux
fois pour la cuisson à convection.
2. Appuyez sur le bouton
Augmentation/Diminution pour régler la
température pour le rôti. (Fig. 7)
RÔTI
Faites rôtir votre coupe de viande
favorite à la perfection grâce à la fonction
Cuisson ou Cuisson à convection. Le four
peut rôtir un poulet, des pièces ou un rôti
de dinde de 5 lb maximum. Un
guide de durées de rôti est fourni pour
vous faciliter la tâche. Nous vous
suggérons cependant de vérifier
régulièrement le progrès de la cuisson à
l’aide d’un thermomètre à viande. Pour de
meilleurs résultats, il est recommandé de
préchauffer le four durant 15 minutes.
Remarque : le ventilateur à convection
démarre automatiquement avec la fonction
Cuisson à ventilation. L’utilisation de sacs
de cuisson ou de récipients de verre dans
le four n’est PAS recommandée.
N’utilisez jamais
de plastique, carton ou
autre produit semblable dans le four.
3. Appuyez sur le bouton Minuterie, puis
sur Augmentation/Diminution pour
régler la température désirée. (Fig. 8)
Fig. 7
Fig. 8

7
Operating Instructions
Operation
1. Connect to power supply.
2. Place the wire rack on the desired
support guide.
3. Press “Oven” button one (1) time to
select the “Bake” feature without
convection, or two (2) times to
select “/Fan Bake” for convection
baking. (Fig. 9)
BAKING
Bake your favorite cookies, cakes, pies,
brownies, etc. The bakeware that will fit
in your oven are up to 12 inches in
length. We do not recommend the use of
oven roasting bags or glass containers in
the oven. Never
use plastic cardboard,
paper or anything similar in the oven.
Note:Position the wire rack in the
appropriate support guide.
Roasting Guide
MEAT
OVEN
TEMP
BEEF ROAST 300-325
PORK ROAST 325
HAM 300-325
CHICKEN 350
TURKEY 350
25-30 min.
25-30 min.
TIME
PER LB.
25-30 min.
40-45 min.
35-40 min.
4. Set the desired temperature by
pressing the “Increase/Decrease”
button.
5. Press the “Timer/Temp” button.
6. To select the desired time setting,
press the “Increase/Decrease” button
until the time is reached. (Fig. 10)
7. Open the door and place food to be
baked on the wire rack, then close
door.
8. Press the “Start” button.
9. When the baking time is complete,
the oven will beep continuously for
one (1) minute and “END” will
appear in the display panel until the
stop button is pressed.
10. Press the “Stop/Cancel” button.
11. Unplug the unit and allow it to cool
completely before cleaning.
Fig. 9
Fig. 10
Positioning of Wire Rack
Cookies - use bottom and middle
support guides.
Layer cakes - use bottom support guide
only (bake one at a time).
Pies - use bottom or middle support
guides.
4. Open door and place your food in
the oven, then press start button.
5. When the time is up, the unit will
shut “Off”, beep continually and
“END” will appear on the display
panel. Press the “Stop/Cancel”
button.
6. Unplug the unit and allow it to cool
completely before cleaning.
Operation
1. Press the oven button one (1) time to
select the “Bake” feature or two (2)
times for “(Convection) Fan Baking”.
2. Press the “Increase/Decrease” button to
change the temperature to the desired
temperature for the roast. (Fig. 7)
ROASTING
Roast your favorite cut of meat to
perfection using the “Bake” or “(Convection)
Fan Bake” function. The oven can cook up
to a 5-lb. chicken, turkey parts or roast. A
suggested roasting guide has been
provided to assist you with roasting times.
However, we suggest that you periodically
check the cooking progress with a meat
thermometer. For best results we
recommend that you preheat the oven for
15 minutes. Please note that the convection
fan comes on automatically when using the
“(Convection) Fan Bake” function. We do
NOT recommend the use of oven roasting
bags or glass containers in the oven. Never
use plastic, cardboard, paper or anything
similar in the oven.
3. Press the “Timer/Temp” button and
then the “Increase/Decrease” button to
set the desired cooking time. (Fig. 8)
Fig. 7
Fig. 8
4. Badigeonnez les aliments de sauces
ou d’huile, si désiré, et placez-les sur
le plateau de cuisson.
5. Une fois le four préchauffé, réglez-le à
la température désirée.
6. Placez le plateau de cuisson sur la
grille.
7. La nourriture devrait être placée le
plus près possible de l’élément
chauffant supérieur, sans y toucher.
8. Fermez la porte du four.
9. Appuyez sur le bouton de démarrage.
La minuterie commence son
décompte.
10. Retournez la nourriture à la moitié de
la durée de cuisson prévue.
11. Une fois la cuisson terminée, le four
s'éteindra, un bip continu se fera
entendre et le mot END (FIN)
apparaîtra à l'écran. Appuyez sur le
bouton Arrêt.
Remarque: Les aliments d'épaisseur
irrégulière, comme les cuisses de poulet,
cuisent de façon plus égale lorsque leur
portions épaisses sont près de l'extérieur
du plateau de cuisson.
Remarque: Le four émet des bips à la fin
du cycle de cuisson, jusqu'à ce que vous
appuyez sur le bouton Arrêt.
30
Guide de gril
VIANDE
DURÉE
BIFTECK DE CÔTE 20-25 min.
T-BONE STEAK 20-25 min.
HAMBOURGEOIS 15-20 min.
CÔTELETTES DE PORC 20-25 min.
CÔTELETTES D’AGNEAU 20-25 min.
CUISSES DE POULET 30-35 min.
FILETS DE POISSON 20-25 min.
DARNES DE SAUMON 20-25 min.
Les résultats peuvent varier. Ajustez la
durée de cuisson selon vos besoins. En
outre, vérifiez souvent le gril afin d’éviter
de trop cuire.
GRIL
Pour de meilleurs résultats, il est
recommandé de préchauffer le four
durant 15 minutes.
Remarque: Il n'est pas possible de
régler la température de cette fonction.
Fonctionnement
1. Ouvrez la porte du four et faites
glisser la grille à la position
intermédiaire ou supérieure dans le
four, selon l'épaisseur des aliments.
2. Appuyez trois fois sur le bouton
Four pour sélectionner le gril à
convection. La température par
défaut s’affiche à l’écran. (Fig. 5)
Fig. 5
Mode D’Emploi
3. Appuyez sur le bouton Minuterie
/Température pour régler la durée.
Appuyez sur le bouton Augmentation
/Diminution. Chaque fois que vous
appuyez sur ce bouton, la durée est
modifiée d'une minute. Sélectionner un
préchauffage de 15 minutes. Si vous
maintenez la pression sur les boutons
Augmentation/Diminution, les
intervalles changent rapidement.
Appuyez sur le bouton de démarrage.
(Fig. 6)
Fig. 6
Guide de Rôtisserie
Les résultats peuvent varier. Ajustez la
durée de cuisson selon vos besoins.
Vérifiez souvent la cuisson afin d’éviter
de trop cuire.
Le guide de rôtisserie ci-dessous est
offert à titre indicatif SEULEMENT.
Vérifiez la cuisson à l’aide d’un
thermomètre à viande. Utilisez une
minuterie indépendante pour vous
rappeler de vérifier la température de la
viande.
VIANDE LB
RÔTI DE BOEUF 25-30 min.
RÔTI DE PORC 35-40 min.
JAMBON 35-40 min.
POULET 25-30 min.
DINDE 25-30 min.

Fig. 3
Bouton
de Rôtisserie
8
Operating Instructions
Baking Cookies
For baking cookies, we suggest
adjusting baking temperature and using
cookie sheets placed on the wire rack.
(Please note that these are not provided
with your oven.) Also, using parchment
paper on the cookie sheets might prove
helpful when baking certain types of
cookies.
1. Preheat oven for 15 minutes, then
place cookie sheets on the wire rack
to begin baking.
2. Use parchment paper on cookie
sheets so cookies will not stick.
3. Cookie sheets baking times and
temperatures may differ from those
necessary when using other baking
materials.
Baking Guide
Follow the package or recipe instructions
for baking times and temperature.
29
Mode D’Emploi
TOASTING
Toast breads, bagels, English muffins,
and other breakfast treats with even
golden brown results. When toasting
only 1or 2 items, place food on the wire
rack in the center of the oven for even
toasting results.
Operation
Note: The temperature setting on this
function is not adjustable.
1. Ensure crumb tray is in place.
2
. Place food to be toasted on the wire
rack.
3. Press on the toast button.
4. Press the increase/decrease
button to select the toast color.
(Fig. 11)
5. Press the start button. Count down
will not appear on the display panel
for the first few minutes. (Fig. 12)
7. When the toasting time is done, the
oven will turn “Off”, “END” will appear
on the display panel and the unit will
beep continuously.
8. Press the stop/cancel button.
Note: Wire rack should be positioned in
the middle of the oven.
WARNING: Never leave oven
unattended when in use.
Fig. 12
Fig. 13
6. The timer will count down from 58
seconds. (Fig. 13)
Fig. 11
Tige à rôtir
Broche à rôtir
Vis à oreille
Extrémité pointue
Extrémité
carrée
Fonctionnement
Nous vous recommandons de ne pas faire
cuire un rôti de plus de 5 lb sur la broche
à rôtir. Pour les plus gros rôtis, nous vous
recommandons le grillage et non la
rôtisserie. Le poulet doit être ficelé afin
d’éviter que ses pattes ou ses ailes ne se
déploient durant la cuisson, et pour
permettre à l’ensemble à rôtir de tourner
doucement.
1. Insérez l’extrémité pointue de la
broche à rôtir dans la tige en vous
assurant que les pointes de la broche
sont dans la même direction que
l’extrémité pointue de la tige à rôtir.
Faites glisser la broche à rôtir vers
l’extrémité carrée de la tige à rôtir et
fixez-la à l’aide de la vis à oreille.
(Fig. 1)
RÔTISSERIE
Pour de meilleurs résultats, il est
recommandé de préchauffer le four durant
15 minutes.
Remarque: Il n'est pas possible de
régler la température de cette fonction.
Fig. 1
2. Fixez les aliments sur la tige à rôtir en
insérant la broche dans la pièce à cuire.
3. Insérez la deuxième broche à l’autre
extrémité du rôti ou de la volaille et fixez
la broche à rôtir à l'aide de la vis à
oreille.
4. Vérifiez que la pièce est centrée et fixée
à la tige à rôtir.
5. Assurez-vous que le plateau à miettes
est en place pour récupérer l’égouttage.
6. Insérez l’extrémité pointue de la broche
à rôtir dans la cavité située sur la droite,
à l’arrière de la paroi du four. Assurez-
vous que l’extrémité carrée de la broche
à rôtir repose sur le porte-tige situé sur la
gauche, à l’avant de la paroi du four.
(Fig.2)
11.Une fois la cuisson terminée,
l'appareil s'éteint et émet
continuellement des sons. END
s'affiche sur le panneau. Appuyez sur
le bouton Arrêt pour éteindre le four.
12.Retirez la broche à rôtir en plaçant les
crochets de la poignée à rôtir sous les
rainures de chaque côté de la broche.
(Fig. 4) Soulevez le côté gauche de
la rôtisserie en premier, vers le haut
et vers l’extérieur. Tirez ensuite la
broche à rôtir hors de la cavité et
retirez délicatement le rôti du four.
Retirez la viande de la rôtisserie et
placez-la sur un plateau de coupe ou
de service.
13.Débranchez l'appareil et laissez-le
refroidir complètement avant de
nettoyer.
Fig. 4
7. Fermez la porte du four.
8. Appuyez le bouton rôtisserie.
9. Appuyez sur le bouton
Augmentation/Diminution pour régler la
durée.
10.Appuyez sur le bouton de Rôtisserie,
puis sur le bouton de démarrage.
(Fig. 3)
MISE EN GARDE: Le bouton Rôtisserie
s’illumine lorsqu’il est à la position « On »
(en marche).
MISE EN GARDE: Employez des gants
de cuisson et la poignée de rôtisserie
lorsque vous insérez l'ensemble à rôtir
dans le four: les parois sont chaudes
lorsque le four a été préchauffé.
Côté arrière droit
Côté avant gauche
Fig. 2

9
Operating Instructions
DEHYDRATE
Note: It is not recommended to pre-
heat the oven when using this function.
PIZZA FUNCTION
For efficient use of the dehydrate
feature:
• Food should be placed in a single
layer on a wire mesh rack suitable
for dehydrating. (Not supplied) Do
not use cookie sheets, as the air
needs to circulate around the food.
• Once the drying process begins, it
is not recommended to stop the
process. Do not let your vegetables
/fruit cool again until process is
complete.
• Dehydrate food in small quantities
only.
Bake your favorite pizza, or pizza
pockets, etc. The bake ware that will fit
in your oven is up to 12 inches in
diameter. Never
use plastic cardboard,
paper or anything similar in the oven.
Operation
Note: The temperature setting is not
adjustable on this function.
1. Connect unit to power supply.
2. Place wire rack on desired support
guide.
3. Press the “Pizza” button to select the
pizza function.
4. Set the time by pressing the “Increase
/Decrease” button. We recommend
that you set the time according to
package instructions. (Fig. 14)
Note: There is no need to press the
“Timer/Temp” button when using this
feature to adjust the time desired.
WARNING: Be sure to unplug the
oven and allow it to cool before
cleaning.
5. Open the door and place the pizza in
the oven, then close the door.
6. Press the “Start” button.
7. When the pizza is done, the unit will
beep continuously for one (1) minute
and “END” will appear in the display
panel until the stop button is pressed.
8. Press the “Stop/Cancel” button.
Fig. 14
• Dehydrating food should be done
slowly to remove moisture from
food.
• Do not mix strong flavored items
together, as the flavors can transfer
from one vegetable/fruit to the next.
• Fruits and vegetables that could
brown should be pretreated by
dipping into a solution of 3 tbsp of
lemon juice and 1 quart (1 liter) of
water. Dip fruit or vegetables in the
solution for 30-60 seconds before
dehydrating.
• After process is complete, store the
food in air tight containers to
preserve their freshness.
Operation
Note: The temperature setting on this
function cannot be adjusted.
1. Connect unit to power supply.
2. Place wire rack on desired support
guide, then place dehydrating rack
with food onto wire rack.
3. Press the “Dehydrate” button to
select the dehydrate function.
4. Set the timer by pressing the
“Increase/Decrease” button.
5. Open the door and place the food in
the oven, then close the door.
6. Press the “Start” button.
7. When the food is done, the unit will
beep continuously and “END” will
appear in the display panel.
8. Press the “Stop/Cancel” button.
Note: There is no need to press the
“Timer/Temp” button when using this
feature to adjust the time desired.
WARNING: Be sure to unplug the
oven allow it to cool before cleaning.
28
Utilisation de Votre Four Grille-Pain
Veuillez vous familiariser avec les fonctions et les accessoires suivants de votre four
avant sa première utilisation :
• Bouton Four – Ce four est doté de trois options de cuisson :
Cuisson
Cuisson à convection
Gril à convection
• Bouton Pizza – Appuyez sur ce bouton pour une pizza.
• Bouton Décongélation
– Choisissez ce bouton pour décongeler des aliments.
• Bouton Grille-pain – Choisissez ce bouton pour griller.
• Bouton Déshydratation –
Choisissez ce bouton pour déshydrater les aliments.
• Bouton Rôtisserie –
Choisissez ce bouton pour rôtir.
• Bouton Augmentation/Diminution – Pour régler la durée, appuyez sur le
bouton Minuterie et sur le bouton Minuterie/Température/Grille-pain/Couleur, vers le
haut ou vers le bas, pour choisir la durée.
• Bouton Horloge – Réglez et affichez l'heure.
•
Bouton Arrêt – Arrête le four, annule la sélection de fonction.
• Bouton de démarrage – Démarre le four une fois les réglages, la durée et la
température choisis.
• Bouton Minuterie/Température – Pour régler la température, appuyez sur le
bouton Minuterie et sur le bouton Température, vers le haut ou vers le bas, pour
choisir la température.
• Ventilateur à convection – Le ventilateur à convection se met en marche
automatiquement durant la cuisson à « fan bake, grill » et la rôtisserie.
• Grille – Grille-pain, cuisson générale et cuisson pour plats en cocotte et
plats standards.
• Plateau à miettes – Placez-le dans la fente au fond du four. Nettoyez après
chaque utilisation..
• Plateau de cuisson - Pour faire griller et rôtir les viandes, la volaille, le poisson et
autres.
• Ensemble à rôtir - Rôtit une gamme de viandes et volailles, les rendant très
tendres et juteuses à l’intérieur, dorées à la perfection à l’extérieur.
• Poignée de rôtissoire - Permet de retirer la broche à rôtir une fois le rôti cuit.
Cuisson à Convection
La cuisson à convection combine les mouvements d’air chaud d’un ventilateur aux
fonctions habituelles (cuisson et gril à convection, rôtisserie). Dans bien des cas, la
cuisson à convection est plus rapide que celle des fours grille-pain à éléments radiants.
Le ventilateur fait circuler l’air doucement dans chaque recoin du four, brunissant,
croustillant et enfermant l’humidité et la saveur. La convection permet une température
plus égale tout autour de la nourriture à l’aide du mouvement d’air, de façon à ce que la
nourriture cuise ou grille de façon égale, contrairement aux fours réguliers qui
présentent des endroits chauds et froids. La fonction de convection permet de cuire à
des températures plus faibles, ce qui sauve de l’énergie et garde la cuisine plus fraîche.
L’air de convection est surchauffé et circule autour de la nourriture, augmentant
grandement la vitesse de cuisson.

Setting the Clock
The clock has two options; a 24 hour
clock or a 12 hour clock.
The clock can be set each time you plug
in the toaster oven. To set the clock:
1. Press the “Clock” button once, Hr24
will appear in the display window,
press clock button a second time,
Hr12 will appear. “Clock” will flash
continuously. (Fig. 15)
2. To enter the correct time of day,
press the “Increase” button until the
appropriate hour appears. (Fig. 16)
3. Once the hour is selected press the
clock button again to change the
minutes. The :00 will flash. (Fig. 17)
Fig. 15
Fig. 16
Fig. 17
Using the Stop/Cancel Function
1. Press the “Stop/Cancel” button to
stop the oven while oven is in
operation. “PAUSE” will light up on
the display window. (Fig. 18)
2. Press the “Start” button to resume
function.
3. Press “Stop/Cancel” to cancel
setting or selected function.
Recommended Pan Sizes
The following recommended pan sizes
should fit your Convection/Toaster Oven.
To be sure the pan will fit, place the pan
inside the oven to check before preparing
your recipe.
6 - cup muffin pan
8 x 4 loaf pan
9 x 5 loaf pan
8" round or square baking pan or dish
1-1 1/2 quart casserole dish - most types
When baking in loaf pans, we
recommend you do not fill more than half
full.
CAUTION: When sliding the wire
rack out of oven, always support the
rack. Do not let go until you are sure
the rack is securely supported.
Fig. 18
4. Press the “Increase” button until the
appropriate minutes are displayed.
5. Press the “Clock” button one more
time to set the time selected.
10
Operating Instructions
DEFROST
Note: It is not recommended to pre-heat
the oven when using the defrost function.
Operation
1. Connect unit to power supply.
2. Place wire rack on desired support
guide.
3. Press the “Defrost” button to select
the defrost function.
4. Set the timer by pressing the
“Increase/Decrease” button.
5. Place food on the bake pan.
6. Open the door and place the food in
the oven, then close the door.
7. Press the “Start” button.
8. When the defrost process is done, the
unit will beep 3 times and “END” will
appear in the display window.
9. Press the “Start/Cancel” button.
Note: There is no need to press the
“Timer/Temp” button when using this
feature to adjust the time desired.
1. Avant d’utiliser votre four grille-pain, lisez toutes les directives.
2. Assurez-vous que le four est débranché.
3. Nettoyez tous les accessoires à l’eau savonneuse chaude ou au lave-vaisselle.
Retirez aussi la pellicule de protection du panneau de commande.
4. Séchez complètement tous les accessoires et remettez-les dans le four au
besoin.
5. Branchez le four dans la prise électrique. L’affichage à DEL s’illumine et le four
émet un bip afin de vous informer qu’il est branché.
6. Après l’assemblage de votre four, nous vous recommandons de le faire
fonctionner à la température maximale en mode cuisson durant environ 15
minutes afin d’éliminer tout résidu. Cela éliminera en autre toute trace d’odeur
initiale.
7. Pour sélectionner la fonction de cuisson, appuyez une fois sur le bouton « four ».
Appuyez ensuite sur le bouton d'augmentation pour augmenter la température du
four. Une fois la température sélectionnée, appuyez sur la minuterie pour régler
la durée. Appuyez sur le bouton de diminution pour sélectionner une durée de 15
minutes. Une fois la durée réglée, appuyez sur le bouton de démarrage.
27
Remarque: Le démarrage initial peut causer une odeur et une fumée minimale
durant environ 15 minutes. Cela est normal et sans danger. Ce
phénomène est causé par le brûlage de l’enduit protecteur appliqué
aux éléments chauffants en usine.
Mise en garde: Soyez toujours extrêmement prudent lorsque vous retirez
la grille, le plateau de cuisson, le plateau à miettes ou tout
objet chaud d’un four.
Mise en garde: AFIN DE RÉDUIRE LES RISQUES DE BLESSURE OU DE
BRÛLURE, NE TOUCHEZ PAS AUX SURFACES CHAUDES
LORSQUE LE FOUR EST EN MARCHE. UTILISEZ
TOUJOURS DES GANTS DE CUISSON.
Attention : Ne laissez pas l’appareil sans surveillance pendant l’utilisation.
Remarque: Préchauffez toujours le four pendant 15 minutes avant la
cuisson. Les viandes surgelées peuvent nécessiter une durée
plus longue. L’utilisation d’un thermomètre à viande est donc
fortement recommandée.
Attention: Débranchez le four lorsque vous ne l’utilisez pas.
Avant D’employer Votre Four À Convection Numérique

Fig. 19
Crumb
Tray
Care & Cleaning
Warning: Be sure to unplug the oven and allow it to cool before
cleaning.
To assure maximum safe operation, keep your toaster oven free of grease and build-
up of food particles. Clean the inside of the walls with a damp sponge, cloth or nylon
scouring pad and mild detergent. DO NOT USE STEEL WOOL SCOURING PADS,
ABRASIVE CLEANERS OR SCRAPE THE WALLS WITH A METAL UTENSIL, AS
ALL OF THESE METHODS MAY DAMAGE THE FINISH.
All accessories should be washed in hot soapy water or can be cleaned in a
dishwasher. The door can be wiped with a damp sponge and wiped dry with a paper
or cloth towel. Clean the outside with a damp sponge. DO NOT USE AN
ABRASIVE CLEANER AS IT MAY DAMAGE THE EXTERIOR FINISH.
DO NOT USE AN ABRASIVE CLEANER OR STEEL WOOL SCOURING PAD ON
THE BAKE PAN AS IT MAY DAMAGE THE PORCELAIN ENAMEL FINISH.
LET ALL PARTS AND SURFACES DRY THOROUGHLY PRIOR TO PLUGGING
OVEN IN AND USING.
REGULARLY REMOVE CRUMB TRAY FROM SLOT AND CLEAN. (Fig. 19)
11
Fiche Technique
Tension: 120 V, 60 Hz
Intensité: 1200 watts
* Les illustrations peuvent différer du produit lui-même.
26
1. Habitacle du four
2. Porte rôtisserie
3. Portes grilles
4. Panneau de commande
5. Poignée froide au toucher
6. Porte de verre
7. Éléments chauffants inférieurs
8. Plateau à miettes
9. Grille
10. Plateau de cuisson
11. Poignée de rôtissoire
12. Ensemble à rôtir
(1 tige, 2 broches)
13. Affichage à DEL
14. Bouton Four
15. Bouton Pizza
16. Bouton Décongélation
17. Bouton Grille-pain
18. Bouton Déshydratation
19. Bouton Rôtisserie
20. Bouton Augmentation
21. Bouton Diminution
22. Bouton Minuterie/Température
23. Bouton d’arrêt
24. Bouton Lampe
25. Horloge
26. Bouton de démarrage
Familiarisez-Vous Avec Votre Four Grille-Pain
PANNEAU DE COMMANDE

Model
TO31
12Printed in China
Please fill out and mail the product registration card within ten (10) days of purchase.
The registration will enable us to contact you in the unlikely event of a product safety
notification. By returning this card you acknowledge to have read and understood the
instructions for use, and warnings set forth in the accompanying instructions.
RETURN TO EURO-PRO Operating LLC, 4400 Bois Franc, St-Laurent, Qc, H4S 1A7
_
_____________________________________________________________________
Appliance model
_
_____________________________________________________________________
Date purchased Name of store
_
_____________________________________________________________________
Owner’s name
_
_____________________________________________________________________
Address City Prov. Postal Code
Model TO31
PRODUCT REGISTRATION CARD
FOR CANADIAN CONSUMERS ONLY
ONE (1) YEAR LIMITED WARRANTY
EURO-PRO Operating LLC warrants this product to be free from defects in material and
workmanship for a period of one (1) year from the date of the original purchase, when utilized for
normal household use, subject to the following conditions, exclusions and exceptions.
If your appliance fails to operate properly while in use under normal household conditions within
the warranty period, return the complete appliance and accessories, freight prepaid to:
In U.S.: EURO-PRO Operating LLC, 94 Main Mill Street, Door 16, Plattsburg, N.Y. 12901
In Canada: EURO-PRO Operating LLC, 4400 Bois Franc, St. Laurent, Quebec H4S 1A7
If the appliance is found by EURO-PRO Operating LLC to be defective in material or
workmanship, EURO-PRO Operating LLC will repair or replace it free of charge. Proof of
purchase date and $ 12.95 to cover the cost of return shipping and handling must be included. *
The liability of EURO-PRO Operating LLC is limited solely to the cost of the repair or replacement
of the unit at our option. This warranty does not cover normal wear of parts and does not apply to
any unit that has been tampered with or used for commercial purposes. This limited warranty does
not cover damage caused by misuse, abuse, negligent handling or damage due to faulty
packaging or mishandling in transit. This warranty does not cover damage or defects caused by
or resulting from damages from shipping or repairs, service or alterations to the product or any of
its parts, which have been performed by a repair person not authorized by EURO-PRO Operating
LLC.
This warranty is extended to the original purchaser of the unit and excludes all other legal and/or
conventional warranties. The responsibility of EURO-PRO Operating LLC if any, is limited to the
specific obligations expressly assumed by it under the terms of the limited warranty. In no event is
EURO-PRO Operating LLC liable for incidental or consequential damages of any nature
whatsoever. Some states/provinces do not permit the exclusion or limitation of incidental or
consequential damages, so the above may not apply to you.
This warranty gives you specific legal rights, and you may also have other rights which vary from
state to state or province to province.
*Important: Carefully pack item to avoid damage in shipping. Be sure to include proof of
purchase date and to attach tag to item before packing with your name, complete address
and phone number with a note giving purchase information, model number and what you
believe is the problem with item. We recommend you insure the package (as damage in
shipping is not covered by your warranty). Mark the outside of your package “ATTENTION
CUSTOMER SERVICE”. We are constantly striving to improve our products, therefore the
specifications contained herein are subject to change without notice.
CONSIGNES DE SÉCURITÉ IMPORTANTES
CONSERVEZ CE MODE D’EMPLOI
Pour usage domestique seulement
16. L’insertion d’aliments de grand format ou d
’ustensile de métal dans un four grille-pain
peut causer un incendie ou une électrocution.
17. Un incendie peut se produire si le four est
couvert ou s’il est en contact avec des
produits inflammables, tels que les rideaux,
tapisseries, murs, etc., pendant qu’il est en
marche. Ne déposez aucun article sur le four
pendant qu’il est en marche.
18. Soyez extrêmement prudent lorsque vous
utilisez des contenants ou des ustensiles faits
de matériaux autres que le métal ou le verre
résistant à la cuisson.
19. Assurez-vous que rien n’est en contact avec
les éléments supérieur ou inférieur du four.
20. Ne déposez aucun des produits suivants
dans le four : carton, plastique, papier, ou
autre produit semblable.
21. Lorsque le four n’est pas en marche, n’y
rangez aucun produit autre que les
accessoires recommandés par le fabricant.
22. Portez toujours des gants de protection
isolants pour insérer ou retirer des articles du
four lorsqu’il est chaud.
23. Cet appareil est doté d’une porte de sécurité
de verre trempé. Ce verre est plus résistant
que le verre ordinaire et risque moins de se
casser. Le verre trempé peut toutefois se
casser près des bords. Évitez de gratter la
surface de la porte ou d’entailler les bords.
24. N’UTILISEZ PAS à l’extérieur.
25. N’utilisez l’appareil qu’à ce pour quoi il a été
conçu.
26. Ne placez rien sur la porte ouverte. Vous
endommageriez la porte de verre.
Cet appareil est doté d’un cordon d’alimentation
court afin de réduire le risque de s’emmêler dans
le cordon ou de trébucher. Une rallonge peut être
utilisée avec prudence :
1. La valeur nominale de la rallonge doit
être égale ou supérieure à la valeur nominale
de l’appareil.
2. La rallonge et le cordon d’alimentation
doivent être placés de façon à ne pas tomber
par-dessus le comptoir ou la table, afin d’éviter
de trébucher et afin de le garder hors de la
portée des enfants.
1. Avant d’utiliser votre four grille-pain, lisez
toutes les directives.
2. Ne touchez pas aux surfaces chaudes.
Utilisez toujours les poignées.
3. Une surveillance attentive est nécessaire
lors de l’emploi par ou près des enfants.
4. Pour éviter les risques d’électrocution,
évitez d’immerger l’appareil, son cordon, sa
fiche ou toute autre pièce.
5. Évitez de laisser le cordon traîner sur une
table ou un comptoir, ou entrer en contact
avec des surfaces chaudes.
6. N’utilisez pas si l’appareil, sa fiche ou son
cordon sont endommagés, ou si l’appareil
ne fonctionne pas correctement. Retournez
l’appareil à EURO-PRO Operating LLC
pour vérification, réparation ou réglage.
7. L’utilisation d’accessoires non
recommandés par le fabricant peuvent
entraîner des accidents ou causer des
blessures.
8. NE PLACEZ PAS l’appareil près d’un
brûleur au gaz ou électrique.
9. Lorsque vous utilisez le four, laissez un
espace libre d’au moins quatre pouces de
chaque côté du four afin d’assurer une
circulation d’air adéquate.
10. Débranchez l’appareil lorsque vous ne
l’utilisez pas et avant de le nettoyer.
Laissez l’appareil refroidir avant de le
nettoyer ou d’y insérer ou d’en retirer toute
pièce.
11. Pour débrancher, appuyez sur le bouton
d’arrêt et retirez la fiche. Tenez toujours la
fiche et ne tirez jamais sur le cordon.
12. Soyez extrêmement prudent lorsque vous
déplacez une casserole contenant de
l’huile ou d’autres liquides chauds.
13. Ne recouvrez aucune pièce du four de
papier d’aluminium. Cela pourrait faire
surchauffer le four.
14. Soyez extrêmement prudent lorsque vous
retirez le plateau ou les grilles ou lorsque
vous jetez de la graisse ou autres liquides
chauds.
15. Ne nettoyez pas l’intérieur du four avec de
la laine d’acier. Des morceaux pourraient
se séparer de la laine et toucher aux
composants électriques, augmentant le
risque d’électrocution.
25
V. 06/06C
AVERTISSEMENT: Afin de réduire les risques d’électrocution, cet appareil est doté d’un
cordon à fiche polarisée (une lame est plus large que l’autre). Cette fiche ne s’insère que
dans un seul sens dans une prise polarisée.
Si la fiche ne s’insère pas dans la prise,
retournez la fiche. Si elle ne s’adapte toujours pas, contactez un électricien qualifié afin
d’installer la prise appropriée. N’altérez la fiche d’aucune façon.
Lors de l’utilisation de votre Four grille-pain, des précautions élémentaires doivent être
observées:
/