Page is loading ...

Item #814-278
640-149
Model #F1AA4535BNV
USE AND CARE GUIDE
TUB AND SHOWER SET
Questions, problems, missing parts? Before returning to the store,
call Glacier Bay Customer Service
8 a.m.-6 p.m., EST, Monday-Friday
1-855-434-5224
HOMEDEPOT.COM
THANK YOU
We appreciate the trust and condence you have placed in Glacier Bay through the purchase of this faucet. We strive
to continually create quality products designed to enhance your home. Visit us online to see our full line of products
available for your home improvement needs. Thank you for choosing Glacier Bay!

Table of Contents........................................2
Safety Information......................................2
Warranty......................................................2
Pre-Installation...........................................3
Installation.................................................5
Care & Cleaning.........................................9
Troubleshooting.........................................9
Service Parts............................................10
Table of Contents
Limited Lifetime Warranty
Safety Information
1. Do not install this product until you read and understand the instruction in this manual. If you are installing this
product for someone else, leave this manual for the owner’s/ user’s reference.
2. Inlet ports are designed to allow for 1/2 in. copper tubing solder connection or 1/2 in. IPS threading coupling
connection. For threaded connections, wrap sealant tape around threaded ends before connecting. If soldering
connections, certain inammable parts should be removed prior to the soldering in order to avoid heat damage.
If you are unsure how to properly remove these parts, please call us at 1-855-434-5224.
3. Protect your eyes with safety glasses when cutting or soldering water supply lines.
NOISE AND WATER HAMMER IN PEX SYSTEMS: As with all plumbing materials under some operating conditions,
water hammer can occur in PEX plumbing systems. The inherent exibility of PEX drastically reduces the magni-
tude of pressure surges compared with metallic plumbing materials. Damage to plumbing components in a PEX
system due to these pressure surges in highly unlikely, although noise can sometimes result. Fortunately, there
are solutions to minimize of eliminate water hammer noise.Clamping or strapping more frequently may help
prevent tubing noise. It is very important that the tubing not be in contact with wallboard, forced air ducts or
other high resonance articles. Insufciently or improperly clamped or strapped tubing may move during xture
operation and hit against these surfaces.Install a water hammer arrester at xtures where noise is a problem.
A water hammer arrester installed within 6 feet of the xture on the cold water side only will eliminate the
source of the noise: the pressure wave. It should be noted that even with an arrester, tubing which is clamped or
strapped insufciently may still hit against something as it moves slightly when the water ow is stopped.Avoid
operating xtures in such a way that causes near instantaneous shut off. Simply closing xtures in a less abrupt
manner can eliminate hammer noise.
Glacier Bay products are manufactured with superior quality standards and workmanship and are backed by our
limited lifetime warranty. Glacier Bay products are warranted to the original consumer purchaser to be free of
defects in materials or workmanship. We will replace FREE OF CHARGE any product or parts that proves defective.
Simply, return the product / part to any of The Home Depot retail locations or call 1-855-HD Glacier (1-855-434-
5224) to receive the replacement item. Proof of purchase (original sales receipt) from the original consumer
purchaser must be made available for all Glacier Bay warranty claims.
This warranty excludes incidental/inconsequential damages and failures due to misuse, abuse or normal wear and
tear. This warranty excludes all industrial, commercial & business usage, whose purchasers are hereby, extended
a ve year limited warranty from the date of purchase, with all other terms of this warranty applying except the
duration of warranty.
Some states and provinces do not allow the exclusion or limitation of incidental or consequential damages, so the
above limitations may not apply to you. This warranty gives you specic legal rights and you may also have other
rights that vary from state to state and province to province. Please see a store or contact 1-855-HD Glacier for
more details.
4.
2

PLANNING INSTALLATION
TOOLS REQUIRED
Pre-Installation
Before you begin to install this product, ensure that all parts are present. Compare parts with the package
contents list. If any part is missing or damaged, do not attempt to install the product. Contact customer service
for replacement parts.
All installations can vary depending on how your previous faucet was installed. Not all supplies for faucet
installation are included; however they are available wherever plumbing supplies are sold. When choosing your
installation supplies, make sure they are IAPMO and/or CSA approved products.
Adjustable
Wrench
Phillips
Screwdriver
Safety
Goggles
Soldering
Gun
3
HOMEDEPOT.com
Please contact 1-855-434-5224 for further assistance.

Pre-Installation (continued)
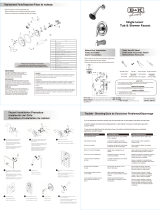
PACKAGE CONTENTS
Part Description Quantity
A Shower head 1
B Shower arm 1
C Escutcheon 1
D Escutcheon screw 2
E Handle 1
F Spout 1
G Sealant tape 1
H Plaster guard 1
I Shower arm ange 1
J Valve body 1
K Plug 1
L Hex wrench 1
A
D
E
F
L
G
J
K
I
H
B
C
4

Turning off water supplies
Connecting the pipes
Preparing for installation
Apply sealant tape (G) on all threads. Connect
water supply tubes to the valve body (J). For
welding connection, remove inammable
parts prior to soldering.
Attach the vertical shower pipe and elbow to
the valve body (J).
Attach the vertical spout pipe and elbow to the
valve body (J).
For shower only installation, install the plug (K)
included onto the bottom unused port.
Note the installation distance between the shower
arm (B), handle (E), and spout (F).
Shut off main water supply before installation.
Fiberglass wall: Position the valve body (J) so
that the face of the plaster guard (H) will be ush
against the back of the berglass wall.
Drywall or drywall with tile: Position the valve
body (J) so that the face of the plaster guard (H)
will be ush with the face of the nished wall.
Installation
1
3
2
K
J
B
E
F
49 3/16 in.
(1250 mm)
1 15/16 in.
(50 mm)
1 13/16~2 5/16 in.
5 13/16 in.
(148 mm)
Plaster guard
Plaster guard
Finish wall Dry wall
6 in.
(152 mm)
G
5
HOMEDEPOT.com
Please contact 1-855-434-5224 for further assistance.

Installing the stub-out pipe
Installing the tub spout
Installing the shower
Install stub-out pipe (not included) for the spout.
Use proper length stub-out pipe so pipe threads
will extend 3-3/4 to 4-1/8 inches beyond the
nished wall.
Install the shower arm (B) and shower arm ange
(I) to the vertical shower pipe elbow.
In order to assure proper function, piping from the
bottom port of the valve-to-tub spout outlet MUST
be either 1/2 in. normal copper pipe or 1/2 in. iron
pipe. If PEX is used for the tub spout, the PEX must
be more than 1/2 in.
Install the shower head (A) to the shower arm (B).
Wrap the thread on the shower arm (B) with
selant tape (G).
Apply sealant tape (G) on all threads.
Apply sealant tape (G) on the pipe thread.
Install the tub spout (F) onto the pipe by turning
the tub spout (F) in a clockwise direction.
Installation (continued)
4
6
5
I
B
A
F
G
G
G
6

Removing the plastic cap
Checking for leaks
Installing the handle
Twist and break off the plastic cap from the
plaster guard (H).
Turn on the water supplies and check for
leaks.
Secure the escutcheon (C) onto the shower valve
(J) with the escutcheon screws (D).
Install the handle (E) using the hex wrench (L) to
secure with the set screw.
Installation (continued)
7
9
8
H
E
D
E
E
F
F
H
A A
7
HOMEDEPOT.com
Please contact 1-855-434-5224 for further assistance.

UP
UP
B
B
First line
Eleventh line
Temperature Adjust Instructions
Removing the valve cap Installing the shower
Disassemble the handle (E) and the escutcheon
(C).
Reassemble the handle (E) and the escutcheon
(C) back onto the valve body (J).
Remove the valve cap (1).
Remove the temperature limiting device (1) from
the valve stem (2). There are 11 lines (10 distances)
between “-”(70°) and “+” (140°) mark on the
temperature limiting device. Select what range
you want and x the dot (blue) that showed on the
valve, then place the temperature limiting device (1)
back onto to the valve stem (2).
1 2
Replacing the valve cap
Replace the valve cap (1) back onto the valve
body (J).
3
E
E
C
1
1
D
C
J
J
J
2
1
8

Care and Cleaning
Troubleshooting
Clean periodically with a soft cloth.
This faucet is designed for years of trouble-free performance. Keep it looking new by doing the following:
Avoid abrasive cleaners, steel wool, and harsh chemicals as these will dull the nish and void your warranty.
Problem Possible Cause Solution
There is a leak underneath the
handle.
The retainer nut has come loose.
The O-ring on the cartridge is
dirty or damaged.
Tighten the retainer nut.
Clean or replace the O-ring.
Water will not shut off
completely.
The rubber valve seat is dirty or
broken.
Remove the handle and cartridge to
check the rubber valve seat.
Clean or replace it.
The water temperature is not as
hot as when rst installed.
Seasonal adjustments may be
necessary as ground water
temperatures vary.
Reset the temperature limit stop.
9
HOMEDEPOT.com
Please contact 1-855-434-5224 for further assistance.

15.
16.
3.
2.
1.
11.
12.
13.
10.
8.
5.
7.
6.
4.
9.
14.
Service Parts
MODEL TYPE
Part Description Part No.
1 Shower Head (814-278) S1211306
1 Shower Head (640-149) S1214302
2 Shower Arm A020002
3 Shower Arm Flange A019001
4 Metal Handle A069752
5 Handle Cap A66D814
6 Trim Cap A103311
7 Screw (3/16" -24 * 4 " L) A608563
8 Escutcheon Assembly A667103
9 Screw
(3/16" -24 * 2-3/16" L)
A608519
10 Plaster Guard A127211KP
Part Description Part No.
11 Retainer nut A103303
12 Ceramic Disc Cartridge A507887
13 Check Valve A603120
14 Plug A028452
15 Hex Wrench
(H2.5 * 19 mm L * 53 mm L)
A031000NI
16 Spout W/Diverter (Threaded) A100012
10

Questions, problems, missing parts? Before returning to the store,
call Glacier Bay Customer Service
8 a.m.-6 p.m., EST, Monday-Friday
1-855-434-5224
HOMEDEPOT.COM
Retain this manual for future use.
/