Page is loading ...

Vivanco GmbH, Ewige Weide 15, D-22926 Ahrensburg, Tel:+49 (0)4102 231235,
Fax: +49(0)4102 231444, e-Mail: [email protected] 1
Vivanco Viv.Control 3 & 5 Universal Controller
1.
2.
3.
= SETUP (3 s) = Set
4.
= TV
5.
= 1 Set: XXX, e.g. 1 = 1XX
6.
= 5; Set: XXX, e.g. 5 = 15X
7.
= 2 Set: XXX, e.g. 2= 152
(GB) Instructions
Viv.Control 3 + 5
remote control for almost all TV, audio, video and other
infrared-controllable equipment
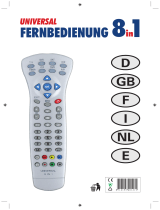
1 Inserting the batteries
Open the battery flap on the back of the remote control, s. Fig.1.
– press the tongue lightly upwards, then insert 2 alkaline AAA
batteries. Check that the polarity markings on the batteries and
in the battery compartment are correctly lined up (+=+), then
close the flap carefully. – Always use undamaged batteries.
2 Setting label
Attach the enclosed label in your language to the back of the
VivControl so that you can still set the remote control should
these instructions not be available.
3 Adapting to appliances
In order to control your appliances you must adapt or set the
remote control to them. There are three ways of doing so: direct
control code entry, code search or learning the button functions
of original remote controls.
If your VivControl does not understand you it blinks rapidly
several times. Each understood entry is confirmed by an
appliance button blinking once briefly.
3.1 Direct control code entry using the enclosed list
Example: setting to control a Panasonic television set:
3.1.1 The enclosed list gives, for example, the Panasonic
Code 152.
Please make sure you have selected the correct list for
television sets (TV).
3.1.2 To prepare code entry, keep the
SETUP button
pressed until the lamp (LED) lights constantly.
3.1.3 Then press the required appliance button, e.g.
TV,
and the number buttons (e.g. 1 5 2) in sequence.
3.1.4 Once the numbers have been entered the button lamp
goes out and the remote control is ready to control your
appliance.
3.1.5 Finally, test the control code setting by trying to control (in
this example) your television set. If it does not work at all or not
correctly try a different code from the list or the code search (see
below).
3.1.6 How to set the remote control for other appliances is
described in part 3.1. ff. Instead of the TV appliance button,
press another button, e.g. VCR, SAT, CD, CBL, HOME).
Vivanco VivControl remote controls are TV+ remote controls, i.e.
under TV you can only set television sets or video projectors,
but any other appliance under the other appliance buttons.
The button decriptions SAT, ASAT (analog sat receiver), DSAT
(digital sat receiver), VCR, etc. are intended only for easier
orientation.

Vivanco GmbH, Ewige Weide 15, D-22926 Ahrensburg, Tel:+49 (0)4102 231235,
Fax: +49(0)4102 231444, e-Mail: [email protected] 2
Example: Under the VCR appliance button you can also enter a
CD code and control your CD player.
3.2 Code search
If the brand of your appliance is not in the list or none of the
codes given fits, we recommend a code search.
3.2.1 Slow code search
3.2.1.1 Switch on the appliance to be controlled. Program is
running.
3.2.1.2 Keep the
SETUP button pressed until the lamp
lights constantly in one of the appliance buttons.
3.2.1.3 Press the required appliance button, e.g.
ASAT.
3.2.1.4 Press the ON/OFF
(appliance on/off) button once
briefly.
3.2.1.5 Press the ON/OFF (appliance on/off) or CHAN+
(next channel) button repeatedly until the appliance, e.g. your
satellite receiver, reacts.
Each time a button is pressed the lamp goes out briefly then
comes back on to confirm.
If no button is pressed, the VivControl automatically continues to
search by sending a signal to your appliance every 3 seconds.
If you notice the reaction of your appliance too late and the next
code has already been emitted you can go back by pressing
CHAN-. If your appliance has switched itself off you must switch
it back on again, e.g. on the appliance or with the original remote
control, to continue searching.
3.2.2 When your appliance reacts, simply press the arrow key
(Enter) and end the search.
3.2.3 To test whether the right setting has been found, simply
press a few buttons on the VivControl and check whether the
functions work correctly. If everything is OK you can now set the
VivControl for the second appliance.
If nothing happens or some of the buttons do not work correctly
you must let the VivControl continue to search for the correct
setting as described starting in 3.2.1.
The VivControl Zap 2 continues with the search at the point
where you ended the search with
. When the end of the code
list is reached the search stops automatically. The remote
control blinks quickly several times. The code last confirmed with
remains stored.
The research backwards always ends automatically at the code
last confirmed.
3.2.4 Searching by brand
You can considerably speed up the code search if you search by
brand. This is done as follows:
3.2.4.1 Switch on the appliance to be controlled. Program is
running.
3.2.4.2 Keep the
SETUP button pressed until the lamp
lights constantly in one of the appliance buttons.
3.2.4.3 Press the required appliance button, e.g.
ASAT.
3.2.4.4 Press the brand number button, button 1 for Philips, 2
for Sony, 3 for Thomson, 4 for Grundig or 6 for Nokia
appliances. Then continue as described in 3.2.1.4.
3.3 Quick code search
Your remote control finds the correct settings almost
automatically in seconds:
3.3.1 Switch on the appliance to be controlled. A channel
number, for example, appears in the display of your satellite
receiver.
3.3.2 Keep the
SETUP button pressed until the lamp lights
constantly in one of the appliance buttons.
3.3.3 Press the required appliance button, e.g.
ASAT.
3.3.4 Press the ON/OFF
(appliance on/off) button once
briefly.
3.3.5 Automatic quick search: If you then do nothing more
the VivControl emits a different signal every 0.7 seconds. When
your appliance reacts, very quickly press the
button (Enter)
to confirm a functioning control code. - It is advisable to have
your finger already placed on the
(Enter) button so that you
can react quickly enough. Otherwise the VivControl emits the
next signal before you have reacted.
Note: With very few appliances the quick search does not work.
The search is automatically stopped if there is no reaction from
the appliance to be controlled. You should then use a different
setting procedure, e.g. code entry or slow search.
Instead of pressing
(Enter) and possibly missing the correct
setting you can also switch the VivControl to slow code search:
to do so, press the CHAN-, CHAN+ or ON/OFF button instead of
the
(Enter) button. Then continue as described above in
3.2.1.
Remember to switch your appliance, e.g. SAT, back on again if
you wish to continue searching.
3.3.6 Finally, test the control code setting by trying to control
your SAT appliance. If it does not work correctly, please try the
code search again. The code search then begins with the next
code in the sequence.
3.4 Code identification
You can identify the codes you have set at any time:
3.4.1 Keep the
SETUP button pressed until the lamp lights
constantly in one of the appliance buttons.
3.4.2 Press the appliance button, e.g.
ASAT.
3.4.3 Press the
SETUP button once briefly.
3.4.4 Then read off the 3-digit code: Press the number buttons,
1-9 and 0, one after the other. The hundred figure is displayed
when the appliance button goes out briefly when a button is
pressed. The number corresponds to the button number. The
ten figure is displayed when the appliance button goes out briefly
when a button is pressed a second time. The number
corresponds to the button number. The one figure is displayed
when the appliance button goes out when a button is pressed.
The number corresponds to the button number.
Example: You want to read off the code under the TV button. To
do so, keep SETUP pressed until an appliance button lights
constantly. Then press TV, SETUP, 1 in succession. For button
1 the button goes out briefly and you note 1. Then continue by
pressing 1,2,3,4,5. For button 5 the button goes out briefly and
you write 5 after the 1. Then continue by pressing 1,2. For button
2 the appliance goes out completely and you note the 2 after 15
and have found the code 152.
3.4.5 You can note the numbers on the back of the battery
compartment, e.g. for quick code entry after replacing the
batteries.
The code details are also required when making queries on the
Vivanco Hotline. Please read off all the codes used and make a
note of them before contacting the Hotline. Table: see back page
of these instructions.
Once the code is known, the Hotline can explain which buttons
you can use with the code concerned.
4 Operation
You operate the basic functions of your appliances in the same
way as if you were using the original remote controls.
4.1 Select appliance: You select the appliance to be controlled
using the appliance buttons TV, VCR etc., row (B) (see
illustration at beginning). When a button is pressed and shortly
afterwards, the button lights up and indicates which appliance
you are currently controlling. Apart from the TV button, the other
buttons can be programmed as required, i.e. the lettering is only
a recommendation. The function can be different to that of the
lettering, depending on which appliance you have programmed
on this button. You could, for example, have programmed an
audio cassette player or a Minidisk player under VCR.
4.2 Settings and On/Off: In the top row of buttons (A) you will
find the buttons SETUP and PWR=power=On/Off.
4.3 Volume and channel control: In the button area (C) you will
normally find the buttons for volume control (VOL-=quieter,
Mute on/off, VOL+=louder) and for switching channels (CHAN+=
next channel and CHAN-= previous channel). Volume Punch-
Through function: To simplify operation, the volume buttons
(VOL+ or VOL-) and the Mute
button always control the
television set when video recorders are being controlled. If you
have programmed audio or other appliances on an appliance
button the volume buttons control the programmed appliance.
With HOME, for example, a dimmer can be controlled remotely.
4.4 2nd operating level: With the
Shift button in area (D)
you select the 2nd button function of the remote control buttons.
After you have pressed Shift and the appliance button is lit you
have all the button functions of the 2nd operating level at your
disposal. In many cases, it is possible to adjust the colour and
brightness of televisions in this way using the volume and
channel buttons. But many other, rarely used buttons are also to
be found on the second level. Try it out for yourself. Our Hotline
can also help you to find missing button functions. You return to
the first level by pressing Shift again or after no button has been
pressed for a longer period.

Vivanco GmbH, Ewige Weide 15, D-22926 Ahrensburg, Tel:+49 (0)4102 231235,
Fax: +49(0)4102 231444, e-Mail: [email protected] 3
4.5
Scan / Video+® (SV/V+) in area (D): When this button
is pressed the next channel signal is emitted every 3 seconds
with CHAN+ and the following channels are shown automatically
one after the other without your having to press a button
repeatedly. This function stops when you press any button and
ends automatically after 2 minutes.
The Scan function is not possible with video recorders. The
button is then used for Video+® or timer programming of your
video recorder. Consult the instruction manual of your video
recorder or DVD player for further details.
4.6 Number pad and AV: In area (E) you will find the
customary number pad. You normally enter 2-digit numbers
(channel numbers) using the
arrow button or SHIFT and
then the arrow button. With the
button you normally select
the AV input, e.g. sat receiver or video recorder.
4.7 Videotext and Toptext: In the areas (G) and (I) you will find
the Videotext buttons , , , and in area (J) die
Toptext buttons
Red, Green, Yellow and Blue.
The buttons in area (J) are used to control the drive functions of
video recorders, CD players, etc.
Hotline
Should you have any questions regarding your remote control
you can call our telephone hotline: Tel. 01442 246088. –
Vivanco products are improved constantly. The code library in
particularly is updated continuously. If something is missing, call
us or send an e-mail to:consumer@vivanco.co.uk. It is quite
possible that we already have a solution to your problem.
Please always indicate the brand and type of the appliances you
wish to control and which Vivanco control code you are using.
See also 3.4.
Specifications
Batteries: 2 AAA batteries, R03, UM4
Range: max. 7 m
Not for 400 kHz equipment
2-year works guarantee
Should your VivControl cease to work within 2 years of
purchasing you will receive a free replacement from Vivanco.
Exceptions: deliberate destruction and normal wear and tear of
the housing and buttons.
® Registered trademark of Gemstar International Inc.
___________________________________________________
(D) Bedienungsanleitung
Fernbedienung VivControl 3 + 5 für fast alle Fernseh-,
Audio-, Video und anderen infrarotsteuerbaren Geräte
1 Batterien einlegen
Bitte öffnen Sie die Batterieklappe an der Geräterückseite, s.
Abb.1. – Lasche leicht nach oben drücken, und legen Sie 2
Alkali-Mikrozellenbatterien ein. Achten Sie auf die angegebenen
Polaritäten auf Batterien und im Batteriefach (+=+), und
schließen Sie das Fach wieder vorsichtig. – Bitte achten Sie
darauf, immer einwandfreie Batterien zu verwenden.
2 Einstellungsaufkleber
Bitte kleben Sie den beigefügten Aufkleber Ihrer Sprache auf die
Rückseite Ihrer VivControl , damit Sie die Fernbedienung auch
einstellen können, wenn diese Anleitung mal nicht zur hand sein
sollte.
3 Geräteanpassung
Um Ihre Geräte steuern zu können, müssen Sie die
Fernbedienung für Ihre Geräte einstellen. Dazu gibt es drei
Möglichkeiten: die direkte Steuerkodeeingabe, die Kodesuche
oder das Lernen von Tastenfunktionen von
Originalfernbedienungen.
Wenn die VivControl Sie nicht versteht, dann blinkt sie mehrfach
heftig hintereinander. Jede verstandene Eingabe quittiert sie mit
einem kurzen Blink einer Gerätetaste.
3.1 Die direkte Steuerkodeeingabe mithilfe der
beigefügten Liste
Beispiel: Einstellung der Fernbedienung für ein Panasonic-
Fernsehgerät:
3.1.1 Aus der beigefügten Liste entnehmen Sie z.B. den
Panasonic-Code 152.
Bitte vergewissern Sie sich, dass Sie die korrekte Liste für
Fernseher (TV) gewählt haben.
3.1.2 Zur Vorbereitung der Kodeeingabe drücken Sie
solange die
SETUP (Einstellen)-Taste bis das Lämpchen in
einer Gerätetaste (LED) dauernd leuchtet.
3.1.3 Dann drücken Sie die gewünschte Gerätetaste, z.B.
TV, und danach nacheinander die Zifferntasten (z.B. 1 5 2).
3.1.4 Nach der Zifferneingabe erlischt die Tastenlampe
und die Fernbedienung ist bereit zum Steuern Ihres Gerätes.
3.1.5 Zum Abschluss testen Sie den eingestellten
Steuerkode, indem Sie versuchen in diesem Fall Ihr TV-Gerät zu
steuern. Funktioniert es nicht oder nicht richtig, dann versuchen
Sie bitte einen weiteren Kode aus der Liste oder die Kodesuche,
s.u..
3.1.6 Die Einstellung der Fernbedienung zur Steuerung
weiterer Geräte nehmen Sie entsprechend Abschnitt 3.1. ff. vor.
Anstelle der Gerätetaste TV drücken Sie andere Tasten, z.B.
VCR, SAT, CD, CBL, HOME). .
Vivanco VivControl-Fernbedienungen sind TV+
Fernbedienungen, d.h. Sie können unter TV nur Fernsehgeräte
oder Videoprojektoren einstellen, unter den anderen
Gerätetasten aber jedes beliebige andere Gerät. Die
Tastenbeschriftungen SAT, ASAT (Analogsatempfänger), DSAT
(Digitalsatempfänger), VCR usw. dienen daher nur Ihrer
leichteren Orientierung.
Beispiel: Sie können unter der Gerätetaste VCR auch einen CD-
Kode eingeben und Ihren CD Player steuern
3.2 Die Kodesuche
Wenn die Marke eines Gerätes nicht in der Liste steht oder kein
angegebener Kode paßt, empfiehlt sich eine Kodesuche.
3.2.1 Langsame Kodesuche
3.2.1.1 Bitte das zusteuernde Gerät einschalten. Programm
läuft.
3.2.1.2
SETUP (Einstellen)-Taste drücken, solange bis
das Lämpchen in einer Gerätetaste dauernd brennt.
3.2.1.3 Gewünschte Gerätetaste, z.B.
ASAT, drücken.
3.2.1.4 Einmal kurz EIN/AUS
(Gerät ein/aus)Taste
drücken.
3.2.1.5 Wiederholt EIN/AUS (Gerät ein/aus) oder
CHAN+ (nächstes Programm) Taste drücken bis Gerät, z.B. Ihr
Satreceiver, reagiert.
Das Lämpchen geht nach jedem Tastendruck zur Bestätigung
kurz aus und wieder an.
Wenn Sie keine Taste drücken, wird die VivControl automatisch
weitersuchen, indem sie alle 3 Sekunden an Ihr Gerät ein Signal
aussendet.
Wenn Sie die Reaktion Ihres Gerätes zu spät bemerkt haben
und schon der nächste Kode gesendet wurde, dann macht das
nichts: Sie können zurück, indem Sie CHAN- drücken. Hatte
sich Ihr Gerät ausgeschaltet, so müssen Sie es, z.B. am Gerät
oder mit der Originalfernbedienung zur weiteren Suche wieder
einschalten.
3.2.2 Wenn Ihr Gerät reagiert, drücken Sie einfach die
Pfeiltaste
(Eingabe) und beendenden so die Suche.
3.2.3 Zum Test, ob die richtige Einstellung gefunden
wurde, drücken Sie einfach ein paar VivControl-Tasten und
probieren so die richtige Funktion. Wenn alles ok ist, können Sie
nun die VivControl für das nächste Gerät einstellen.
Wenn gar nichts geht oder einige Tasten nicht richtig
funktionieren, müssen Sie Ihre VivControl, wie ab Abschnitt
3.2.1.beschrieben, weiter nach der richtigen Einstellung suchen
lassen.
Die VivControl setzt die Suche dort fort, wo Sie die Suche mit
abgebrochen hatten. Wenn das Ende der Kodeliste erreicht
ist, endet die Suche automatisch. Dabei blinkt die
Fernbedienung mehrfach schnell hintereinander. Der zuletzt mit
bestätigte Kode bleibt gespeichert.
Die Suche rückwärts, endet immer automatisch beim zuletzt
bestätigten Kode.
3.2.4 Markenbegrenzte Suche
Sie können die Kodesuche stark beschleunigen, wenn Sie
markenorientiert suchen lassen. Das geht so:
3.2.4.1 Bitte das zusteuernde Gerät einschalten. Programm
läuft.
3.2.4.2
SETUP (Einstellen)-Taste drücken, solange bis
das Lämpchen in einer Gerätetaste dauernd brennt.
3.2.4.3 Gewünschte Gerätetaste, z.B.
ASAT, drücken.
3.2.4.4 Markenziffertaste drücken, Taste 1 für Philips-, 2 für
Sony-, 3 für Thomson-, 4 für Grundig- oder 6 für Nokia-Geräte.
Weiter geht es dann nach Abschnitt 3.2.1.4.
/