Bauknecht CM 945 PT User guide

Category
Coffee makers
Type
User guide
51 mm65 mm
CM 945 PT
IT
AR
Gebrauchsanweisung 7
Instructions for use 26
Mode d’emploi 45
Gebruiksaanwijzing 64
Instrucciones para el uso 83
Istruzioni per l’uso 102
Brugsanvisning 121
Bruksanvisning 140
Bruksanvisning 159
Käyttöohje 178
Instruções de utilização 235
4
4
A
B
C
13
Gerät
Siehe Abbildung A auf Seite 4.
A1 Abstellfläche Tassen
A2 Serviceklappe
A3 Zentralauslauf Kaffee
A4 Sammelbehälter für Kaffeesatz
A5 Brüheinheit
A6 Beleuchtung Abstellfläche Tassen
A7 Taste Ein/Standby
A8 Bedienfeld
A9 IEC Anschluss
A10 Düse Heißwasser und Dampf
A11 Zubehörschale
A12 Wasserbehälter
A13 Kaffeeauslauf (höhenverstellbar)
A14 Tropfschale
A15 Deckel Kaffeebohnenbehälter
A16 Kaffeebohnenbehälter
A17 Reglerknopf Kaffeemahlstärke
A18 Klappe für Kaffeemehltrichter
A19 Messlöffel
A20 Platz für den Messlöffel
A21 Trichter zum Einfüllen des Kaffeemehls
A22 Netzkabel
A23 Hauptschalter ON/OFF
Bedienfeld
Siehe Abbildung B auf Seite 4.
Anmerkung: Um die Symbole zu aktivieren, genügt ein
leichtes Berühren.
B1 Display: Geführte Gebrauchsanleitung für den
Benutzer
B2 Symbol MENU
zum Aktivieren oder
Deaktivieren des Einstellungsmodus der
Menüparameter.
B3 Symbol
für die Wahl des Kaffeearomas.
B4 Symbol
für die Wahl der gewünschten
Kaffeeart (Espresso, kleine Tasse, mittlere Tasse,
große Tasse, Becher)
B5-B6 Symbole
zum Vor- oder Zurückblättern
innerhalb des Menüs.
B7 Symbol
zum Bestätigen der Auswahl
B8 Symbol
für die Ausgabe einer Tasse Kaffee
B9 Symbol
für die Ausgabe von zwei Tassen
Kaffee
B10 Symbol
für die Ausgabe eines Cappuccinos
B11 Symbol
für die Ausgabe von Heißwasser
Behälter Milch und Zubehör
Siehe Abbildung C auf Seite 4.
C1 Cursor Milchaufschäumer
C2 Griff des Milchbehälters
C3 Taste CLEAN
C4 Milchzulaufschlauch
C5 Milchschaumausgabe
C6 Milchaufschäumer
C7 Heißwasserdüse
Beschreibung des Geräts
Spannung: 220-240 V~ 50/60 Hz max. 10 A
Leistungsaufnahme: 1350W
Druck: 15 bar
Fassungsvermögen Wassertank: 1,8 Liter
Abmessungen (L x H x T): 595 x 455 x 398 mm
Gewicht: 26 kg
Technische Eigenschaften
Important safety instructions 27
Preliminary steps 29
Scrapping 29
Declaration of conformity CE 29
Built-in installation 30
Product description 32
Technical data 32
Using the appliance for the first time 33
Switching on and preheating 33
Making coffee (using coffee beans) 34
Changing the amount of coffee in the cup 35
Adjusting the coffee grinder 35
Making espresso with pre-ground coffee (instead of beans) 35
Running off hot water 36
Making cappuccino 36
Changing the amount of milk and coffee for cappuccino 37
Changing and setting menu parametrs 37
Cleaning and maintenance 40
Switching off the appliance 42
Displayed messages 43
Troubleshooting 44
26
Important safety instructions
27
The appliance is not intended for use by persons (including children) with reduced
physical, sensory or mental capabilities, or lack of experience and knowledge, unless they
have been given supervision or instruction concerning use of the appliance by a person
responsible for their safety. Children should be supervised to ensure that they do not
play with the appliance.
Cleaning and user maintenance shall not be made by children without supervision.
Never immerse the appliance in water.
This is an household appliance only. It is not intended to be used in: staff kitchen areas in
shops, offices and other working environments; farm houses; by clients in hotels, motels
and other residential type environments; bed and breakfast type environments.
If the plug or power cable is damaged, it must be replaced by customer services only to
avoid all risk.
For european markets only:
This appliance can be used by children aged from 8 years and above if they have been
given supervision or instruction concerning use of the appliance in a safe way and if they
understand the hazard involved. Cleaning and user maintenance shall not be made by
children unless they are older than 8 and supervised. Keep the appliance and its cord out
of the reach of children aged less than 8 years.
Appliances can be used by persons with reduced physical, sensory or mental capabilities
or lack of experience and knowledge if they have been given supervision or instruction
concerning use of the appliance in a safe way and understand the hazards involved.
Children shall not play with the appliance.
When not in use and before cleaning, always unplug the appliance.
Surfaces marked with this symbol become hot during use (the symbol is present
in certain models only).
Your safety and that of others is paramount
Failure to fully comply with the indications given in this user handbook can lead to electric shocks, serious injury,
burns, fire, or damage to the appliance.
Important warnings are accompanied by the following symbols.
This is the danger symbol, pertaining to safety, which alerts users to potential risks to themselves and
others.
All safety warnings are preceded by the danger symbol and the following terms:
DANGER:
Indicates a hazardous situation which, if not avoided, will result in
serious injury.
WARNING:
Indicates a hazardous situation which, if not avoided, may result in
serious injury.
Critical safety warnings
WARNING:
This appliance is designed exclusively for domestic use.
It is not designed or approved for use in:
- areas appointed as staff kitchens in shops, offices or other working environments
- agritourism establishments
- hotels, motels and other hospitality structures
- rooms for rent
This is an electrical appliance; you must therefore observe the following safety warnings:
- do not touch the appliance with wet hands;
- do not touch the plug with wet hands;
- make sure that the power socket used is always accessible, so that the appliance can be unplugged whenever
necessary;
- in the event of an appliance malfunction, do not attempt to carry out any repairs yourself. Switch the appliance off
using the main switch (A23), unplug it from the mains and contact After-sales Service.
Keep packaging materials (plastic bags, polystyrene) out of reach of children.
Do not allow the appliance to be used by persons (including children) with any physical, sensory or mental
impairment, or with insufficient experience or knowledge of the appliance, unless they are under the supervision
of, or instructed in its use by, a person responsible for their safety. Supervise children, making sure they do not play
with the appliance.
Risk of Burns! This machine produces hot water and hot steam may form during operation. Take care to avoid
contact with splashes of hot water or hot steam. Use the knobs or handles.
Do not hold onto or lean on the coffee machine while it is outside the housing unit.Do not place items containing
liquids or flammable or corrosive materials on the machine. Use the accessories compartment to store all
accessories needed for making coffee (for example, the scoop). Do not place unstable objects on the machine, or
large items which might prevent it being moved.
Do not use the machine while it is removed from the housing unit: always wait for the machine to be switched off
before removing it. The only exception to this rule is adjustment of the coffee grinder, which must be carried out
with the machine extracted from the housing (see chapter ADJUSTING THE COFFEE GRINDER).
N.B.: only use original spare parts and accessories, or those expressly recommended by the manufacturer.
Prescribed use
This machine is designed and constructed for the preparation of coffee and for heating drinks.
Any other use is to be considered improper.
This machine is not suitable for commercial use. The manufacturer declines all liability for damage or injury resulting
from improper use of the machine.
This appliance may be installed above a built-in oven if the latter is equipped with a rear cooling fan (maximum power
3kW).
Instructions for use
Read this user handbook carefully before using the machine.
Keep this handbook in a safe place.
Failure to observe the instructions can lead to personal injury or damage to the appliance. The manufacturer
declines all liability for injury or damage resulting from failure to observe these user instructions.
N.B.: the machine is equipped with a cooling fan. The fan switches on every time the machine dispenses coffee, steam
or hot water. It switches off again automatically after a few minutes.
28
Preliminary steps
Transport check
After unpacking the appliance, check that it is undamaged and that all the accessories are present and correct. Do not
use the appliance is there is any visible damage. Contact the After-sales Service.
Installing the appliance
Critical safety warnings
WARNING:
• Installation must be carried out by a qualified technician in accordance with local regulations (see
chapter BUILT-IN INSTALLATION).
• Keep the packaging material (plastic bags, polystyrene parts, etc.) out of the reach of children.
• Under no circumstances should the appliance be installed in rooms where the temperature may
drop to 0°C.
• Adjust the water hardness setting as soon as possible, following the instructions in chapter BUILT-IN
INSTALLATION.
Connecting the appliance
WARNING:
Make sure that the voltage indicated on the rating plate on the
underside of the machine corresponds to the domestic power supply
voltage.
Connect the machine to a professionally installed power socket having a current rating of at least 10A and an efficient
earth connection. If the appliance plug and socket are incompatible, have an electrician replace the socket with one of
a suitable type. Observance of safety directives requires that a multi pole switch with a minimum contact gap of 3mm
be used for the installation. Do not use multiple plug adapters or extension cords.
WARNING:
The mains power supply must have electrical disconnect devices in
compliance with national installation standards.
If the power cable or plug are damaged, to avoid any risk have them replaced only by the After-Sales Service.
29
Electrical appliances must not be disposed of as general household waste. Appliances marked with this
symbol fall under European Directive 2002/96/CE. Electrical and electronic appliances must not be disposed
of as household waste, but delivered to an authorized collection centre for scrapping. Correct scrapping of
the appliance after its working life prevents damage to the environment and potential health hazards. For
further information on the scrapping of the appliance, contact your local authority, the waste disposal service or the
shop where you purchased the product.
Scrapping
This appliance has been designed, constructed and distributed in compliance with the requirements of European
Directives: LVD 2014/35/EU, EMC 2014/30/EU and RoHS 2011/65/EU.
This appliance, which is intended to come into contact with foodstuffs, complies with European Regulation (LOGO
CE) n. 1935/2004.
Declaration of conformity CE
Built-in installation
Check the minimum measurements required for correct installation of the appliance.
The coffee machine must be installed in a column unit, which must in turn be securely fixed to the wall by means of
commercial brackets.
Attention:
Disconnect the appliance from the mains before carrying out any installation work or servicing.
Kitchen units in contact with the appliance must be heat resistant (min. 65°C).
To ensure adequate ventilation, provide an opening on the bottom of the housing (see dimensions in Figure).
Dimensions in mm
Position the runners on the sides of the housing, as
shown in the Figure. Secure the runners with the screws
supplied, then pull them out to full extension. If the
coffee machine is installed above a “warmer drawer”,
use the top of the latter as a reference for positioning the
runners. In this case, there will be no support surface.
455
595
398
21
361
528
372
30
45
45
45
45
450 + 2 mm
500
560 + 8
x 16 x 2
30
31
Secure the power supply cable with the clip provided.
The power supply cable must be long enough to allow
the machine to be removed from the housing in order
to fill the coffee bean container. Regulations require
that the appliance is earthed. Electrical connection
must be carried out by a qualified electrician in
accordance with the manufacturer’s instructions.
Position the machine on the runners, making sure that
the pins engage properly in their seats before securing
with the screws provided.
If machine alignment requires adjustment, position the
spacers provided either below or at the side of the
support.
x 1
x 4
x 4
560 + 1 mm
32
Appliance
See image A on page 4.
A1 Cup tray
A2 Service door
A3 Coffee feed
A4 Coffee grounds container
A5 Brewing unit
A6 Cup tray lights
A7 On/stand-by button
A8 Control panel
A9 IEC Connector
A10 Hot water and steam nozzle
A11 Storage tray
A12 Water tank
A13 Coffee spout (height-adjustable)
A14 Drip tray
A15 Lid of coffee bean container
A16 Coffee bean container
A17 Grinding coarseness adjustment knob
A18 Ground coffee funnel cap
A19 Scoop
A20 Scoop compartment
A21 Ground coffee feed funnel
A22 Power supply cable
A23 Main ON/OFF switch
Control panel
See image B on page 4.
N.B.: the touch-control buttons are activated at the
lightest touch of a finger.
B1 Display: guides the user through use of the
machine.
B2 MENU Button
to activate or deactivate the
menu setting mode.
B3 Button
for selecting the coffee taste.
B4 Button
for selecting the type of coffee desired
(espresso, small cup, medium cup, large cup,
mug)
B5-B6 Buttons
for browsing through the various
menu entries.
B7 Button
to confirm the selection
B8 Button
to prepare one cup of coffee
B9 Button
to prepare two cups of coffee
B10 Button
to prepare a cappuccino.
B11 Button
to dispense hot water.
Milk and accessories container
See image C on page 4.
C1 Milk frother pointer
C2 Milk container handle
C3 CLEAN button
C4 Milk intake tube
C5 Frothed milk spout
C6 Milk frother
C7 Hot water spout
Product description
Voltage 220-240 V~ 50/60 Hz max. 10A
Absorbed power: 1350W
Pressure: 15 bar
Water tank capacity: 1.8 litres
Size (L x H x W): 595 x 455 x 398 mm
Weight: 26 kg
Technical data
Coffee has been used to factory test the machine and it is therefore completely normal for there to be traces of
coffee in the mill.
Customize water hardness as soon as possible, following the instructions in paragraph Setting water hardness.
1. Connect the appliance to the mains electricity supply and place the main switch (A23) in position I.
2. The appliance displays “fill tank” in different languages. Extract the water tank (fig. 4), rinse and fill with fresh water
without exceeding the MAX line. Replace and push as far as it will go.
3. Choose the language (the languages scroll through at intervals of about 3 seconds): When the message “press
to TO INSTALL ENGLISH” is displayed, press the
(B7) (fig. 3) for 3 seconds until ENGLISH INSTALLED
is displayed. If you set the wrong language, follow the instructions in the “Setting the language” section. If your
language is not available, select one from those displayed (the instructions refer to English). Then follow the
instructions displayed.
4. Place a cup under the hot water spout (fig. 5). (If the hot water spout is not inserted, the appliance displays
INSERT WATER SPOUT. Attach the spout as shown in figure 6. The machine displays HOT WATER PRESS
”.
Press the
(B7), a little water comes out of the spout.
5. The display shows TURNING OFF. PLEASE WAIT... and switches off.
6. Slide the machine out, using the handles provided (Figure 7); open the lid, fill the coffee bean container, then close
the lid and push the machine back into the housing.
The coffee machine is now ready for normal use.
WARNING:
Never place pre-ground coffee, freeze-dried coffee, caramelized coffee
or foreign objects in the container, as they could damage the machine
N.B.:
When using the appliance for the first time, you need to make 4/5 cups of coffee and 4/5cappuccinos before the
appliance gives good results.
Each time the machine is turned on using the main ON/OFF switch (A23) it runs the SELF-DIAGNOSIS function
and then switches off: to switch back on again, press the (A7) on/stand-by button (Figure 1).
Using the appliance for the first time
33
Each time the machine is switched on, it performs an automatic preheat and rinse cycle which cannot be interrupted.
The machine is ready for use only after completion of this cycle
WARNING:
Risk of burns! During rinsing, some hot water is run off from the coffee
spouts.
To switch the appliance on, press the (A7) on/stand-by button (Figure 1): the display shows HEATING UP. PLEASE
WAIT.... After heating, the display shows another message: RINSING. The machine is at working temperature when
the display shows MEDIUM CUP STANDARD TASTE.
Switching on and preheating
34
1. The machine is factory-set to make coffee with a standard taste. You can choose coffee with the following tastes:
extra-mild, mild, standard, strong or extra-strong, with the option of using pre-ground coffee. To choose the
desired taste, press the button
(B3) (Figure 8) repeatedly until the required taste is displayed.
2. Place 1 cup under the coffee spouts if you wish to make 1 coffee (Figure 9) or 2 cups for 2 coffees (Figure 9). For a
creamier coffee, lower the coffee spout as near as possible to the cups (Figure 10).
3. Press button
(B4) (Figure 11) to select the type of coffee desired: espresso, small cup, medium cup, large cup,
mug.
Press button
(B8) (Figure 12) to make 1 coffee, or button (B9) (Figure 13) to make 2 coffees. The machine
grinds the coffee beans and then runs off the coffee.
After running off the pre-set quantity of coffee, the machine automatically stops run-off and then empties the coffee
grounds into the grounds container.
4. After a few seconds, the machine is once again ready for use.
5. To switch off the machine, press the on/stand-by button (A7) (Figure 1). (Before switching off, the machine runs an
automatic rinse cycle: beware of the danger of burns).
N.B.:
If coffee run-off is too slow or incomplete, refer to chapter ADJUSTING THE COFFEE GRINDER.
If coffee run-off is too quick and the coffee is not creamy enough, refer to chapter ADJUSTING THE COFFEE
GRINDER.
Tips for hotter coffee:
- proceed as described in chapter CHANGING AND SETTING MENU PARAMETRS, function Rinsing;
- do not use very thick cups as they absorb too much heat unless pre-heated in advance;
- use pre-heated cups, rinsing them with hot water.
You can interrupt run-off any time by pressing the previously selected button again.
As soon as run-off is finished, to increase the amount of coffee in the cup, simply press and hold the previously
selected button within 3 seconds of completion of run-off).
When the display shows FILL TANK! the water tank must be filled, otherwise the machine will not prepare any
coffee. (The tank may still contain some water; this is normal).
Every 14 single coffees (or 7 doubles) made, the display shows the message EMPTY GROUNDS CONTAINER!.
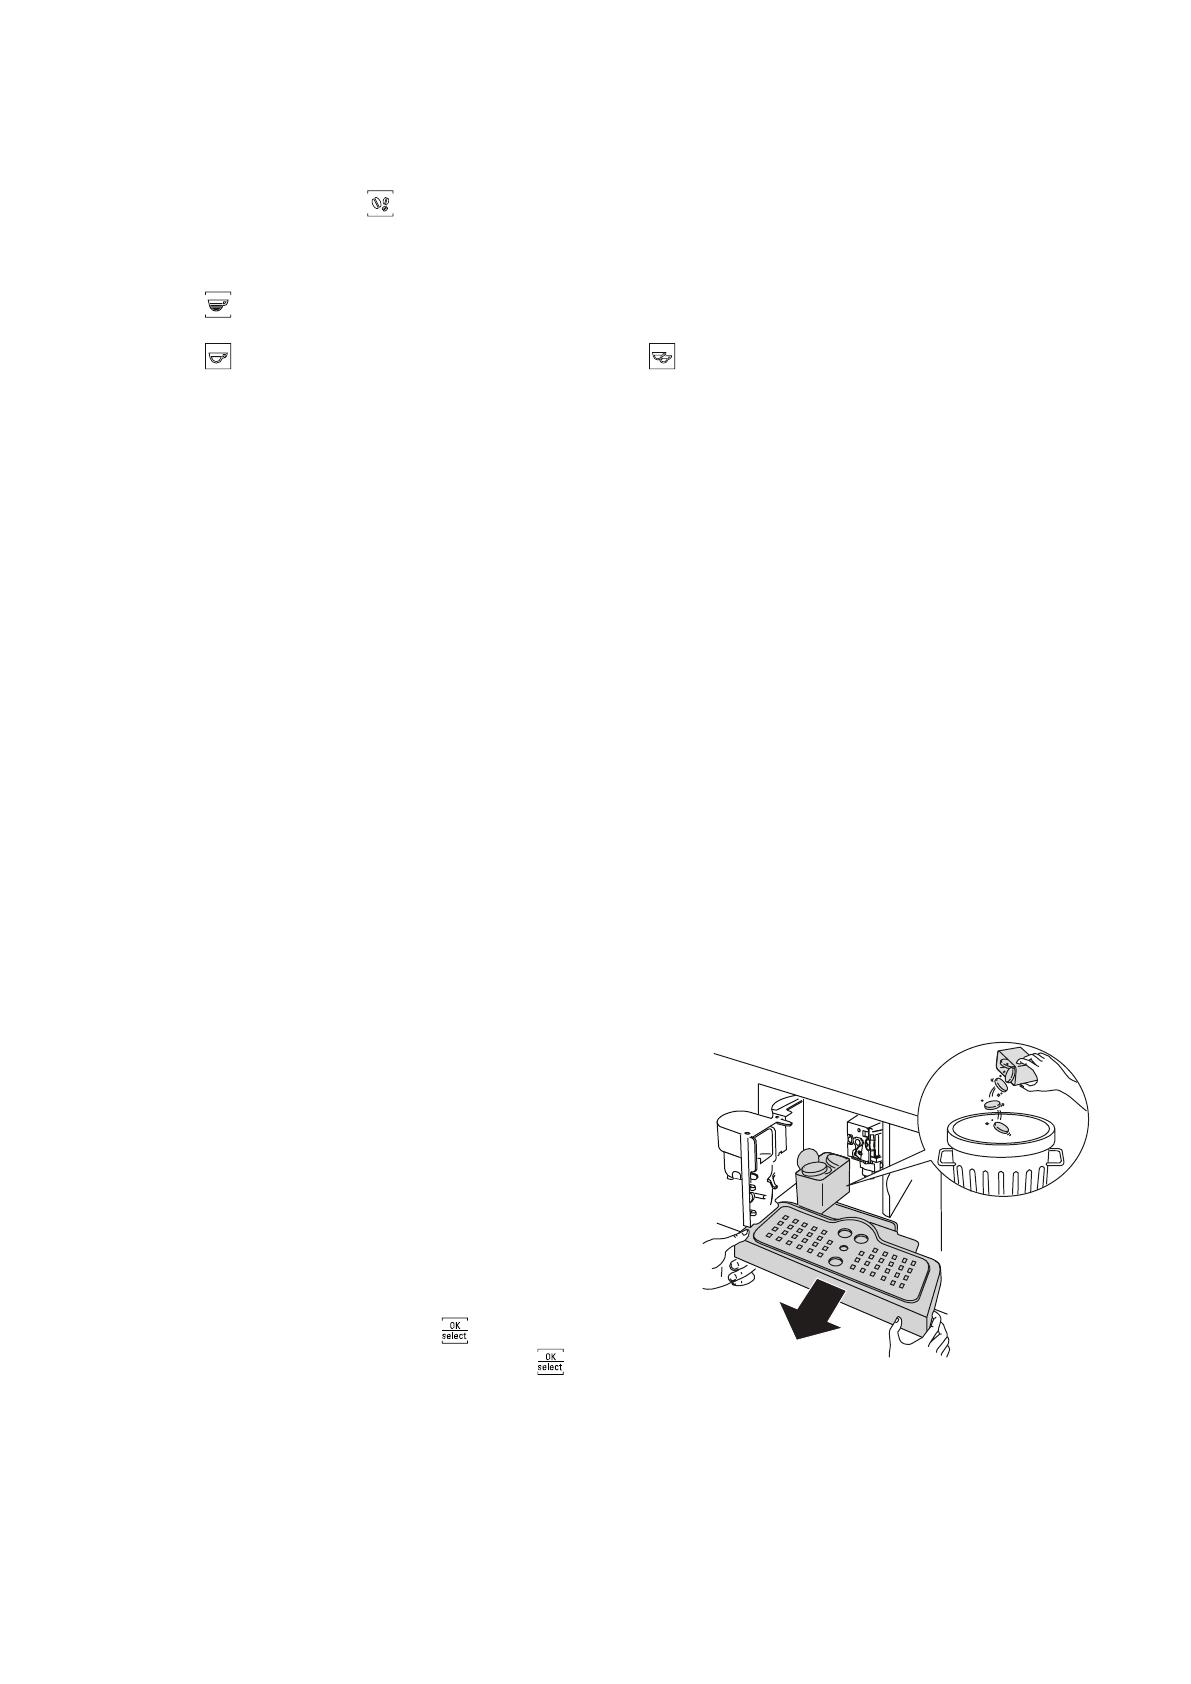
To clean, open the service door on the front by pulling the spout (Figure 16), then remove the drip tray (Figure 17)
and clean it.
When cleaning the machine, always fully remove the drip
tray.
When removing the drip tray, the grounds container
MUST be emptied. If this is not done, the machine
may clog up.
The water tank must never be pulled out during coffee run-
off. If the tank is removed at this point, the machine cannot
make the coffee and will display the message: GROUND
TOO FINE. ADJUST MILL! PRESS ‘OK’ followed by FILL
TANK!. Check the water level in the tank and replace in
the machine. To restart the machine, insert the water spout
if not already inserted (Figure 6), press
(B7) and the
display shows HOT WATER. PRESS ‘OK’. Press
(B7)
within a few seconds, let water run off from the spout for around 30 seconds. After run-off, the machine display
automatically reverts to the programmed standard settings.
The machine may require you to repeat the operation several times; this is in order to eliminate any air in the
hydraulic circuit.
If the above described operation is not carried out correctly or if the machine is switched off, the display may
revert to showing the programmed standard settings, even if in actual fact the problem persists.
Making coffee (using coffee beans)
35
The appliance is factory-set to automatically deliver the following amounts of coffee:
• Espresso,
Small cup,
Medium cup,
Large cup,
• Mug.
To modify these quantities and set the amount of coffee desired, for example changing the amount of espresso,
proceed as follows:
Press the button
(B4) repeatedly until the display shows ESPRESSO.
Keep the button
(B8) pressed until the display shows the message PROGRAM QUANTITY. Meantime the
machines runs off coffee.
Press the button
(B8) again to stop run-off and reprogram the machine with the new quantity of coffee.
The machine is now reprogrammed with the new setting and is ready for use.
You can also modify the amount of coffee in a small cup, medium cup, large cup and mug.
N.B.: press button (B9) for a measure of coffee which is double that previously set using button (B8).
If you wish to return to the original machine settings, see paragraph Resetting factory default values (reset).
Changing the amount of coffee in the cup
The coffee grinder is factory-set and does not require adjustment; nonetheless, if run-
off is too fast or too slow (coffee drips out), carry out an adjustment using the grinding
coarseness adjustment knob (Figure 14).
WARNING:
The adjustment knob must only be turned
while the grinder is in operation.
For slower run-off and creamier coffee, turn the knob 1 click in an anti-clockwise
direction (= finer ground coffee).
For faster run-off (not in drips), turn the knob 1 click in a clockwise direction (=
coarser ground coffee).
Adjusting the coffee grinder
Press button (B3) (Figure 8) and select the pre-ground coffee function.
Slide the machine out towards you; be sure to use the purpose-designed handles (Figure 7).
Lift the small central lid, pour one scoop of pre-ground coffee into the funnel (Figure 18); push the machine back
inside the housing and proceed as described in chapter MAKING COFFEE (USING COFFEE BEANS).
N.B.: only one coffee at a time can be made, press button
(B8) (Figure 12).
If, after operating the machine with pre-ground coffee, you want to revert to making coffee with beans again,
deactivate the pre-ground coffee function by pressing button
(B3) (Figure 8) again.
N.B.:
Never add pre-ground coffee when the machine is switched off, as it could spread throughout the inside.
Never add more than 1 scoop, otherwise the machine will not prepare the coffee.
Use only the scoop provided.
Only use pre-ground coffee for espresso coffee machines.
If you add more than one scoop of ground coffee and the funnel becomes blocked, carefully use a knife to clear
the coffee through the funnel (Figure 20), then remove and clean the brewing unit and the machine as described in
paragraph Cleaning the brewing unit.
Making espresso with pre-ground coffee (instead of beans)
Running off hot water
36
Always check that the machine is ready for use.
Check that the water spout is attached to the nozzle (Figure 6).
Place a container under the spout.
Press button
(B11) the display will show HOT WATER PRESS OK, press (B7) to confirm.
The display shows HOT WATER and hot water runs out of the spout, filling the container below (Do not run off hot
water for more than 2 minutes at a time). To stop the flow, press the button
(B11). Run-off stops automatically
when the pre-set quantity of water has been dispensed.
Making cappuccino
Select the taste of coffee you wish to use for making the cappuccino, pressing the button (B3).
Remove the milk container lid.
Fill the container with approximately 100 ml of milk for each cappuccino you want to make (Figure 22), without
exceeding the MAX line (equivalent to 750ml approx.) on the container. Ideally, use skimmed or semi-skimmed
milk at refrigerator temperature (about 5°C).
Make sure the milk intake tube is properly inserted in the rubber washer (Figure 23), then replace the milk
container lid.
Position the milk frother pointer (C1) between the words CAPPUCCINO and CAFFELATTE printed on the milk
container lid. The quantity of froth produced can be adjusted: move the pointer towards the word CAFFELATTE
for a lighter froth. Moving the pointer, on the other hand, towards CAPPUCCINO gives a thicker froth.
A. NO froth
B. Lighter froth
C. Pointer
D. Thicker froth
Remove the hot water spout (Figure 6) and attach the milk container to the nozzle (Figure 24).
Move the milk spout as described above and place a sufficiently large cup under the coffee spout and the milk
spout.
Press the button
(B10). The message CAPPUCCINO is displayed and a few seconds later, frothed milk runs
out of the milk spout and fills the cup below. (Run-off of milk stops automatically and
coffee run-off begins).
The cappuccino is now ready: add sugar to taste and, if you like, dust the froth with powdered cocoa.
A
B
C
D
37
N.B.:
While making cappuccino, you can stop frothed milk or coffee run-off by pressing the button (B10).
To keep the milk frother hygienically clean at all times, always clean the internal tubes of the milk container lid after
making cappuccino. The message PRESS CLEAN BUTTON is displayed:
- place a container under the milk spout (Figure 25);
- press and hold the CLEAN button (C3) on the milk container lid for at least 8 seconds, (Figure 25) to activate
cleaning. The message CLEANING... is displayed with a progress bar below. Do not release the CLEAN button
until the bar is complete and cleaning has ended. The cleaning cycle stops when the CLEAN button is released.
After cleaning, remove the milk container and place it in the refrigerator. It is best not to leave milk out of the
refrigerator for longer than 15 minutes.
If you want to modify the amount of coffee or frothed milk automatically run off into cups by the machine, proceed
as described in chapter CHANGING THE AMOUNT OF MILK AND COFFEE FOR CAPPUCCINO.
Changing the amount of milk and coffee for cappuccino
The appliance is factory-set to automatically deliver a standard cappuccino. To modify these quantities, proceed as
follows:
Fill the milk container up to the maximum level indicated on the container itself.
Keep the button
(B10) pressed until the display shows the message PROGRAM QUANTITY MILK FOR
CAPPUCCINO. Meantime the machine runs off milk.
Press the button
(B10) again to stop run-off and reprogram the machine with the new quantity of milk.
After a few seconds, coffee begins running out and the display shows the message PROGRAM QUANTITY
COFFEE FOR CAPPUCC..
Press the button
(B10) again to stop run-off and reprogram the machine with the new quantity of coffee.
The machine is now reprogrammed with the new setting and is ready for use.
Changing and setting menu parametrs
When the machine is ready for use, you can access the menu in order to change the following parameters or functions:
• RINSING
SETTING THE CLOCK
• LANGUAGE
AUTO START
• DESCALING
COFFEE TEMPERATURE
AUTO OFF
WATER HARDNESS
RESET TO DEFAULT
ENERGY SAVING
• STATISTICS
SETTING THE TONE
• EXIT
Setting the language
To change the display language, proceed as follows:
Press the MENU button
(B2) to access the menu and then buttons (B5) and (B6) to select LANGUAGE.
• Press
(B7).
Press buttons
(B5) and (B6) until the required language is displayed.
• Press
(B7) to confirm.
Press the MENU button
(B2) to exit the menu.
Rinsing
This function is used to obtain hotter coffee. Proceed as follows:
If, when you turn the machine on, you select a small cup of coffee (less than 60ml), use the hot water from the
rinse cycle to pre-heat the cup.
If, on the other hand, more than 2/3 minutes have elapsed since the last coffee was made, pre-heat the brewing
unit before making any more coffee. To do so, press the MENU button
(B2) to access the menu; the display
shows the message RINSING. Press
(B7). The display shows ‘OK’ TO CONFIRM. Press the button (B7)
again. Let the water run into the drip tray below or use it to fill (and then empty) the cup to be used for coffee,
thus warming it.
Changing the duration of operation
The appliance is factory-set to switch off automatically after 30 minutes of inactivity. To change this time (max 120
min.), proceed as follows:
Press the MENU button
(B2) to access the menu and then buttons (B5) and (B6) until the display shows
the message AUTO-OFF.
• Press
(B7) to confirm.
Press buttons
(B5) and (B6) to set the period of time after which the appliance must switch off (30 minutes,
1 hour, 2 hours).
• Press
(B7) to confirm.
Press the MENU button
(B2) to exit the menu.
Setting the clock
Press the MENU button
(B2) to access the menu and then buttons (B5) and (B6) until the display shows
the message ADJUST TIME.
• Press
(B7).
To set the hours, use buttons
(B5) and (B6) then press (B7) to confirm.
To set the minutes, use buttons
(B5) and (B6) and then press (B7) to confirm.
Press the MENU button
(B2) to exit the menu.
Setting automatic start time
This function allows you to set the machine to switch on automatically at a time of your choosing.
Make sure the appliance clock has been set.
Press the MENU button
(B2) to access the menu and then buttons (B5) and (B6) until the display shows
the message AUTO-START.
• Press
(B7).
The machine displays the message AUTO-START ENABLE?
• Press
(B7) to confirm.
To set the auto start time, use the buttons
(B5) and (B6) then press (B7) to confirm.
To set the minutes, use buttons
(B5) and (B6) and then press (B7) to confirm.
• Press
(B7), the display shows AUTO-START ENABLED.
Changing the coffee temperature
To change the temperature of coffee run off, proceed as follows:
Press the MENU button
(B2) to access the menu and then buttons (B5) and (B6) until the display shows
the message COFFEE TEMPERATURE;
• Press
(B7).
Press buttons
(B5) and (B6) to select the required coffee temperature: low, medium, high.
• Press
(B7) to confirm the temperature chosen.
Press the MENU button
(B2) to exit the menu.
38
Setting water hardness
If desired, the interval between descaling cycles can be increased so that descaling is performed less
frequently and in accordance with the actual calcium content of the water used. Proceed as follows:
Remove the “Total hardness test” water hardness strip from its packaging (attached to page 2),
immerse it fully in the water for a few seconds. Next, remove it and wait around 30 seconds (until it
changes colour and red squares appear on the strip).
Press the MENU button
(B2) to access the menu and then buttons (B5) and (B6) until the
display shows the message WATER HARDNESS.
• Press
(B7).
Press buttons
(B5) and (B6) to select the number of dots corresponding to the number of red
squares which have formed on the test strip (for example, if the test strip shows 3 red squares, you
need to select the message
);
• Press
(B7) to confirm. The machine is now set to carry out descaling when it is actually necessary.
Press the MENU button
(B2) to exit the menu.
Descaling
WARNING:
Descaler contains acids. Observe the manufacturer’s safety
warnings given on the descaler pack.
N.B.: Only use descalers recommended by the manufacturer. Failure to do so invalidates the machine
warranty. Failure to descale the machine regularly will also invalidate the warranty.
When the display shows the message DESCALE!, it is time to descale the machine. Proceed as follows:
Make sure that the machine is ready for use.
Attach the water spout (C7) to the nozzle (A10).
Press the MENU button
(B2) to access the menu and then buttons (B5) and (B6) until the
display shows the message DESCALING.
• Press
(B7), the display shows the message DESCALING. ‘OK’ TO CONFIRM.
• Press
(B7), the display shows the message ADD DESCALER. PRESS ‘OK’.
Empty the water tank, pour in the contents of the bottle of descaler, taking care to observe the
manufacturer’s instructions on the label. Place a container with a capacity of approx. 2 litres underneath
the hot water spout.
Press the
button (B7); the descaling solution runs out of the hot water spout and starts to fill the
container below. The message DESCALING UNDERWAY... is displayed.
The descaling programme automatically follows a series of run-offs and pauses.
After approximately 30 minutes, the display shows the message RINSING. FILL TANK!.
Empty the water tank, rinse it thoroughly to eliminate all traces of descaler and then fill it again with
clean water.
Fit the tank full of clean water back in the machine. The display shows the message RINSING
COMPLETE. PRESS ‘OK’.
• Press
again (B7). Hot water runs out of the spout, filling the container, and the message RINSING
PLEASE WAIT is displayed.
Wait for the message RINSING COMPLETE. PRESS ‘OK’.
• Press
(B7). The display shows the message DESCALING COMPLETE. The appliance goes off
automatically.. Fill the tank again with clean water.
The descaling programme is now complete and the machine is ready to prepare coffee again.
N.B.: if you interrupt the descaling cycle before it has been completed, you will have to start again from
the beginning.
N.B.: FAILURE TO DESCALE THE MACHINE REGULARLY WILL INVALIDATE THE MACHINE
WARRANTY.
Resetting factory default values (reset)
To restore the machine’s original default values (even after they have been changed), proceed as follows:
Press the MENU button
(B2) to access the menu and then buttons (B5) and (B6) until the
display shows the message DEFAULT VALUES.
• Press
(B7), the display shows the message ‘OK’ TO CONFIRM.
• Press
(B7) to restore factory settings.
Energy saving
Press the icon
(B2) to enter the settings menu.
39
Press the icons (B5) and (B6) until ENERGY SAVING is displayed.
Press the icon
(B7) DISABLE? is displayed (or ENABLE? if the function has already been disabled).
Press the icon
(B7) to enable or disable the function or the icon (B2) to exit the menu.
Statistics
This function enables you to view the machine statistics. To view them, proceed as follows:
Press the MENU button
(B2) to access the menu and then buttons (B5) and (B6) until the
machine shows the message STATISTICS.
• Press
(B7).
Press buttons
(B5) and (B6) to verify:
- how many coffees and cappuccinos have been made;
- how many times the machine has been descaled;
- the total number of litres of water run off.
Press the MENU button
(B2) once to exit the function, or press MENU button (B2) twice to
exit the menu.
Setting the tone
This function enables you to activate or deactivate an acoustic signal emitted by the machine each time a
button is pressed and each time the accessories are inserted/removed.
N.B.: the machine is factory set with the acoustic signal activated.
Press the MENU button
(B2) to access the menu and then buttons (B5) and (B6) until the
display shows the message BEEP.
• Press
(B7). The display shows the message BEEP DISABLE?
• Press
(B7) to deactivate the acoustic signal.
Press the MENU button
(B2) to exit the menu.
Programming coffee
For instructions on programming coffee, refer to chapter CHANGING THE AMOUNT OF COFFEE IN THE CUP.
Programming cappuccino
For instructions on programming cappuccino, see chapter CHANGING THE AMOUNT OF MILK AND
COFFEE FOR CAPPUCCINO.
40
Cleaning and maintenance
Cleaning the machine
Do not use solvents or abrasive detergents to clean the machine. A soft damp cloth will suffice. The following machine
parts must be cleaned regularly:
Coffee grounds container (A4).
Drip tray (A14).
Water tank (A12).
Coffee spouts (A13).
Feed funnel for adding pre-ground coffee (A21).
The inside of the machine, accessed from the service door (A2).
The brewing unit (A5).
Cleaning the coffee grounds container
When the display shows the message EMPTY GROUNDS CONTAINER !, empty and clean the grounds container.
To clean, proceed as follows:
Open the service door on the front of the machine (Figure 16), next remove the drip tray (Figure 17), and clean it.
Clean the coffee grounds container thoroughly.
N.B.: When removing the drip tray, the grounds container MUST be emptied.
Cleaning the drip tray
WARNING:
If the drip tray is not emptied, the water can overflow. This can
damage the machine.
  • Page 1 1
  • Page 2 2
  • Page 3 3
  • Page 4 4
  • Page 5 5
  • Page 6 6
  • Page 7 7
  • Page 8 8
  • Page 9 9
  • Page 10 10
  • Page 11 11
  • Page 12 12
  • Page 13 13
  • Page 14 14
  • Page 15 15
  • Page 16 16
  • Page 17 17
  • Page 18 18
  • Page 19 19
  • Page 20 20
  • Page 21 21
  • Page 22 22
  • Page 23 23
  • Page 24 24
  • Page 25 25
  • Page 26 26
  • Page 27 27
  • Page 28 28
  • Page 29 29
  • Page 30 30
  • Page 31 31
  • Page 32 32
  • Page 33 33
  • Page 34 34
  • Page 35 35
  • Page 36 36
  • Page 37 37
  • Page 38 38
  • Page 39 39
  • Page 40 40
  • Page 41 41
  • Page 42 42
  • Page 43 43
  • Page 44 44
  • Page 45 45
  • Page 46 46
  • Page 47 47
  • Page 48 48
  • Page 49 49
  • Page 50 50
  • Page 51 51
  • Page 52 52
  • Page 53 53
  • Page 54 54
  • Page 55 55
  • Page 56 56
  • Page 57 57
  • Page 58 58
  • Page 59 59
  • Page 60 60
  • Page 61 61
  • Page 62 62
  • Page 63 63
  • Page 64 64
  • Page 65 65
  • Page 66 66
  • Page 67 67
  • Page 68 68
  • Page 69 69
  • Page 70 70
  • Page 71 71
  • Page 72 72
  • Page 73 73
  • Page 74 74
  • Page 75 75
  • Page 76 76
  • Page 77 77
  • Page 78 78
  • Page 79 79
  • Page 80 80
  • Page 81 81
  • Page 82 82
  • Page 83 83
  • Page 84 84
  • Page 85 85
  • Page 86 86
  • Page 87 87
  • Page 88 88
  • Page 89 89
  • Page 90 90
  • Page 91 91
  • Page 92 92
  • Page 93 93
  • Page 94 94
  • Page 95 95
  • Page 96 96
  • Page 97 97
  • Page 98 98
  • Page 99 99
  • Page 100 100
  • Page 101 101
  • Page 102 102
  • Page 103 103
  • Page 104 104
  • Page 105 105
  • Page 106 106
  • Page 107 107
  • Page 108 108
  • Page 109 109
  • Page 110 110
  • Page 111 111
  • Page 112 112
  • Page 113 113
  • Page 114 114
  • Page 115 115
  • Page 116 116
  • Page 117 117
  • Page 118 118
  • Page 119 119
  • Page 120 120
  • Page 121 121
  • Page 122 122
  • Page 123 123
  • Page 124 124
  • Page 125 125
  • Page 126 126
  • Page 127 127
  • Page 128 128
  • Page 129 129
  • Page 130 130
  • Page 131 131
  • Page 132 132
  • Page 133 133
  • Page 134 134
  • Page 135 135
  • Page 136 136
  • Page 137 137
  • Page 138 138
  • Page 139 139
  • Page 140 140
  • Page 141 141
  • Page 142 142
  • Page 143 143
  • Page 144 144
  • Page 145 145
  • Page 146 146
  • Page 147 147
  • Page 148 148
  • Page 149 149
  • Page 150 150
  • Page 151 151
  • Page 152 152
  • Page 153 153
  • Page 154 154
  • Page 155 155
  • Page 156 156
  • Page 157 157
  • Page 158 158
  • Page 159 159
  • Page 160 160
  • Page 161 161
  • Page 162 162
  • Page 163 163
  • Page 164 164
  • Page 165 165
  • Page 166 166
  • Page 167 167
  • Page 168 168
  • Page 169 169
  • Page 170 170
  • Page 171 171
  • Page 172 172
  • Page 173 173
  • Page 174 174
  • Page 175 175
  • Page 176 176
  • Page 177 177
  • Page 178 178
  • Page 179 179
  • Page 180 180
  • Page 181 181
  • Page 182 182
  • Page 183 183
  • Page 184 184
  • Page 185 185
  • Page 186 186
  • Page 187 187
  • Page 188 188
  • Page 189 189
  • Page 190 190
  • Page 191 191
  • Page 192 192
  • Page 193 193
  • Page 194 194
  • Page 195 195
  • Page 196 196
  • Page 197 197
  • Page 198 198
  • Page 199 199
  • Page 200 200
  • Page 201 201
  • Page 202 202
  • Page 203 203
  • Page 204 204
  • Page 205 205
  • Page 206 206
  • Page 207 207
  • Page 208 208
  • Page 209 209
  • Page 210 210
  • Page 211 211
  • Page 212 212
  • Page 213 213
  • Page 214 214
  • Page 215 215
  • Page 216 216
  • Page 217 217
  • Page 218 218
  • Page 219 219
  • Page 220 220
  • Page 221 221
  • Page 222 222
  • Page 223 223
  • Page 224 224
  • Page 225 225
  • Page 226 226
  • Page 227 227
  • Page 228 228
  • Page 229 229
  • Page 230 230
  • Page 231 231
  • Page 232 232
  • Page 233 233
  • Page 234 234
  • Page 235 235
  • Page 236 236

Bauknecht CM 945 PT User guide

Category
Coffee makers
Type
User guide

Ask a question and I''ll find the answer in the document

Finding information in a document is now easier with AI