Remington RM193B User manual
- Category
- Air blowers/dryers
- Type
- User manual
This manual is also suitable for

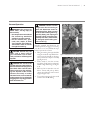
IMPORTANT: Read and understand this manual before assembling or
operating this appliance. Improper use of this appliance can cause severe
injury or death. Keep this manual for future reference.
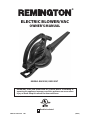
MODELS: RM191BV, RM193BVT
ELECTRIC BLOWER/VAC
OWNER’S MANUAL
®
Double Insulated
PART NO. 769-05180 P00 (06/09)
Page is loading ...

REMINGTON ELECTRIC BLOWER/VAC | iII
1 Important Safety Information 1
2 Product Identication 3
3 Blower/Vac Assembly 4
Assembling Blower . . . . . . . . . . . . . . . . . . . . . . . . . . . 4
Converting from Blower to Vacuum . . . . . . . . . . . . . . . . . . . . 5
4 Blower/Vac Operation 7
Extension Cords . . . . . . . . . . . . . . . . . . . . . . . . . . . . . 7
Operating the Blower/Vac . . . . . . . . . . . . . . . . . . . . . . . . 8
5 Blower/Vac Maintenance 11
Cleaning and Maintenance . . . . . . . . . . . . . . . . . . . . . . . . 11
Servicing of Double-Insulated Appliances . . . . . . . . . . . . . . . . . 11
6 Troubleshooting 12
7 Replacement Parts 13
8 Warranty Information 14
table of contents

iv |
welcome
ank you for purchasing this Remington brand Electric Blower/Vac. We are proud
to offer this quality product to assist you in keeping your property neat and well-
groomed.
is owner’s manual provides complete instructions for safely assembling, operating, and
maintaining your Blower/Vac. Read and save these instructions. Refer to this manual
each time before using your Blower/Vac.
DO NOT RETURN THIS UNIT TO THE RETAILER. PROOF OF PURCHASE WILL BE REQUIRED FOR WARRANTY SERVICE.
THIS PRODUCT IS COVERED BY ONE OR MORE U.S. PATENTS. OTHER PATENTS PENDING.
For assistance regarding the assembly, controls, operation or maintenance of the unit, please call the Customer Support Department.
Additional information about the unit can be found on our website.
For service, please call the Customer Support Department to obtain a list of authorized service dealers near you. Service on this unit, both
within and after the warranty period, should only be performed by an authorized and approved service dealer. When servicing, use
only identical replacement parts.
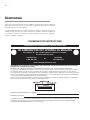
Before beginning, locate the unit’s model plate, which lists the model and serial numbers of your unit. Refer to the sample plate below
and copy the information for future reference.
Copy the serial number here:
Copy the model and parent part numbers here:
DO NOT RETURN THIS PRODUCT
Please call the Customer Support Department
or visit our website for assistance:
or
SAVE THESE INSTRUCTIONS
All information, illustrations and specifications in this manual are based on the latest product information available at the time of
printing. We reserve the right to make changes at any time without notice.
Copyright© 2009 MTD SOUTHWEST INC, All Rights Reserved.
SERVICE INFORMATION
U.S.
1-866-206-2707
Canada
1-877-696-5533
www.remingtonpowertools.com

REMINGTON ELECTRIC BLOWER/VAC | 1
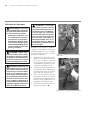
1 important safety information
SAFETY
WARNINGS
BEFORE OPERATING
BLOWER/VAC
READ ALL INSTRUCTIONS BEFORE
OPERATING THIS BLOWER/VAC.
1. Avoid Dangerous Environments
• This blower/vac is intended for
indoor or outdoor use. Do not op-
erate blower/vac in rain or in damp
or wet locations.
• Do not handle electric plug or
blower/vac with wet hands.
• Do not use to vacuum any liquids or
wet surfaces. Especially, do not use
to vacuum flammable or combus-
tible liquids, such as gasoline, or in
areas where they may be present.
• Do not vacuum anything that is
burning or smoking, such as ciga-
rettes, matches, or hot ashes.
• Do not operate blower/vac if it is
damaged or not securely and fully
assembled.
2. Do not allow blower/vac to be used as
a toy. Pay close attention when using
blower/vac near children.
3. Do not use blower/vac for any job
except that for which it is intended.
Use only as described in this manual.
Use only attachments included with
this blower/vac.
4. Do not use vacuum without dust bag
and/or filters in place.
5. Always wear eye protection that
meets or exceeds the requirements of
ANSI Z87.1.
6. Wear long pants and shoes when
operating this blower/vac.
7.
Provide Ground Fault Circuit In-
terrupter (GFCI) protection on
the circuit or outlet to be used for
blower/vac. You may use receptacles
with built-in GFCI protection for
this safety measure.
WARNING: This product con-
tains chemicals known to the
State of California to cause
cancer or birth defects, or other
reproductive harm.
When using an electric appliance, basic
precautions should always be followed,
including the following:
WARNING: To Reduce The
Risk of Electric Shock – Do not use
vacuum on wet surfaces. Do not
expose to rain. Store indoors.
WARNING: When using blow-
er/vac, follow all basic safety
precautions to reduce the risk of
re, electric shock, and personal
injury.
WHILE OPERATING
BLOWER/VAC
1. Stay alert. Watch what you are doing.
Use common sense.
2.
Keep hair, loose clothing, fingers, and
all parts of body away from openings
and moving parts.
3. Never operate this blower/vac with
defective guards or shields, or without
safety devices in place.
4. Disconnect from power supply before
clearing any blockage.
5. Do not abuse power cord. Never pull
or carry blower/vac by power cord.
Never yank cord to disconnect from
receptacle. To unplug, grasp plug, not
the cord. Do not close a door on the
cord. Keep power cord from heat, oil,
and sharp edges.
6. Use extra care when using blower/vac
on stairs.
7. Do not put any object into openings.
Do not use with any opening blocked.
Keep free of dust, lint, hair, and any-
thing that may reduce air flow.
8. Disconnect blower/vac properly. Turn
off all controls before disconnecting
blower/vac from power supply.
9. e impeller rotates for a few seconds
after turning blower/vac off. The
rotating impeller can cut or injure
fingers. Do not remove the bottom
inlet cover while the motor is running
or when the blower/vac is plugged
into a power outlet.
10.
Do not leave blower/vac when plugged
in. Unplug unit from outlet when not
in use and before servicing.

2 | Chapter 1: Important Safety Information
MAINTENANCE AND
STORAGE OF BLOWER/VAC
1. Maintain blower/vac with care.
• Do not use with damaged cord or
plug.
• If blower/vac is not working prop-
erly, has been dropped, damaged,
left outdoors, or dropped into wa-
ter, have it repaired by a qualified
service center.
• Keep handles dry, clean, and f
ree
from oil and grease.
2. Check damaged parts.
• If a part is damaged, carefully check
the damaged part before using the
blower/vac. Make sure the part will
operate properly and perform its
intended function.
• Check for alignment of moving parts,
binding of moving parts, breakage of
parts, mounting, and any other con-
dition that may affect its operation.
• A guard or other part that is dam-
ag
ed should be properly repaired
or replaced by a qualified service
center unless indicated elsewhere
in this manual.
3. Store idle blower/vac indoors. When
not in use, store the blower/vac and
extension cord indoors in a dry loca-
tion. Store blower/vac above the reach
of children or in a locked area out of
the reach of children.
4. This appliance is provided with
double insulation. Use only identical
replacement parts. See instructions
for servicing of double-insulated ap-
pliances on page 11.
is manual is your guide to safe and proper
operation of the blower/vac.
SAVE THESE
INSTRUCTIONS.

L
L
REMINGTON ELECTRIC BLOWER/VAC | 3
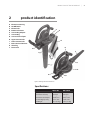
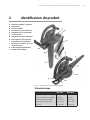
2 product identication
A. Blower/Vac Housing
B. On/O Switch
C. Blower Tube
D. Bottom Inlet Cover
E. Vacuum Bag Adapter
F. Vacuum Bag
G. Vacuum Tube Adapter
H. Upper Vacuum Tube
I. Lower Vacuum Tube
J. Extension Cord Retainer
K. Inlet Plug
L. Draw Latch
Specications
RM191BV RM193BVT
Input
Max. Blower Velocity
Max. Blower Air Output
Vacuum Bag Capacity
Net Weight
120V, 12A
200 mph
350 ft
3
/min.
1.6 ft
3
/ 45 L
9 lbs. (4.1 Kg)
120V, 12A
200 mph
350 ft
3
/min.
1.6 ft
3
/ 45 L
9 lbs. (4.1 Kg)
Figure 2-1: Remington brand electric blower/vac
A
C
K
E
F
I
H
G
D
J
B

4 |
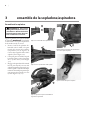
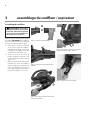
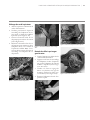
3 blower/vac assembly
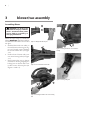
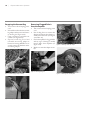
Assembling Blower
Follow the steps below to assemble the
blower. IMPORTANT: e blower will not
run unless the bottom inlet cover is locked
into place.
1. Slide the blower tube onto outlet on
front of blower/vac housing (see Fig-
ure 3-1). Securely connect the draw
latch to the blower tube (see Figure
3-2).
2. Position front of bottom inlet cover
over motor housing hook (see Figure
3-3).
3. Pivot bottom inlet cover to bottom
of blower/vac housing. Slightly press
locking lever on bottom inlet cover
to allow cover to lock into place (see
Figures 3-4 and 3-5).
Figure 3-5: Pressing locking lever
WARNING: To Reduce The
Risk of Personal Injury or Electric
Shock – Disconnect from power
source before assembling or
changing attachments.
Figure 3-1: Sliding blower tube into place
Figure 3-3: Attaching bottom inlet cover to motor housing
hook
Figure 3-4: Pivoting bottom inlet cover to blower/vac
housing
Figure 3-2: Connect draw latch to blower tube
1
2
3
4

REMINGTON ELECTRIC BLOWER/VAC | 5
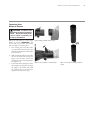
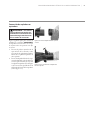
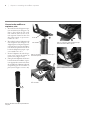
Follow the steps below to convert from
blower to vacuum. IMPORTANT: The
vacuum will not run unless the vacuum
tube assembly is locked into place.
1. Press locking lever on bottom inlet
cover and remove bottom inlet cover
from blower/vac. Remove blower tube
from blower/vac.
2. Slide vacuum tube adapter onto outlet
on front of blower/vac housing (see
Figure 3-6). Securely connect the
draw latch to the vacuum bag adapter
(see Figure 3-7).
3. Connect the lower and upper vacuum
tubes together (see Figure 3-8). Align
the ridge on the bottom tube with
the channel on the top tube. Press
together until you hear a “snap”.
Figure 3-6: Sliding vacuum tube adapter into place
Converting from
Blower to Vacuum
WARNING: To Reduce The
Risk of Personal Injury or Electric
Shock – Disconnect from power
source before assembling or
changing attachments.
Figure 3-8: Conntecting lower and upper vacuum tube
together
1
Figure 3-7: Connect draw latch to vacuum bag adapter

6 |
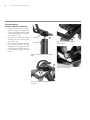
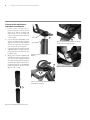
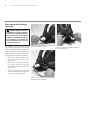
4. Connect the tubes to the vacuum tube
adapter (see Figure 3-9). Align the tab
on the top tube with the notch on the
vacuum tube adapter. Press together
until you hear a “snap”.
5. Position front of vacuum tube adapter
assembly over motor housing hook
(see Figure 3-10).
6. Pivot vacuum tube adapter assembly
to bottom of blower/vac housing.
Slightly press locking lever on vacu-
um tube adapter to allow adapter to
lock into place (see Figures 3-11 and
3-12).
Converting from
Blower to Vacuum, continued
Figure 3-9: Connecting vacuum tubes to vacuum tube
adapter
Figure 3-10: Attaching vacuum tube adapter to motor
housing hook
Figure 3-11: Pivoting vacuum tube adapter to
blower/vac housing
Figure 3-12: Pressing locking lever
Chapter 3: Blower/Vac Assembly
5
Notch
Tab
2
3
4

REMINGTON ELECTRIC BLOWER/VAC | 7
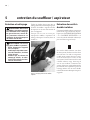
4 blower/vac operation
Figure 4-3: Pull extension cord loop tight around molded
cord hitch
Figure 4-2: Inserting extension cord loop through cord slot
Figure 4-1: Plugging extension cord into inlet plug
WARNING: Read and under-
stand this owner’s manual before
operating blower/vac. Make cer-
tain you read and understand all
Safety Warnings on pages 1 and
2 of this manual. Improper use
of this blower/vac can result in
severe injury or death from re,
electric shock, or body contact
with moving parts.
Connecting Extension Cord
WARNING: Fully seat the ex-
tension cord on the inlet plug of
blower/vac. Failure to do so could
lead to overheating of blower/
vac. This could cause a re that
results in personal injury to you
or others.
e blower/vac has a built-in extension
cord retainer. is cord hitch prevents ac-
cidental disconnection of the power cord
during use. e cord hitch is molded into
the lower rear of the blower/vac housing.
1. Plug extensio
n cord into the inlet plug
of appliance (see Figure 4-1).
2. Create a loop in the extension cord
and insert the loop through the cord
slot of the blower/vac housing (see
Figure 4-2).
3. Pull the loop tight around the molded
cord hitch (see Figure 4-3).
IMPORTANT: is blower/vac is for house-
hold use only.
WARNING: To reduce the risk
of electric shock, use only with
an extension cord intended for
outdoor use, such as SW-A, SOW-A,
STW-A, STOW-A, SJW-A, SJOW-A,
SJTW-A, or SJTOW-A.
Extension Cords
Make sure your extension cord is in good
condition. Inspect extension cords periodi-
cally and replace if damaged. When using
an extension cord, be sure to use one heavy
enough to carry the current your blower/vac
will draw. An undersized extension cord
will cause a drop in line voltage resulting
in loss of power and overheating.
e table below shows the correct size exten-
sion cord to use depending on cord length
and nameplate ampere rating. If in doubt, use
the next larger gauge cord. e smaller the
gauge number, the larger the cord. To reduce
the risk of disconnection of blower/vac from
the extension cord during operation, use the
cord hitch described in this manual.
To reduce the risk of electric shock, this
blower/vac has a polarized plug (one blade
is wider than the other) and will require
the use of a polarized extension cord. e
blower/vac’s plug will fit into a polarized
extension cord only one way. If the plug
does not fit fully into the extension cord,
reverse the plug. If the plug still does not
fit, obtain a correct polarized extension
cord. A polarized extension cord will
require the use of a polarized wall outlet.
is plug will fit into the polarized wall
outlet only one way. If the plug does not
fit fully into the wall outlet, reverse the
plug. If the plug still does not fit, contact
a qualified electrician to install the proper
wall outlet. Do not change the blower/vac
plug, extension cord receptacle, or exten-
sion cord plug in any way.
Inspect cord often. Replace if damaged.
Cord Length AWG Cord Size
25 feet
50 feet
100 feet
150 feet
16 AWG
16 AWG
14 AWG
12 AWG

8 | Chapter 4: Blower/Vac Operation
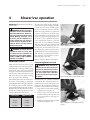
Operating the
Blower/Vac
e on/off toggle switch has three settings;
off, low, and high. e middle switch po-
sition, marked “O”, is off. e rear switch
position, marked “I”, is low. e forward
switch position, marked “II”, is high. See
Figure 4-4.
Blower Operation
Figure 4-4: On/O switch positions
Figure 4-5: Holding blower/vac for blower operation
Figure 4-7: Operating blower
WARNING: The blower can
throw debris, causing injury to
those nearby.
• Do not blow nails, bolts, rocks,
or other hard objects.
• Do not operate blower near
bystanders or pets.
• Be careful when blowing de-
bris from stairs, corners, or
other tight areas. Objects can be
blown back toward operator.
• Wear approved eye protec
tion,
long pants, and shoes while
operating this blower/vac.
Properly assemble the blower/vac for
blower operation (see page 4, Assembling
Blower). Follow the steps below to operate
the blower.
1. Hold blower/vac using the handle on
housing (see Figure 4-5).
2. When ready to
start the blower, toggle
the on/off switch to either the low “I”
or high “II” setting (see Figure 4-6).
3. To stop the blower, toggle the on/off
switch to the off “O” setting.
Figure 4-6: On/O Switch to LOW position

REMINGTON ELECTRIC BLOWER/VAC | 9
Figure 4-8: Holding blower/vac for vacuum operation
Figure 4-9: Picking up debris with vacuum
Vacuum Operation
WARNING: The vacuum can
throw debris, causing injury to
those nearby.
• Do not operate vacuum without
the vacuum bag attached or
with the bag zipper opened.
• Do not vacuum nails, glass,
rocks, wire, staples, or other
sharp, pointed, or hard objects.
These items could be thrown
through the cloth bag.
Properly assemble the blower/vac for
vacuum operation (see page 5, Converting
from Blower to Vacuum). Follow the steps
below to operate the vacuum.
1. Hang vacuum b
ag from your shoulder
using the attached strap. Hold blow-
er/vac using the handles on housing
and vacuum tube adapter assembly
(see Figure 4-8).
2. When ready to start the vacuum,
toggle the on/off switch to either the
low “I” or high “II” setting (see Figure
4-4).
3. Move end of vacuum tube over soft
debris. Vacuum will pick up debris,
chop it up, and deposit it into vacuum
bag (see Figure 4-9).
4. To stop the vacuum, toggle the on/off
switch to the off “O” setting.
CAUTION: Vacuum only soft
items such as leaves and cut
grass. Hard items such as sticks,
rocks, and acorns will damage the
impeller.
CAUTION: Do not force the
vacuum tube into a pile of debris.
Do not hold the tube upright and
force-feed debris into the tube.
These actions may clog and dam-
age the impeller. If the vacuum
vibrates excessively or makes
abnormal noises, turn vacuum o,
unplug power cord, and check for
clogging. Clear any clogged debris
from the blower/vac.
CAUTION: Normal vacuum
usage causes the vacuum bag to
wear and deteriorate. A worn or
deteriorated bag allows vacuum
to throw debris through the bag,
possibly hitting and injuring the
operator. Check vacuum bag fre-
quently. If it is worn, deteriorated,
or damaged, replace with a genu-
ine vacuum bag.

10 |
Chapter 4: Blower/Vac Operation
Figure 4-13: Removing vacuum tube adapter
Figure 4-14: Removing debris from impellers
Figure 4-10: Removing bag/adapter assembly
Emptying the Vacuum Bag
1. Turn vacuum off and unplug power
cord.
2. Lift and rele
ase draw latch on vacuum
bag adapter and remove from blower/
vac housing (see Figure 4-10).
3. Unzip vacuum bag and shake out
contents (see Figure 4-11).
4. Zip the vacuum bag closed and
reassemble vacuum bag adapter to
blower/vac housing. Note: Be sure to
securely connect the draw latch to the
vacuum bag adapter.
Figure 4-11: Unzipping and emptying bag
Removing Clogged Debris
from the Impeller
1. Turn vacuum off and unplug power
cord.
2. Press locking lever on vacuum tube
a
dapter and remove tube adapter as-
sembly from blower/vac (see Figures
4-12 and 4-13).
3. Check the impeller for clogged debris
and any signs of damage. Carefully
remove debris from impellers (see
Figure 4-14).
4. Replace vacuum tube adapter assem-
bly.
Figure 4-12: Pressing locking lever

REMINGTON ELECTRIC BLOWER/VAC | 11
5 blower/vac maintenance
WARNING: Disconnect blower/
vac from power supply before
cleaning or servicing. Severe
injury or death could occur from
re, electrical shock, or rotating
impeller.
WARNING: When cleaning
blower/vac:
• Do not submerse in any
liquids
• Do not use products that con-
tain Ammonia, Chlorine, or
abrasives
• Do not use chlorinated cleaning
solvents, Carbon Tetrachloride,
Kerosene, or Gasoline.
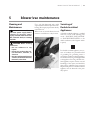
Use a soft cloth dampened with a mild
soap and water mixture to wipe blower/vac
housing. Do not spray or pour water directly
onto blower/vac.
When not in use, store the blower/vac and
extension cord indoors in a dry location.
Cleaning and
Maintenance
Figure 5-1: Cleaning blower/vac housing
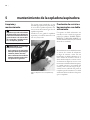
Servicing of
Double-Insulated
Appliances
A double-insulated appliance is marked
with one or more of the following: e
words “DOUBLE INSULATION”
or “DOUBLE INSULATED” or the
double insulation symbol (square within
a square).
In a double-insulated appliance, two sys-
tems of insulation are provided instead
of grounding. No grounding means is
provided on a double-insulated appliance,
nor should a means for grounding be added
to the appliance. Servicing a double-insu-
lated appliance requires extreme care and
knowledge of the system, and should be
done only by qualified service personnel.
Replacement parts for a double-insulated
appliance must be identical to the parts
they replace.

12 |
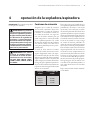
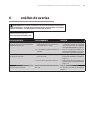
6 troubleshooting
WARNING: Unplug blower/vac from power source before servicing. Severe
injury or death could occur from re, electrical shock, or rotating impeller.
T
Y
a
b
S
c
a
m
D
A
P
P
B
h
OBSERVED FAULT POSSIBLE CAUSE REMEDY
Motor does not run when you turn on/o
switch low or high
1. Bottom inlet cover or vacuum tube
adapter not locked into place
2. Extension cord connection is loose
1. Check inlet cover or vacuum tube
adapter for proper installation (see
blower/vac assembly, page 4)
2. Check cord connection at electrical
outlet and at rear of blower/vac
Motor runs, but vacuum will not pick
up debris
1. Clogged vacuum tube or impeller
2. Vacuum bag full
1. Follow steps under Removing
Clogged Debris from the Impeller,
page 10
2. Empty vacuum bag (see Emptying
the Vacuum Bag, page 10
Blower/vac vibrates excessively and/or
makes abnormal noises
Clogged vacuum tube or impeller Follow steps under Removing Clogged
Debris from the Impeller, page 10
Note: For additional help, visit
www.remingtonpowertools.com.

REMINGTON ELECTRIC BLOWER/VAC | 13
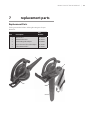
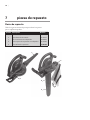
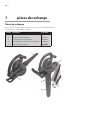
7 replacement parts
Replacement Parts
Use the part numbers below to order replacement parts for your
blower/vac.
1
3
5
4
2
Item Description
Part
Number
1
2
3
4
5
Blower Tube
Bottom Inlet Cover
Vacuum Bag with Adapter
Upper Vacuum Tube with Adapter
Lower Vacuum Tube
731-07378
731-07379
764-04084
731-07380
731-07381

14 |
8 warranty information
The limited warranty set forth below is given by Remington LLC (“Remington”) with respect with new
merchandise purchased and used in the United States, its possessions and territories.
Remington warrants this product against defects in material and workmanship for a period of two (2)
years commencing on the date of original purchase and will, at its option, repair or replace, free of charge,
any part found to be defective in material or workmanship. This limited warranty shall only apply if this
product has been operated and maintained in accordance with the Operator’s Manual furnished with the
product, and has not been subject to misuse, abuse, commercial use, neglect, accident, improper
maintenance, alteration, vandalism, theft, fire, water, or damage because of other peril or natural disaster.
Damage resulting from the installation or use of any accessory or attachment not approved by Remington
for use with the product(s) covered by this manual will void your warranty as to any resulting damage.
HOW TO OBTAIN SERVICE: Warranty service is available, WITH PROOF OF PURCHASE THROUGH
YOUR LOCAL AUTHORIZED SERVICE DEALER. To locate the dealer in your area, please check for a
listing in the Yellow Pages or contact the Customer Service Department of Remington by calling 1-866-
206-2707 or writing to P.O. Box 361032, Cleveland, OH 44136 or if in Canada call 1-877-696-5533. No
product returned directly to the factory will be accepted unless prior written permission has been
extended by the Customer Service Department of Remington.
This limited warranty does not provide coverage in the following cases:
A. Wear items - Bump Knobs, Outer Spools, Cutting Line, Inner Reels, Starter Pulley, Starter Ropes,
Drive Belts, Saw Chains, Guide Bars
B. Remington does not extend any warranty for products sold or exported outside of the United
States of America, its possessions and territories, except those sold through Remington’s
authorized channels of export distribution
Remington reserves the right to change or improve the design of any Remington Product without
assuming any obligation to modify any product previously manufactured.
No implied warranty, including any implied warranty of merchantability or fitness for a particular
purpose, applies after the applicable period of express written warranty above as to the parts as
identified. No other express warranty or guaranty, whether written or oral, except as mentioned
above, given by any person or entity, including a dealer or retailer, with respect to any product shall
bind Remington. During the period of the Warranty, the exclusive remedy is repair or replacement
of the product as set forth above. (Some states do not allow limitations on how long an implied
warranty lasts, so the above limitation may not apply to you.)
The provisions as set forth in this Warranty provide the sole and exclusive remedy arising from
the sales. Remington shall not be liable for incidental or consequential loss or damages
including, without limitation, expenses incurred for substitute or replacement lawn care
services, for transportation or for related expenses, or for rental expenses to temporarily
replace a warranted product. (Some states do not allow limitations on how long an implied warranty
lasts, so the above limitation may not apply to you.)
In no event shall recovery of any kind be greater than the amount of the purchase price of the product
sold. Alteration of the safety features of the product shall void this Warranty. You assume the risk and
liability for loss, damage, or injury to you and your property and/or to others and their property arising
out of the use or misuse or inability to use the product.
This limited warranty shall not extend to anyone other than the original purchaser, original lessee or the
person for whom it was purchased as a gift.
How State Law Relates to this Warranty: This warranty gives you specific legal rights, and you may
also have other rights which vary from state to state.
To locate your nearest service dealer dial 1-866-206-2707 in the United States or 1-877-696-5533 in
Canada.
REMINGTON LLC
P.O. Box 361032
Cleveland, OH 44136
MANUFACTURER’S LIMITED WARRANTY FOR:
Page is loading ...
Page is loading ...
Page is loading ...
Page is loading ...
Page is loading ...
Page is loading ...
Page is loading ...
Page is loading ...
Page is loading ...
Page is loading ...
Page is loading ...
Page is loading ...
Page is loading ...
Page is loading ...
Page is loading ...
Page is loading ...
Page is loading ...
Page is loading ...
Page is loading ...
Page is loading ...
Page is loading ...
Page is loading ...
Page is loading ...
Page is loading ...
Page is loading ...
Page is loading ...
Page is loading ...
Page is loading ...
Page is loading ...
Page is loading ...
Page is loading ...
Page is loading ...
Page is loading ...
Page is loading ...
Page is loading ...
Page is loading ...
Page is loading ...
Page is loading ...
Page is loading ...
Page is loading ...
Page is loading ...
Page is loading ...
-
 1
1
-
 2
2
-
 3
3
-
 4
4
-
 5
5
-
 6
6
-
 7
7
-
 8
8
-
 9
9
-
 10
10
-
 11
11
-
 12
12
-
 13
13
-
 14
14
-
 15
15
-
 16
16
-
 17
17
-
 18
18
-
 19
19
-
 20
20
-
 21
21
-
 22
22
-
 23
23
-
 24
24
-
 25
25
-
 26
26
-
 27
27
-
 28
28
-
 29
29
-
 30
30
-
 31
31
-
 32
32
-
 33
33
-
 34
34
-
 35
35
-
 36
36
-
 37
37
-
 38
38
-
 39
39
-
 40
40
-
 41
41
-
 42
42
-
 43
43
-
 44
44
-
 45
45
-
 46
46
-
 47
47
-
 48
48
-
 49
49
-
 50
50
-
 51
51
-
 52
52
-
 53
53
-
 54
54
-
 55
55
-
 56
56
-
 57
57
-
 58
58
-
 59
59
-
 60
60


Remington RM193B User manual
- Category
- Air blowers/dryers
- Type
- User manual
- This manual is also suitable for
Ask a question and I''ll find the answer in the document
Finding information in a document is now easier with AI
in other languages
- français: Remington RM193B Manuel utilisateur
- español: Remington RM193B Manual de usuario
Related papers
-
Remington BV12199A User manual
-
-
-
-
-
-
-
-
-
Other documents
-
Ryobi RY421021VNM Owner's manual
-
Earthwise Power Tools BLR20070 Owner's manual
-
Troy-Bilt TB180b User manual
-
Homelite ut42121 Owner's manual
-
Homelite UT42120A Owner's manual
-
Craftsman 358.798340 User manual
-
-
 EarthWise BLR20075 User manual
-
Univex 79838 User manual
-
Worx WG518 User guide
