Craftsman 18A-188-799 Owner's manual
- Category
- Lawnmowers
- Type
- Owner's manual
This manual is also suitable for

Operator's Manual
CRRFTSMRN°
19-inch Rechargeable
Rotary Mower
Model No. 247.370480
CAUTION: Before using
this product, read this
manual and follow all
safety rules and operating
instructions.
,, SAFETY
• ASSEMBLY
• OPERATION
• MAINTENANCE
• PARTS LIST
• ESPANOL R 21
O his symbolonthe product'snameplatemeansit is listedby
LISTEDUNDERWRITERSLABORATORIESINC.
Sears, Roebuck and Co., Hoffrnan Estates, IL 60179, U.S.A.
Visit our web site: www, craftsrnan,corn FORMNO 769-02924
1/17/2008

WarrantyStatement..........................................................2
SafetyInstructions........................................................3-4
SlopeGuide.......................................................................5
SafetyLabels....................................................................7
Assembly.......................................................................8-9
Operation...................................................................10-11
ServiceandMaintenance.........................................12-14
Off-SeasonStorage........................................................15
Troubleshooting..............................................................16
PartsList.........................................................................18
Espa_ol............................................................................21
ServiceNumbers.............................................BackCover
CraftsmanTwoYearLimited Warranty
If thisCraftsmanproductfailsduetoa defectin materialor workmanshipwithintwoyearsfromthedateofpurchase,returnittoanySearsstore,
SearsServiceCenter,orotherCraftsmanoutletintheUnitedStatesforfreerepair.
Thiswarrantydoesnotinclude:
• Expendableitemswhichcanwearoutfromnormalusewithinthewarrantyperiod,suchasthegrassbagandrotarymowerblade.
Repairsnecessarybecauseofoperatorabuseor negligence,includingbentmotorshaftsandthefailuretooperateor maintainthe
equipmentaccordingtoall suppliedinstructions.
Thiswarrantyappliesforonly90 daysifthis productiseverusedforcommercialorrentalpurposes.
ThiswarrantyappliesonlywhilethisproductisusedintheUnitedStates.
This warrantygivesyouspecificlegalrights,andyoumayalsohaveotherrightswhichvaryfromstatetostate.
Sears, Roebuckand Co.,Hoffman Estates,IL 60179
Battery: 12Volt
Motor: 48VoltDC
ModelNumber
Serial Number
Dateof Purchase
Recordthemodelnumber,serialnumber,
anddateof purchaseabove.
© SearsBrands,LLC 2

Thissymbolpointsout importantsafetyinstructions
which,ifnotfollowed,couldendangerthepersonal
safetyand/orpropertyofyourselfandothers.Read
andfollowall instructionsinthismanualbefore
attemptingtooperatethismachine.Failuretocomplywiththese
instructionsmayresultin personalinjury.Whenyouseethissymbol,
HEEDITSWARNING!
Your Responsibility: Restricttheuseofthis powermachineto
personswhoread,understand,andfollowthewarningsandinstruc-
tionsinthis manualandonthemachine.
Thismachinewasbuilttobeoperatedaccordingtothe rulesfor
safeoperationinthis manual.Aswithanytype ofpowerequipment,
carelessnessorerroronthepartoftheoperatorcanresultinserious
injury.Thismachineiscapableofamputatinghandsandfeetand
throwingobjects.Failuretoobservethefollowingsafetyinstructions
couldresultinseriousinjuryordeath.
Whenusingelectriclawnmowers,basicsafetyprecautionsshould
alwaysbe followedtoreducetheriskoffire,electricshock,and
personalinjury.Thesebasicprecautionsincludethefollowing:
Children
Tragicaccidentscanoccurifoperatorisnot alertto presenceofchildren.Chil-
drenareoftenattractedto mowerandmowingactivity.Theydo notunderstand
thedangers.Neverassumethatchildrenwill remainwhereyou lastsawthem.
,, Keepchildrenoutofthe mowingareaandunderwatchfulcareofa
responsibleadultotherthanthe operator.
,, Bealertandturn moweroffif achild entersthe area.
,, Beforeandwhile movingbackwards,lookbehindand downforsmall
children.
,, Useextremecarewhenapproachingblindcorners,doorways,shrubs,
trees,orotherobjectsthat mayobscureyourvisionofachildwhomay
runintothe mower.
,, Neverallowchildrenunder 14yearsoldto operateapowermower.
Children14yearsoldand overshouldreadandunderstandoperation
instructionsand safetyrulesin thismanualand shouldbetrainedand
supervisedbya parent.
Operation
General Operation:
,, Readthisoperator'smanual carefullyin its entiretybeforeattempting
toassemblethismachine.Read,understand,andfollow allinstructions
onthe machineandinthe manual(s) beforeoperation.Becompletely
familiarwiththe controlsandtheproperuseofthismachinebefore
operatingit. Keepthis manualinasafeplaceforfuture andregular
referenceandfor orderingreplacementparts.
,, Thismachineisaprecisionpiece ofpowerequipment,not aplaything.
Therefore,exerciseextremecautionat alltimes.Yourunit hasbeen
designedto performonejob:to mowgrass.Do notuseit foranyother
purpose.
,, Don'tforcelawnmower-it willdo thejob betterandsaferatthe ratefor
whichit wasdesigned.
,, Neverallowchildrenunder 14yearsoldto operatethismachine.
Children14yearsoldand overshouldreadandunderstandthe instruc-
tionsinthis manualandshouldbetrainedand supervisedbya parent.
Onlyresponsibleindividualswhoarefamiliarwiththeserulesofsafe
operationshouldbeallowedtousethismachine.
,, Thoroughlyinspectthe areawherethe equipmentisto beused.Remove
all stones,sticks,wire,bones,toysand otherforeignobjectswhichcould
betrippedoveror pickedupandthrownbythe blade.Thrownobjects
cancause seriouspersonalinjury.Planyourmowingpatterntoavoid
dischargeofmaterialtowardroads,sidewalks,bystandersand thelike.
Also,avoiddischargingmaterialagainstawallor obstructionwhichmay
causedischargedmaterialtoricochetbacktowardtheoperator.
,, Tohelpavoidbladecontactor athrownobject injury,stayin operator
zonebehindhandlesandkeepchildren,bystanders,helpersand petsat
least75feet frommowerwhileit is inoperation.Stopmachineifanyone
entersarea.
,, Alwayswearsafetyglassesorsafetygogglesduringoperationandwhile
performinganadjustmentor repairto protectyoureyes.Thrownobjects
whichricochetcancauseseriousinjuryto theeyes.
,, Wearsturdy,rough-soledworkshoesandclose-fittingslacksandshirts.
Shirtsand pantsthat coverthe armsand legsandsteel-toedshoes
arerecommended.Neveroperatethismachinein barefeet,sandals,
slipperyor lightweight(e.g.canvas)shoes.
,, Donotput handsor feet nearrotatingpartsor undercuttingdeck.
Contactwith bladecanamputatehandsandfeet.
,, Amissingordamageddischargecovercancausebladecontactor
thrownobjectinjuries.
,, Manyinjuriesoccurasa resultofthe mowerbeingpulledoverthefoot
duringafall causedbyslippingortripping.Do nothold ontothe mowerif
youarefalling;releasethehandleimmediately.
,, Neverpull themowerbacktowardyouwhileyouarewalking.Ifyoumust
backthe mowerawayfromawallor obstructionfirst lookdownand
behindtoavoidtrippingandthenfollowthesesteps:
,, Step backfrom mowertofullyextendyourarms.
,, Besureyouarewellbalancedwith surefooting.
,, Pullthe mowerbackslowly,nomorethanhalfwaytowardyou.
,, Repeatthesestepsasneeded.
,, Donotoperatethe mowerwhile undertheinfluenceof alcoholor drugs.
,, Stayalert- Watchwhatyou aredoing.Usecommonsense.Donot
operatelawnmowerwhenyouaretired.
3

,, Themotor/bladecontrolhandleis asafetydevice.Neverattemptto
bypassitsoperation.Doingso makesthe safetydeviceinoperativeand
mayresultin personalinjurythroughcontactwiththe rotatingblade.The
motor/bladecontrolhandlemustoperateeasilyin bothdirectionsand
automaticallyreturntothe disengagedpositionwhenreleased.
,, Do notchargethemowerin rain,or inwetconditions.
,, Neveroperatethemowerinrainor wetgrass.Alwaysbe sureofyour
footing. A slipandfall cancauseseriouspersonalinjury. Ifyoufeel
youarelosingyourfooting, releasethe motor/bladecontrolhandle
immediatelyandthe bladewill stoprotatingwithinthreeseconds.
,, Mowonlyindaylightor goodartificiallight.Walk,neverrun.
,, Stopthe bladewhencrossinggraveldrives,walksor roads.
,, Ifthe equipmentshouldstartto vibrateabnormally,stopthe motorand
checkimmediatelyforthe cause.Vibrationisgenerallyawarningof
trouble.
,, Shutthe motoroffand waituntilthe bladecomestoa completestop
beforeremovingthe grasscatcheror uncloggingthe chute.Thecutting
bladecontinuesto rotatefor afew secondsafterthe motorisshutoff.
Neverplaceanypartofthebody inthe bladearea untilyouaresurethe
bladehasstopped rotating.
,, Neveroperatemowerwithoutpropertrailingshield,dischargecover,
grasscatcher,motor/bladecontrolhandleor othersafetyprotective
devicesinplaceandworking.Neveroperatemowerwithdamaged
safetydevices.Failureto doso,can resultin personalinjury.
,, Onlyuse partsandaccessoriesmadeforthismachinebymanufacturer.
Failureto dosocan resultin personalinjury.
,, Ifsituationsoccurwhich arenotcoveredinthis manual,usecareand
goodjudgment.ContactyourSearsServiceCenterfor assistance.
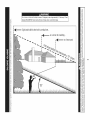
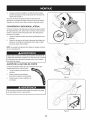
Slope Operation:
Slopesarea majorfactorrelatedto slipandfall accidentswhichcanresultin
severeinjury.Operationonslopesrequiresextracaution.Ifyoufeeluneasyon
aslope,donotmowit.Foryoursafety,usethe slopegaugeincludedaspart
ofthismanualtomeasureslopesbeforeoperatingthisunitonaslopedor hilly
area.Ifthe slopeis greaterthan15degrees,do notmowit.
Do:
,, Mowacrossthefaceof slopes;neverup anddown.Exerciseextreme
cautionwhenchangingdirectionon slopes.
,, Watchforholes,ruts,rocks,hiddenobjects,or bumpswhichcan cause
youtoslipor trip.Tallgrasscan hideobstacles.
,, Alwaysbe sureofyourfooting.Aslip andfall cancauseseriouspersonal
injury.Ifyoufeelyouarelosingyourbalance,releasethe motor/blade
controlhandleimmediately,andthe bladewill stoprotatingwithinthree
(3)seconds.
Do Not:
,, Do notmowneardrop-offs,ditchesorembankments,you couldlose
yourfootingor balance.
,, Do notmowslopesgreaterthan15degreesasshownonthe slope
gauge.
,, Do notmowonwetgrass.Unstablefootingcouldcauseslipping.
Service
,, Ifthe mower'sbuilt-inoverloadprotectionswitchfrequentlytrips,contact
yournearestSearsServiceCenterfor repair.
,, Removekeyandstoreidle lawnmowerindoorswhennotin use.Allow
motorto coolbeforestoringin anyinclosure.Lawnmowershouldbe
storedindoorsinadry,high,or locked-upplace,outof reachof children.
,, Whenservicinguseonlyidenticalreplacementpartslistedinthis
manual."Useofpartswhichdo notmeetthe originalequipmentspecifi-
cationsmayleadto improperperformanceandcompromisesafety!"
,, Beforecleaning,repairing,or inspecting,makecertainthe bladeand
all movingpartshavestopped.Removethe keyto preventaccidental
starting.
,, Removekeybeforeservicing,cleaning,or removingmaterialfromthe
lawnmower.
,, Followinstructionsforlubricatingand changingaccessories.
,, Keephandlesdry,clean andfreefromoilandgrease.
,, Toreduceafire hazard,keepthe motorcoverfreeofgrass,leavesand
debrisbuild-up.
,, Checkthe bladeandmotormountingboltsatfrequentintervals
forpropertightness.Also,visuallyinspect bladefor damage(e.g.,
bent,cracked,andworn).Replacebladewiththe originalequipment
manufacturer's(OEM)bladeonly,listedinthismanual.
,, Maintainyourmowerwith care-- Keepmowerbladesharpandcleanfor
best andsafestperformance.Mowerbladesaresharpandcancut,wrap
the bladeor wearglovesanduseextracautionwhenservicingthem.
,, Keepall nuts,bolts,andscrewstightto besuretheequipmentis in safe
workingcondition.
,, Nevertamperwith safetydevices.Checktheirproperoperation
regularly.
,, Neverattempttomakewheelor cuttingheightadjustmentswhilethe
motoris running.
,, Afterstrikingaforeignobject,stopthe motor,removethe key,and
thoroughlyinspectthe mowerforanydamage.Repairthe damage
beforeoperatingthe mower.
,, Grasscatchercomponents,dischargecover,andtrailingshieldare
subjecttowearanddamagewhichcould exposemovingpartsorallow
objectsto bethrown.Forsafetyprotection,frequentlycheckcomponents
andreplaceimmediatelywith originalequipmentmanufacturer's(OEM)
partsonly,listedin thismanual.
SAVE THESE INSTRUCTIONS!

g3
C3_
C_
o3
g3
"5
o3
g)
.o3
g)
o3
OperateWALK-BEHNDmowersacrossthefaceofsopes,neverup anddownsopes,
Sight and h01dthis levelwith avertical tree...
I
15°

Thispage left intentionallyblank.
6

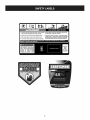
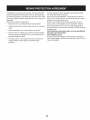
e TO REDUCE THE RiSK OF ELECTRIC SHOCK, DO NOT EXPOSE • REMOVE OBJECTSTI_,T CAN RE THROWN BYTHEBLADE iN
UNiT TO WATEROR OPERATEUNiT ON WET GROUND. ANY DiRECTiON. WEAR SAFETYGLASSES.
• REMOVE KEY BEFORESERViCiNG OR REMOVING BLADE. • USE EXTRA CAUTION ONSLOPES. DO NOT MOW SLOPES
GREATER THAT15 °. MOW ACROSS, NEVER UP AND DOWN.
e KEEP HANDS AND FEET AWAY FROM ROTATING PARTS. NEVER PULL MOWER CLOSE TO YOUR FEET. LOOK DOWN
• DO NOT MOW WHEN CHILDREN OH OTHERS ARE AROUND. AND BEHIND BEFORE AND WHILE MOVING BACKWARDS.
7

IMPORTANT:Becertaintochargethe batteryforatleast14hours f-
beforeoperatingyourmower.RefertoOperationsection.
NOTE:Standbehindthemoweras ifyouweregoingtooperateit.
Yourrighthandcorrespondstotherightsideofthemower;yourleft
handcorrespondsto theleftsideofthe mower.
LOOSE PARTS IN CARTON
Thefollowingitemsarepackagedloosein thecarton:
Operator'sManual,GrassCatcher
REMOVING THE UNIT FROM THE CARTON
1. Cutthecornersofthecartonandlaythesidesflaton theground.
Removeall packinginserts.
2. Movethemowerandgrasscatcheroutofthecarton.
3. Makecertainthecartonhasbeencompletelyemptiedbefore
discardingit.
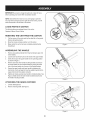
ASSEMBLING THE HANDLE
1. Removeanypackingmaterialwhichmaybebetweenupperand
lowerhandles.
2. Looseneachhandknobfoundon theinsideof theupperhandle.
3. Gentlylift andpivottheupperhandleintotheoperatingposition
asshownin Figure1.
4. Removestarknobsfromhandlemountingbracketsandsecure
thelowerhandleontothehandlebracketsbyplacingthelower
holeofthelowerhandleontothepinsofthehandlebrackets.
5. Securetheupperhandleandlowerhandlebytighteningthe
handknobs. Eachcarriageboltmustbe seatedproperlyintothe
squareholefoundin theplasticconnector.
6. Tightenstarknobssecuringlowerhandletohandlebrackets.See
Figure2. Makecertainthelowerhandleisseatedsecurelyinto
thehandlemountingbrackets.
ATTACHING THE GRASS CATCHER
1. Liftreardischargedoor.
2. Removemulchingbaffle.SeeFigure3.
f
Figure1
J
f
Figure2
J
--.,,
Figure3
,,J
8

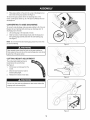
3. Placegrasscatcheron thepivotrod.Letgoofdischargedoorso
thatit restson thegrasscatcher.SeeFigure4.
Toremovethegrasscatcher,lift thereardischargedooron the
mower.Liftthegrasscatcherup,off ofthepivotrod.Releasetherear
dischargedoor.
CONVERTING TO SIDE DISCHARGE
Toconvertto sidedischarge,makesuregrasscatcherisoff oftheunit.
Replacetherearmulchingbaffleandclosereardischargedoor.To
dischargegrassto theside:
1. Lift mulchingplugontherightsideofmower.
2. Slidetwohooksofsidedischargechuteunderthehingepinon
themulchingplugassemblyand lowerthesidemulchingplug.
SeeFigure5.
NOTE:Donotremovethesidemulchingplugatanytime,evenwhen
youare notmulching.
CUTTING HEIGHT ADJUSTMENT
Thecuttingheightadjustmentleveris
locatedabovetherearleftwheel.
SeeFigure6.
1. Pulltheleveroutandawayfromthe
mower.
2. Movetheleverforwardor backfor
desiredcuttingheight.
3. Releaselevertowardsmowerdeck.
Donotatanytimemakeanyadjustmenttolawnmowerwithoutfirst
stoppingmotorandremovingkey.
Figure4
f
Figure5
/
//
/
/ /
//
/
,J
Figure6
,J
9

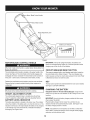
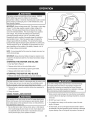
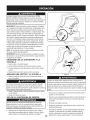
Motor/BladeControlHandle
Control
HeightAdjustmentLever
BatteryLevelIndicator
@ O O O O I_
MOTOR/BLADE CONTROL HANDLE
Themotor/ bladecontrolhandleisa safetydevice.Neverattemptto
[bypassts operatons. J
Themotor/bladecontrolhandleislocatedon theupperhandleofthe
mower.SeeFigure6.Themotor/bladecontrolhandleengagesand
disengagesthe motorandblade.Themotor/bladecontrolconsistsof
threeparts- starterbutton,motor/bladecontrolhandle,and key.
Figure6
IMPORTANT:Ifthefarleft redlightilluminates,thebatterieswill
needtobe rechargedbeforefurtheruse.Continuedoperationbefore
chargingmayshortenthelifeofthebatteries.
CIRCUIT BREAKER RESET BUTTON
Themowerisequippedwitha circuitbreakerresetbutton,locatedon
themotor/bladecontrol.RefertoFigure7.Thiscircuitbreakerreset
buttonmaypopoutwhentoomuchstrainis placedonthemotor.Refer
to MaintenanceSectiontoresetthisbutton.
Releasethemotor/bladecontrolhandletostopthemotorandblade.
Removethekeytopreventaccidentalstartingwhenequipmentis
unattended.
KEY
Thekeymustbepresentandinsertedbeforethemotorcanbestarted.
SeeFigure7.DONOTTURNKEY.
Thebladewillbe rotatingwheneverthemotorisrunning.
HEIGHT ADJUSTMENT LEVER
Thecuttingheightadjustmentleverislocatedabovetheleft rear
wheel.Toadjustthecuttingheight,refertotheAssemblySection.
BATTERY LEVEL INDICATOR
Thebatterylevelindicatorislocatedonthemotorcover.Theindicator
showstheconditionofthebatteryand isonwhenthemotorison.The
indicatorlit allthewayto therightindicatesthebatteryisfullycharged;
astheindicatoris litmoretowardthe left,it indicatesthebatteryis
discharging.SeeFigure6 inset.
CHARGING THE BATTERY
Chargethe mowerfor 14hoursbeforeinitialuse. Chargemower
indoorsina dryareaoutoftheweather.DONOTchargein rainorwet
locations.
IMPORTANT:Useonlythebatterychargerprovidedwiththismower
(Partnumber725-04387).
Plugthebatterychargerintothemowerfirst,andthenintoany
standard110/120volthouseholdelectricaloutlet. SeeFigure7 inset
forbatterycharginglocationonmower.
NOTE:If anextensioncordisrequired,useonethat isat leastwire
size 16AWG.Connecttheextensioncordtochargerbeforeplugging
extensioncordintoelectricaloutlet.
10

Thebatterycontainscorrosivefluidandtoxicmaterial-HANDLE
WITHCARE.Keepawayfromchildren.Donotpuncture,
disassemble,mutilate,or incinerate.Explosivegasescouldbevented
duringchargingor discharging.Useinawellventilatedarea,away
fromsourcesofi nition.
IMPORTANT:Alwaysrechargemowerfully.Thechargerisatwo stage
charger.Thefirststage,equalize,suppliesahighervoltageto the
batteries.Thishelpsspeedchargetimeand balancethecharge
acrosstheindividualbatteries.Thesecondstage,float,suppliesa
lowervoltage.Thispreventsthebatteriesfromexperiencing
overchargingdamageandalso"topsoff"thebatterycharge.
Dependingon batteryconditiontheequalizestagewillcompletein
approximately8 hours. Whentheequalizestageiscompletethe
charger'sgreenLEDwillstopblinking. Thisstartsthefloatstage.
DuringthefloatstagethechargersgreenLEDwillbe oncontinuously.
Thefloatstagewill"topoff"thebatteriesinapproximately4-6 hours,
again,dependingontheconditionofthebattery.However,a full14
hourchargeisalwaysrecommended.
NOTE:It isrecommendedthatthemowerbechargedonceeverytwo
monthsduringstorage.
IMPORTANT:Alwaysdisconnectbatterycharger(or extensioncord,
if used)fromtheelectricaloutletfirst,thendisconnectbatterycharger
frommower.
STARTING THE MOWER AND BLADE
1. Insertkey.RefertoFigure8.
2. Depressstarterbuttononthe motor/bladecontrol.
3. Pullmotor/bladecontrolhandleupagainstupperhandle.
4. Releasestarterbuttonwhenmotorstarts.
STOPPING THE MOTOR AND BLADE
1. Releasemotor/bladecontrolhandletostopmotorandblade.
CircuitBreaker
ChargerAdapter ResetButton
,,, j
Figure7
Figure8
handleisreleased nearestSearsServiceCenter.
2. Removethekeytopreventaccidentalstartingwhenequipmentis
unattended.
3. Chargethemower.
USING YOUR LAWN MOWER
)airson it.
Besurethat lawnisclearofstones,sticks,wires,or otherobjects
whichcoulddamagethelawnmowerormotor.Suchobjectscould
beaccidentallythrownbythemowerinanydirectionandcause
seriouspersonalinjurytotheoperatorandothers.
Ifyoustrikea foreignobject,stopthemotor,and removethekey.
Thoroughlyinspectthemowerforanydamage,andrepairthe
damagebeforerestartingandoperatingthemower.Excessive
vibrationofthemowerduringoperationisan indicationofdamage.
Theunitshouldbe promptlyinspectedand repaired.
• Whenusingthesidedischarge,themosteffectivemowingpattern
isone thatallowstheclippingstodischargetowardsthe uncutpart
ofthelawn.
DONOTusemowerin therain.
Fora healthylawn,alwayscutoff one-thirdor lessofthetotal
lengthofthegrass.
Forbestresults,donotcutwetgrassbecauseit tendstostickto
theundersideofthedeckpreventingpropermulchingordischarge
ofgrassclippings.Neworthickgrassmayrequirea narrowercut.
11

F
i
f
.... J
Figure9
_.., j
Figure10
GENERAL RECOMMENDATIONS
,, Alwaysobservesafetyruleswhenperforming
anytypeof maintenance.
,, Thewarrantyon thislawnmowerdoesnotcoveritemsthathave
beensubjectedtooperatorabuseor negligence.Toreceivefull
valuefromwarranty,operatormustmaintainthelawnmoweras
instructedhere.
,, Alladjustmentsshouldbecheckedat leastonceeachseason.
,, Periodicallycheckall fastenersandmakesurethesearetight.
LUBRICATION
Alwaysstopthemotorand removekeybeforecleaning,lubricating
orperforminganyrepairsor maintenanceon thelawnmower.Always
wearsafetyglassesduringoperationorwhileperforminganyadjustments
orrepairs.
* Lubricatethewheelsat leastoncea seasonwithlightoil(or motor
oil). Ifwheelsare removedforanyreason,lubricatesurfaceofthe
pivotarmand innersurfaceofthewheelwith lightoil.SeeFigure9.
,, Lubricatethetorsionspringand pivotpointon thereardischarge
doorandsidemulchplugperiodicallywithlightoil topreventrust.
SeeFigure9.
DECK CARE
Theundersideofmowerdeckshouldbe cleanedaftereachuseas
grassclippings,leaves,dirtandotherdebriswillaccumulate.This
accumulationof grassclippings,etc.,isundesirableasitwillpromote
rustandcorrosion.
1. Removeanybuildupof grassandleavesonor aroundthemotor
cover(donotusewater).Wipethemowercleanwitha drycloth
occasionally.
Toreducetheriskofelectricshock,do notexposethemowerto
water. J
2. If debrisisallowedtobuild upontheundersideoftheunit,tiltthe
mowerandscrapeitcleanwitha suitabletool(makecertainthe
keyis removed).
REPLACING TRAILING SHIELD
canresultin personalinjury.
Thetrailingshieldissubjecttowearanddamagewhichcouldexpose
movingpartsorallowobjectstobe thrown.Forsafetyprotection,fre-
quentlycheckthetrailingshieldandreplaceimmediatelywithoriginal
equipmentmanufacturer's(OEM)partonly,listedinthis manual.
1. Toremovetrailingshield,lift reardoor,and bend(bow)thetrailing
shieldinwardoneachsidetoreleasetabsfromtheholesin the
mowerframe.SeeFigure10.
2. Replacewithnewtrailingshieldbybendingtheshieldtoalloweach
tabtofit intoholesin mowerframe.
12

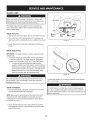
BLADE CARE f" "X
Whenremovingthecuttingbladeforsharpeningorreplacement,
protectyourhandswitha pairof heavyglovesorusea heavyragto
holdtheblade.Be certaintostopmotorandremovekey.
Periodicallyinspectthebladeadapterforcracks,especiallyifyou
strikea foreignobject.Replacewhennecessary.Followthesteps
belowforbladeservice.
Blade Removal
1. Stopthemotorandremoveignitionkey.Turnthe moweron itsside.
2. Placea2x4blockofwoodapproximately8.5"longbetweenthe
deckhousingandthecuttingbladetoactasa stabilizer.SeeFigure
11.
3. Loosenand removethebladebolt,lockingplate,andblade.See
Figure11. f-
Blade Sharpening
IMPORTANT:Ifanymetalseparationis present,replacetheblades
withnewones.
1. Toproperlysharpenthecuttingblades,removeequalamounts
ofmetalfrombothendsofthebladesalongthecuttingedges,
paralleltothetrailingedge,ata 25°to 30°angle.SeeFigure12.
a. It isimportantthateachcuttingbladeedgebeground
equallyto maintainproperbladebalance.A poorlybalanced
bladewillcauseexcessivevibrationand maycausedamage
tothemowerandresultin personalinjury.Thebladecanbe
testedbybalancingiton a roundshaftscrewdriver.Grind
metalfromtheheavysideuntilitbalancesevenly.
An unbalancedbladewillcauseexcessivevibrationwhenrotating
at highspeeds.It maycausedamagetomowerandcouldbreak
causng persona nury.
Blade Installation
1. Placethecuttingblade,lockingplate,andbladeboltonthemotor
shaftandthreadthebladeboltin fingertight.
NOTE:Makecertainto replacethepartsintheexactorderinwhich
theywereremoved.Wheninstallingthecuttingblade,besureitis
installedwiththecurvedendspointingtowardsthemowerdeckand
nottowardstheground.
2. Torquethe bladeboltdownusingatorquewrenchtoassurethe
boltistightenedproperly.Therecommendedtorquefortheblade
boltis170-220in.Ibs.
Block of Locking ,_ Blade
Wood Plate _ _="=Bolt
Figure11
J
Figure12
J
Toensuresafeoperationof yourmower,periodicallychecktheblade
boltforcorrecttorque.
Thebladehardwareis notonlyusedtoattachthebladeassembly,
butisalsoan insulatedsafetydeviceandshouldneverbe alteredin I
anyway.If replacementis necessary,useoriginalequipmentpartsas
Ishown ntheparts st.
13

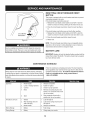
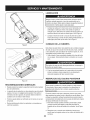
CircuitBreaker
ResetButton
Figure13
ServiceCenterifrepairsareneeded.
RESETTING CiRCUiT BREAKER RESET
BUTTON
This mowerisequippedwithancircuitbreakerresetbuttontoprevent
overheatingdamagetothemotor.
Ifthecircuitbreakerresetbuttonpopsout:
1. Releasethemotor/bladecontrolhandleanddo NOTre-startthe
mowerforatleastoneminute,allowingforthemotortimetocool.
2. Pressthecircuitbreakerresetbuttoninwardtoreset.SeeFigure
13.
Ifthecircuitbreakerresetbuttonpopsoutshortlyafterresetting:
1. Releasethemotor/bladecontrolhandleanddo NOTre-startthe
mowerforatleast15minutestoallowthemotorextratime tocool.
2. Pressthecircuitbreakerresetbuttoninwardtoreset.
3. Restartunit.
NOTE:If thecircuitbreakerresetbuttonpopsoutrepeatedlyduring
operationor willnotremaininwhenattemptingto reset,contactyour
nearestSearsServiceCentertoarrangeforrepair.
BATTERY CARE
IMPORTANT:Replacewithonlythe identicalbatteryprovidedwiththis
mower(Partnumber725-04381).Thebatteryshouldonlybereplaced
bya SearsServiceCenter.
MAINTENANCE SCHEDULE
_,lwaysstopthemotorand removekeybeforecleaning,lubricating
_rperforminganyrepairsor maintenanceon thelawnmower.Always
Nearsafetyglassesduringoperationorwhileperforminganyadjustments
_rrepairs.
Followthemaintenanceschedulegivenbelow.Thischartdescribes
serviceguidelinesonly.UsetheServiceLogcolumntokeeptrackof
completedmaintenancetasks.To locatethe nearest SearsService
Centeror to schedule service, simply contactSearsat
1-800-4-MY-HOME®.
EachUse 1. Mowerblades
2. Looseormissinghardware
3. Controls
4. Motor
5. Deck
Annuallyor 25hours 1. Wheels
2. Reardischargedoorand
sidemulchplug
3. Mowerblades
BeforeStorage 1. Battery
DuringStorage 1. Battery
1. Sharpenasrequired
2. Tightenor replace
3. Checkforproperoperation
4. Removeanybuildupofgrassand
leaveson oraroundthemotorcover
(donotusewater).
5. Cleanundersideofdeckwitha
suitabletool(do notusewater).
1. Lubewithlightoil
2. Lubetorsionspringandpivotpoint
with lightoil.
3. Sharpenandbalance
1. Fullycharge
1. Chargeeverytwo months
14

PREPARING THE LAWN MOWER
Thefollowingstepsshouldbe takentoprepareyourlawnmowerfor
storage:
,, Lubricatemowerthoroughlyasdescribedinthelubricationinstruc-
tions.
,, Removeanybuildupofgrassandleavesonor aroundthe motor
cover(do notusewater).Wipethemowercleanwitha drycloth.
,, if debrisisallowedtobuildupon theundersideoftheunit,tilt the
mowerandscrapeitcleanwitha suitabletool(makecertainthe
keyisremoved).
,, Storemowerfullycharged.
IMPORTANT:Westronglyrecommendthemowerbechargedonce
everytwomonthsduringstorage.
,, Storemowerin a dry,cleanarea.Donotstorenexttocorrosive
materials,suchasfertilizer.
,, Wipethecordtoremoveanystainsorforeignsubstancesuchas
oil.
,, Coatmower'scuttingbladewithchassisgreaseto preventrusting.
15

Alwaysstopthemotorandremovekeybeforecleaning,lubricating
orperforminganyrepairsor maintenanceon thelawnmower.Always
wearsafetyglassesduringoperationorwhileperforminganyadjustment_
orrepairs.
Replacementfusemustbea ULlistedor recognizedcomponent, I
rated40amp,58volt.If mowerblowsfuse,contactyournearest I
authorizedservicedealerforrepair.Donotuseanyothertypeorsize I
fuse. J
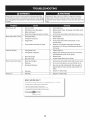
Motorfailstostart
Mowerstopswhilemowing
Excessivevibration
Mowerwillnotmulchgrass
1. Keynotin switch
2. Motor/bladecontroldisengaged.
3. Batterydischarged.
4. Mowerdeckcloggedwithgrassanddebris.
1. Dischargedbattery.
2. Cuttingtoomuchgrass.
3. Cloggeddeck.
4. Circuitbreakerresetbuttonistripped.
1. Cuttingbladeloose.
2. Cuttingbladeunbalanced.
3. Bentcuttingblade.
4. Bentmotorshaft.
1. Mowerdeckclogged.
2. Wetgrass.
3. Excessivelyhighgrass.
1. Insertignitionkey.
2. Depressstarterbutton,andengagemotorbladecontrol.
3. Chargebattery.
4. Unclogmowerdeck.Makecertainbladeisfreeto move.
1. Chargebattery.
2. Raisecuttingheight.
3. Unclogmowerdeck.Raisecuttingheight,orcut a
narrowerswath.
4. Resetthecircuitbreakerresetbuttonfollowingthe
instructionsintheServiceandMaintenancesectionof
thismanual.
1. Tightenbladebolt.
2. BalancebladefollowingtheinstructionsintheService
andMaintenancesectionof thismanual.
3. Replaceblade.
4. ContactnearestSearsServiceCenter.
1,
2.
3.
4. Dullblade.
Unevencut 1. Dullblade. 1. Sharpenor replaceblade.
Unclogmowerdeck.Makecertainbladeisfreeto move.
Donotmowwhengrassiswet;waituntillatertocut.
Mowonceata highcuttingheight,thenmowagainat
desiredheightor makea narrowercuttingswath(1/2
width).
Sharpenor replaceblade.
:iNEED MORE HELP?
You'll fir_dt:he _msw_,r_d mo_'eon m>_r_:_gemyhom,_: _m for fmo
i _ Find this and all your other product manuals online.
Get answers from our team of home experts.
oGet a personalized maintenance plan for your home.
i ° Find information and tools to help with home projects.
marlag÷ ÷ home
l
16
Page is loading ...

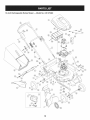
19=inch Rechargeable Rotary Mower- Model No. 247.370480
[]
18

19=inch Rechargeable Rotary Mower -- Model No. 247.370480
D" O 0
787-01649 19"Deck
2 731-05727 MotorBracket
3 710-1241 Screw,1/4-15x 1.000
4 724-04025 Motor,48V
5 749-04312 LowerHandle
6 731-05753 BatteryShroud
7 731-2095A BladeHub
8 731-05832 ElectricFan
9 742-04152 MulchingBlade
10 782-7051 BladeLockingPlate
11 624-0078 BladeBoltAssembly
12 731-05639A TrailShield
13 731-05746 RearMulchPlug
14 731-04177 SideDischargeChute
15 687-02055 MulchPlug(Incl.16-18)
16 732-1014 TorsionSpring
17 747-0710 HingePin
18 17032A ChuteDeflectorAdapter
19 736-0270 BelevilleWasher
20 710-0599 Screw
21 731-05686 RearDoor
22 731-05634 FrontCover
23 687-02325 HandleBracket-RH
687-02324 HandleBracket-LH
24 664-04076 GrassBag
25 647-04082 GrassBagFrame
26 687-02225 FrontBracketAssembly
27 738-0148 Screw,Shoulder,.50x.66
28 687-02228 RearBracketAssembly
29 710-3025 Hhes,5/16-18x .625
30 710-1242 Screw,5/16-14x.750
31 712-04063 Nut,FlangeLock,5/16-18
32 712-04065 Nut,FlangeLock,3/8-16
33 734-04176 FrontWheel
34 734-2004A RearWheel
720-0230 FoamGrip
36 712-0324 Nut,HexLock,1/4-20
37 749-04353 UpperHandle
38 625-04037 Motor/BladeControl
39 710-04213 Screw,Flat,1/4-20x 1.75
40 749-04356 CrossBracket
41 738-04278 Screw,Shldr.,1/4-20x .50
42 731-05186 LowerHandleInsulator
43 731-05178 UpperHandleInsulator
44 747-04663 Motor/BladeControlHandle
45 710-0572 BoltCarriage,5/16-18x2.50
46 720-04072 StarKnob
47 731-05710 RearBaffle
48 732-04264 DoorTorsionSpring- RH
732-04265 DoorTorsionSpring- LH
49 732-04377 SpringLever
50 726-0201 Nut,Speed
51 736-0504 Washer,Wave,.510x.750x .017
52 738-0507B Screw,Shoulder,.500Dia.X .434
53 741-0492A Bushing,Block,.505Dia.X .62
54 747-04589 RearDoorPivotRod
55 725-04381 Battery,12V
56 725-04387 BatteryCharger
57 725-04438 BatteryLevelIndicator
58 731-05754 BatteryTray
59 725-04497 BatteryJumper
60 710-0895 Screw,1/4-15x .750
61 731-2422 CableGuide
62 731-05880 Spacer,.515x 1.00x.310Lg.
63 736-0255 Washer,Bell,.510x 1.14x.040
64 736-3012A Washer,Wave,.390x.825x .016
65 731-0981A Hubcap
66 710-1268 Screw,#10-16x.375
67 710-0726 Screw,5/16-12x .750
68 726-0230 CableTie
19

Congratulationson makingasmartpurchase.YournewCraftsman®
productisdesignedandmanufacturedforyearsofdependableopera-
tion.Butlikeallproducts,it mayrequirerepairfromtimetotime.That's
whenhavinga RepairProtectionAgreementcansaveyoumoneyand
aggravation.
Here'swhat'sincludedin theAgreement:
,, Expertservicebyour 12,000professionalrepairspecialists
,, Unlimitedserviceand nochargefor partsandlaboronall covered
repairs
,, Productreplacementifyourcoveredproductcan'tbe fixed
,, Discountof 10%fromregularpriceofserviceandservice-related
partsnotcoveredbytheagreement;also,10%offregularpriceof
preventivemaintenancecheck
,, Fasthelpbyphone- phonesupportfroma Searstechnicianon
productsrequiringin-homerepair,plusconvenientrepair
scheduling
Purchasea RepairProtectionAgreementnowandprotectyourself
fromunexpectedhassleandexpense.
OnceyoupurchasetheAgreement,asimplephonecallisall thatit
takesforyoutoscheduleservice.Youcancallanytimedayor night,or
schedulea serviceappointmentonline.
Searshasover12,000professionalrepairspecialists,whohave
accesstoover4.5millionqualitypartsandaccessories.That'sthe
kindofprofessionalismyoucancountonto helpprolongthelifeof
yournewpurchaseforyearstocome.PurchaseyourRepairProtection
Agreementtoday!
Somelimitationsand exclusionsapply. Forpricesand additional
informationcall 1-800-827-6655.
Sears InstallationService
ForSearsprofessionalinstallationofhomeappliances,garagedoor
openers,waterheaters,andothermajorhomeitems,in theU.S.A.call
1-800-4-MY-HOME®
2O
Page is loading ...
Page is loading ...
Page is loading ...
Page is loading ...

e TO REDUCE THE RISK OF ELECTRICSHOCK, DO NOT EXPOSE • REMOVE OBJECTSTHaTCAN BE THROWN BY THE BLADE iN
UNiT TO WATER OR OPERATE UNiT ON WET GROUND. ANY DiRECTiON. WEAR SAFETY GLASSES.
e REMOVE KEY BEFORE SERViCiNG OR REMOVING BLARE. • USE EXTRA CAUTION ON SLOPES. DO NOT MOW SLOPES
GREATER THAT 15°. B_IOWACROSS, NEVER UP AND DOWN.
• KEEP HANDS AND FEET AWAY FROM ROTATING PARTS. NEVER PULL MOWER CLOSE TO YOUR FEET.LOOK DOWN
o DO NOT MOW WHEN CHILDREN OR OTHERS ARE AROUND. AND BEHIND BEFORE AND WHILE MOVING BACKWARDS.
25
Page is loading ...
Page is loading ...
Page is loading ...
Page is loading ...
Page is loading ...
Page is loading ...
Page is loading ...
Page is loading ...
Page is loading ...
Page is loading ...
Page is loading ...
-
 1
1
-
 2
2
-
 3
3
-
 4
4
-
 5
5
-
 6
6
-
 7
7
-
 8
8
-
 9
9
-
 10
10
-
 11
11
-
 12
12
-
 13
13
-
 14
14
-
 15
15
-
 16
16
-
 17
17
-
 18
18
-
 19
19
-
 20
20
-
 21
21
-
 22
22
-
 23
23
-
 24
24
-
 25
25
-
 26
26
-
 27
27
-
 28
28
-
 29
29
-
 30
30
-
 31
31
-
 32
32
-
 33
33
-
 34
34
-
 35
35
-
 36
36


Craftsman 18A-188-799 Owner's manual
- Category
- Lawnmowers
- Type
- Owner's manual
- This manual is also suitable for
Ask a question and I''ll find the answer in the document
Finding information in a document is now easier with AI
in other languages
Related papers
-
Craftsman 247.370480 User manual
-
-
-
-
Craftsman 11A-A15A099 Owner's manual
-
-
-
-
-
Other documents
-
MTD 460 Series Owner's manual
-
Yard-Man 11A-435A701 Owner's manual
-
-
Troy-Bilt 565 Owner's manual
-
-
-
-
-
-
Troybilt 836 Owner's manual