Page is loading ...

POR FAVOR LEA ESTE INSTRUCTIVO ANTES DE USAR EL PRODUCTO.
PLEASE READ AND SAVE THIS USE AND CARE BOOK.
Modelo
Model
❑
CTO500
Toast-R-Oven
™
Horno/asador para el mostrador
Countertop Oven/Broiler
Accesorios/Partes (EE.UU/Canadá)
Accessories/Parts (USA/Canada)
1-800-738-0245
?
USA/Canada 1-800-231-9786
Mexico 01-800-714-2503
www.blackanddecker.com
CTO500Pub1000002999 4/12/06 3:59 PM Page 1

When using electrical appliances, basic safety precautions should always
be followed, including the following:
❑ Read all instructions.
❑ Do not touch hot surfaces. Use handles or knobs.
❑ To protect against risk of electrical shock, do not immerse cord, plug,
or any non-removable parts of this oven in water or other liquid.
❑ Close supervision is necessary when any appliance is used by or near
children.
❑ Unplug from outlet when not in use and before cleaning. Allow to cool
before putting on or taking off parts.
❑ Do not operate any appliance with a damaged cord or plug or after the
appliance malfunctions or is dropped or damaged in any manner. Return
the appliance to the nearest authorized service facility for examination,
repair, or electrical or mechanical adjustment. Or, call the appropriate
toll-free number listed on the cover of this manual.
❑ The use of accessory attachments not recommended by the appliance
manufacturer may cause injuries.
❑ Do not use outdoors.
❑ Do not let cord hang over edge of table or counter, or touch hot surfaces.
❑ Do not place on or near a hot gas or electrical burner, or in a heated oven.
❑ Extreme caution must be used when moving an appliance containing hot
oil or other hot liquid.
❑ Turn all controls to OFF before inserting or removing plug from wall outlet.
❑ Do not use appliance for other than intended use.
❑ Oversize foods or metal utensils must not be inserted in this appliance,
as they may create a fire or risk of electric shock.
❑ A fire may occur if the toaster oven is covered or touching flammable
material including curtains, draperies, walls and the like, when in
operation. Do not store any item on top of unit when in operation.
❑ Do not clean with metal scouring pads. Pieces can break off the pad and
touch electrical parts resulting in a risk of electric shock.
❑ Extreme caution should be used when using containers constructed of other
than metal or glass.
❑ Do not store any material, other than manufacturer's recommended
accessories, in this oven when not in use.
❑ Do not place any of the following materials in the oven: paper, cardboard,
plastic wrap, and the like.
6
5
Cómo asar
1. Coloque la parrilla de asar sobre la bandeja
de hornear y luego colóquelas sobre la parrilla
corrediza (B).
2. Coloque el control de temperatura en la
posición de ASAR y el cronómetro de
30 minutos en la posición (encendido
continuo) (vea la fígura A). No es necesario
precalentar el horno para asar.
3. Para detener la cocción, abra la puerta del horno. Supervise los alimentos cuando se
cumpla el tiempo mínimo de cocción recomendado.
4. Cuando termine de asar, extraiga la bandeja corrediza con un guante de cocina y luego
retire la bandeja de hornear.
Advertencia: El horno está caliente. Tenga cuidado de no tocar ninguna superficie.
5. Coloque el control de temperatura en la posición (apagado) y el cronómetro de
30 minutos en la posición 0 (apagado).
Cuidado y limpieza
Este producto no contiene piezas reparables por el consumidor. Para servicio, acuda a personal
calificado.
1. Apague el aparato, desconéctelo de la toma de corriente y permita que se enfrie antes de
limpiarlo.
2. La puerta de vidrio se debe limpiar con una almohadilla de nylon y agua jabonosa. No se
deben utilizar rociadores de limpiar vidrios.
3. Para retirar la parrilla corrediza, abra la puerta y tire de la parrilla hacia adelante y hacia
afuera. Lavela en agua tibia jabonosa o en la maquina lavaplatos. Para eliminar las manchas
persistentes, utilice una almohadilla de poliester o de nylon. Para volver a colocar la parrilla
corrediza, abra la puerta completamente, coloque la parrilla en su ranura y cierre la puerta.
4. Lave la bandeja de hornear y la parrilla de asar con agua tibia jabonosa o en la maquina
lavaplatos. Utilice una almohadilla de poliester o de nylon a fin de evitar las rayaduras.
5. Para retirar la bandeja de residuos, sujete el mango al frente del
horno y tire del mismo hacia afuera (C). Deseche los residuos y
lave la bandeja en agua tibia jabonosa. Para eliminar las manchas
persistentes, utilice una almohadilla de nylon. Asegurese de secar
bien la bandeja antes de insertarla de nuevo en el horno.
Interior antiadherente fácil de limpiar
1. Desconecte el horno y permita que se enfrie. Limpielo con una esponja jabonosa o almohadilla
de nylon despues de cada uso.
2. No utilice limpiadores quimicos para hornos. No use limpiadores abrasivos ni de fibras fuertes
ya que se puede danar el revestimiento del horno. Seque el horno con una toalla de papel o un
pano suave.
Exterior
Permita que el horno se enfrie totalmente antes de limpiar cualquier superficie exterior. Limpie el
exterior con un pano o una esponja humeda y sequelo con una toalla de papel o un pano suave.
Recipientes para cocinar
Este aparato le permite utilizar recipientes de metal, de vidrio resistente al calor o de
cerámica, sin tapas de vidrio. Siga las indicaciones del fabricante. Asegurese de que
haya un espacio minimo de 2,54 cm (1 pulgada) entre el borde superior del recipiente
y los elementos calefactores.
C
IMPORTANT SAFEGUARDS
B
CTO500Pub1000002999 4/12/06 3:59 PM Page 6

8
7
❑ Do not cover crumb tray or any parts of the oven with metal foil. This will
cause overheating of the oven.
❑ To stop toasting, turn toast browning control to OFF. To stop baking or
broiling, turn temperature control OFF and Timer to 0.
SAVE THESE INSTRUCTIONS.
GROUNDED PLUG
As a safety feature, this product is equipped with a grounded plug, which will only
fit into a three-prong outlet. Do not attempt to defeat this safety feature. Improper
connection of the grounding conductor may result in the risk of electric shock.
Consult a qualified electrician if you are in doubt as to whether the outlet is properly
grounded.
ELECTRICAL CORD
a) A short power-supply cord (or detachable power-supply cord) is to be
provided to reduce the risk resulting from becoming entangled in or tripping
over a longer cord.
b) Longer detachable power-supply cords or extension cords are available and
may be used if care is exercised in their use.
c) If a long detachable power-supply cord or extension cord is used,
1) The marked electrical rating of the detachable power-supply cord or
extension cord should be at least as great as the electrical rating of the
appliance,
2) If the appliance is of the grounded type, the extension cord should be a
grounding-type 3-wire cord, and
3) The longer cord should be arranged so that it will not drape over the
countertop or tabletop where it can be pulled on by children or tripped over.
Note: If the power supply cord is damaged, it should be replaced by qualified
personnel or in Latin America by an authorized service center.
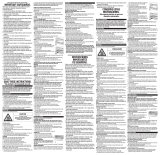
Product may vary slightly from what is illustrated.
1. Toast ( ) /Bake/Broil temperature control
2. 30-minute bake timer with (encendido continuo/ON) setting
3. On indicator light
4. Side handle
5. Toast browning control
6. Slide rack
7. Slide-out crumb tray
8. Door handle
9. Bake pan
10. Broil rack
CTO500Pub1000002999 4/12/06 3:59 PM Page 8

10
9
How to Use
This product is for household use only.
Getting Started
1. Wash all parts as instructed in the Care and Cleaning section.
2. Insert the crumb tray underneath the bottom heating elements.
3. Plug the unit into a standard outlet.
Toasting
1.
Insert the slide rack in the rack slot. It is not necessary to preheat the
oven for toasting.
2.
Set the toast browning control as desired (A). For best results, select the
medium setting for your first cycle, then adjust lighter or darker to suit
your taste.
3.
Turn temperature control to setting. The on indicator light comes on
and stays on during the toasting cycle. When toasting is done, you hear a
bell sound. The on indicator light goes out.
4.
To stop toasting at any time, open the oven door. The heating elements
and the on indicator light go out.
5.
Turn the toast browning control to (off).
6.
Using an oven mitt or pot holder, open the door and slide out the slide
rack to remove food.
Caution: The oven is hot. Do not let your skin touch any surface.
Baking
1. Place bake pan containing food to be cooked, on the slide rack.
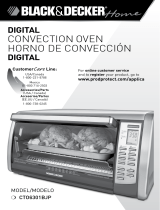
2. Turn the temperature control to the desired temperature setting (see figure A).
a. If not using the bake timer, turn the control to (encendido continuo/ON) and monitor
the food.
b. If using the 30-minute bake timer, turn the control to the desired number of minutes.
Note: For best results, always preheat the oven for 5 minutes.
3. The upper and lower heating elements will cycle on and off to maintain the temperature.
To stop cooking, open the oven door. To continue cooking, close the door. Check food for
doneness at minimum time.
4. When finished cooking, turn the temperature control to (off).
5. If using the 30-minute bake timer, you will hear a bell sound once it reaches the set time.
If not, when cooking is done, turn the timer to 0 (off). The on indicator light goes out.
6. Using an oven mitt or pot holder, open the door and slide out the slide rack to remove the bake
pan.
Caution: The oven is hot. Do not let your skin touch any surface.
Broiling
1.
Insert the broil rack in the bake pan and place
both on the slide rack (B).
2.
Turn the temperature control to broil (ASAR) and
the 30-minute bake timer control to the desired
number of minutes or to (encendido continuo/
ON) on (see figure A). The oven does not need to
be preheated for broiling.
3.
To stop cooking, open the door. Check food for
doneness at minimum cooking time.
4. When finished broiling, using an oven mitt or pot holder, slide out slide rack to remove
bake pan.
Caution: The oven is hot. Do not let your skin touch any surface.
5. Turn temperature control to (off) and 30-minute bake timer to 0 (off).
Care and Cleaning
This product contains no user serviceable parts. Refer service to qualified service personnel.
1. Turn off unit, unplug from wall outlet and let it cool before cleaning.
2. Clean the glass door with a nylon pad and sudsy water. Do not use a spray glass cleaner.
3. To remove slide rack, open the door and pull the rack forward and out. Wash in warm, sudsy
water or in the dishwasher. To remove stubborn spots, use a polyester or nylon pad. To replace
the slide rack, open the door completely, slide into the rack slot and close the door.
4. Wash the bake pan and broil rack in warm, sudsy water or in the dishwasher. To minimize
scratching, use a polyester or nylon pad.
5. To remove the crumb tray, grasp the handle at the front of the
oven and pull it out (C). Dispose of crumbs and wash the tray in
warm, sudsy water. Remove stubborn spots with a nylon mesh
pad. Be sure to dry thoroughly before inserting the tray back into
the oven.
Nonstick Easy-Clean Interior
1. Unplug the oven and let it cool, then wipe with a soapy sponge or nylon pad after each use.
2. Do not use a chemical oven cleaner. Do not use any abrasive cleansers or scouring pads as
they may harm the coating. Dry with paper towel or soft cloth.
Exterior
Let the oven cool completely before cleaning any outer surface. Wipe with a damp cloth or sponge
and dry with paper towel or soft cloth.
Cooking Containers
Metal, ovenproof glass or ceramic bakeware without glass lids can be used in your oven. Follow
manufacturer’s instructions. Be sure the top edge of the container is at least 1” (2.54 cm) away
from the upper heating elements.
A
B
C
CTO500Pub1000002999 4/12/06 3:59 PM Page 10

¿NECESITA AYUDA?
Para servicio, reparaciones o preguntas relacionadas al producto, por favor llame
al número del centro de servicio en el país donde usted compró su producto. NO
devuelva el producto al fabricante. Llame o lleve el producto a un centro de
servicio autorizado.
DOS AÑOS DE GARANTÍA LIMITADA
(No aplica en México, Estados Unidos o Canadá)
¿Qué cubre la garantía?
• La garantía cubre cualquier defecto de materiales o de mano de obra. Applica
no se responsabiliza por ningún costo que exceda el valor de compra del
producto.
¿Por cuánto tiempo es válida la garantía?
• Por dos años a partir de la fecha original de compra.
¿Cómo se puede obtener servicio?
• Conserve el recibo original de compra.
• Por favor llame al número del centro de servicio autorizado.
Esta garantía no cubre:
• Los productos que han sido utilizados en condiciones distintas a las normales
• Los daños ocasionados por el mal uso, el abuso o negligencia.
• Los productos que han sido alterados de alguna manera
• Los daños ocasionados por el uso comercial del producto
• Los productos utilizados o reparados fuera del país original de compra
• Las piezas de vidrio y demás accesorios empacados con el aparato
• Los gastos de tramitación y embarque asociados al reemplazo del producto
• Los daños y perjuicios indirectos o incidentales
NEED HELP?
For service, repair or any questions regarding your appliance, call the appropriate
"800" number on the cover of this book. Do not return the product to the place of
purchase. Do not mail the product back to the manufacturer nor bring it to a
service center. You may also want to consult the website listed on the cover of
this manual.
One-Year Limited Warranty
(Applies only in the United States and Canada)
What does it cover?
• Any defect in material or workmanship; provided; however, Applica’s liability
will not exceed the purchase price of the product.
For how long?
• One year after the date of original purchase.
What will we do to help you?
• Provide you with a reasonably similar replacement product that is either new
or factory refurbished.
How do you get service?
• Save your receipt as proof of the date of sale.
• Check our on-line service site at www.prodprotect.com/applica, or call our
toll-free number, 1-800-231-9786, for general warranty service.
• If you need parts or accessories, please call 1-800-738-0245.
What does your warranty not cover?
• Damage from commercial use
• Damage from misuse, abuse or neglect
• Products that have been modified in any way
• Products used or serviced outside the country of purchase
• Glass parts and other accessory items that are packed with the unit
• Shipping and handling costs associated with the replacement of the unit
• Consequential or incidental damages (Please note, however, that some states
do not allow the exclusion or limitation of consequential or incidental
damages, so this limitation may not apply to you.)
How does state law relate to this warranty?
• This warranty gives you specific legal rights, and you may also have other rights
that vary from state to state or province to province.
CTO500Pub1000002999 4/12/06 3:59 PM Page 12

Marca registrada de The Black & Decker Corporation, Towson, Maryland, E.U.
is a trademark of The Black & Decker Corporation, Towson, Maryland, USA
1500 W 120 V 60 Hz
2005/12-6-22S/E
Copyright © 2006 Applica Consumer Products, Inc.
Pub. No.1000002999-00-RV00
Fabricado en la República Popular de China
Impreso en la República Popular de China
Importado por:
Applica de México S. de R.L. de C.V.
Blvd. Manuel Avila Camacho 2900-902, Fracc Los Pirules
Tlalnepantla, Edo. de México. C.P. 54040
Teléfono: (55) 1106-1400
Del interior marque sin costo
01 (800) 714-2503
Made in People’s Republic of China
Printed in People’s Republic of China
CTO500Pub1000002999 4/12/06 3:59 PM Page 16
/