
Bathroom Ventilation Kit
Installation and Operation Manual
CVK-105/210/260/450 & VK-105/210/260/450
AirScape Bathroom Ventilation Kit Installation Manual, 06102015
©AirScape, Inc., 2015. All Rights Reserved.
Page 1
SAFETY INFORMATION
• Switch power to this unit off at the main circuit panel prior to its installation, service or
cleaning.
• Installationandwiringmustbedoneinaccordancewiththismanualandalllocalcodesandstandards.
• DoNOTinstallthisunit’sswitchwhereitcanbereachedfromatuborshower.
• Thisfanisforgeneralventilationonly.It has NOT been designed to exhaust particle-laden and/
or explosive mixtures of air, or for use in re-rated installations, and must NOT be used for
such.
INTRODUCTION
ThankyouforpurchasinganAirScape
®
BathroomVentilationKit.Thisunithasbeendesignedtoexhaust
airfromyourbathroom,quickly,quietlyandefciently,keepingthespacefreshandserene.Pleasetake
thetimetoreadthisentiremanualbeforeproceedingwithinstallation.

AirScape Bathroom Ventilation Kit Installation Manual, 06102015
©AirScape, Inc., 2015. All Rights Reserved.
Page 2
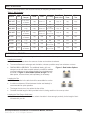
WHAT’S INCLUDED
Beforeproceedingfurther,takeaquickinventoryofeverythingincludedinthiskit.
Table 1: Kit Contents
Model # Fan
Plenum &
Damper
Grille Duct Y-Fitting
Roof Cap /
Wall Hood
Electronic
Timer
Cable
Ties
CVK-105
1qty
1qty,w/6”-
4”reducer
1qty 25ft.x4”
N/A
1qty,4” 1qty 4qty
CVK-210
1qty 1qty 1qty 25ft.x6”
N/A
1qty,6” 1qty 4qty
CVK-260
1qty 2qty 2qty 25ft.x6”
1qty,
6”x6”x6”
1qty,6” 1qty 8qty
CVK-450
1qty
2qty,w/8”-
6”reducer
2qty.
25ft.x6”;
25ft.x8”
1qty,
8”x6”x6”
1qty,8” 1qty 7qty
VK-105
1qty
1qty,w/6”-
4”reducer
1qty
N/A N/A N/A N/A N/A
VK-210
1qty 1qty 1qty
N/A N/A N/A N/A N/A
VK-260
1qty 2qty 2qty
N/A
1qty
6”x6”x6”
N/A N/A N/A
VK-450
1qty
2qtyw/8”-
6”reducer
2qty
N/A
1qty
8”x6”x6”
N/A N/A N/A
CHOOSING A LOCATION
Considerthefollowingwhenselectinglocationsforeachofthisunit’scomponents:
LocatingtheIntake(s)
• Positiontheintake(s)abovethesourcesofodorandmoisturetoexhaust.
• Toensureeffectiveairexchangeandcirculation,chooseapositionawayfromwindowsordoors.
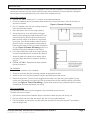
• CVK/VK-260 & -450 ONLY:Theadditionalintake,grill,and
damperincudewiththesemodelsmakesitpossibletoventilate
onelargebathroomortwoadjacentbathroomssimultaneously,
asshowninFigure 1: Dual Intake Options at right.Forthe
latteroption,asecondtimer(soldseperately)isnecessary.
LocatingtheFan
• Choosealocationintheatticthatwillbeaccessibleforservice.
• Aminimumdistanceof8feetbetweenthefanandintake(s)is
recommendedforquietoperation.
• Thelongertheductrun,thequieterthefanwillbe.
• Considerthetotallengthofductprovidedinthekit,beingcarefulnottocomeupshort.
LocatingtheRoofCaporWallHood
• Apartfromaestheticconsiderations,selectalocationincloseenoughproximityforthelengthofduct
includedwithyourkit
Figure 1: Dual Intake Options

INSTALLATION
AirScapeBathroomVentilationKitsaredesignedforquickandeasyinstallation.Onceallofthexedcom-
ponentsaremounted,theyaresimpleconnectedusingtheprovidedex-ductandcableties.Straightfor-
wardwiringtotheincludedelectronicpush-buttontimercompletesthejob.
PlenumBoxInstallation
1. CVK/VK 105 ONLY:Attachthe6”-4”reducertothebackdraftdamper.
2. Checktheclearanceabovethedesiredintakelocation(s)tomakesurethereisroomfortheplenum
andductintheattic.
3. Cuta6”diametercircleoutoftheceilingsheetrock
inthedesiredintakelocation.
4. Placetheplenumboxovertheroughopening.
5. Anchortheplenumtoanatticjoistbydrivingat
least2robustself-tappingmetalscrews(NOTpro-
vided)throughtheplenumwallandintothestud.
Makesuretheweightoftheplenumissupported
bythejoist.Ifthedesiredintakelocationisnotad-
jacenttoajoist,useappropriatelysizedlumberto
frameacross-peicetowhichtoanchortheplenum.
Atright,Figure 2: Plenum & Framingshowshow
theplenumshouldbeattachedtotheframing.
6. Useahigh-qualitylatexcaulkattheroughopening
tomakeasealbetweenthesheetrockandplenum.
7. Attachthegrilletotheplenumfrombelow;adjust
thespringclipswithpliersasneededtoachievea
snugt.
8. CVK/VK 105 ONLY:Repeatthesestepstoattach
thesecondplenum.
FanInstallation
The fan can be mounted in any orientation.
1. Attachthemountingbrackettoframingmemberatappropriatelocation.
2. Attachthefantothemountingbracketusingtheprovidedsheetmetalscrews.
3. ElectricalConnection:Thefancanbepluggedintoanoutletintheatticusingthesupplied3-prong
powercord.Alternatively,thepowercordcanberemovedandthefanhardwireddirectlytothetimer
switch(seeFigure 3: Timer & Fan Wiring).Consultlocalcodesforwiringstandardsand/orcontact
anelectricianforfurtherassistancewithwiring.
FlexDuctInstallation
The individual components are joined together using insulated acoustic ex-duct.
Toattachtheducttoacollar:
1. Pullbacktheouterfoilandinsulationlayerstoexposetheblackpolylinewithspringcoil.
2. Pullthiscoillineoverthecollarandwrapitwithoneoftheprovidedcableties.
3. Pulltheinsulationandfoillayersoverthecollarandwrapthejointwithducttape(NOTprovided)to
makeanairtightseal.
AirScape Bathroom Ventilation Kit Installation Manual, 06102015
©AirScape, Inc., 2015. All Rights Reserved.
Page 3
Figure 2: Plenum & Framing

INSTALLATION,cont.
AirScape Bathroom Ventilation Kit Installation Manual, 06102015
©AirScape, Inc., 2015. All Rights Reserved.
Page 4
TimerInstallation
Theincludeddecora-styleelectronictimerinstallsintoastandardsingle-gangelectricalbox(notincluded).
Asecondtimer(soldseparately)canbewiredtoasinglefanfordual-bathventilation(seebelow).Besure
toshutoffpoweratthecircuitpanelpriortoanyelectricalwiring,andrefertolocalcodesforproperand
approvedmethods.Consultanelectricianifneeded.
1. Runwirefromthefan(oroutlet)intheattictothelocationinthewallwherethetimerwillbeinstalled.
2. Connectleadsusingapprovedmethods,followingtheproperwiringdiagramshownbelow.
NOTE: The following instructions apply ONLY to models CVK-105, -210, and -260:
RoofCap/WallHoodInstallation
*Use caution when walking on roofs and climbing ladders*
1. Atthedesiredlocation,cutthepropersizecircularholeintherooforwall.
2. Useproperandapprovedmethodstoattachtheroofcaporwallhoodandensurealeak-proofseal
aroundtheashing.If needed, consult a roong or siding professional.
Onceinstalled,operationofyourAirScapeBathVentilationKitisassimpleasapushofabutton.Gener-
ally,itisrecommendedtohaveabathfancontinuetorunfor20minutesaftertheconclusionofashower.
Withthe10/20/30/60minuteoperationoftheincludedelectronicpush-buttontimer,thiscanbeachieved
withconvenienceandease.
Sincethefanbearingsarepermanentlylubricatedandsealed,thereisnoperiodicmaintenancenecessary.
Figure 3: Timer & Fan Wiring
OPERATION & MAINTENANCE

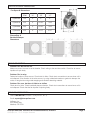
SPECIFICATIONS & DIMENSIONS
Fan Specs & Dimensions
CFM “A” “B” “C”
(C)VK-105
105 4” 11” 8”
(C)VK-210
205 6” 12.625” 7.625”
(C)VK-260
260 6” 12.625” 7.625”
(C)VK-450
450 8” 14.75” 8.25”
AirScape Bathroom Ventilation Kit Installation Manual, 06102015
©AirScape, Inc., 2015. All Rights Reserved.
Page 5
Phone:866.448.8187(8:00am–5:00pmPST,M–F)
Email:[email protected]
AirScape,Inc.
625CharlesWay
Medford,OR97501
CONTACT INFORMATION
Problem: Fan will not turn on.
Makesurepoweristurnedonatthebreaker.Checkwiringtofanandtimerswitch.Checkfantoensure
impellercanspinfreely.
Problem: Fan is noisy.
Determinelocationofnoisesource.Checkductforkinks.Checkductconnectionstoensureinnercoilis
notcollapsed.Iffanvibrationisthenoisesource,tryusingrubberizedwashersorgaskettodampenthe
noise,orhangthefanusingmetalstrappingandvibrationabsorbingmaterial.
Problem:Fanruns,butthereislittletonoairow.
Checkductforkinks.Checkbackdraftdamperdirection.Checkductconnectionstoensureinnercoilis
notcollapsed.Checkthatthefanimpellerisspinningfreely.
TROUBLESHOOTING
Plenum Box &
Backdraft Damper
Dimensions

WARRANTY
AirScape Bathroom Ventilation Kit Installation Manual, 06102015
©AirScape, Inc., 2015. All Rights Reserved.
Page 6
Hardware
AirScapewarrantstheoriginalenduser(“Customer”)thatnewAirScapefanproducts,includingallmoving
parts,motors,dampers,anddamperactuatorswillbefreefromdefectsinworkmanshipandmaterials,
undernormaluse,forthree(3)yearsfromtheoriginalpurchasedate.Electronictimersareexcludedand
arewarrantedbythemanufacturer.
Software
AirScapewarrantstoCustomerthattheAirScapefansoftwarewillperforminsubstantialconformanceto
itsprogramspecicationsforaperiodofthree(3)yearsfromthedateoftheoriginalpurchase.
Exclusions
Thiswarrantyexcludes(1)physicaldamagetothesurfaceoftheproduct,includingcracksorscratcheson
theoutsidecasing;(2)damagecausedbymisuse,neglect,improperinstallation,unauthorizedattempts
toopen,repair,ormodifytheproduct,oranyothercausebeyondtherangeofintendeduse;(3)damage,
causedbyaccident,re,powerchanges,otherhazard,oractsofGod;or(4)useoftheproductwithany
unauthorizeddeviceifsuchdevicecausestheproblem.
Exclusive Remedies
ShouldacovereddefectoccurduringthewarrantyperiodandCustomernotiesAirScape,Customer’s
soleandexclusiveremedywillbe,atAirScape’ssoleoptionandexpense,torepairorreplacetheproduct.
Replacementproductsorpartsmaybeneworreconditionedoracomparableversionofthedefective
item.AirScapewarrantsanyreplacedproductorpartforaperiodofninety(90)daysfromshipment,or
throughtheendoftheoriginalwarranty,whicheverislonger.
Obtaining Warranty Service
CustomermustcontactandreturnproducttoAirScape,ProductdealerorInstallerwithintheapplicable
warrantyperiodtoobtainwarrantyservice.Datedproofoforiginalpurchasewillberequired.AirScapewill
notberesponsibleforCustomer’smemorydatacontainedin,storedon,orintegratedwithanyproducts
returnedtoAirScapeforrepair,whetherunderwarrantyornot.
Warranty Exclusive
Theforgoingwarrantiesandremediesareexclusiveandinlieuofallotherwarranties,expressorimplied,
includingwarrantiesofmerchantability,tnessforaparticularpurpose,correspondencewithdescription,
andnon-infringement,allofwhichareexpresslydisclaimedbyAirScapeanditssuppliers.
Disclaimer
NeitherAirScapenoritssuppliersshallbeliableforincidental,consequential,indirect,special,orpunitive
damagesofanykind,ornanciallossarisingoutoforinconnectionwiththesaleoruseofthisproduct,
whetherbasedincontract,tort(includingnegligence)oranyothertheory,evenifAirScapehasbeenad-
visedofthepossibilityofsuchdamagesAirScape’sentireliabilityshallbelimitedtoreplacementorrepair
oftheproduct.
-
 1
1
-
 2
2
-
 3
3
-
 4
4
-
 5
5
-
 6
6


AirScape VK-450 Operating instructions
- Type
- Operating instructions
- This manual is also suitable for
Ask a question and I''ll find the answer in the document
Finding information in a document is now easier with AI
Related papers


Other documents
-
DampRid FG60FS User manual
-
 Triangle Engineering COMFORT COOLER CC4223 Operating instructions
-
CFM AXC Series Installation & Maintenance
-
Fantech Serenity Series Operating instructions
-
Greenheck Fan GGH20 User manual
-
-
 Serene Steam Solar Flare Installation guide
-
-
CITROEN New Cars Price List
-
FIELD CONTROLS VentCool Tahoe Series Whole House Fan Installation guide

