Page is loading ...

Aquaticausa.com
Aquaticabath.ca
Aquatica
®
Freestanding
Bath Installer
™
Installation Manual
USA and CANADA
Install a freestanding bathtub in minutes
No muss. No fuss
No kidding
Your job just got easier
Function : Form : Fashion

Aquatica
®
Freestanding Bath Installer
™
FEATURES
• 18 Gauge Epoxy coated Metal Deck Flange
• Designed to be installed in an 8” joist space
• Can be installed with Waterproofing Membrane
(*bronte™ NobleSeal TS Recommended)
• CSA Certified for Canadian and US markets
KIT INCLUDES
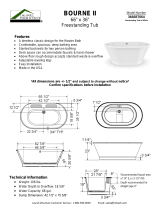
• 2 Brass Tailpieces (Fine Thread and Flanged)
• Freestanding Bath Installer™ assembly with 1-1/2” DWV
ABS tailpiece
• Cutting templat
e
INSTALLATION TIPS
• Use 5” hole saw to cut sub floor (not included).
Cutting template included
• Do not cut the brass Tailpiece as this may cause a leak
• Secure Deck Flange with 6 screws (not included)
Aquaticausa.com
Aquaticabath.ca
4
4
"
121mm
127mm
8
"
87mm
2
8
"
2
8
"
1"
27mm
3-7/8”
98mm
8"
1
1
2
"
Fine Thread Tailpiece
Attaches to 314 Series
Direct/Offset Bath Wastes
and Integral Bath Wastes.
1
1
2
"
8"
Flanged Tailpiece
Attaches to 314DC Series
Cable-Drive
®
Bath Wastes
and Integral Bath Wastes.
ABS or PVC Adapter Kit
Attaches to ABS or PVC Bath
Wastes and includes Brass
Nut and Poly Washer.
Male Adapter Spg x MIPT - ABS DWV
for Aquatica
®
bath wastes with
Sch40 hub outlet.
Thread: 1 ½ NPSM (1 ½ IPS)
1
8
"
41mm
1
4
"
7"
178mm
1
4
"
Y
X

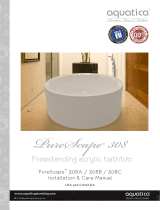
INSTALLATION INSTRUCTIONS
Attaches to Freestanding Bath W/O
A. Cut 5” (12.7cm) hole into wood sub-floor
(use supplied Cutout Template).
B. Measure and cut ABS Tailpiece as necessary
to ensure a secure connection to P-Trap below.
C. Insert Freestanding Bath Installer™ assembly into floor
opening and connect to Pipe below.
D. Affix to sub-floor with 6 screws (not supplied)
A. Install flooring surface, leaving a 5” opening to
access Drain.
B. Affix the appropriate brass Tailpiece to the Waste &
Overflow. NOTE: DO NOT CUT THE BRASS TAILPIECE
AS THIS MAY CAUSE A LEAK.
Ensure the measurement between the base of the
Drain and P-Trap will accomodate the Tailpiece.
Other lengths available (contact Aquatica).
A. Cut out the Installation Label with a utility knife and
remove to expose the Drain.
B. Apply lubricant (supplied) to the Tailpiece.
C. Position the Tub and brass Tailpiece in-line with the Drain.
D. Carefully lower the tub with the installed brass Tailpiece
into the Red Collar in Drain assembly. Ensure Tailpiece is
fully engaged with Seal.
Aquatica
®
Freestanding Bath Installer
™
Function : Form : Fashion
Function : Form : Fashion
IMPORTANT: Do not remove Installation Label until Step 3.
DO NOT CUT THE SUPPLIED BRASS TAILPIECE. Doing so may cause a leak.
Disassembling the drain or cutting the Tailpiece will void the warranty.
1
2
3

Function : Form : Fashion
Aquaticausa.com
Aquaticabath.ca
Function : Form : Fashion
/