Page is loading ...

ASSEMBLY GUIDE:
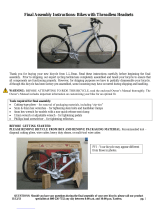
Izip & Ezip Electric Bicycles with
Rack-Mounted Batteries (“RMB Bicycles”)
Ezip Coastline
Diamond Frame Izip Via Lento
Low Step
Please Refer to your Owner’s Manual for Detailed Setup Instructions
Technical & Customer Service: 1-800-377-4532
Ezip Trailz
Low Step

Helpful Tools:Included in your parts box:
• Scissors
• Bicyclegrease
• Phillips-headscrewdriver
• Allenwrenches:2.5,4,5,&6mm
• Open-endwrenches:9,10,14,15,&17mm
oradjustablecrescentwrench
• Needle-nosepliers
• Pedals
• Quickreleaseskewer(somemodels)
• Reectors(ifnotalreadyinstalled)
• Stem
• Toolkit(4+5mmcomboAllenwrench,
13+15mmcomboopen-endwrench)
• Rackkeys
• Touch-uppaint
Assembly will take 1 - 2 hours
Note:Whenworkingonyourbicycleasinstructedbythisguide,pleaserefertothetorquevalueschartinyourowner’smanualfordetailedtorque
requirements.Under-orover-tightenedcomponentsmayloosenorbreak,causingafall.
Stepsinthisguidethatcallfortheuseofbicyclegreasedosointheinterestofkeepingyourbicycleinworkingconditionforaslongaspossible.Grease
isnotabsolutelyvitaltotheassemblyofthisproduct,butfailuretoapplyitasdirectedcouldcausepartstoseizeovertimeandirreparablydamagethe
frameorcomponents.
Becausebicyclepartstendtobegreasy,itisrecommendedthatyoulaydownatarporsheettoprotectyouroorifassemblingthebikeindoors.
Itisbesttoremovetheprotectivepackagingduringtheassemblyprocessonlyasneeded,leavingsomeintacttoprotectthebikeduringassembly.
Duringassemblyitmaybehelpfultoreferencethephotosonthecoverofthisguideandonthebicycleboxifyouareunsureofanysteps.
Pleasetakethetimetoreadthebatterycareandstoragesectionofyourmanualforusefulinformationonprolongingthelifeofyourbattery.
Assembly Tools

Unpacking and Preparation
Handlebars and Stem
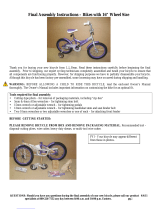
1. Carefully remove the bicycle from the box. Youshouldhavea
friendhelpyouwiththis,asthebikeisheavy.Ifyouarealone,youcanlay
theboxonitssideandgentlyslidethebikeout.
Seat Tube
Top Tube
Down Tube
Chainstay Seatstay
Head tube
3. Cut the zip-ties holding the front wheel to the bike frame.Setthe
wheelasidefornow.
4. Rotate the fork so the brake faces away from the frame,thenrest the bike
upright on its rear wheel and fork,asshowningureA.Whenrotatingthefork,be
surethecablesruninfrontoftheframeanddonotwraparoundtheforkorheadtube.
5.Find the stem in the parts box (gureC).Remove the protective
caps from the stem and head tube,theninsert the stem into the bike’s
head tube facingawayfromtheframe.Remove the faceplatebyremoving
thetwoorfourfaceplatebolts(dependingonmodel)showningureD.
2. At this point you can begin charging your
battery. Thebatteryispackagedinabrowncardboard
box underneath the bike. The charger is in a small
whitebox,usuallyrubber-bandedtotherack.
Recommendchargetimeis6-8hours.Plugthecharger
rstintothewalloutlet,thenintotheportunderneath
thebatteryhandle(gureB).
A solid red or blinking green light on the charger
(dependingonmodel)indicatesthebatteryischarging
properly.Asolidgreenlightindicatesthatthecharger
hasenteredtricklechargemode,andyourbatteryisat
least80%full.Formaximumrange,pleasechargefor
thefullrecommendedtimeperiod(6-8hours).
Fork
A
B
Pleaserecycle
packagingmaterials! Currie TechnologiesTechnical and Customer Service 1-800-377-4532
Protective cap
(remove and discard)
Izip stem
Faceplate
C
Ezip stem
Wedge bolt
(top of stem)

6.Cut the zip-ties securing the handlebar to the bike frame,arrangethebrakeand
shiftercablessotheyruninfrontofthebicycle,thenclamp the handlebars to the stem
usingthefaceplateasshowninphotoE.Thebarsshouldberotatedtoacomfortablegripping
positionwithcomfortableaccesstothebrakelevers,andcenteredaroundthestem.Besure
totighten the faceplate bolts evenlysothetopandbottomgapsareequal.
Faceplate Bolts
Head tube
D
Wedge Bolt
(top)
Equal faceplate
gaps & bolt
tightness
7.Align the stem so it is facing forward in relation to the fork (gure F),then
tighten the wedge bolt securely.Besurethattheforkisrotatedwiththebrakesfacing
forward,andthatnocablesaretangledaroundit!Refertothephotosonthecoverofthis
manualforpropercablerouting.It is extremely important that you properly tighten the
wedge bolt.Leavingthisbolttooloosecanresultinthehandlebarsturningawayfromthe
wheel,causingacrash.
8.Ifnotalreadyinstalled,attach the square white reector to the handlebar using
aPhillips-headscrewdriver.
Wedge Bolt
Throttle
(right side)
Shifter
(left side)
Brakes face
forward!
(Top View)
Stem in line
with fork
Currie TechnologiesTechnical and Customer Service 1-800-377-4532
E
F

9.Apply grease to the inside of the seat tube,theninsert the
seatpostandclose the quick release tightly.Itwillhelpduringthenext
stepsifyoulowertheseatcompletely;itcanbeadjustedtoacomfortable
heightbeforeyourrstride.
Refertotheowner’smanualformoreinformationontheuseandadjustment
ofquickreleaselevers.It is vital to your safety that you understand and
properly secure this lever!
Swing QR Closed
Seatpost
Currie TechnologiesTechnical and Customer Service 1-800-377-4532
G
H10.Release the front brakebypullingbacktherubberboot,squeezing
thebrakearmstogether,thenremovingthenoodlefromitsholder.Thiswill
allowyoutoinstallthefrontwheel.Youwillneedtoreattachthebrakeby
reversingthissteponcethefrontwheelisinstalled.
Brake Noodle
Boot
11.Flip the bike
oversothatitrests
onitshandlebarsand
saddle.Becarefulnot
todamagethethrottle
orbrakelevers.
Removetheplastic
dropoutprotectorfrom
theendofthefork.
I

Front Wheel
12. Determine whether your front wheel uses a solid or quick release axle
(seephotoJ/K).
Solid axle with safety
washer and nut
Quick release
J
L
K
12a.Solid Axle:Loosen the axle nuts on each side of the wheel.Insert the wheel
into the fork,makingsurethesafetywasheroneachsideistotheoutsideofthefork,as
showninphotoL.
Orient the safety washers as shownsotheirhooksinsertintotheholesinthefork,then
tighten the axle nuts rmlywitha15mmopenendwrench(includedinyourpartsbox).
12b.Quick Release: Remove the end nut and one spring from the quick release
skewer,takingcarenottoloseeitherofthesmallsprings.Push the skewer through the
front hub, then replace the spring and end nut.Leavethenutloosefornow,abouttwo
turnsin.
Solid Axle
Safety washer hooks into dropout
Tension
adjusting
nut
SpringSpring Skewer
• Forsolidaxles,proceed to step 12a.
• Forquickreleaseaxles,proceed to step 12b.
M
N
Currie TechnologiesTechnical and Customer Service 1-800-377-4532
Insert the wheel into the fork,asshowninphotoN.
Securely close the quick release.Refertotheappendixofthisdocumentformoreinformation
ontheuseandadjustmentofquickreleaselevers.It is vital to your safety that you understand
and properly secure this lever!

Pedals
13. Find the pedals in your parts box. Grease the threadsand
thread them securely into the crank arms using a 15mm open-end
wrench.Notethatthepedalshaveoppositethreaddirectionsandmust
goonaspecicsideofthebicycle.Thepedalmeantforthedrive-side(the
sideofthebicyclewiththechainandgears)hasastandardthread,whichis
tightenedclockwise.Thenon-drive-sidepedalhasareverse,non-standard
thread.Itmustbeturnedcounter-clockwisetobescrewedin.
Thepedalsshouldbemarked‘R’and‘L’for“Right”and“Left,”howeverthey
canalsobeidentiedbytheirthreads,asshownindiagramP.
14.Turn the bike right-side-up,usingthekickstandtokeepitupright.
Close the front brakebyreversingstep10(gureH),pullingthebrake
noodlebackintoitsholder.Ifthecablefeelstight,checkthecablingtomake
sureitisproperlyorganizedinfrontofthebiketoallowenoughslacktore-
closethebrake.
15.Adjust your front and rear brakes.Yourbrakesmaynotbe
fullyadjustedfromthefactory;refertoyourowner’smanualfordetailed
instructionsonbrakeadjustmentorconsultaprofessionalbikemechanicif
youarenotcomfortablemakingtheseadjustmentsyourself.Do not attempt
to ride your bicycle without properly adjusting the brakes!
16.Adjust your shifters and derailleurs,referringtotheowner’s
manualforfullinstructions.Riding your bicycle without properly adjusting
the drivetrain can cause irreparable damage!Consultaprofessionalbike
mechanicifyouarenotcomfortablemakingtheseadjustmentsyourself.
Tighten
O
P
Currie TechnologiesTechnical and Customer Service 1-800-377-4532

Currie TechnologiesTechnical and Customer Service 1-800-377-4532
Q
S
R
Installation:
Yourelectricbicyclecomeswitha24voltsealedlead-acid(SLA)battery.Toinstallthebattery,simplyslide it into the rear
rack(asshowningureQ,Currielogofacingoutward)makingsureyourstremove the rubber terminal cover if present.
Thistypeofbatterydoesnothaveamemory,andridingonapartialchargewillnotharmthebatteryinanyway.Recharge
timeforthisbatteryis6-8hourstoreachafullcharge.
Locking:
LocksareincludedwiththeRMBracktoholdthebatteriesinplacewhenriding.Itisrecommendedthatthebatterypackbe
lockedwheneveryouareridinginordertomaintainastrongconnection.After sliding a battery pack into place, lock it
with one of the included keys (usuallyinthepartsboxorrubber-bandedtotherack),makingsurethelockcylinderfully
engagesintothebatterycase.Allkeysincludedwithyourbicycleareidentical.
Operation
To turn your bicycle on:
Ezip RMB Bicycles & Izip RMB bicycles prior to 2010: Flip the three-position
battery selector switch, located on the rack behind the rear reector, to the side
corresponding to the attached battery you wish to use.Thisturnsthebicycleon,indicated
bytheglowinglightsonthethrottle.Toturnthebikeoff,ipthebatteryselectorswitchtothe
neutralcenterposition.
Izip RMB Bicycles:Flip the two-position battery selector switch, located on the rack
behind the rear reector, to the side corresponding to the attached battery you wish to
use.Onceyouhaveselectedyourbattery,press the “ON/OFF” switchnexttothethrottleon
thehandlebars(asshowninphotoS1)toturnthebikeon.Toturnthebikeoff,simplypress“ON/
OFF”again;thereisnoneedtochangethepositionofthebatteryselectorswitch.
PAS/TAG System:
Using the “PAS/TAG” selector button on the throttle, you can switch between PAS
(PedalAssist) and TAG (TwistAnd Go) modes. TAG mode uses a straight throttle
system;motorpowerisdirectlycontrolledbythethrottleonyourhandlebars.When
thebikeisswitchedtoPASmode,asensorinthedrivetrainisactivated,allowingthe
motortoautomaticallyrunatupto50%powerwhenitsensespedaling.ThisPASmode
helpstomaximizerangeasitonlyactivatesthemotorwhentheriderispedaling.
For Izip RMB
Bicycles Only
ON/OFF
Button
For Ezip RMB
Bicycles Only
Izip: ON/ON
(Battery selector)
Ezip: ON/OFF/ON
(Power and selection)
1
2
PAS/TAG
SELECTOR
PAS/TAG
SELECTOR
Battery

Before your rst ride...
• Remove all remaining packaging on the bike,includingtheplasticcoversontheoutsideofthewheels
• Check the operation of your front and rear brakesbypushingthebikeforwardandoperatingthebrakelevers.
• Check the tightness of all nuts and bolts,especiallythefrontandrearwheelnuts,thestembolts,andtheboltssecuringthebrakeleversand
shifterstothehandlebars.
• Make sure the stem’s wedge bolt is tight.Checkthatitistightenedproperlybystandingoverthefrontwheel,holdingitwithyourthighs,then
tryingtoturnthehandlebars.Ifthehandlebarscanbeturnedindependentlyofthewheel,thewedgeboltmustbetightenedfurther.
• Make sure your front wheel is secure in the frame.Refertothequickreleasesectionintheowner’smanualfordetailedinstructionsonusing
quickreleases.
• Make sure your tires are lled to the pressure recommended on the sidewall. Over-or under-inatedtirescanblowofftherimandcause
afall.Werecommendusingabicyclepumpwithpressuregauge.
• Test power:leanthebikeonitskickstand,raisingtherearwheelofftheground.Whenthebikeispoweredon(indicatedbythethrottlelights)
youcantestsystempowerbytwistingthethrottleinTAGmodeandwatchingtherearwheel.Refertothetroubleshootingchartonthispagefor
assistanceifthebikewillnotpoweron.
Bike won’t turn on (no lights on
throttle)
Batteryselectorippedtowrongside
Batterynotseatedproperlyagainstrackterminals
NeedtopresshandlebarON/OFFswitch
Batterynotcharged
Throttle lights work, but motor
will not run
BikemaybeinPedalAssistmode.Presstheredbuttononthe
throttletochangetoTwist-and-Gomode.
Brakes rub when riding Re-adjustbrakes,referringtoowner’smanual
Gears/chain make clicking or
grinding noises while riding
Re-adjustdrivetrain,referringtoowner’smanual
Can someone help me with...? CalltheCurrieTechnologiestechnicalandcustomerservice
departmentat1-800-377-4532
Refer to owner’s manual for detailed troubleshooting chart
Currie TechnologiesTechnical and Customer Service 1-800-377-4532

ManyIzipandEzipbicyclemodelsusequickrelease(QR)leverstofacilitatecommontaskssuchasfrontwheelremovalandseatheightadjustment.
Whenproperlyadjusted,quickreleaseleversarebothsafeandconvenient,butyoumustunderstandandapplythecorrecttechniquetoadjustthem
properlybeforeridingyourbicycletopreventseriousinjuryordeathfromafall.
Quickreleaseleversuseacamactiontoclampthewheelorothercomponentsinplace.Becauseoftheiradjustablenature,itiscriticalthatyou
understandhowtheywork,howtousethemproperly,andhowmuchforceyouneedtoapplytosecurethem.
Warning: Thefullforceofthecamactionisneededtoclampthewheelsecurely.Holdingthenutwithonehandandturningtheleverlikeawingnutis
NOTasafeoreffectivewaytocloseaquickreleaseandwillnotclampthewheelorothercomponentssafely.
QUICK RELEASE USAGE
Ridingwithanimproperlyadjustedwheelquickreleasecanallowthewheeltowobbleorfalloffthebicycle,whichcancauseseriousinjuryordeath.
Therefore,itisessentialthatyou:
1.Askyourdealeroralocalbikeshoptohelpyoumakesureyouknowhowtoinstallandremoveyourwheelssafely.
2.Understandandapplythecorrecttechniqueforclampingyourwheelinplacewithaquickrelease.
3.Eachtime,beforeyouridethebike,checkthatthewheelissecurelyclamped.
Installing a quick release front wheel
Inaquickreleasesystem,thewheelhubisclampedinplacebytheforceofthequickreleasecampushingagainstonedropoutandpullingthetension
adjustingnut,bywayoftheskewer,againsttheotherdropout.Theamountofclampingforceiscontrolledbythetensionadjustingnut.Turningthe
tensionadjustingnutclockwisewhilekeepingthecamleverfromrotatingincreasesclampingforce;turningitcounterclockwisewhilekeepingthecam
leverfromrotatingreducesclampingforce.Lessthanhalfaturnofthetensionadjustingnutcanmakethedifferencebetweensafeclampingforceand
unsafeclampingforce.
Appendix: Quick Release Levers
Currie TechnologiesTechnical and Customer Service 1-800-377-4532

1. Removethetensionadjustingnutandoneofthesmallsprings,thenslidethequickreleaseskewerthroughthehub.Ifyourbicyclehasadisc
brake,inserttheskewerstartingonthesidewiththebrakerotor.Replacethespringandtensionadjustingnut(ga).
2. Ifyourbicyclehasrimbrakes,disengagethemtoincreasetheclearancebetweenthetireandbrakepads.
3. Installthewheelintothedropouts,makingsurethequickreleaseleverisontheleftsideofthebicycle.
4. HoldingthequickreleaseleverintheOPENpositionwithonehand,tightenthetensionadjustingnutwithyourotherhanduntilitisngertight
againsttheforkdropout.
5. Whilepushingthewheelrmlytothetopoftheslotsintheforkdropouts,andatthesametimecenteringthewheelriminthefork,movethequick-
releaseleverupwardsandswingitintotheCLOSEDposition(gb&c)Thelevershouldnowbeparalleltotheforkbladeandcurvedtowardthe
wheel.Toapplyenoughclampingforce,youshouldhavetowrapyourngersaroundtheforkbladeforleverage,andthelevershouldleaveaclear
imprintinthepalmofyourhand.
WARNING: Securely clamping the wheel takes considerable force. If you can fully close the quick release without wrapping your ngers
around the fork blade for leverage, and the lever does not leave a clear imprint in the palm of your hand, the tension is insufcient. Open
the lever; turn the tension adjusting nut clockwise a quarter turn; then try again.
6. Ifthelevercannotbepushedallthewaytoapositionparalleltotheforkblade,returnthelevertotheOPENposition.Thenturnthetension
adjustingnutcounterclockwiseone-quarterturnandtrytighteningtheleveragain.
7. Re-engagethebraketorestorecorrectbrakepad-to-rimclearance;spinthewheeltomakesurethatitiscenteredintheframeandclearsthebrake
pads;thensqueezethebrakeleverandmakesurethatthebrakesareoperatingcorrectly.
closed
c
Springs
a
Tension
adjusting nut
b
open
Currie TechnologiesTechnical and Customer Service 1-800-377-4532

9453OwensmouthAve,Chatsworth,CA91311
Phone:+1800.377.4532
Fax:+1818.734.8199
www.currietech.com
Ezip Trailz
Diamond Frame
Izip Via Lento
Diamond Frame
Ezip Coastline
Low Step
/