Electrolux EI24RD65KS User guide

Category
Drink coolers
Type
User guide

Electrolux EI24RD65KS refrigerator drawers offer convenient refrigerated storage solutions for your kitchen. With a spacious 5.1 cubic foot capacity, adjustable temperature control, and a variety of features, these drawers provide flexibility and convenience for your food storage needs.

Electrolux EI24RD65KS refrigerator drawers offer convenient refrigerated storage solutions for your kitchen. With a spacious 5.1 cubic foot capacity, adjustable temperature control, and a variety of features, these drawers provide flexibility and convenience for your food storage needs.

Use & Care Guide
Refrigerator Drawers
Guia de Uso y Cuidado
Cajones de refrigerador
Guide D’utilisation et D’entretien
Tiroirs de réfrigérateur
241958102 August 2009
2Finding Information
Product Registration Card
The package containing this manual also includes
your product registration information. Warranty
coverage begins at the time your Electrolux
refrigerator drawers were purchased.
Please Read and Save This
Guide
Thank you for choosing Electrolux, the new
premium brand in home appliances. This Use &
Care Guide is part of our commitment to customer
satisfaction and product quality throughout the
service life of your new refrigerator drawers.
We view your purchase as the beginning of a
relationship. To ensure our ability to continue
serving you, please use this page to record key
product information.
IMPORTANT
PLEASE READ all instructions completely before
attempting to install or operate the unit.
All refrigerator drawers require a connection to
an electrical power source. Improper hook-up can
result in a safety hazard and potential damage
to the product or contents! Proper installation, in
accordance with the manufacturer’s specifications
and all local codes, is the sole responsibility of the
consumer. The manufacturer is not responsible
for any installation expenses or damages incurred
due to improper installation. If you are unsure of
your ability to safely connect electric power to the
unit, consult a licensed and insured professional
to perform all electrical work.
Once you have your unit installed, we suggest
you keep this manual in a safe place for future
reference. Should any problems occur, refer to the
Troubleshooting” section of this manual. This
information will help you quickly identify a problem
and get it remedied. In the event you require
assistance, please contact the dealer where you
purchased your unit.
Make a Record for Quick
Reference
Whenever you call to request information or
service, you will need to provide your model
number and serial number. You can find this
information on the serial plate located on the ceiling
of your unit and on the product registration card.
NOTE
Registering your product with Electrolux
enhances our ability to serve you. You can
register online at www.electroluxappliances.
com or by dropping your Product Registration
Card in the mail. Complete and mail the Product
Registration Card as soon as possible to validate
the registration date.
Please record the purchase date of your Electrolux
unit and your dealer’s name, address, and
telephone number.
_________________________________________
Purchase Date
_________________________________________
Electrolux Model Number
_________________________________________
Electrolux Serial Number
_________________________________________
Dealer Name
_________________________________________
Dealer Address
_________________________________________
Dealer Telephone
Keep this manual and the sales receipt together in
a safe place for future reference.
Questions?
For toll-free telephone support in the U.S. and
Canada:
1-877- 4ELECTROLUX (1-877-435-3287)
For online support and Internet product information:
www.electroluxappliances.com
3
Finding Information
Table of Contents
Finding Information ................................................................................. 2
Please Read and Save This Guide ......................................................................................2
Make a Record for Quick Reference ...................................................................................2
Product Registration Card ..................................................................................................2
Questions? .........................................................................................................................2
Safety .................................................................................................. 4
Important Safety Instructions ............................................................................................4
Safety Precautions .........................................................................................................4
Definitions .....................................................................................................................4
General Precautions .......................................................................................................4
Installation ........................................................................................... 5
Installing the Refrigerator Drawers ....................................................................................5
Site Preparation .................................................................................................................6
Leveling the Unit ................................................................................................................6
Start-Up and Temperature Control ................................................................ 7
Starting the Unit .................................................................................................................7
Adjusting the Temperature .................................................................................................7
Operation.............................................................................................. 8
Description of Features ......................................................................................................8
Alarms ................................................................................................................................8
Notifications .......................................................................................................................8
Sabbath Mode ....................................................................................................................8
Maintenance ......................................................................................... 9
Removing your Refrigerator Drawers .................................................................................9
To Remove Top Drawer ..................................................................................................9
To Remove Bottom Drawer ............................................................................................9
Maintaining Refrigerator Drawers ......................................................................................9
Exterior Cleaning for Your Stainless Steel Model ...........................................................9
Interior Cleaning ..........................................................................................................10
To Replace Air Filter .....................................................................................................10
Troubleshooting ..................................................................................... 11
Before You Call for Service ...............................................................................................11
If Service is Required .......................................................................................................11
Warranty Information .............................................................................. 12
4Safety
Important Safety Instructions
Safety Precautions
Do not attempt to install or operate your unit
until you have read the safety precautions in this
manual. Safety items throughout this manual are
labeled with a Danger, Warning, or Caution based
on the risk type.
Definitions
This is the safety alert symbol. It is used to
alert you to potential personal injury hazards. Obey
all safety messages that follow this symbol to avoid
possible injury or death.
WARNING
WARNING indicates a potentially hazardous
situation which, if not avoided, could result in
death or serious injury.
IMPORTANT
Indicates installation, operation, or maintenance
information which is important but not hazard-
related.
CAUTION
CAUTION indicates a potentially hazardous
situation which, if not avoided, may result in
minor or moderate injury.
DANGER
DANGER indicates an imminently hazardous
situation which, if not avoided, will result in
death or serious injury.
General Precautions
WARNING
RISK OF CHILD ENTRAPMENT. Before you
throw away your old appliance, take off the
doors and leave shelves in place so that
children may not easily climb inside.
WARNING
• Neverattempttorepairorperform
maintenance on the unit until the electricity
has been disconnected.
• Altering,cuttingofpowercord,removalof
power cord, removal of power plug, or direct
wiring can cause serious injury, fire and/or
loss of property and/or life and will void the
warranty.
• Donotliftunitbydoorhandle.
CAUTION
• Usecarewhenmovingtheunit.Someedges
are sharp and may cause personal injury.
Wear gloves when moving or repositioning
the unit.
• Neverinstalltheunitbehindcloseddoors.
Be sure front grille is free of obstruction.
Obstructing free air flow can cause the unit
to malfunction and may void the warranty.
• Allowunittemperaturetostabilizefor24
hours before use.
CAUTION
• UseonlygenuineElectroluxreplacement
parts. Imitation parts can damage the unit
and may void the warranty.
5
Installation
Installing the Refrigerator
Drawers
Your Electrolux refrigerator drawers have been
designed for built-in installation. When built-in, your
refrigerator drawers do not require additional air
space for top, sides, or rear. The front grille must
NOT be obstructed.
NOTE
To ease unit installation and removal, it is
recommended that the cabinet rough opening
dimensions be increased by at least ¼ inch over
the dimensions given for your unit.
Width Height Depth
2313/16 inch 34-35 inches 263/4 inch
Unit Dimensions
Product Dimensions
WARNING
Double drawer Refrigerator Drawers are
designed to be built-in only. They can not be
used for free-standing.
All screws supplied with the Anti-Tip Kit
are for mounting the bracket directly to wall
studs. These screws will not work if used with
sheetrock (dry wall) or anything other than
wall studs.
6Installation
Leveling the Unit
Position the unit on a flat, level surface capable of
supporting the entire weight of the unit when full.
This unit contains four (4) adjustable leveling
legs. Turn the legs clockwise to raise and
counterclockwise to lower.
WARNING
ELECTROCUTION HAZARD!
Electrical Grounding Required - This
appliance is equipped with a three prong
(grounding) polarized plug for your protection
against possible shock hazards.
•NEVERremovetheroundgroundingprong
from the plug.
•NEVERuseatwo-pronggroundingadapter.
•NEVERuseanextensioncordtoconnect
power to the unit.
Where a two-prong wall receptacle is
encountered or a longer power cord is
required, contact a qualified electrician to
have it replaced in accordance with applicable
electrical codes.
5 Position the unit to allow free air flow through
the front grille.
6 Wipe out inside of unit with a damp cloth.
7 Be sure to install the Anti-Tip bracket. Follow
the instructions provided with the Anti-Tip
bracket kit.
Site Preparation
1 Position the unit on a flat, level surface
capable of supporting the entire weight of the
unit. Remember the unit will be significantly
heavier once it is fully loaded.
2 This unit requires a grounded and polarized
115 VAC, 60Hz, 15A circuit (normal
household current).
3 Avoid connecting the unit to a Ground
Fault Interruptor (GFI). GFIs are prone to
nuisance tripping which will cause the unit to
shut down. GFIs are generally not used on
circuits which power equipment that must run
unattended for long periods of time.
4 The unit must be installed according to your
local codes and ordinances.
WARNING
The Anti-Tip Kit must be installed on this unit
before it is used. Double stacking units may
cause serious personal injury.
7
Starting the Unit
Your refrigerator drawers unit is shipped in the ON position; however, you may turn it ON or OFF by
pressing and holding the ON/OFF for three (3) seconds and then releasing the key.
Adjusting the Temperature
To accurately check the temperature, insert a reliable thermometer
into a plastic (non-breakable) bottle, partially filled with water.
Tighten the bottle cap securely.
Place the bottle in the desired area for 24 hours. Refrain from
opening the unit during the testing period. After 24 hours, check the
temperature of the water.
Press and release the (+) or (–) indicator to adjust the temperature
to the desired setting. The temperature display will begin to blink
with the first touch and release. Adjust the temperature by touching
and releasing the key. After three (3) seconds of inactivity, the
display will beep to accept the new temperature.
Start-Up and Temperature Control
Factors that affect the internal temperatures of the cabinet include:
1 Temperature setting
2 Room temperature where installed
3 Number of times the door is opened and closed
4 Amount of time the internal light is illuminated
5 Installation in direct sunlight or near a heat source
8
Sabbath Mode
Sabbath mode disables portions of
the unit and its controls in accordance
with the weekly Sabbath and religious
holidays observed within the Orthodox
Jewish community.
Sabbath mode is enabled and disabled by pressing
and holding the vacation mode key for five (5)
seconds and then releasing the key. Temperature
display shows “Sb” while in Sabbath mode.
Operation
Alarms
door ajar If the door has been left open for five
(5) minutes, an audible alarm will
sound and the door ajar indicator
will illuminate on the right side of the
display. The mute sounds indicator
will blink. Pressing and releasing the
mute sounds key will acknowledge
the alarm and disable the audible por-
tion. The door ajar indicator will con-
tinue to blink until the door is closed.
high temp In the event of a high temperature
condition, an audible alarm will sound,
the temperature display will blink and
display “HI”, and the high temp in-
dicator on the right side of the display
will blink. The mute sounds indica-
tor will blink. Pressing and releasing
the mute sounds key will acknowl-
edge the alarm and disable the audible
Description of Features
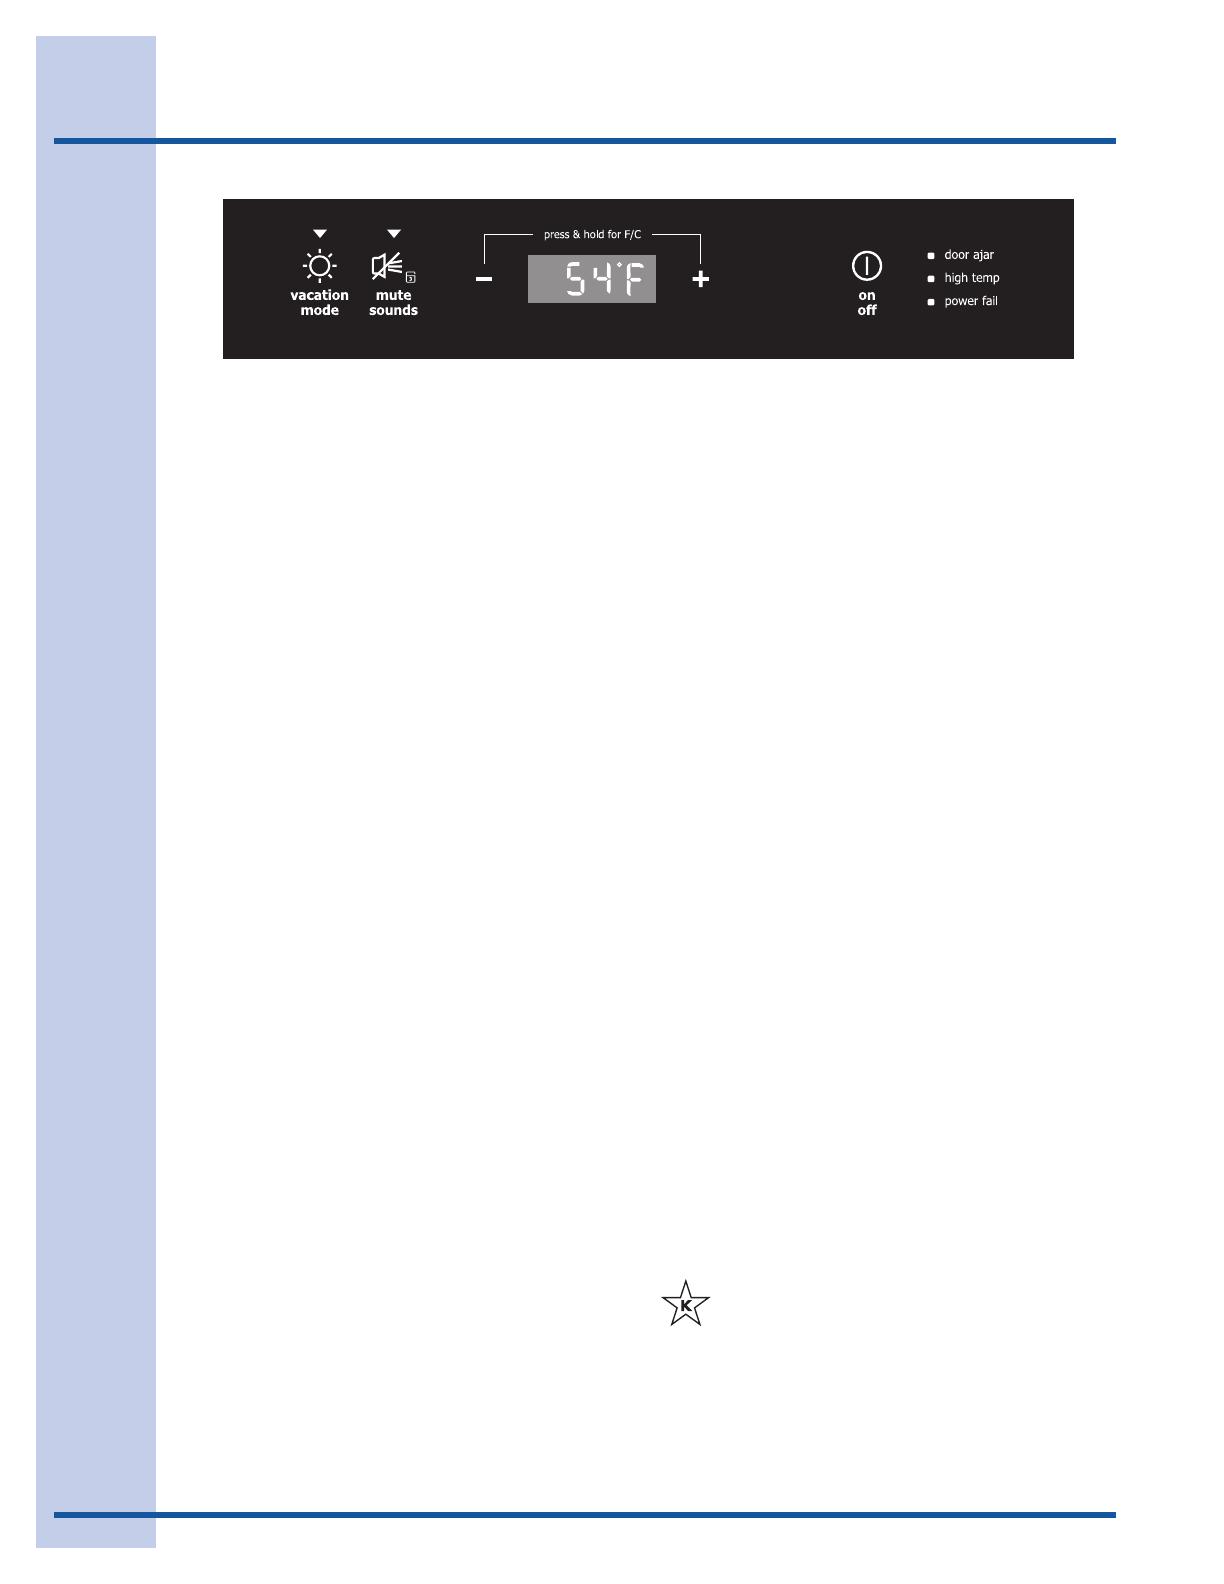
vacation mode Conserves energy by disabling interior
lights and keypad inputs.
mute sounds Tones emitted by each keypress can be
turned off based on user preference.
The sounds are muted when the red
indicator is lit. The mute sounds
key also is used to acknowledge alarm
conditions, denoted by a flashing red
indicator. Press and hold the mute
sounds key for three (3) seconds
then release to enable control lock,
which prevents undesired changes to
the unit settings. Temperature display
will show “LOC”.
temperature Simultaneously press and hold the (+)
and (–) keys for three (3) seconds then
releasing the key causes the tempera-
ture display to toggle from Fahrenheit
to Celsius and back again.
on off Press and hold for three (3) seconds
then release the key. This allows the
user to turn off the cooling system.
The temperature display will display
“OFF”. THIS DOES NOT REMOVE
POWER FROM THE UNIT.
portion. All other modes are turned off
until the alarm is acknowledged. The
high temperature indicator and “HI”
will stay illuminated until a normal safe
range operating temperature has been
reached, at which time the temperature
display will show the actual tempera-
ture.
power fail In the event of a power failure or
initial power-up, an audible alarm will
sound and the power fail indicator
on the right side of the display will
blink. The mute sounds indicator
will blink. Pressing and releasing the
mute sounds key will acknowledge
the alarm and disable the audible por-
tion. All other functions are disabled
until the alarm is acknowledged, at
which point the power fail indicator
is turned off and the unit will resume
normal operation. The high temp
alarm may also be illuminated until a
safe temperature has been reached.
Notifications
air filter After six months of use the display
will show AF. This is a reminder
that it is time to change the air filter.
The product will continue to function
normally. Pressing any key will reset
the reminder for 10 minutes. Once the
air filter is replaced, pressing the “On/
Off” and “ “ keys for three seconds
will reset the reminder for another six
months.
mode
9
Operation / Maintenance
Removing Your Refrigerator
Drawers
To remove top drawer:
1. Fully extend drawer.
2. Disconnect Molex connector.
3. Remove two screws using Phillips®
screwdriver.
4. Remove drawer by sliding forward 1/2” and
pull up.
5. Reverse procedure to reinstall drawer.
To remove bottom drawer:
1. Fully extend drawer.
2. Remove two screws using Phillips®
screwdriver.
3. Remove drawer by sliding forward 1/2” and
pull up.
4. Reverse procedure to reinstall drawer.
The customer may open or close the door at any
time without concern of directly turning on or off
any lights, digital readouts, solenoids, fans, valves,
compressor, icons, tones or alarms. After power
failure, the unit will immediately return to Sabbath
mode.
While in Sabbath mode, alarm indicators will not
illuminate, nor be accompanied by audible alarms.
For further assistance, guidelines for proper usage
and a complete list of models with the Sabbath
feature, please visit the web at http:\\www.star-k.
org.
Maintaining Your Refrigerator
Drawers
Periodic cleaning and proper maintenance will
ensure efficiency, top performance, and long
life. The maintenance intervals listed are based
on normal conditions. You may want to shorten
the intervals if you have pets or other special
considerations.
Exterior Cleaning for Your Stainless
Steel Model
• Yourstainlesssteelmodelmaydiscolorwhen
exposed to chlorine gas, pool chemicals, salt
water, or cleaners with bleach.
• Keepyourstainlessunitlookingnewby
cleaning with a high quality, all-in-one
stainless steel cleaner/polish on a monthly
basis. Frequent cleaning will remove surface
contamination that could lead to rust. Some
installations will require cleaning on a weekly
basis.
• DONOTCLEANWITHSTEELWOOLPADS.
• DONOTUSECLEANERSTHATARE
NOT SPECIFICALLY INTENDED FOR
STAINLESS STEEL (this includes glass, tile
and counter cleansers).
10
Interior Cleaning - as Required
1 Disconnect power to the refrigerator drawers.
2 Wipe down the interior with a solution of non-
abrasive mild detergent and warm water.
3 Rinse with clear water.
4 Reconnect power to the unit.
To Replace Air Filter:
1. Fully extend lower drawer. Air filter is
located on lower left wall of cabinet.
2. Remove old filter and replace with new
filter.
Maintenance
CAUTION
• Stainlesssteelmodelsexposedto
chlorine gas and moisture such as areas
with spas or swimming pools, may have
some discoloration of the stainless steel.
Discoloration from chlorine gas is normal.
Follow exterior cleaning instructions.
• NEVERUSECHLORIDETOCLEAN
STAINLESS STEEL.
• Ifanysurfacediscolorsorrustingappears,
clean it quickly with Bon-Ami or Barkeepers
Friend Cleanser and a non-abrasive cloth.
Always clean in the direction of the grain.
Always finish this process with a high quality,
all-in-one stainless steel cleaner/polish to
prevent further problems.
• USEOFABRASIVEPADSSUCHAS
SCOTCHBRITE WILL CAUSE THE
GRAINING IN THE STAINLESS TO
BECOME BLURRED.
• Rustthatisallowedtolingercanpenetrate
into the surface of the stainless steel and
become impossible to remove.
11
Troubleshooting
Before You Call for Service
If the unit appears to be malfunctioning, read
through this manual first. If the problem persists,
check the Troubleshooting Guide below. Locate
the problem in the guide and refer to the cause
and its remedy before calling for service. The
problem may be something very simple that can
be solved without a service call. Some remedies
listed in the Troubleshooting Guide are very
complex. Consulting or contracting a qualified
service technician may be necessary.
If Service is Required
Contact the dealer where you purchased the unit
if service is required. State the model and serial
number and explain the problem. The model and
serial number plate is located on the ceiling of your
unit.
If you do not know the name of the selling dealer
or a local service company, you can check online
at www.electroluxappliances.com, or call
1-877-435-3287.
WARNING
ELECTROCUTION HAZARD
NEVERattempttorepairorperformmaintenanceontheunituntilthemainelectricalpowerhas
been disconnected.
Problem Possible Cause Remedy
Unit not cold
enough
•Controlsettoowarm
•Airowtofrontgrille
blocked
•Doorgasketnotsealing
properly.
•Adjusttemperaturecolder.See“Adjusting the
Temperature in the Start-Up and Temperature Control
section. Allow 24 hours for temperature to stabilize.
•Airowmustnotbeobstructedtofrontgrille.See
Installation Section.
•Adjustdoorgasket.
Unit too cold •Controlsettoocold •Adjusttemperaturewarmer.SeeAdjusting the
Temperature in the Start-Up and Temperature Control
section. Allow 24 hours for temperature to stabilize.
No interior light •FailedLEDassembly •ContactaqualiedElectroluxServiceTechnician.
Light will not go out
when door is closed
•Doorswitchnotmaking
contact
•Checkforproperdooralignment.
12 Warranty Information
Major Appliance Warranty Information
Your appliance is covered by a one year limited warranty. For one year from your original date of purchase, Electrolux will repair or
replace any parts of this appliance that prove to be defective in materials or workmanship when such appliance is installed, used, and
maintained in accordance with the provided instructions. In addition, the cabinet liner and sealed refrigeration system (compressor,
condenser, evaporator, dryer or tubing) of your appliance is covered by a two through fi ve year limited warranty. During the 2nd through
5th years from your original date of purchase, Electrolux will repair or replace any parts in the cabinet liner and sealed refrigeration
system which prove to be defective in materials or workmanship when such appliance is installed, used, and maintained in accordance
with the provided instructions.
Exclusions
This warranty does not cover the following:
1. Products with original serial numbers that have been removed, altered or cannot be readily determined.
2. Product that has been transferred from its original owner to another party or removed outside the USA or Canada.
3. Rust on the interior or exterior of the unit.
4. Products purchased “as-is” are not covered by this warranty.
5. Food loss due to any refrigerator or freezer failures.
6. Products used in a commercial setting.
7. Service calls which do not involve malfunction or defects in materials or workmanship, or for appliances not in ordinary
household use or used other than in accordance with the provided instructions.
8. Service calls to correct the installation of your appliance or to instruct you how to use your appliance.
9. Expenses for making the appliance accessible for servicing, such as removal of trim, cupboards, shelves, etc., which are not a
part of the appliance when it is shipped from the factory.
10. Service calls to repair or replace appliance light bulbs, air fi lters, water fi lters, other consumables, or knobs, handles, or other
cosmetic parts.
11. Pickup and delivery costs; your appliance is designed to be repaired in the home.
12. Surcharges including, but not limited to, any after hour, weekend, or holiday service calls, tolls, ferry trip charges, or mileage
expense for service calls to remote areas, including the state of Alaska.
13. Damages to the fi nish of appliance or home incurred during transportation or installation, including but not limited to fl oors,
cabinets, walls, etc.
14. Damages caused by: services performed by unauthorized service companies; use of parts other than genuine Electrolux
parts or parts obtained from persons other than authorized service companies; or external causes such as abuse, misuse,
inadequate power supply, accidents, fi res, or acts of God.
DISCLAIMER OF IMPLIED WARRANTIES; LIMITATION OF REMEDIES
CUSTOMER’S SOLE AND EXCLUSIVE REMEDY UNDER THIS LIMITED WARRANTY SHALL BE REPAIR OR REPLACEMENT
AS PROVIDED HEREIN. CLAIMS BASED ON IMPLIED WARRANTIES, INCLUDING WARRANTIES OF MERCHANTABILITY OR
FITNESS FOR A PARTICULAR PURPOSE, ARE LIMITED TO ONE YEAR OR THE SHORTEST PERIOD ALLOWED BY LAW,
BUT NOT LESS THAN ONE YEAR. ELECTROLUX SHALL NOT BE LIABLE FOR CONSEQUENTIAL OR INCIDENTAL DAMAGES
SUCH AS PROPERTY DAMAGE AND INCIDENTAL EXPENSES RESULTING FROM ANY BREACH OF THIS WRITTEN LIMITED
WARRANTY OR ANY IMPLIED WARRANTY. SOME STATES AND PROVINCES DO NOT ALLOW THE EXCLUSION OR LIMITATION
OF INCIDENTAL OR CONSEQUENTIAL DAMAGES, OR LIMITATIONS ON THE DURATION OF IMPLIED WARRANTIES, SO THESE
LIMITATIONS OR EXCLUSIONS MAY NOT APPLY TO YOU. THIS WRITTEN WARRANTY GIVES YOU SPECIFIC LEGAL RIGHTS.
YOU MAY ALSO HAVE OTHER RIGHTS THAT VARY FROM STATE TO STATE.
If You Need Service
Keep your receipt, delivery slip, or some other appropriate payment record to establish the warranty period should service be required.
If service is performed, it is in your best interest to obtain and keep all receipts. Service under this warranty must be obtained by
contacting Electrolux at the addresses or phone numbers below.
This warranty only applies in the USA, Puerto Rico and Canada. In the USA and Puerto Rico, your appliance is warranted by Electrolux
Major Appliances North America, a division of Electrolux Home Products, Inc. In Canada, your appliance is warranted by Electrolux
Canada Corp. Electrolux authorizes no person to change or add to any obligations under this warranty. Obligations for service and parts
under this warranty must be performed by Electrolux or an authorized service company. Product features or specifi cations as described
or illustrated are subject to change without notice.
USA
1-877-435-3287
Electrolux Major Appliances North America
P.O. Box 212378
Augusta, GA 30907
Canada
1-800-265-8352
Electrolux Canada Corp.
5855 Terry Fox Way
Mississauga, Ontario, Canada L5V 3E4
  • Page 1 1
  • Page 2 2
  • Page 3 3
  • Page 4 4
  • Page 5 5
  • Page 6 6
  • Page 7 7
  • Page 8 8
  • Page 9 9
  • Page 10 10
  • Page 11 11
  • Page 12 12
  • Page 13 13

Electrolux EI24RD65KS User guide

Category
Drink coolers
Type
User guide

Electrolux EI24RD65KS refrigerator drawers offer convenient refrigerated storage solutions for your kitchen. With a spacious 5.1 cubic foot capacity, adjustable temperature control, and a variety of features, these drawers provide flexibility and convenience for your food storage needs.

Ask a question and I''ll find the answer in the document

Finding information in a document is now easier with AI