Husqvarna Viking Owner's manual
- Category
- Sewing machines
- Type
- Owner's manual

leflUelAl
6u!MOS
6
U!N!A
I

CONTENTS
General
hints
2—
3
Steps
in
sewing
4—27
Marking
4
Basting
S
Overcasting
and
assembling
6—
9
Top
stitching
10—11
Buttonholes
12—13
Eyelets
14
Loops
14
Sewing
on
buttons, buckles,
etc.
15
Gathering
16—17
Bound
edges
and
facings
18—19
Sewing
in
zippers
—
regular
method
20—21
Sewing
in
zippers
—
Tape-sew
method
22—25
Hemming
26—27
Sewing
in
different
materials
28—37
Sewing
terry
cloth
28—29
Sewing knit
and
stretch
fabrics
30-31
Sewing
sweater
knits
32
Sewing
synthetic fabrics
V
3335
Sewing
leather
and
imitation
leather
36—37
Decorative
effects
38—45
Decorative
seams
38—39
Appliqués
40
Raised
seams
(pintucks)
41
Lace
42—43
Monograms
44
Free-hand
monograms and
embroidery
45
Mending and
darning
46—48
Alphabetical
index
49

This
is
part
two”
of
the
instructional literature
that
comes
with
your
Viking
sewing
machine.
“Part
one”
is
the
Operating
Manual.
Whenever
you
want
to
check
which
dial
to
turn
or
what
else
to do
in
order
to
make
your
machine
perform
a
specific
sewing
operation,
you
can
look
it
up
in
the
Operating
Manual, quickly.
The
Sewing
Manual,
which
you
are now
reading.
contains
many
additional
sewing
hints
that
you might
find
helpful.
By
presenting
them
in
this
separate
booklet
it
has
been
possible
to
give
you
more
complete
information
while
keeping
the
Operating
Manual
concise for
easy
reference.
Together.
the
Operating
Manual
and
the Sewing
Manual
will
help
you
utilize
more
of
the
fine
Viking
features
to
the
greatest
possible
advantage.
q
n
Else-Marie
Gutarp
Director
of
the
Sewing
Academy
at
the
Viking-Husqvarna
Factory,
Huskvama.
Sweden

General
hints
It
is
always
wise
to
try
a
tension
test
on
the
fabric
you
are
using before
beginning
to
sew
your
garment
together.
To
do this
thld
an
ofT
cut of
the
fabric
in
half
and
sew
a
straight seam
in
the
direction
of
the
grain:
the
two
threads
should
lock
between
the
two
layers
of
fabrics.
If
the
lower
thread
lies
along
the
underneath
of
the
seam
pulling
the
top
thread
through.
the
top
thread
tension
is
too
loose,
and
should
he
set
on
a
higher
number.
If
the
upper
thread
lies
along
the
top
of
the
seam
pulling
the
lower
thread
through.
the
top
tension
is
too
tight
and
should
be
set
at
a
lower number.
In
most
cases
it
is
sufficient
to
alter
the
tension
only
on
the
top
thread:
you
v
ill
rarely need
to
adjust
the
tension
on
the
lower
thread.
Loose tension
reduces
the
strength
of
the
‘seam
and
tight
tension
will
give
a
puckered
seam.
Always
start
a
straight
seam
b
turning
the
hand
wheel
towards
you
so
that
the
needle
enters
the
seam
line.
then
loer
the
presser
foot.
When
sewing
zig-zag
and
other stitches
it
is
easier
to
lower
the
presser
foot
over
the
center
of
the
seam,
then
lower
the
needle.
When
se
ing
on
thin
and
soft
fabrics,
start
the
seam
about
1/4”
from
the
edge
of the
fabric
to
prevent
it
from
being
pulled
don
into
the
needle
hole
in
the
throat
plate. If
you
wish
to
extend
the
seam
out
to
the
very
edge
of
the
fabric,
sew
a
few
reverse
stitches
and
then
hold
the
thread
behind
the
presser
foot
when
sewing
forward
again.
Start
the
machine
gently
and
increase
the
speed
gradually.
Watch
the
presser
foot
to
ensure
that
it
tllo
s
an edge
or
a
seam
don’t watch
the
needle
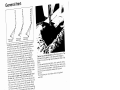
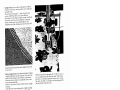
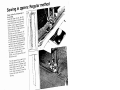
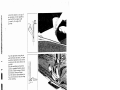
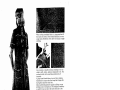
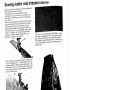
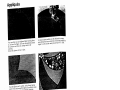
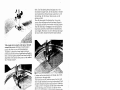
The
best
way
to
hold
the
fabric
is
illustrated above.
The
left
hand
resting
lightly
on
the
fabric and helping
to
guide
it
forward.
the
right
hand
holding
the
edge
of
the
fabric.
Let
the
machine
feed
the fabric. Only
guide the
fabric
toward
the
presser
foot.
When
sewing
very
thick
sean-is
you
can
assist
the
machine
by
releasing
the
pressure
on
the
presser
foot
and
gently
leading
the
material
forward.
The
reduction
gear
also
helps when
sewing
thick
mate
ri
a
Is.
RIGHT
WRONG
WRONG

Lock the
seam
ends
by
pressing
the
reverse
button.
making
the
machine
sew
backwards.
This
prevents
stitches
from
coming
undone.
When
sewing
zig-zag
stitches
lock the
seam
end
by
sewing
a
few
stitches
with
the
feed
dog
lowered.
With
the
elastic
straight stitch
there
is
no
need
to
lock
the
end
of
the
seam
as
this
is
done
automatically.
Before
you
remove
the
fabric,
the
machine
should
have
fully
completed
the last
stitch,
with
the
needle
in
its
highest
position.
PuN
the
threads
away
from
you
and
cut
them.
Leave
at
least
6
inches
(15
cm)
of
thread
in
the
needle
so
that
it
will
not
he
drawn
out
of
the eve of
the
needle
when the
next
seam
is
started.
When
turning
a
corner
stop
with
the
needle
down
in
the
fabric.
This
also
applies when
stopping
the
machine
in
order
to
re-arrange
the
work,

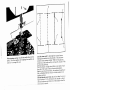
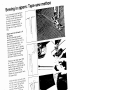
Marking
•
-
-
-
-
-
-
-
.‘
;
—I—
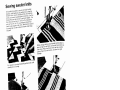
Having
cut
your
garment
it
is
necessary
to
transfer
all
the
instructions
from the
paper
pattern
to
the
fabric.
On
cotton
and
other
less
delicate fabrics
you
can
mark
with
marking
paper
and
wheel
or
with
chalk
or
pencil.
For
finer
and
more
delicate
fabrics
you
use
the
Viking
marking
presser
foot
(41
13
931).
Set
the
machine
for
zig-zag
—
stitch
length
2—2.5
and
stitch
width
2.
Reduce
thread
tension
to
the
buttonhole
symbol
test).
4
—
Carefully
pin
the
pattern
pieces
to
the
fabric.
Cut
out
the
darts
and
other
markings
from the
paper
and
sew
around
the
pattern,
as
close
to
the edge
of
the
paper
as
possible. Remove
the
pattern.

aDLII
-
-
-
\/3:
Pull
the
pieces
of
the
fabric
apart
and
snip
the
stitches
between
the
layers
of
fabric.
The
threads
now
remain
in
the
fabric
in
the
form
of
small
tassels
and
show
where
the
seams
are
to
be
sewn.
Tape-Sew
hint.
Attach
pieces
of tape
to
the
reverse
side
of
the
pieces
of
garment
and
write
the
directions
on
them
i.e.
“right
sleeve”.
“left
sleeve”.
“upper
collar”.
etc. The positions
of
the
pockets.
buttonholes.
etc..
can
also
be
marked
ith
the
tape.
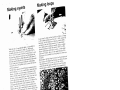
Pin
basting
saves
work
when sewing
simpler
garments.
Insert
the
pins
at
right-angles
to
the
seam.
Then
sew the
seam
and
remove
each
pin
as you
come
to
it.
If
you
are
carefuf.
use
fine
pins,
and
relatively
long
stitches,
you
can
sew
right
across
the pins.
Ho
ever
this
involves
a
risk
of
blunting
the
needle.
Machine
basting allows
you
to
try
on
the
garment
before
sewing
it
together.
Pin
the
seams
as
described
above.
Set
the
machine
for
the
longest
stitch
length
ith
loose
top
thread
tension.
Baste
the
parts
of
the
garment
together.
You
can. after
finally
se
ing
the
garment.
remove
the
basting
h
drawing
out
the
lower
thrci.
.,
—.
_..
7
I

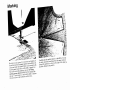
Overcasting
and assembling
PRESSED
OPEN
SEAMS
are
formed
by
first
overcasting
the
edges
of
the
fabric
with
three-step
zig-zag
or
some
other
type
of
overcasting
seam.
and
then sewing
the
pieces
together
with
a
straight
seam.
either
ordinary
or
elastic.
it
is
wise
to
overcast
the
edges
of
every
piece
individually
before sewing
the
garment
together.
If
it is
necessary
to
adjust
the
seam
and
cut
off
the
seam
allowance,
it
can
easily
be
overcast
again.
On
the
other
hand.
armholes
and
neck
lines
should
not
be
overcast
in
advance,
unless
the
fabric
frays
easily.
Pieces
to
be
turned
after
stitching.
such
as
collars.
pocket
flaps
and
so
on.
need not
be
overcast
either.
You
may
also
overcast
the
seams
during
the
progress
of
the
work,
but
never
sew the
garment
together
before
overcasting
as
the
seams
will
be
more difficult
to
get
at
and
the
overcasting
will
be
neither
neat nor
efficient.
Trim
the
edges
of
the
fabric
before
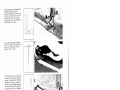
overcasting.
Use
as
fine
a
thread
as
possible.
Make
sure
that
the
needle
sews
over
the
edge
of
the
fabric.
If
you
use
the
largest
stitch
width
(4)
it
will
be
sufficient
if the
edge
of
the
fabric
follows the
notch
on the
presser
foot
No.
41
1383
or
the
right-hand indication
on
the
presser
foot
No.41
14512
as
shown
in
the
pictures.
If
a
narrower
stitch
width
is
used,
determine
the
correct
measurement
by
sewing
a
sample
seam
on
a
scrap
of
the
fabric.
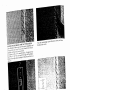
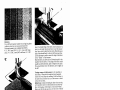
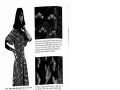
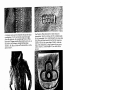
Three-step
zig-zag
has many
advantages
over
ordinary
zig-zag
when
overcasting.
it
is
more
elastic
and
does
not
pull
the
edges
of
the fabric
together
when
deaing
with
thin
fabrics.
It
is
preferable
to
use
overcast
stitch
(C.
green)
for
certain
thin
fabrics.
Double
overlock
is
suitable
for
overcasting
loosely
woven
or
knit
fabrics.
Threads criss-cross
to
reinforce
the
edge.
6

Straight
stitch
can
he
used
for
joining
pieces
of
fabric
which are
not
elastic
and
are
not
likely
to
be
subjected
to
much
strain.
The
normal
stitch
length
is 2.
hut
the
structure
and
weave
of
different
fabrics
max’
require
different
adjustments
to
the
length
so
that
the
stitches
will
blend
attractively
into the
weave
of
the
fabric,
in
general
shorter
stitches
may
be
used
for
thin
fabrics,
but
remember
that
if
the
stitches
are
too
short
the
seam
will
become
puckered
and
if they
are
too
long
the
seam
will
be
too
loose.
Elastic
straight
stitch
should
be
used
instead
of
ordinary
straight
stitching
for
all
elastic
material.
It
is
also
to be
preferred
for
putting
in
sleeves
and
for
crotch
seams
which
are
always
subject
to
considerable
strain,
even
in
non-stretch
materials.
Relatively
fine
thread
shnnld
he
used
for elastic
straight
stitching.
A
tip:
Baste
the
seams
using
ordinary
straight
stitching.
stitch
length
6.
and
a
thread
the
same
color
as
the
material.
When
you
have
tried
on
the
garment.
the
seams
can
be
“sewn
in”
with
elastic straight
stitching.
The
tacking
thread
need
not
be
removed
if
you
sew
exactly
along
the
basting seam.
-‘
With
the
help
of
the
edge
guide
(40
15
420
it
is
easy
to
se
at
a
uniform
distance
from
the edge.
With
simple
garments
it
is
therefore
generally
unnecessary
to
mark
the
seams.
Instead,
it
is
enough
to
set
the
edge guide for
the
prescribed
seam
allowance
Lw

If
you
prefer
it.
you
can
cut
the
garment
with
a
wider
seam
allowance,
but
remember
that
the
left-hand
edge
of
the
seam
should
then
follow the
marking
for
the
seam.
‘you
can
see
in
the
picture
how
the
left-hand
marking
on
the
transparent
presser
foot
(41
14512)
can
be
used as
a
guide.
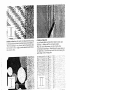
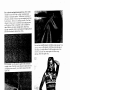
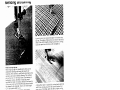
8
The
overlock
stitch
will
stretch
and
binds
the
edges
of
the fabric
well.
It
can
be
used
for
any
fabric
but
is
especially
suitable
when
thin,
elastic
seams
are
required
in
knit
fabrics,
double
knit
and
stretch
towelling.
SEAMS
WITH EDGES
OVERCAST
TOGETHER
Trim
the
remaining
seam
allowance
once
you
have
are
obtained
when
you
stitch
the
pieces
together
and
finished the
seam.
overcast
in
one
step.
You
can
use elastic
knit
stitch.
double
overlock
or
overcast
stitch.
Calculate
ith
a
114”
seam
allowance.
Using
presser
foot
No.31
14512
you
can
let
the
edge
of
the
fabric
follow
the
right-hand
marking
on
the
presser
foot.
as
shown.
N
—.-.-------
,--
.
.
,-

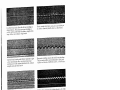
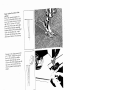
Double
overlock
can
he
used
for
sewing
and
overcasting
in
one
operation
in
both
stretch
and
non-stretch
fabrics.
The overcasting
is
very close-set
and
is
therefore
ideal
for
loosely
woven,
rough
textured materials
and
fabrics
that
tend
to
fray.
itill
1:
jijI
t1
11j
)
c!
M1i1
‘
ll
4
1
l
I
:
if
Ii
OVERLAP
SEAMS
are
soft
and
pliant
and
therefore
ideal
for baby
and
children’s
clothes
and
for
sewing
in
leather.
Place
the
seam
allowances
on
top
of
each
other
(matching
the
markings). Stitch
along
the
open edge
on
the
right
side.
Turn
the
work
and
then
stitch
along the
open
edge
on
the
wrOng
side.
Overcast
stitch
is
suitable
for
simultaneous
sewing
and
overcasting
in
sheer
materials.
:
J;
..
..
-
.
•
••..
.
•
I
—_.___..__
.-
‘..-
I
—
1
‘-1
•.‘::....:;;
.
.
&—-
•.,.•••
.
Double
action
stitch
is
ideal
for
overlap
seams
in
almost
any
type
of
material.
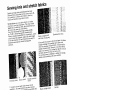
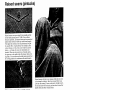
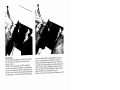
9

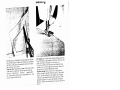
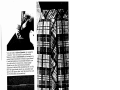
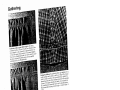
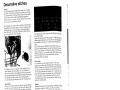
Top
stitching
Attractive
top
stitching
can
be
achieved
by
using
several
types
of stitches
and
varying
methods.
as
shown
on
the
opposite
page.
The
jacket
shown
here
has top
stitching done
with
Ric
Rac.
The
stitching
should
be
done
on
double
fabric.
In
thinner fabrics
it
is
even
advisable
to
use
interfacing.
The
top
stitching
on the
skirts
shown
above
has
been
done
using
coarse
thread
and
long
stitches.
l0

Use
fine
thread
and
a
fine
needle for
top
stitching
on
thinner
fabrics.
The
picture
shows
top
stitching
on
cotton
cambric performed
with
ordinary
straight
stitch.
long
stitches
and
ordinary
sewing
thread.
Coarser
thread
can
be
used
in
thicker
materials
to
give
a
more
pronounced
effect.
The picture
shows
top
stitching
sewn
with
synthetic
buttonhole
silk,
ordinary
straight
seam
and
stitch
length
6.
j%i.-
-
•
.
You
can
achieve
parallel
stitching
by
using
twin
needles.
It
is
best
to
use
a
coarse upper
thread
and
a
tner
lower
thread.
Ric
Rac
gives
pronounced
stitching
thanks
to
the
triple
thread.
Elastic
straight
stitch
gives
attractive
top
stitching
in
any
fabric.
especially
double
knit.
Use
fine
thread.
Decorative stitches
can
also
be
used
for
top
stitching.
The
decorative
effect
can
be
enhanced
by
using twin
needles
and
threads of
different
colors.
as
shown
here.
II

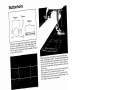
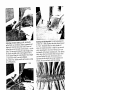
Buttonholes
Determine
the length
of
the
buttonhole
by
measuring
the
button
and
adding
1/10”
to
3/16”
depending
on
the
thickness
of
the
button
and
the
fabric.
The
distance
from
the
edge
of the
garment
should normally
be
equal
to
the
width
of
the
button.
The position
of
the
buttonhole
can
be
marked
with
thread,
as
illustrated,
or
with
chalk
or
adhesive
tape.
15mm
3mm
18mm
:“‘
When
using
tape.
check
first
to
ensure that
the tape
does
not
damage
the
fabric.
The
tape
should
preferably
be
placed
alongside
the
buttonhole
position
so
that
you
do not
sew into
the
tape.
However
in
loosely knitted
fabrics
like
sweater
knits
the
buttonhole
may
be
Sewn
on
the
tape.
Make
atrial
buttonhole
on
a
scrap
of
the
material
first.
If
the
garment
has
an
interfacing
then
the
trial
buttonhole
should also
have one.
Cut
open
the
trial
buttonhole
and
see
if
the
button
will
go
through
it.
If
not.
slightly
lengthen the
buttonhole.
12

You
can
make
a
reinforced
buttonhole,
by
sewing
the
“columns”
twice
as
described
in
your
Operating
Manual,
or
make
a
corded
buttonhole,
by
sewing
over
a
coarse
thread,
buttonhole
twist
thread
or
gimp
thread.
Corded
buttonholes
are
recommended
whenever
you
sew
with
knitted
or
stretch
fabrics.
Attach
a
gimp
thread
loop as
shown
in
the
picture around
the
projection
at
the heel
of
the
buttonhole
foot
(41
11
650).
Draw
the
gimp
threads
towards
you,
one
under
each
groove
in
the
presser
foot.
Lower
the
presser
foot,
and
sew the
buttonhole
in
the
normal
way.
When
the
buttonhole
has
been finished,
pull
the
loose
ends
of
the gimp
thread
so
that
the
loop
reinforces
one
end
of
the
buttonhole.
Using
a
needle,
hand
sew
the
loose
ends
through
to
the
reverse
side and
tie
them.

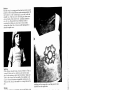
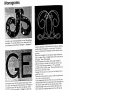
Making
eyelets
I
With
the
aid
of
a
special
eyelet
plate.
it
is
posibIe
to
make
eyelets
in
embroidery,
belts. etc.
Plates
are
aailahle
for
holes
of
4
mm
15/32”)
and
6mm
(7/32”).
No.41
15
55-0l
and
41
IS
855-02
respectively.
Lower
the
feed
dog.
Remove
the
presser
foot
and
attach
the
special
e’.
elet
plate
by
sliding
the
hooks
at
the
rear
of
the
plate
into the
feed dog
slots
and
then
press
down
the
front
of
the
plate.
Darning
or
preferably
embroidery
cotton No.
4))
or
50
should
be
used.
Loosen
the
tension
on
the
top
thread.
Set
the
stitch
selector
at
the
left-hand
starting
position.
stitch
idth
at
3
or
4.
Use
an
embroidery
hoop
for
thin
t’ahric’.
Carefully
cut
or
puncture
a
small
hole
in
the
fabric
ith
the
seam
ripper
and
fit
it
over
the
stud
on
the
plate.
Ensure
that
the
hole
tts
snugly
over
the
stud.
Lo
er
the
presser
foot
lever.
Draw
up
the
bottom
thread.
Hold
both
thread ends
and
se
over
them.
the
se
ing
needle
alternately
in
the
stud
hole
and
the
fabric.
You may
use
the
button
reed
to
protect
your
fingers
and
use
the
low
speed gear
for
more
accurate
speed
control.
Rotate
the
ork
very slowly
and
sew
the
stitches
close
together
in
order
to
obtain
an
attractive
eyelet.
Cut
off
both
the
loose
starting
threads
just
before
the
eyelet
is
completed.
The
eyelet
may
hsewn
with
greater
intervals
between
stitches
the
first time
round,
then
a
second
time
with
stitches
closer
together.
How
close
the
stitches
will
be
to
each
other
depends
on
how slowly
you
rotate
the
fabric
and
the
speed
of
the
machine.
Making
loops
Loops
may
he
made
on the
machine
as
follows.
Change
to
the
raised
seam
presser
foot
(4l
II
389).
Lower
the
feed
dog.
Set
the
machine
on
zig-zag.
stitch
width
2.
and
loosen
the
top
thread
tension.
Use
buttonhole
twist,
light
cord or
ordinary smooth
string
as
a
gimp
thread
and
place
it
under
the
presser
tbot.
Use
fine
thread.
preferably
embroidery
cotton.
as
both
upper
and
lower
threads.
Sew
over
the
gimp
thread
with
a
zig-zag as
you
carefully draw
the
gimp
away
from
you
by
hand.
Remember.
the
feed
dog
is
lowered
so
the
closeness
of
the
stitches
will
depend
on
the
pace
at which
you
draw
the
gimp
thread.
It
is
easier
to
sev
the
stitches
somewhat
farther
apart
and
then sew
over
the
gimp
thread
again
to
achieve
a
smooth,
neat
appearance.
1j’
1r
-
The
resulting
loop
can
he
used
ftr
belts
or
for button
loops.
It
should
he
attached
with zig-zag
stitching. Ifit
is
to
he
used along
an
edge,
it
can
he
attached
before
the
Lcing
is
sewn
on.
14

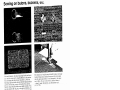
Sewing
on
buttons,
DucKlets,
eu.
Not
only
buttons.
but
also
rings,
large
hooks
and
eyes.
etc. may
he
sewn
on by
machine.
Remove
the
presser
foot.
leaving
only
the
presser
foot
ankle.
Lower
the
feed
dog.
Set
the
stitch
selector
in
the
left-hand
position
and
test
to
find
the
correct
stitch
width.
Sew
on
the
-
button.
ring
or
buckle
with
seven
or
eight
stitches.
You
can
also
attach
the
ring.
etc.
with
a
row
of stitches.
by
carefully
moving
the
work
forwards.
Finally, fasten
the
thread
by
setting
the
stitch
width
knob
at
0
and
sewing
several
stitches
in
the
same
place.
The
buttons
or
buckles
ma
be
held
in
place
with
tape
before
being
placed
under
the
presser
bar
(provided
that
the
particular
fabric
is
not
damaged
by
the
tape:
test
it
firsu.
If
you wish
to
have
a
thread
stem
or
“shank”
under
the
button.
use
the
button
reed
(41
II
73.
15

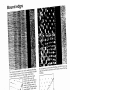
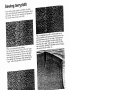
Gathering
Easing
the
fullness by
gathering
after
zig-zagging
over
a
cord
orgimp
can
he
done
at
the
lower
edge
of
a
circular
skirt
in
order
to
reduce
the
circumference
slightly
for
hemming.
and
also when making
a
pocket
with
rounded
corners.
The
gimp
should
just
barely
run
smoothly
in
the
stitching
but
naturally
must
not
be
stitched
down.
Recommended
setting:
stitch
length
I,
stitch
width
1.5
(test).
Gathering
with
increased
stitch
length
is
the
most
common
method.
The
best
results
are
obtained
if the
stitch
length
is
only
increased
to
approximately
3
or
3.5
and
the
upper
thread
tension
is
loosened
slightly.
Two
rows
of
gathering
stitches
are
sewn
side
by
side
—
the
lower
thieads
from
both
rows
are
then pulled
simultaneously
to
effect
gathering.
Gathering
by
zig-zagging
over
a
coarse
thread
(sewing
thread
or
buttonhole
twist)
gives
a
more
durable
result.
for
example
at
a
skirt
waistband.
This
method
is
useful
for
the
gathering
of
very
wide
or
long
pieces.
where
the
gathering
thread
may
tend
to
break. Two
rows
of
gathering
stitches
should
be
sewn for
more uniform
gathering.
16

Gathering
with
sheer
elastic
gives
soft,
stretchable
gathering
for
use
on
blouses,
children’s
garments
and
nightwear.
Hold
the
elastic
firmly
both
in
front
and
behind
the
presser
foot
and
stretch
the
elastic
—
not
the
fabric
The
zig-zag
stitch
should
be
wide
enough
so
that
the
elastic
can
glide
within
it
and
the
gathers
will
be
evenly
spaced
when
the
work
is
finished.
Stitch
length
2.5
and
stitch
width
2
are
usually
sufficient.
In
a
similar way.
double
overlock
can
be
used
as
casing
for
1/8
flat
elastic.
Gathering
with
shirring
stitch.
Use
the
buttonhole
pres
ser
foot
(41
11
650)
and
place
the
elastic
thread
around
its
“heel”.
Remember
that
the
elastic
thread
will
always
be
stitched
in
double.
so
take
this
into
account
when
calculating
how
much
you
will
need.
Sew
over
both
lengths
of
the
elastic
simultaneously.
The
shirring
elastic
may
either
be
stretched
while
sewing
or
hen
you
have finished the
seam.
In
the
latter
case
it
is
important
that
the
elastic does
not get
stitched
in
by
mistake.
but
can
run
freely
under
the
stitching.
.-
Gathering
with
flat
elastic
is
more
decorative
if
the
elastic
is
attached
with
three-step
zig-zag.
Stretch
the
elastic
both
in
front and behind
the
presser
foot
and sew
along
the
center
of
the
elastic.
The
elastic
should
be
uniformly
stretched
along
its
entire
length.
Elastic smocking
can
be
obtained
by
sewing
several
rows
of
gathering
next
to
each
other.
either
using
the
shirring
stitch
or
zig-zag
stitching
over
shirring elastic.
17

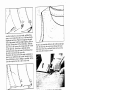
Bound
edges
_________
1,t.
________
r.
_...
The
simplest method
is
to
use
ready-made
bias
binding.
If
the
binding
is
to be
sewn
on
to
a
curved
edge
it
should
he
pre-shaped.
Fold
it
over
the
edge
of
the
fabric
allowing
the
lower part
(which
will
be
on
the
reverse
side
of
the
fabric)
to
be
slightly
wider.
Sew
using
a
straight
seam
or.
even
easier.
using
zig-zag.
stitch
length
I
and stitch
width
1—1.5
(test).
A
decorative
stitch
may
also
be
used.
If
you
have
a
woven
seam binding,
just
fold
it
over
the
edge
of
the
fabric and
stitch
on
the same
way
as
for
bias
binding.
4;;
0
4;
0
0
-—
18
Page is loading ...
Page is loading ...
Page is loading ...
Page is loading ...
Page is loading ...
Page is loading ...
Page is loading ...
Page is loading ...
Page is loading ...
Page is loading ...
Page is loading ...
Page is loading ...
Page is loading ...
Page is loading ...
Page is loading ...
Page is loading ...
Page is loading ...
Page is loading ...
Page is loading ...
Page is loading ...
Page is loading ...
Page is loading ...
Page is loading ...
Page is loading ...
Page is loading ...
Page is loading ...
Page is loading ...
Page is loading ...
Page is loading ...
Page is loading ...
Page is loading ...
-
 1
1
-
 2
2
-
 3
3
-
 4
4
-
 5
5
-
 6
6
-
 7
7
-
 8
8
-
 9
9
-
 10
10
-
 11
11
-
 12
12
-
 13
13
-
 14
14
-
 15
15
-
 16
16
-
 17
17
-
 18
18
-
 19
19
-
 20
20
-
 21
21
-
 22
22
-
 23
23
-
 24
24
-
 25
25
-
 26
26
-
 27
27
-
 28
28
-
 29
29
-
 30
30
-
 31
31
-
 32
32
-
 33
33
-
 34
34
-
 35
35
-
 36
36
-
 37
37
-
 38
38
-
 39
39
-
 40
40
-
 41
41
-
 42
42
-
 43
43
-
 44
44
-
 45
45
-
 46
46
-
 47
47
-
 48
48
-
 49
49
-
 50
50
-
 51
51


Husqvarna Viking Owner's manual
- Category
- Sewing machines
- Type
- Owner's manual
Ask a question and I''ll find the answer in the document
Finding information in a document is now easier with AI
Related papers
-
Husqvarna Huskylock 234D Owner's manual
-
-
-
-
-
-
-
-
-
Other documents
-
Baby Lock ESG-IZF Operating instructions
-
Baby Lock BLE-LF Operating instructions
-
Bernina 930 Record electronic Owner's manual
-
White 1570 User manual
-
SINGER 725 Owner's manual
-
Pfaff hobby 4240 User manual
-
Pfaff tipmatic 6152 Owner's manual
-
-
-
Pfaff tiptronic 2030 Owner's manual