Global Air Products NPC1-12.5C-B User guide
- Category
- Split-system air conditioners
- Type
- User guide
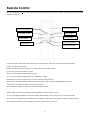
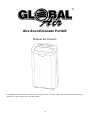
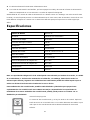
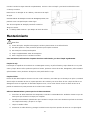
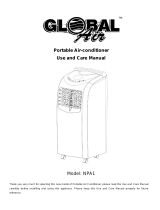
Global Air Products NPC1-12.5C-B is a portable air conditioner designed for residential use. With a cooling capacity of 12500 BTU/hr, it is suitable for medium to large rooms. The unit features three fan speeds, a 24-hour timer, and an auto-swing function for even cooling distribution. It also has a dehumidifying function to remove excess moisture from the air, creating a more comfortable environment. The remote control allows for convenient operation from anywhere in the room.
Global Air Products NPC1-12.5C-B is a portable air conditioner designed for residential use. With a cooling capacity of 12500 BTU/hr, it is suitable for medium to large rooms. The unit features three fan speeds, a 24-hour timer, and an auto-swing function for even cooling distribution. It also has a dehumidifying function to remove excess moisture from the air, creating a more comfortable environment. The remote control allows for convenient operation from anywhere in the room.


-
 1
1
-
 2
2
-
 3
3
-
 4
4
-
 5
5
-
 6
6
-
 7
7
-
 8
8
-
 9
9
-
 10
10
-
 11
11
-
 12
12
-
 13
13
-
 14
14
-
 15
15
-
 16
16
-
 17
17
-
 18
18
-
 19
19
-
 20
20
-
 21
21
-
 22
22
-
 23
23
-
 24
24
-
 25
25
-
 26
26
-
 27
27
-
 28
28
-
 29
29
-
 30
30


Global Air Products NPC1-12.5C-B User guide
- Category
- Split-system air conditioners
- Type
- User guide
Global Air Products NPC1-12.5C-B is a portable air conditioner designed for residential use. With a cooling capacity of 12500 BTU/hr, it is suitable for medium to large rooms. The unit features three fan speeds, a 24-hour timer, and an auto-swing function for even cooling distribution. It also has a dehumidifying function to remove excess moisture from the air, creating a more comfortable environment. The remote control allows for convenient operation from anywhere in the room.
Ask a question and I''ll find the answer in the document
Finding information in a document is now easier with AI
in other languages

Other documents
-
Infiniton PAC-97CO Owner's manual
-
-
-
Honeywell MM14CHCS User manual
-
Honeywell HF0CESWK6 Owner's manual
-
Royal Sovereign ARP-9009TL User manual
-
Amcor 9000E User manual
-
-
Amcor NanoMax Series User manual
-