Celestron 72204 User manual

Category
Binoculars
Type
User manual
Binocular & Digital Camera
Model #72204 /72205/72217
Cautions
Introduction
VistaPix is a binocular integrated with a digital camera that is great for
sporting events, concerts and wildlife activities such as hunting or
bird-watching. VistaPix lets you record memories and sights at the
touch of a button. Use the full-featured binocular for closer views and
capture images to take home with you at the same time. VistaPix makes
it possible to share your fun with others by downloading images from the
camera right to your computer to e-mail to your friends and family.
˙ Avoid dropping VistaPix.Do not disassemble VistaPi x.
Usage of the battery
˙ Please always use Alkaline Battery(AAA Alkaline Battery).
˙ Please remove batteries when not using your VistaPix for long periods
of time.
Cautions
˙Never immerse VistaPix into any fluid or liquid.Remove dust or stains
with a soft cloth dampened with water or neutral detergent.
Keep in a dry and cool dust-free environment or a container when it is
not used.
About usage
˙ To avoid damage do not use VistaPix under the following conditions.
1.Places in temperature higher that 100 F.(35 C)
2.Damp or dust places.
3.Places with strong electromagnetic field.
˙ Please do not disassemble or repair the product to avoid malfunction.
˙ Please do not drop the product on the ground to avoid malfunction.
o
o
Product part identification
1. Diopter Knob(on underside)
2. Center Focus Knob
3. Objective Lens
4. Power/Mode Button
5. Shutter/Set Button
6. USB Port
7. Eyepiece
8. Camera Lens
9. LCD Screen
10. Battery Compartment Lid
11. Objective Barrel
-
+
11
3
8 9
3
11
2
1
7
5
6
4
7
7
10
Looking at or near the sun will cause instant and irreversible damage
to your eye. Eye damage is often painless, so there is no warning to
the observer that damage has occurred until it is too late. Do not point
the binocular at or near the sun.Children should always have adult
supervision while observing...............................................................
WARNING !
Never use a VistaPix to look at the sun !
Howtouseyourbinocular
Adjustment of eye-relief for eyeglass wearers
Fold down the rubber eyecups and pla ce them again st your gla sses to
get the best vie win g result .
How To Use Your Binocular
Adjusting the eyepieces
The dis tance between your eyes is calle d in ter pupilla ry dis tance.
The in ter pupilla ry dis tance is dif ferent from one person to another.
It is im portant to adju st to your in ter pupilla ry dis tance before usin g
your Vis taPix :
- Hold Vis taPix fir mly in the normal vie win g posit io n.
- Adju st the barrels by pushin g together or pullin g apart until you see a
sin gle cir cle fie ld wit h both of your eyes.
Focusing the Binocular
1. Set the Dio pter Knob on undersid e of Vis taPix at it scenter
Poin t between + and - .
2. Choose an obje ct that is 10meters(30ft) away.
3. Lookin g wit h ju st your le ft eye, rotate the Center Focus Knob until
the obje ct you are vie win g is in best focus.
4. Lookin g wit h ju st your rig ht eye, rotate the Dio pter Knob until the
obje ct you are vie win g is in best focus.
5. Vie win g your obje ct wit h both eyes, turn the Center Focus Knob to
brin g it in best focus.
How To Use Your Camera
Attention!!:
* To extend battery life remove the batteries when not using the camera..
Failure to do so will result in losing pictures and dead battery after
several days.
* When batteries are removed, memory of pictures can maintain for 30
seconds. Batteries must be replaced within 30 seconds to avoid losing
pictures. Be sure VistaPix is OFF before replacing the batteries.
Inserting Batteries
Lift the battery compartment lid and insert two AAA size alkaline batteries.
Operation Instruction
Camera Functions Control
Power off the camera
Press the Function button to select the shown on the
LCD, then press the Shutter button to power off the camera.
Auto - Shoot Mode
1.Press the Function button to select shown on the LCD.
2.Press the Shutter button within 5 seconds. The timer runs
for about 10 seconds before the photo is taken.
Operation Instruction
Taking 3 Photos Continuously
1.Press the Function button to select shown on the LCD.
2.Hold down Shutter button within 5 seconds and it will take 3
photos continuously. And saved as jpg format.
Photo Resolution Selection
The resolution status will always show on the LCD display in
small character.
1.Press Function button to selectMode character shown on
LCD;
2. Hi means VGA mode 640*480 pixels, Lo means QVGA
mode 320*240 pixels;
3.When you select Mode function, press the shutter button
once to switch between the Hi mode and the Lo mode.
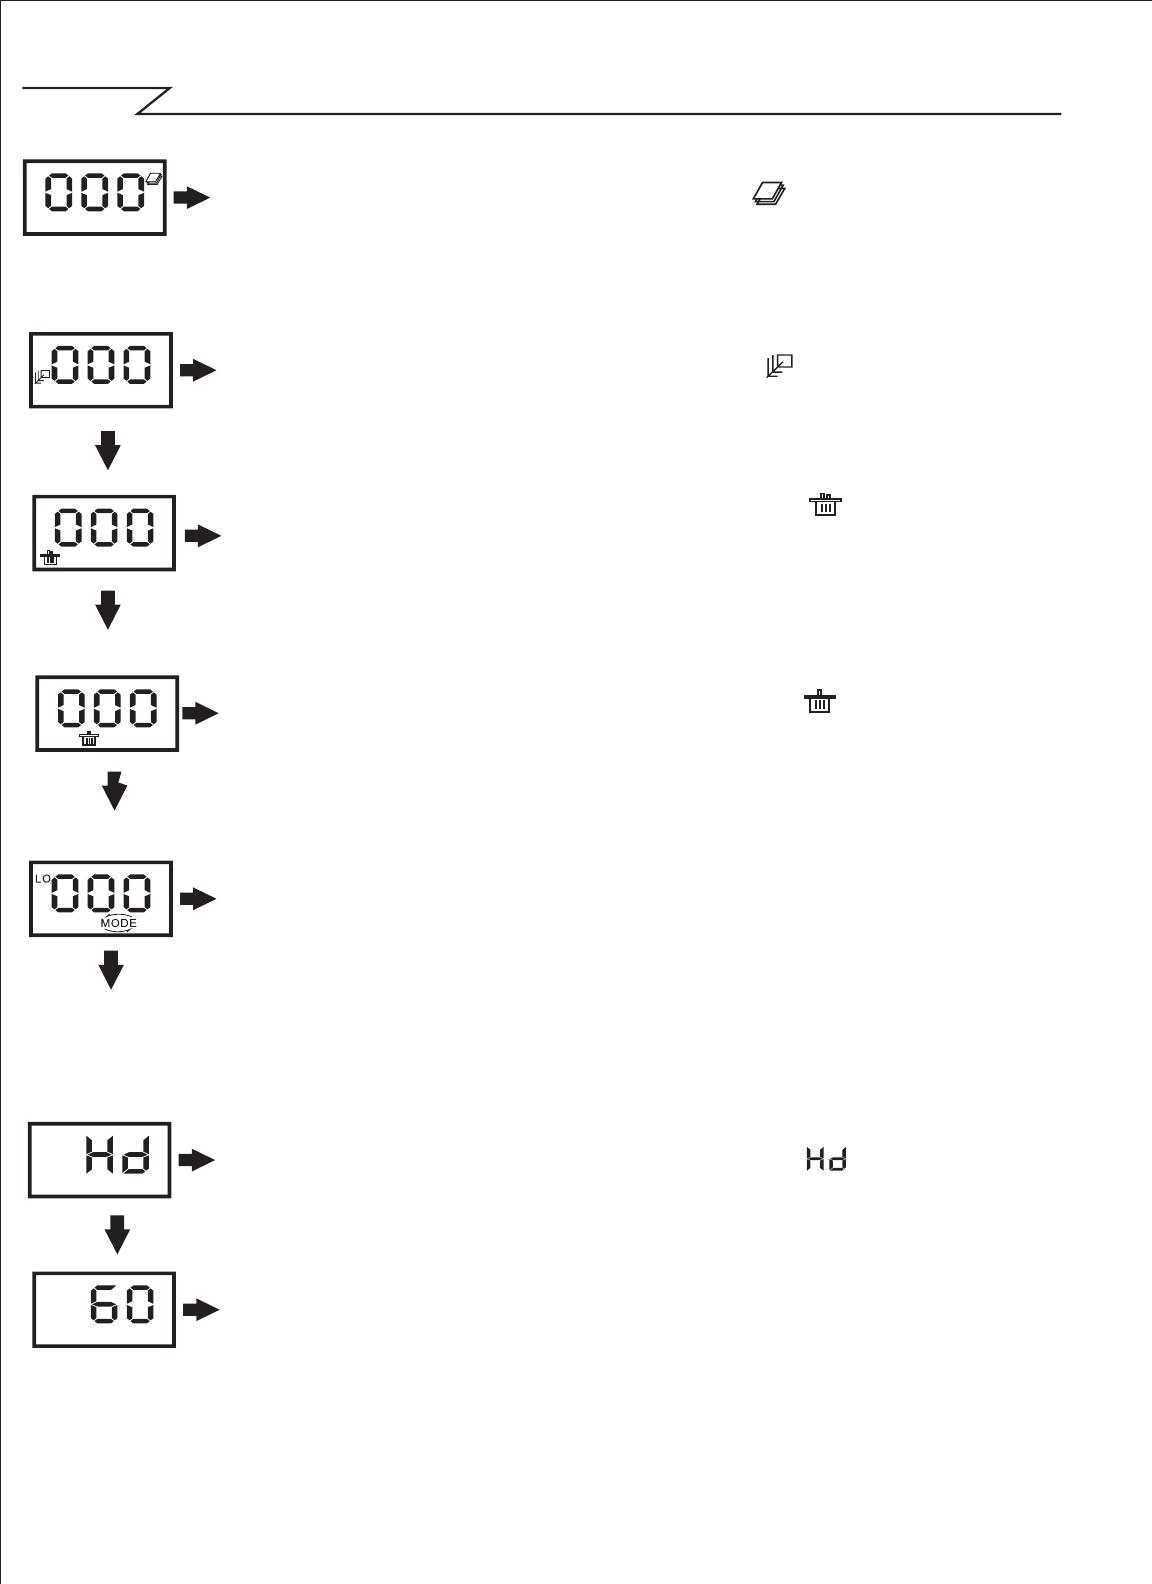
Image Compression / Processing Mode Shift:
1.Press Function button to select the icon shown on LCD.
2.Press the shutter button within 5 seconds to shift between
Compression(Hd) and ordinary mode(Ld).
Fluorescent Lamp Frequency Selection
1.Press the Function button to select the 60 icon shown on
the LCD.
2.Press the Shutter button within 5 seconds to switch the icon
60 to 50 .
Tips: 60 means you are in 60HZ; If you press shutter button,
you will switch to 50HZ. Generally speaking, there is 60Hz
fluorescent lamp frequency used in United States, Asia. And
50Hz used in Japan and Europe.
Delete All Photos
1.Press the Function button to select the icon shown on
the LCD.
2.Press the Shutter button the LCD will flash. Press the
Shutter Button again within 5 seconds to delete all the
photos stored in the memory.
Delete Single Photos
1.Press the Function button to select the icon shown on
the LCD.
2.Press the Shutter button once within 5 seconds to delete
the last photo.
Continuous Shoot Mode
1.Press the Function button to select shown on the LCD.
2.Press and hold the Shutter button within 5 seconds.
Notes: Under the continuous shooting mode, the photos are
all taken in QVGA mode and can be downloaded individually.
SOFTWARE INSTALLATION
You must install the PhotoImpression and driver before downloading
t he p hotos.
1. Please put the software CD into your computer and the install menu
will be displayed automatically as shown below:
. ...... . . . . ...... . . . . . ..... . . . . . ..... . . . . . ...... . . . . . ..... . . . . . ..... . . . . . ...... . . . .
......................................
2. Click the icon Install PhotoImpression, then follow the below steps to
install it.
SOFTWARE INSTALLATION
3. Click the icon Install Driver, then follow the installation directions to
install it.
Tips
Do not connect the camera to your computer during installing software.
If the install menu does not appear on your screen automatically ,
follow the steps below.
1. Place the CD into your CD-ROM drive.
2. Press the "Start" button on your computer and selectRun.
3.Enter E:\autorun.exe (If E is your CD-ROM drive letter).
4. Follow the directions of the installation.
You can use the Funhouse software to edit or print the photos.
Click Install Funhouse to install it per your request.
DOWNLOAD PHOTOS
Please follow the steps below to download the photos.
1. Connect your camera to computer with USB cable .
2. Double-click the PhotoImpression icon on your desktop.
3. Click the Camera / Scanner button.
4. Click the icon.
5. Select the photo you want to view and click OK.
6. Click Save.
7. Click Save As.
8. Input the file name and select the file type.
Click Save to save your photo.
Step 3
Step 5
Step 4
Step 6
Tip:
Your photos downloaded will be automatically saved at the folder
\\My Documents\MyPictures\ .
DOWNLOAD PHOTOS
Step 7 Step 8
PC CAM FUNCTION
Functions Introduction
Sources :You can set the Brightness,Cotrast and the other camera controls
SelectDefault and pressOK.
Format : You can adjust the resolution and the color mode of images;
the color mode is suggested to select [RGB-24].
Live : You can browse real-time videos or images.
Capture: When you play live videos,click and select this function to
acquire the single picture and store it in the album.
Done : Finish the PC Camera Functions.
5. Click Live to start browsing.
6. Click Done to finish browsing.
Browse Live
1.Connect your camera to the computer with the USB cable correctly.
2.Double-click the PhotoImpression icon on your desktop.
3.Click the icon Camera/Scanner.
4.Click the Video Camera symbol . You will see the dialog box
displayed as below.
If your operation system is Windows XP, you may need to
take the following steps.
1. Connect your camera to the computer with the USB cable.
2. Double-click My Computer icon on the desktop.
3. Double-click DaulCamera icon .
You can browse live via your camera now.
4. Click Take a New Picture button. The picture you are browsing will
be captured.
5. Select the picture you captured, click Copy this file to save your
picture.
6. Select the place you want to copy this photo, then click Copy.
PC CAM FUNCTION
Troubleshooting
For Taking Photos
Q:There are color spots or stripes layers and segments on my photos.
A: This is caused by camera`s internal program loop, the factors might be
caused from using the non-alkaline or low batteries. Please turn off
all the power. (including USB cable and batteries), then turn on after
10 seconds.
Q: Why my photo was blurred?
A: The camera was shaking during shooting. Please hold the camera
steadily.
Q: There is shadow on my photo, what`s the reason?
A: Maybe the lens of camera was obscured by your hand or strap during
shooting. Please make sure the lens was not obscured while shooting.
Troubleshooting
For Downloading Photos
Q: Can I connect the camera to the computer when I install the driver?
A: No, the camera should not be connected when installing the driver.
Q: After I finished installing the software, when I download the photos from
my camera, there is an icon showing no photos in camera ? .
A: First make sure that you have taken photos already, then check the total
number of the photos showing on the camera`s LCD.
Please also check if the USB cable is connected to your computer and
camera correctly. If it still does not work, please do the following steps:
If your O/S (operating system) is Win XP or Win 2000
(1) Open [Device Manager] (Select [My computer] on the Desktop,
Press right key/Properties/Hardware/Device Manager?)
(2) Select [Action] [Scan for hardware changes]
If your O/S is Win 98SE or Win ME
(1) Open [Device Manager] (Select [My computer] on the Desktop,
Press right key/Properties/Device Manager)
(2) Press right key/[Refresh]
Q: The camera can`t work after connection, there`s a yellow mark !
showing at Device Manager/Imaging devices/ DaulCamera
A: Due to a conflict of the computer`s peripheral, please follow below
steps:
(1)Select DaulCamera in [Device Manager]
(2)Press right key/[Uninstall] (If OS is WIN98SE or WIN ME, Press right
key/[Remove])
(3)Remove USB cable
(4)Restart Computer
(5)Re-plug USB cable
Q: After finished installing software and connect the camera to the
computer, in device manager there`s unknown USB device .
A: Please check if your camera was connected to your computer correctly,
if it was, please do the following steps:
(1)Unload driver
(2)Re-install driver.
  • Page 1 1
  • Page 2 2
  • Page 3 3
  • Page 4 4
  • Page 5 5
  • Page 6 6
  • Page 7 7
  • Page 8 8
  • Page 9 9
  • Page 10 10
  • Page 11 11
  • Page 12 12
  • Page 13 13
  • Page 14 14

Celestron 72204 User manual

Category
Binoculars
Type
User manual

Ask a question and I''ll find the answer in the document

Finding information in a document is now easier with AI