12
AUTOMATIC ICE & WATER DISPENSER (CONTINUED)
PURESOURCE
TM
* ICE AND WATER FILTER
(SOME MODELS)
Ordernewltercartridgesthroughthedealerwhereyou
boughttherefrigerator,contacttheElectroluxSolutionsHotline
at1-800-944-9044,orgotoourwebsiteatwww.frigidaire.
com.Itmightbegoodtoordersomeltercartridgeswhen
yourstinstallyourrefrigerator.BesuretoaskfortheRG-100
PureSource™*replacementcartridge.
System Startup:
Watersupplydoesnotneedtobeturnedoff,however,donot
useiceandwaterdispenserwhileinstallinglter.Thelter
cartridgehasalreadybeeninstalledinthelterhousingatthe
factory.RefertotheHowtoPrimetheWaterSupplySystem
sectiontoproperlyllthesystemwithwater.
Changing the Filter:
Waterconditionsvarythroughouttheworld,butchangingthe
waterlterevery6-9monthsnormallywillensurethehighest
possiblewaterquality.Ice jams in the ice maker and/or
hollow ice cubes (partially frozen cubes with water inside),
may also be a sign that your water filter needs changing.
TheFilterStatuslightwillturnredafter400gallonsofwater
hasowedthroughtheiceandwaterdispenser.Also,ifthelter
hasbeeninarefrigeratorthathasnotbeeninuseforawhile
(duringmovingforexample),changethelterbeforereinstalling
therefrigerator.Thedispensersystemwillalsooperatewithout
ltration(withltercartridgeremoved).
* WhiteWestinghouseusesthenameCrystalClearinsteadofPureSource,buttheyarethesamelter.
ThePureSource™*NGRG-2000IceandWater
FilterSystemwiththeRG-100cartridgeis
testedandcertiedbyNSFInternational,the
nationallyrecognizedandrespected,notfor
prot,certicationorganizationforpublichealth
safety.ThePureSource™*systemistestedandcertied
toANSI/NSFStandard42.Seeperformancedatasheetfor
specications.Thissystemshouldnotbeusedonwaterthat
ismicrobiologicallyunsafeorwithwaterofunknownquality
unlessthewaterhasbeenadequatelydisinfectedbeforeor
aftertravelingthroughtheltrationsystem.
•RatedCapacity-400gallons
•Ratedserviceow-.5GPM
•MaximumRatedPressure-100PSI,Minimum30PSI
•MaximumOperatingTemp.-100°F,Minimum33°F
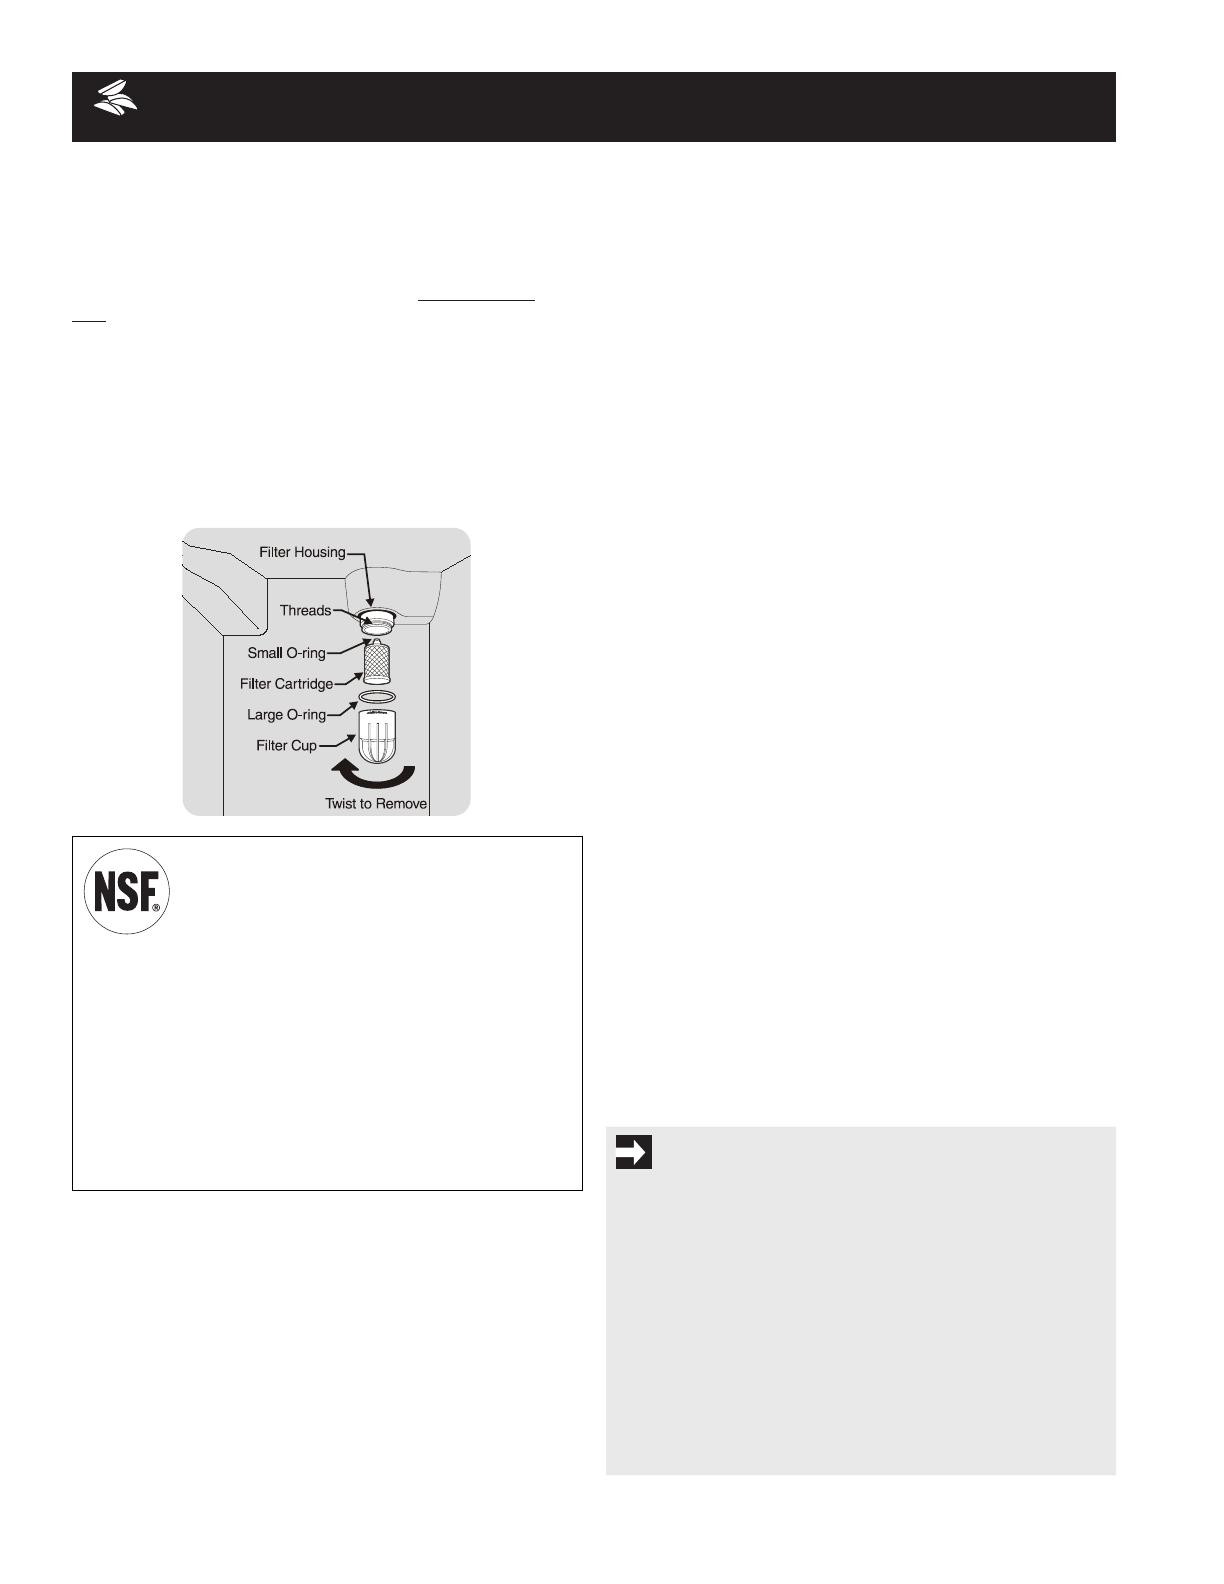
To change filter:
Itisnotnecessarytoturnthewatersupplyofftochangethelter.
1 Openfreezerdoorandleaveopenuntillterchangeis
complete.
2 TurnOFFsidemountedicemakerbyraisingwiresignal
armtotheUPposition.TurnOFFrearmountedicemaker
bypressingON/OFFpowerswitchtothe“O”position.
3 Holdltercuprmly,andunscrewtowardsleft.(Somewater
couldleakoutasyouremovecup.Thisisnormal.)Filter
cartridgeshouldcomedownwithcup.Ifcartridgeremainsin
housing,pulldowngently,whiletwistinglterbackandforth.
4 Rinseoutcupunderrunningwater.
5 Thelargeo-ringthatsealstheltersystemtsinthe
o-ringgrooveinsidethecup.Shouldtheo-ringfallout
duringltercartridgereplacement,simplyplaceitback
inthegroovepriortoscrewingthecupbackinplace.If
theo-ringbecomesdamaged,youwillneedtoorderone
fromtheElectroluxSolutionsHotline.
6 Discardoldltercartridge.
7 Removenewltercartridgefrompackaging.Placeincup.
Theendwiththesmallo-ringshouldbeup,outofthecup.
8 Screwcup,withlter,backontohousing.Do Not Use
Wrench To Reinstall Cup.Filtercartridgewillself-align
ascupistightened.Besurecupiscompletelytightened
withPureSource™ logofacingoutward.Do Not Tighten
Past Stop.
9 TurnONsidemountedicemakerbyloweringwiresignal
armtotheDOWNposition.TurnONrearmountedice
makerbypressingON/OFFpowerswitchtothe“I”position.
10 Checkforleaks.Openrefrigeratordoor.Wipeanywater
dropletsfromtheltercup.Fillaglasswithwater.If
thereisaleak,unscrewltercup,andreinsertthelter
cartridge.CheckplacementoflargeO-ring.Reinstalllter
cup,makingcertainitistightenedcompletely.
11 To prime filter system and purge air from water line,
continueushingthesystemforapproximately3minutes
toassurethatthepurestwaterpossibleisstoredin
thewatertank.There will be noticeable spurts and
sputters as the system pushes air out through the
system and out the dispenser nozzle. This is normal.
IMPORTANT
Resetting The Filter Status Light (some models)
Afterreplacingtheltercartridge,itwillbenecessarytopress
theFilterStatusResetbuttonlocatedontheiceandwater
dispenser.ThiswillresettheFilterStatuslight.PushtheReset
buttonuntilthegreen,redandamberlightsash(10-15
seconds).Pleaserefertothecompletedispenseroperating
instructionsattachedtotheinsideofthefreezerdoor.
On models without a Filter Status reset button, thereisa
setofReminderStickersincludedintheenvelopethattheUse
& Care Manualcamein.Chooseadatedstickerthatindicates
6-9months(dependingonyourwaterqualityandusage)
fromthedateofinstallation.Placethestickeronthefrontof
theltercuptoremindyouwhenitistimetochangethelter.


