
V260/V262
CDMA


1
Welcome
Welcome to the world of Motorola digital wireless
communications! We are pleased that you have chosen the
Motorola V260/V262 wireless phone.
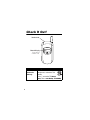
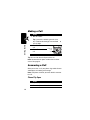
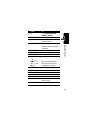
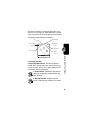
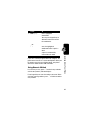
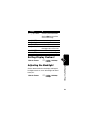
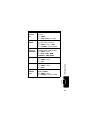
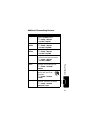
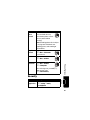
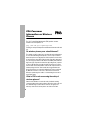
Speakerphone
Key
CLR Key
Clear entries, move
back through menus.
Menu Key
Volume Keys
Adjust earpiece &
ringer volume.
Smart/
Speakerphone Key
Select menu items,
set ring styles.
Voice Recognition
Key
Activate speaker-
independent voice
recognition, record
voice records, &
contacts.
Power/End Key
Turn phone on/off,
end phone calls, exit
menus.
5-Way
Navigation Key
Scroll through
menus & lists, set
values. Press
K
key
in center to select
highlighted item.
Accessory Port
Send Key
Make & answer
calls, view recently
dialed calls list.
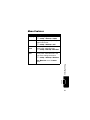
Left Soft Key
Perform
functions identified
by left display
prompt.
Right Soft Key
Perform functions
identified by right
display prompt.
Microphone

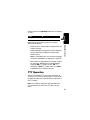
2
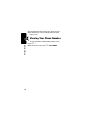
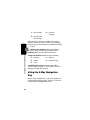
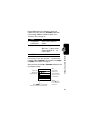
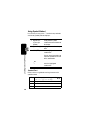
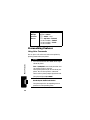
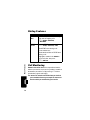
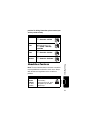
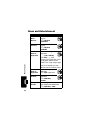
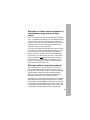
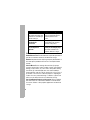
Check It Out!
Feature Description
Send
Multimedia
Message
Send a multimedia message
with pictures, animations, and
sounds:
Press
S
to scroll to
U
(
Message
Center
), then >
Create Message
>
New MMS Msg
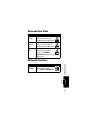
Headset Jack
External Display
View caller ID
& status icons.
032380o

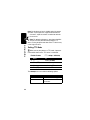
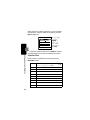
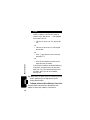
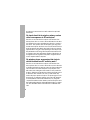
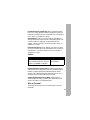
3
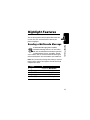
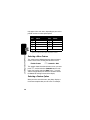
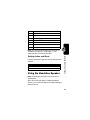
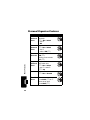
Send Text
Message
Send a text message:
Press
S
to scroll to
U
(
Message
Center
), then >
Create Message
>
New Short Msg
Read
Multimedia
Message
Read a new multimedia
message or letter that you have
received:
Press
READ
(
+
).
Feature Description
032380o
032380o

4
Motorola, Inc.
Consumer Advocacy Office
1307 East Algonquin Road
Schaumburg, IL 60196
www.hellomoto.com
1-800-331-6456 (United States)
1-888-390-6456 (TTY/TDD United States for hearing impaired)
1-800-461-4575 (Canada)
www.motorola.com
(United States)
www.motorola.ca
(Canada)
MOTOROLA and the Stylized M Logo are registered in the US Patent &
Trademark Office. All other product or service names are the property of their
respective owners.
© Motorola, Inc. 2004
The information contained in Motorola's user's guides is believed to be correct
at the time of printing. Motorola reserves the right to change or modify any
information or specifications without notice. The contents of Motorola’s user's
guides are provided “as is.” Except as required by applicable law, no warranties
of any kind, either express or implied, including, but not limited to, the implied
warranties of merchantability and fitness for a particular purpose, are made in
relation to the accuracy, reliability, or contents of this guide.
Caution:
Changes or modifications made in the radio phone, not expressly
approved by Motorola, will void the user’s authority to operate the equipment.
Manual number: 6809490A03-O

5
Contents
Getting Started
. . . . . . . . . . . . . . . . . . . . . . . . . . . . . . . . . . 8
About This Guide . . . . . . . . . . . . . . . . . . . . . . . . . . . . . . . 8
Installing the Battery . . . . . . . . . . . . . . . . . . . . . . . . . . . . . 8
Battery Use. . . . . . . . . . . . . . . . . . . . . . . . . . . . . . . . . . . 10
Charging the Battery. . . . . . . . . . . . . . . . . . . . . . . . . . . . 11
Removing a Flip Cover . . . . . . . . . . . . . . . . . . . . . . . . . . 12
Attaching a Flip Cover. . . . . . . . . . . . . . . . . . . . . . . . . . . 12
Turning On Your Phone. . . . . . . . . . . . . . . . . . . . . . . . . . 12
Adjusting Volume . . . . . . . . . . . . . . . . . . . . . . . . . . . . . . 13
Making a Call . . . . . . . . . . . . . . . . . . . . . . . . . . . . . . . . . 14
Answering a Call. . . . . . . . . . . . . . . . . . . . . . . . . . . . . . . 14
Changing the Call Alert. . . . . . . . . . . . . . . . . . . . . . . . . . 15
Viewing Your Phone Number . . . . . . . . . . . . . . . . . . . . . 16
Highlight Features
. . . . . . . . . . . . . . . . . . . . . . . . . . . . . . 17
Sending a Multimedia Message . . . . . . . . . . . . . . . . . . . 17
Receiving a Multimedia Message. . . . . . . . . . . . . . . . . . 20
TTY Operation . . . . . . . . . . . . . . . . . . . . . . . . . . . . . . . . 21
Learning to Use Your Phone
. . . . . . . . . . . . . . . . . . . . . . 24
Using the Display . . . . . . . . . . . . . . . . . . . . . . . . . . . . . . 24
Using the 5-Way Navigation Key. . . . . . . . . . . . . . . . . . . 26
Using Menus. . . . . . . . . . . . . . . . . . . . . . . . . . . . . . . . . . 27
Entering Text. . . . . . . . . . . . . . . . . . . . . . . . . . . . . . . . . . 30
Using the Handsfree Speaker. . . . . . . . . . . . . . . . . . . . . 39
Using the External Display . . . . . . . . . . . . . . . . . . . . . . . 40
Changing a Code, PIN, or Password . . . . . . . . . . . . . . . 42
Locking and Unlocking Your Phone . . . . . . . . . . . . . . . . 42
If You Forget a Code, PIN, or Password . . . . . . . . . . . . . 44

6
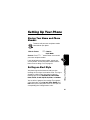
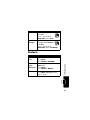
Setting Up Your Phone
. . . . . . . . . . . . . . . . . . . . . . . . . . 45
Storing Your Name and Phone Number . . . . . . . . . . . . 45
Setting an Alert Style . . . . . . . . . . . . . . . . . . . . . . . . . . 45
Setting Answer Options. . . . . . . . . . . . . . . . . . . . . . . . . 46
Setting a Wallpaper Image . . . . . . . . . . . . . . . . . . . . . . 47
Setting a Screen Saver Image . . . . . . . . . . . . . . . . . . . 48
Setting Display Contrast . . . . . . . . . . . . . . . . . . . . . . . . 49
Adjusting the Backlight . . . . . . . . . . . . . . . . . . . . . . . . . 49
Hiding or Showing Location Information . . . . . . . . . . . . 50
Conserving Battery Power . . . . . . . . . . . . . . . . . . . . . . 51
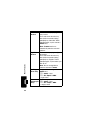
Calling Features
. . . . . . . . . . . . . . . . . . . . . . . . . . . . . . . 52
Changing the Active Line . . . . . . . . . . . . . . . . . . . . . . . 52
Redialing a Number . . . . . . . . . . . . . . . . . . . . . . . . . . . 52
Using Automatic Redial. . . . . . . . . . . . . . . . . . . . . . . . . 52
Turning Off a Call Alert . . . . . . . . . . . . . . . . . . . . . . . . . 53
Calling an Emergency Number . . . . . . . . . . . . . . . . . . . 53
Using AGPS During an Emergency Call . . . . . . . . . . . . 54
Viewing Recent Calls . . . . . . . . . . . . . . . . . . . . . . . . . . 55
Returning an Unanswered Call . . . . . . . . . . . . . . . . . . . 56
Using the Notepad . . . . . . . . . . . . . . . . . . . . . . . . . . . . 57
Attaching a Number . . . . . . . . . . . . . . . . . . . . . . . . . . . 58
Calling with Speed Dial . . . . . . . . . . . . . . . . . . . . . . . . . 58
Calling with 1-Touch Dial. . . . . . . . . . . . . . . . . . . . . . . . 58
Using Voicemail. . . . . . . . . . . . . . . . . . . . . . . . . . . . . . . 59
Phone Features
. . . . . . . . . . . . . . . . . . . . . . . . . . . . . . . . 61
Main Menu . . . . . . . . . . . . . . . . . . . . . . . . . . . . . . . . . . 61
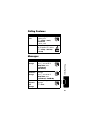
Calling Features . . . . . . . . . . . . . . . . . . . . . . . . . . . . . . 63
Messages . . . . . . . . . . . . . . . . . . . . . . . . . . . . . . . . . . . 63
Contacts . . . . . . . . . . . . . . . . . . . . . . . . . . . . . . . . . . . . 65
Personalizing Features . . . . . . . . . . . . . . . . . . . . . . . . . 68
Menu Features . . . . . . . . . . . . . . . . . . . . . . . . . . . . . . . 75

7
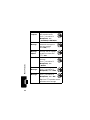
Dialing Features . . . . . . . . . . . . . . . . . . . . . . . . . . . . . . . 76
Call Monitoring . . . . . . . . . . . . . . . . . . . . . . . . . . . . . . . . 76
Handsfree Features . . . . . . . . . . . . . . . . . . . . . . . . . . . . 77
Data and Fax Calls . . . . . . . . . . . . . . . . . . . . . . . . . . . . . 79
Network Features . . . . . . . . . . . . . . . . . . . . . . . . . . . . . . 79
Personal Organizer Features . . . . . . . . . . . . . . . . . . . . . 80
Security. . . . . . . . . . . . . . . . . . . . . . . . . . . . . . . . . . . . . . 81
News and Entertainment . . . . . . . . . . . . . . . . . . . . . . . . 82
Specific Absorption Rate Data
. . . . . . . . . . . . . . . . . . . . 83
Index
. . . . . . . . . . . . . . . . . . . . . . . . . . . . . . . . . . . . . . . . . 85

8
Getting Started
Getting Started
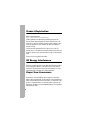
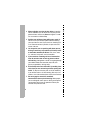
About This Guide
This guide describes the basic features of your Motorola
wireless phone.
Optional Features
This label identifies an optional network or
subscription-dependent feature that may not be
offered by all service providers in all geographical
areas. Contact your service provider for more
information.
Optional Accessories
This label identifies a feature that requires an
optional Motorola Original® accessory.
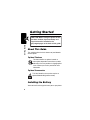
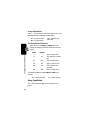
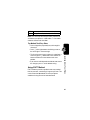
Installing the Battery
You must install and charge the battery to use your phone.
CAUTION: Before using the phone for the
first time, read the
Important Safety and
Legal Information
included in the
gray-edged pages at the back of this guide.
032259o
032380o

9
Getting Started
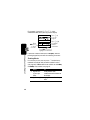
Your phone is designed to use only Motorola
Original batteries and accessories.
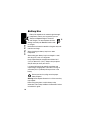
Action
1
Press the release button
on the battery cover.
2
Slide the cover back,
then lift it away from the
phone.
3
Insert the battery with the
tabs toward the front and
facing down.
4
Lower the battery cover
onto the phone, then slide
it forward until it clicks into
place.

10
Getting Started
Battery Use
Battery life depends on the network, signal strength,
temperature, features, and accessories you use.
Always use Motorola Original™ batteries
and chargers. The warranty does not cover
damage caused by non-Motorola batteries and/
or chargers.
New batteries or batteries stored for a long time may take
more time to charge.
When charging your battery, keep it near room
temperature.
When storing your battery, keep it uncharged in a cool,
dark, dry place, such as a refrigerator.
Never expose batteries to temperatures below -10°C
(14°F) or above 45°C (113°F). Always take your phone
with you when you leave your vehicle.
It is normal for batteries to gradually wear down and
require longer charging times. If you notice a change in
your battery life, it is probably time to purchase a new
battery.
Contact your local recycling center for proper
battery disposal.
Warning:
Never dispose of batteries in a fire because they
may explode.
Before using your phone, read the battery safety
information in the “Safety and General Information” section
included in this guide.

11
Getting Started
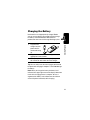
Charging the Battery
New batteries are shipped partially charged. Before
you can use your phone, you need to install and charge
the battery as described below. Some batteries
perform best after several full charge/discharge cycles.
Tip:
You can safely leave the travel charger connected to
the phone after charging is complete. This will
not
damage
the battery.
Note:
When you charge the battery, the battery level
indicator in the upper right corner of the display shows how
much of the charging process is complete. At least 1
segment of the battery level indicator must be visible to
ensure full phone functionality while charging.
Action
1
Plug the travel
charger into your
phone with the
release tab facing
up.
2
Plug the other end of the travel charger into the
appropriate electrical outlet.
3
When your phone indicates
Charge Complete
, press
the release tab and remove the travel charger.

12
Getting Started
Removing a Flip Cover
Notes:
•
Do not use tools to remove a flip cover. Using tools to
remove a flip cover will damage the cosmetic
appearance of the phone.
•
The flip cover is attached tightly to the phone.
Considerable force is required to remove it.
Attaching a Flip Cover
Turning On Your Phone
Action
Insert your fingertip or
fingernail into the slot at the
base of the flip cover, then
firmly
pull up and lift the cover
from the phone.
Action
Insert the tabs at the top of the
cover into the slots at the top
end of the phone, then push
the cover down to snap it into
place.
Action
1
Open your phone.

13
Getting Started
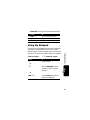
Adjusting
Volume
Press the up or down volume
keys to:
•
increase or decrease earpiece volume during a call
•
increase or decrease the ringer volume setting when
the home screen is visible (flip must be open—see
“Adjusting Volume” on page 13)
•
turn off an incoming call alert
2
Press and hold the
power key for 3
seconds.
The phone may
require several
seconds to power on.
3
If necessary, enter your 4-digit unlock code (the
last 4 digits of your phone number) and press
OK
(
+
) to unlock the phone.
Action
Power
Key
Volume
Keys

14
Getting Started
Making a Call
Tip:
You can also close the flip to end the call.
Note:
You must dial the phone number from the home
screen. See page
24.
Answering a Call
When you receive a call, your phone rings and/or vibrates
and displays an incoming call message.
Note:
If the phone is locked, you must unlock it to answer
the call.
Phone Flip Open
Action
1
Dial the number.
Tip:
If you make a mistake, press the clear
key
C
to delete the last digit. Press and hold
H
to
clear all digits.
2
Press
N
to make the
call.
3
Press
P
to end the
call.
Action
1
Open the flip to answer.
2
Close the flip to end the call.
Press to
send
call.

15
Getting Started
Tip:
To deactivate this feature, press
M
>
Settings
>
In-Call Setup
>
Answer Options
>
Open to Answer
.
Phone Flip Closed
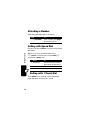
Changing the Call Alert
Phone Flip Open
In the home screen, press the
down volume key to switch to
lower call alert volume, then
switch to vibrate and, finally,
silent alert. Press the up volume key to cycle back from
silent alert to vibrate and then to the lowest alert volume
setting.
Phone Flip Closed
Press the up or down
volume key, then press the
speakerphone key to scroll
through the alert styles:
Loud
,
Soft
,
Vibrate
,
Vibe & Ring
, and
Silent
. The alert styles are shown on the external display.
Action
1
Press
N
to answer.
2
Press
P
to end the
call.
Press to
answer
call.
Volume
Keys
Volume Keys
Smart/
Speakerphone
Key

16
Getting Started
After scrolling to the desired alert style, press the up or
down volume key to save the setting and return to the
home screen.
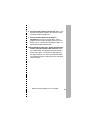
Viewing Your Phone Number
To view your phone number from the home screen,
press
M
#
.
While you are on a call, press
M
>
My Tel. Numbers
.

17
Highlight Features
Highlight Features
You can do much more with your phone than make and
receive calls! This section describes some of your
phone’s highlights.
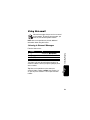
Sending a Multimedia Message
A Multimedia Messaging Service (MMS)
multimedia message contains 1 or more slides
with text and embedded media objects (possibly
including photos, pictures, animations, sounds,
voice records). You can send the multimedia message to
other wireless phone users and to other email addresses.
Note:
You can send the message after entering a recipient
phone number and the message text. You do not need to
complete other fields.
Press To
1
S
scroll to
U
(
Message Center
)
2
S
scroll to
Create Message
3
SELECT
(
+
) select
Create Message
4
S
scroll to
New MMS Message
5
SELECT
(
+
) select
New MMS Message
032380o

18
Highlight Features
6
keypad keys,
then
OK
(
+
)
or
CONTACTS
(
+
),
S
, then
ADD
(
+
) and
DONE
(
-
)
enter a phone number
open
Contacts
, then scroll to
and select 1 or more existing
Contacts
entries
7
keypad keys enter slide text
To add another slide to the
message, continue to the
next step.
To insert a media object, go
to step 8.
8
M
open the menu to insert a
new slide
9
SELECT
(
+
) display a list of items you can
insert
10
S
scroll to
New Page
11
SELECT
(
+
) insert a new slide after the
current slide
Return to step 2 to enter
contents for the new slide.
12
M
open the menu
13
S
scroll to
Insert
14
SELECT
(
+
) display a list of items you can
insert
Press To
Page is loading ...
Page is loading ...
Page is loading ...
Page is loading ...
Page is loading ...
Page is loading ...
Page is loading ...
Page is loading ...
Page is loading ...
Page is loading ...
Page is loading ...
Page is loading ...
Page is loading ...
Page is loading ...
Page is loading ...
Page is loading ...
Page is loading ...
Page is loading ...
Page is loading ...
Page is loading ...
Page is loading ...
Page is loading ...
Page is loading ...
Page is loading ...
Page is loading ...
Page is loading ...
Page is loading ...
Page is loading ...
Page is loading ...
Page is loading ...
Page is loading ...
Page is loading ...
Page is loading ...
Page is loading ...
Page is loading ...
Page is loading ...
Page is loading ...
Page is loading ...
Page is loading ...
Page is loading ...
Page is loading ...
Page is loading ...
Page is loading ...
Page is loading ...
Page is loading ...
Page is loading ...
Page is loading ...
Page is loading ...
Page is loading ...
Page is loading ...
Page is loading ...
Page is loading ...
Page is loading ...
Page is loading ...
Page is loading ...
Page is loading ...
Page is loading ...
Page is loading ...
Page is loading ...
Page is loading ...
Page is loading ...
Page is loading ...
Page is loading ...
Page is loading ...
Page is loading ...
Page is loading ...
Page is loading ...
Page is loading ...
Page is loading ...
Page is loading ...
Page is loading ...
Page is loading ...
Page is loading ...
Page is loading ...
Page is loading ...
Page is loading ...
Page is loading ...
Page is loading ...
Page is loading ...
Page is loading ...
Page is loading ...
Page is loading ...
Page is loading ...
Page is loading ...
Page is loading ...
Page is loading ...
Page is loading ...
Page is loading ...
Page is loading ...
Page is loading ...
Page is loading ...
Page is loading ...
Page is loading ...
Page is loading ...
Page is loading ...
Page is loading ...
Page is loading ...
Page is loading ...
Page is loading ...
Page is loading ...
Page is loading ...
Page is loading ...
-
 1
1
-
 2
2
-
 3
3
-
 4
4
-
 5
5
-
 6
6
-
 7
7
-
 8
8
-
 9
9
-
 10
10
-
 11
11
-
 12
12
-
 13
13
-
 14
14
-
 15
15
-
 16
16
-
 17
17
-
 18
18
-
 19
19
-
 20
20
-
 21
21
-
 22
22
-
 23
23
-
 24
24
-
 25
25
-
 26
26
-
 27
27
-
 28
28
-
 29
29
-
 30
30
-
 31
31
-
 32
32
-
 33
33
-
 34
34
-
 35
35
-
 36
36
-
 37
37
-
 38
38
-
 39
39
-
 40
40
-
 41
41
-
 42
42
-
 43
43
-
 44
44
-
 45
45
-
 46
46
-
 47
47
-
 48
48
-
 49
49
-
 50
50
-
 51
51
-
 52
52
-
 53
53
-
 54
54
-
 55
55
-
 56
56
-
 57
57
-
 58
58
-
 59
59
-
 60
60
-
 61
61
-
 62
62
-
 63
63
-
 64
64
-
 65
65
-
 66
66
-
 67
67
-
 68
68
-
 69
69
-
 70
70
-
 71
71
-
 72
72
-
 73
73
-
 74
74
-
 75
75
-
 76
76
-
 77
77
-
 78
78
-
 79
79
-
 80
80
-
 81
81
-
 82
82
-
 83
83
-
 84
84
-
 85
85
-
 86
86
-
 87
87
-
 88
88
-
 89
89
-
 90
90
-
 91
91
-
 92
92
-
 93
93
-
 94
94
-
 95
95
-
 96
96
-
 97
97
-
 98
98
-
 99
99
-
 100
100
-
 101
101
-
 102
102
-
 103
103
-
 104
104
-
 105
105
-
 106
106
-
 107
107
-
 108
108
-
 109
109
-
 110
110
-
 111
111
-
 112
112
-
 113
113
-
 114
114
-
 115
115
-
 116
116
-
 117
117
-
 118
118
-
 119
119
-
 120
120
-
 121
121
-
 122
122


Motorola V260/V262 Owner's manual
- Category
- Mobile phones
- Type
- Owner's manual
Ask a question and I''ll find the answer in the document
Finding information in a document is now easier with AI
Related papers
-
Motorola C341 User manual
-
-
-
-
-
-
-
-
-