Gigabyte G1.Sniper 3 User manual
- Category
- Motherboards
- Type
- User manual

Intel Rapid Start Technology
A. System Requirements
Windows 7 with SP1 1.
An SSD with size larger than the total system memory2.
Intel Rapid Start Technology enabled in BIOS Setup3.
AHCI/RAID mode supported (please note if the SSD has been assigned as a member of a RAID array, it 4.
cannot be used to set up Intel Rapid Start store partition); IDE mode not supported
All motherboard drivers correctly installed5.
B. Creating a Primary Store Partition
Below it is assumed Windows 7 is already installed on the SATA hard drive.
Open Disk Management Tool
Step 1: Go to Control Panel > System and Security > Administrative Tools > Computer Management >Storage
> Disk Management.
Step 2:
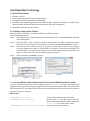
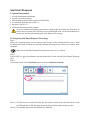
Select the SSD on which you want to create the store partition (if the SSD is unallocated, create a
new partition rst), and right-click on the partition you select and select Shrink Volume. (Figure 1)
Step 3: Enter the size of the required partition (it should be at least equal to the size of the memory
currently installed on the system. (1 GB=1024 MB. For example, to set 8 GB, enter 8192 MB). The
recommendation is to create a partition equal to the maximum memory capacity supported on the
system, in order to take care of future memory upgrade scenarios.)
Step 4: When completed, click Shrink. (Figure 2)
C. Launching DiskPart Disk Partitioning Tool to Set up Intel Rapid Start Store Partition
Open the command prompt window and run diskpart.exe (enter "diskpart" at the C:\> command prompt
and press <Enter>). At the diskpart prompt, type the following commands in sequence. Note: The commands for
MBR format and GPT format are different. Refer to the commands below. After entering all of the commands,
be sure to restart your computer.
MBR format:
DISKPART>list disk
(Lists the disks and information about them)
DISKPART>select disk X
(Selects a disk. "X" is the disk number where you
want to create the store partition. Refer to results from
"list disk" for the exact disk number)
DISKPART>create partition primary
(Create the primary store partition)
Figure 2
Figure 1

DISKPART>detail disk
(Displays the properties of the selected disk and the
volumes on that disk)
DISKPART>select volume X
(Selects the specied volume. "X" is volume of your
store partition. Refer to the results from "detail
disk" for exact volume number)
DISKPART>set id=84 override
(Change the partition type) (Figure 3)
GPT format:
Follow the commands for MBR format. When you execute the last command where you change the partition
type (set id="XXX"), enter the following command instead (Figure 4):
DISKPART>set id=D3BFE2DE-3DAF-11DF-BA40-E3A556D89593
You have created the Intel Rapid Start Technology store partition after completing the commands above.
Restart your computer.
Figure 3
Figure 4
D. Enabling the Intel Rapid Start Technology in BIOS Setup
When the system restarts, press <Delete> to enter the BIOS Setup program. Go to the 1. Peripherals menu
and set Intel Rapid Start Technology to Enabled.
Save the settings and exit BIOS Setup. 2.
E. Installing and Conguring the Intel Rapid Start Application
While in the operating system, insert the motherboard driver disk, go to Application Software\Install Application 1.
Software, and select Intel Rapid Start Technology to install. After the installation is complete, we recommend
that you restart the system.
Launch the 2.
Intel Rapid Start Technology Manager application
from
Start\All Programs\Intel or click the
icon in the notication area.
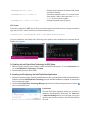
Instructions:
The Intel Rapid Start application allows you to enable or
disable the Intel Rapid Start Technology. The Timer slider
in Advanced Settings allows you to set when to copy and
move the data from the memory to the SSD after entering
S3 mode.

Intel Smart Connect Technology
Intel Smart Connect Technology
(Note)
allows user's computer to automatically update programs designed to work
with the Internet to obtain their data while your system is suspended (sleeping). The user can obtain the latest
data when the computer is waked up.
A. System Requirements
Intel Smart Connect Technology enabled in BIOS Setup1.
Windows 7 with SP1 2.
Normal network connection3.
B. Conguring Intel Smart Connect Technology
Step 1:
After installing the operating system and motherboard drivers, install the Intel Smart Connect Technology
application. Restart your computer when completed.
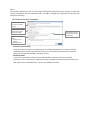
Step 2:
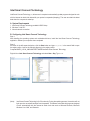
As shown in the left screenshot below, click the Start button and type regedit in the search eld to open
the registry editor. Look for the following directory in the registry editor:
Computer\HKEY_LOCAL_MACHINE\SOFTWARE\Intel\Intel Smart Connect Technology
Right-click on Intel Smart Connect Technology and select New > Key. Type OEM.
(Note) Intel Smart Connect Technology is for S3 mode only. During the updating process, the monitor will not
light up and no sound will be output from the speaker. This feature works best with programs designed
to work automatically with the Internet to obtain their data such as Microsoft Outlook
®
, Microsoft
Windows Live
™
Mail, and Seesmic
®
.

Step 4:
After completing the steps above, go to Start\All Programs\Intel and launch Intel(R) Smart Connect Technology.
On the Intel® Smart Connect Technology Conguration menu, click Enable Updating on the Basic tab.
(The Enable Updating button has now changed to Disable Updating.)
On this menu, the user can set the update frequency to 5 to 60
minutes. (Default: 15 minutes)
The Advanced tab allows you to set the time period during
which the updates will be performed only every two hours (such
as when you are asleep).
Step 3:
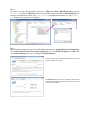
As shown in the left screenshot below, right-click on OEM, select New > Multi-String Value, and type
WhiteList. Double-click WhiteList and type the application name to be added in Edit Multi-String. For
example, to add Microsoft Outlook, type outlook.exe; to add Microsoft Windows Live, type wlmail.
exe. Restart your computer when completed.

Intel Smart Response
A. System Requirements
An Intel Chipset-based motherboard1.
An Intel Core series processor2.
RAID enabled for the Intel SATA controllers in BIOS Setup3.
A conventional SATA disk and an SSD4.
(Note 1)
Windows 7 with SP15.
(Note 2)
All motherboard drivers correctly installed6.
B. Conguring Intel Smart Response Technology
Step 1:
While in the operating system, use the "Xpress Install" function of the motherboard driver disk to install
all motherboard drivers, including the Intel Rapid Storage Technology driver. Restart your computer when
completed.
If you have installed the operating system before conguring the Smart Response Technology, all
original data on the hard disk will be lost once you enable RAID mode. It is recommended that you
back up the hard disk before enabling the Smart Response Technology.
Step 2:
Find the IRST icon in the notication area and double-click it to open the Intel Rapid Storage Technology
utility.
Step 3:
On the main screen, click the Accelerate button and then click Enable acceleration.
j
k
Make sure the Intel Rapid Storage Technology driver version is 11.0 or above.
(Note 1) The SSD works as a cache of the hard disk. The maximum cache memory size is 64 GB. If you use
an SSD larger than 64 GB, the space beyond 64 GB can still be used for storing your data.
(Note 2) The operating system must be installed to the SATA disk.

Select the size allocated
for the cache memory
(maximum 64 GB).
Select the disk or volume
to accelerate (system disk
recommended).
Select the acceleration
mode:
Enhanced mode •
(default)
Maximized mode •
Select the SSD to be used
if more than one SSD is
installed.
Enhanced mode (default) •
In this mode, data is written to the cache memory and the disk simultaneously. In the event that the
accelerated disk or volume is disconnected, there is no risk of data loss because data on the disk is
always synchronized with the data in the cache memory.
Maximized mode •
In this mode, cached data is written to the accelerated disk or volume at intervals to increase
performance. If the cache device is reported as missing or failed and it contained data that had not yet
been written to the accelerated disk or volume, then that data will be lost.
Step 4:
After selecting the SSD you want to use, the size of the SSD allocated for the cache memory, the hard disk/
volume to accelerate, and the acceleration mode, click OK to complete the conguration of the Intel Smart
Response Technology.
The "Enable Acceleration" Dialog Box:
-
 1
1
-
 2
2
-
 3
3
-
 4
4
-
 5
5
-
 6
6


Gigabyte G1.Sniper 3 User manual
- Category
- Motherboards
- Type
- User manual
Ask a question and I''ll find the answer in the document
Finding information in a document is now easier with AI
Related papers
-
Gigabyte GA-Z77M-D3H User manual
-
Gigabyte GA-H77-D3H User manual
-
Gigabyte GA-Z77MX-D3H TH User manual
-
Gigabyte GA-Z77P-D3 User manual
-
-
Gigabyte GA-Z77X-D3H User's manual User manual
-
Gigabyte GA-Z77X-UD3H User manual
-
Gigabyte G1.Sniper 3 User manual
-
-
Gigabyte GA-B75-D3V User manual
