Gigabyte GV-RX29T512VH-B User manual

Category
Graphics cards
Type
User manual

Gigabyte GV-RX29T512VH-B is a powerful graphics accelerator that can significantly enhance your visual experience with its advanced features and capabilities. Equipped with an ATI RadeonTM HD 2900 XT Graphics Processing Unit (GPU) and 512 MB of GDDR3 memory, it supports DirectX 9.0c/10 and delivers stunning graphics performance for gaming and multimedia applications.

Gigabyte GV-RX29T512VH-B is a powerful graphics accelerator that can significantly enhance your visual experience with its advanced features and capabilities. Equipped with an ATI RadeonTM HD 2900 XT Graphics Processing Unit (GPU) and 512 MB of GDDR3 memory, it supports DirectX 9.0c/10 and delivers stunning graphics performance for gaming and multimedia applications.

May 14, 2007
VGA Card
GV-RX29T512VH-B
VGA Card
May 14, 2007
GV-RX29T512VH-B
GV-RX29T512VH-B
ATI Radeon
TM
HD 2900 XT Graphics Accelerator
User's Manual
Rev. 101
12MD-RX29T5VH-101R
* The WEEE marking on the product indicates this product must not be disposed of with user's other household waste
and must be handed over to a designated collection point for the recycling of waste electrical and electronic equipment!!
* The WEEE marking applies only in European Union's member states.
Copyright
© 2007 GIGABYTE TECHNOLOGY CO., LTD
Copyright by GIGA-BYTE TECHNOLOGY CO., LTD. ("GBT"). No part of this manual may be reproduced or transmitted in any from
without the expressed, written permission of GBT.
Trademarks
Third-party brands and names are the property of their respective owners.
Notice
Please do not remove any labels on VGA card, this may void the warranty of this VGA card
Due to rapid change in technology, some of the specifications might be out of date before publication of this booklet.
The author assumes no responsibility for any errors or omissions that may appear in this document nor does the author make a
commitment to update the information contained herein.
Macrovision corporation product notice:
This product incorporates copyright protection technology that is protected by U.S. patents and other intellectual property rights.
Use of this copyright protection technology must be authorized by Macrovision, and is intended for home and other limited viewing
uses only unless otherwise authorized by Macrovision. Reverse engineering or disassembly is prohibited.
- 2 -
English
GV-RX29T512VH-B Graphics Accelerator
Table of Contents
1. Introduction ......................................................................................... 3
1.1. Features ..................................................................................................... 3
1.2. Minimum System Requirements ................................................................... 3
2. Hardware Installation ........................................................................... 4
2.1. Board Layout .............................................................................................. 4
2.2. Hardware Installation ................................................................................... 7
3. Software Installation .......................................................................... 11
3.1. Windows
®
XP Driver and Utilities Installation ................................................11
3.1.1. Operating System Requirement ...................................................................... 11
3.1.2. DirectX Installation ......................................................................................... 12
3.1.3. Driver Installation ........................................................................................... 13
3.1.4. Video In Introduction ..................................................................................... 15
3.1.5. Taskbar Icon ................................................................................................. 18
3.1.6. Display Properties pages .............................................................................. 19
3.2. Windows
®
2000 Driver Installation ............................................................. 36
4. Troubleshooting Tips ........................................................................ 37
5. Appendix .......................................................................................... 38
Resolutions and Color Depth Table (In Windows
®
XP) ...................................... 38
Introduction- 3 -
English
1. Introduction
1.1. Features
Powered by ATI Radeon
TM
HD 2900 XT Graphics Processing Unit (GPU)
Supports PCI Express x16
Integrated with 512 MB GDDR3 memory
Supports DirectX 9.0c/10
Supports native CrossFire
TM
Supports AV / S-Video and HDTV output
Supports AV / S-Video input
Provides TV-Out connector
Provides 2 DVI-I connectors
Supports D-Sub connector (by adapter)
Supports HDMI connector (by adapter)
1.2. Minimum System Requirements
Hardware
- Intel
®
Pentium
®
4 or AMD Athlon
TM
- 512 MB of system memory; 1 GB or more for best performance
- Optical drive for software installation (CD-ROM or DVD-ROM drive)
- A power supply that provides at least 550 W and two 2x3-pin power connectors.
The power supply should be with a known brand and certified to conform to
safety regulations. (For optimum performance, it is recommended that you use
one 2x3-pin and one 2x4-pin power connector. For the list of certified power
supplies, go to ati.amd.com/certifiedpsu.)
Operating System
- Windows
®
Vista
- Windows
®
XP with Service Pack 2 (SP2)
- Windows
®
XP Professional x64 Edition
- Windows
®
2000
- 4 -
English
GV-RX29T512VH-B Graphics Accelerator
CrossFire
TM
Configuration
If you are planning on using this graphics card as part of a CrossFire
TM
system, the
following is required:
- A CrossFire
TM
certified motherboard with two PCI Express x16 slots and
correct PCIe
chipset driver
- Two ATI Radeon
TM
HD 2900 XT cards
- A power supply that provides at least 750 W and one 2x3-pin and one 2x4-pin
power connector. The power supply should be with a known brand and certified
to conform to safety regulations. (For the list of certified power supplies,
go to ati.amd.com/certifiedpsu.)
- Two CrossFire
TM
bridge interconnect cables
2. Hardware Installation
DVI-I Connector 2
VIVO
DVI-I Connector 1
2.1. Board Layout
CrossFire Connector
Hardware Installation
- 5 -
English
(Note) Please refer to page 15 about Video In introduction.
VIVO
(Note)
DVI-I
Connector 2
Analog LCD Monitor
Digital LCD Monitor
DVI Output
DVI-I
Connector 1
DVI-I to D-Sub
Adapter
S-Video Output
Pb/AV Output
Pr
Y
NTSC / PAL TV Projector
HDTV
OR
NTSC / PAL TV Projector
OR
D-Sub
Output
DVI-I to HDMI Adapter
HDMI TV
- 6 -
English
GV-RX29T512VH-B Graphics Accelerator
Expansion cards contain very delicate Integrated Circuit (IC) chips. To
protect them against damage from static electricity, you should follow some
precautions whenever you work on your computer.
1. Turn off your computer and unplug power supply.
2. Use a grounded wrist strap before handling computer components. If you do not have
one, touch both of your hands to a safely grounded object or to a metal object, such as
the power supply case.
3. Place components on a grounded antistatic pad or on the bag that came with the
components whenever the components are separated from the system.
The card contains sensitive electric components, which can be easily damaged by static
electricity, so the card should be left in its original packing until it is installed.
Unpacking and installation should be done on a grounded anti-static mat. The operator
should be wearing an anti-static wristband, grounded at the same point as the anti-static
mat.
Inspect the card carton for obvious damage. Shipping and handling may cause damage
to your card. Be sure there are no shipping and handling damages on the card before
proceeding.
DO NOT APPLY POWER TO YOUR SYSTEM IF IT HAS BEEN DAMAGED ON
THE CARD.
In order to ensure your graphics card working correctly, please use official
Gigabyte BIOS only. Use none official Gigabyte BIOS might cause problem
on the graphics card.
Hardware Installation
- 7 -
English
2.2. Hardware Installation
Installing Your graphics card.
Now that you have prepared your computer, you are ready to install your graphics accelerator
card.
To remove the existing graphics card:
1. Power off the computer and monitor, then
disconnect the display cable from the back
of your computer.
2. Remove the computer cover. If necessary,
consult your computer's manual for help in
removing the cover.
3. Remove any existing graphics card from
your computer.
Or, if your computer has any on-board
graphics capability, you may need to disable
it on the motherboard. For more information,
please see you computer documentation.
- 8 -
English
GV-RX29T512VH-B Graphics Accelerator
2. Replace the screw to fasten the card in place,
and replace the computer cover.
To install your new graphics card:
1. Locate the PCI Express x16 slot. If
necessary, remove the metal cover from this
slot; then align your graphics card with the
PCI Express x16 slot, and press it in firmly
until the card is fully seated.
* Please make sure that the gold edge connector of the graphics card is securely inserted.
After installing the GV-RX29T512VH-B to your computer,
please remember to connect at lease one power cable on the
graphics card to the power supply connector.
We suggest you to connect both of the two power cables on
the graphics card to the power supply to achieve optimal
graphics performance.
To enable ATI Overdrive or CrossFire technology, connect
one 2x3-pin and one 2x4-pin power connector.
Hardware Installation
- 9 -
English
You are now ready to proceed with the installation of the graphics card drivers. Please refer
to next chapter for detailed instructions.
To Flat Panel Display
3. This graphics card provides two DVI-I digital
connectors. You can connect a monitor that
supports DVI-I function or use the DVI-I-to-
D-sub adapter to connect a 15-pin D-Sub
monitor. Or use the DVI-I-to-HDMI adapter
to connect an HDMI monitor.
Connect a flat panel
Connect a D-Sub monitor via DVI-I to D-sub adapter
9-Pin for VIVO
Connect a HDMI monitor via DVI-I to HDMI adapter
- 10 -
English
GV-RX29T512VH-B Graphics Accelerator
(Note) Only Windows
®
XP operating system supports CrossFire
TM
mode. Please do not enable
CrossFire
TM
in Windows
®
2000.
How to enable the ATI
CrossFire
TM
technology
(Note 1)
Two CrossFire
TM
graphics cards of the same type.
(Example: GV-RX195P256D-RH)
Two CrossFire
TM
bridge
interconnect cables.
Step 1:
Install two CrossFire
TM
graphics cards of the same chipset on a CrossFire
TM
-supported motherboard and
connect the graphics cards via two CrossFire
TM
bridge interconnect cables (Figure 1). Then users can
enable the CrossFire
TM
technology simply through the graphics card driver.
Step 2:
After installing graphics card driver in operating system, access the ATI CATALYST Control Center
(please refer to Page 19). From the ATI CATALYST Control Center, enter the CrossFire
TM
menu and
assure to select the Enable CrossFire checkbox (Figure 2).
Step 3:
When the next confirmation dialog box appears (Figure 3), click Yes to complete the CrossFire
TM
configurations.
Figure 2
Figure 3
Figure 1
Software Installation- 11 -
English
3. Software Installation
In this manual, we assume that your CD-ROM Drive letter to be Drive D:
The installation of Windows
®
2000 / Windows
®
XP drivers is very simple. When you insert the
driver CD into your CD-ROM drive, you can see the AUTORUN window (if it does not show
up, run "D:\setup.exe"). Then you can follow the guides to setup your graphics card driver.
(Please follow the subsection 3.1.3 "Driver installation" to install the driver for your graphics
accelerator.)
3.1. Windows
®
XP Driver and Utilities Installation
3.1.1. Operating System Requirement
When loading the graphics card drivers for the system, please make sure your system
has installed DirectX 9.0c or later version.
If you install the graphics card drivers for the motherboard, which consist of SIS, or VIA
chipsets, please install the appropriate driver program for that motherboard. Or please
contact your motherboard nearest dealer for motherboard driver.
- 12 -
English
GV-RX29T512VH-B Graphics Accelerator
3.1.2. DirectX Installation
Install Microsoft DirectX to enable 3D hardware acceleration support for Windows
®
2000 or
Windows
®
XP to achieve better 3D performance.
0 Note: For software MPEG support in Windows
®
2000 or Windows
®
XP, you must install
DirectX first. Users who run Windows XP with Service Pack 2 or above do not need to
install DirectX separately.
Step 1. When autorun window show up, click the
Install DirectX 9 item.
Click the Install DirectX 9 item.
Step 2. Choose I accept the agreement
and click the Next button.
Step 3. Click the Next button.
Step 4. Click Finish to restart computer.
Then the DirectX 9 installation is completed.
Installing the components.
Software Installation- 13 -
English
3.1.3. Driver Installation
A. New hardware found
After the graphics card is inserted into your computer at the first time, the windows will
automatically detect a new hardware in the system and pop out a "New Hardware Found"
message. The following is the step-by-step installation guide.
Step 1: Found new hardware wizard: Video controller (VGA Compatible)
Click the "Next" button to install the driver. (There
is a driver CD disk that came with your graphics
accelerator, please insert it now.)
Or click the "Cancel" button to install the driver
from AUTORUN window.
Step 2: Found new hardware wizard: Searching and installing
The wizard will search for the driver and install it automatically.
Step 3: Found new hardware wizard: Finish
Click the "Finish" button to finish the installation.
- 14 -
English
GV-RX29T512VH-B Graphics Accelerator
B. Driver installation (Autorun Window)
Insert the driver CD disk into your CD-ROM, and then you can see the AUTORUN window.
If it does not show up, please run "D:\setup.exe".
Click the Install Display Driver item.
Step 1. When autorun window show up, click the
Install Display Driver item.
Setp 4. Click Express or Custom icon.
Step 5. Click the Finish button to restart computer.
Then the driver installation is completed.
Windows installings the components.
Step 2. Click Next button. Step 3. Click Yes button.
Software Installation- 15 -
English
Red record
button
Video button
3.1.4. Video In Introduction
A. Cyberlink Power Director 3.X Installation
(Note)
Please install the Cyberlink Power Director 3.X (or above) version with your graphics card.
Press the "Capture" button, PowerDirector enter Capture mode, in which you can capture
media from a variety of device. (Figure 1)
Figure 1
(Note) Power Director 3.X is supported only on the Windows
®
XP operating system.
- 16 -
English
GV-RX29T512VH-B Graphics Accelerator
Figure 3
B. Introduction of the capture sources device
Please check out your capture source. In general, the media sources comprise the following item:
1. Video Tape Recorder (VCR), V8 :
Connect the AV connector or video cable of the VCR to the Video In of the video capture card. And if your
VCR, V8 supports S-Video output, connect S-Video connector to the S-Video In port of the graphics card.
Connect the audio cable of the VCR, V8 to the Line In of the sound card.
If your sound card has no Line In port, try the Microphone port.
2. DV (recommend to use IEEE 1394 card)
DV (Check out if the power of DV is turned on, and enter VCR mode; moreover, make sure FireWire
cable connect well.
Furthermore, when capturing media by VIVO-based graphics card, you could chose two ways
(Note)
,
including Composite (COMP-IN) and SVideo(SVID-IN). Afterward please click the play button of
captured devices, and click the red REC button between Capture preview window and Capture
device selection area.
Figure 4
When you got the media you need, click the red REC button again to stop capturing. And then the media
clips will be loaded into Capture clips area automatically. (Figure 4)
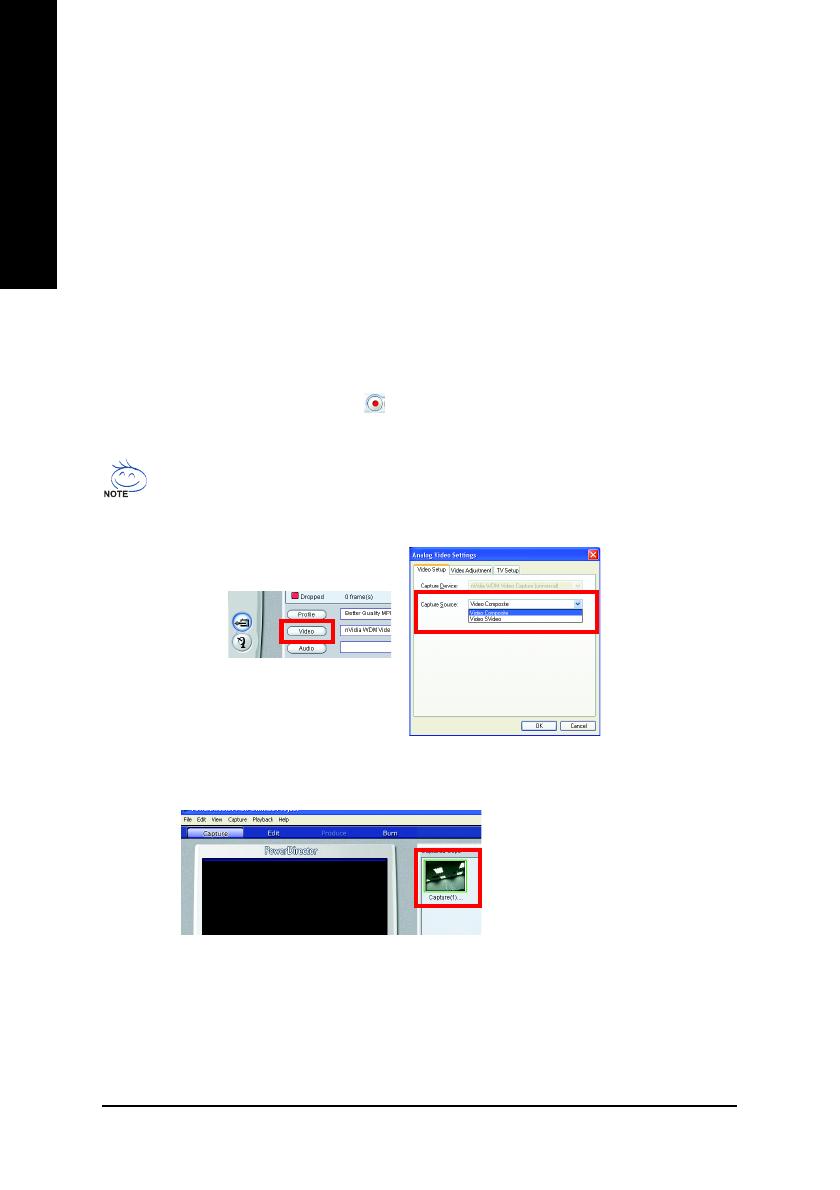
Please verify how your cable connects. If the cable connects to SVID-IN port on HDTV/VIVO
cable, please press the "Video" button (Figure 2), and please select the "Video SVideo" item
(Figure 2); if it connects to COMP-IN port on HDTV/VIVO cable, please select the "Video
Composite" item (Figure 3).
Figure 2
Software Installation- 17 -
English
Once you click the "Edit" button to return Edit mode, the media clips will be loaded into Library
immediately.
(Figure 5)
At this moment in time, you can expand a series of outstanding editing experience to fill you life with
boundless possibility.
(For more details about movie editing function of PowerDirector, please refer to user's guide, or visit
Cyberlink website for official technical support.)
- 18 -
English
GV-RX29T512VH-B Graphics Accelerator
ATI CATALYST
®
Control Center:
After installation of the display drivers, you will find an ATI CATALYST
®
Control Center icon on
the taskbar's status area. The ATI CATALYST
®
Control Center is used to configure all your graphics
card settings. Right-click the icon to enter the ATI CATALYST
®
Control Center (refer to Fig. 1). Or
you can right-click on the desktop to select ATI CATALYST(R) Control Center tab and press ATI
CATALYST(R) Control Center button (refer to Fig. 2).
Fig. 1
Fig. 2
HYDRAVISION
TM
:
HYDRAVISION has everything you need to manage increased amounts of information across your
computer desktop. It allows you to quickly and easily tailor your computer desktop to the way you
work. You can:
• arrange and rearrange monitors. assign Hot Key shortcuts.
• create up to 9 virtual desktops. • add special effects to windows and menus.
You can right-click on ATI CATALYST
®
Control Center icon to select HYDRAVISION
TM
>
HYDRAVISION
TM
Properties to set the HYDRAVISION (refer to Fig. 3).
Fig. 3
3.1.5. Taskbar Icon
  • Page 1 1
  • Page 2 2
  • Page 3 3
  • Page 4 4
  • Page 5 5
  • Page 6 6
  • Page 7 7
  • Page 8 8
  • Page 9 9
  • Page 10 10
  • Page 11 11
  • Page 12 12
  • Page 13 13
  • Page 14 14
  • Page 15 15
  • Page 16 16
  • Page 17 17
  • Page 18 18
  • Page 19 19
  • Page 20 20
  • Page 21 21
  • Page 22 22
  • Page 23 23
  • Page 24 24
  • Page 25 25
  • Page 26 26
  • Page 27 27
  • Page 28 28
  • Page 29 29
  • Page 30 30
  • Page 31 31
  • Page 32 32
  • Page 33 33
  • Page 34 34
  • Page 35 35
  • Page 36 36
  • Page 37 37
  • Page 38 38
  • Page 39 39
  • Page 40 40
  • Page 41 41
  • Page 42 42

Gigabyte GV-RX29T512VH-B User manual

Category
Graphics cards
Type
User manual

Gigabyte GV-RX29T512VH-B is a powerful graphics accelerator that can significantly enhance your visual experience with its advanced features and capabilities. Equipped with an ATI RadeonTM HD 2900 XT Graphics Processing Unit (GPU) and 512 MB of GDDR3 memory, it supports DirectX 9.0c/10 and delivers stunning graphics performance for gaming and multimedia applications.

Ask a question and I''ll find the answer in the document

Finding information in a document is now easier with AI