Page is loading ...

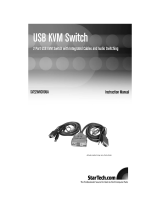
2 Port Starview Mini KVM Switch
2 Port Starview USB Mini KVM Switch
SV221MICRA
SV221MICUSBA
Instruction Guide
The Professionals’ Source For Hard-to-Find Computer Parts
KVM
SWITCH
WITH
BUILT-
ON-CABLES
AND
AUDIO
Revised: January 23, 2004
* Actual product may vary from photo
*SV221MICRA shown

FCC COMPLIANCE STATEMENT
This equipment has been tested and found to comply with the limits for a Class
B digital device, pursuant to part 15 of the FCC Rules. These limits are designed
to provide reasonable protection against harmful interference in a residential
installation. This equipment generates, uses and can radiate radio frequency
energy and, if not installed and used in accordance with the instructions, may
cause harmful interference to radio communications. However, there is no
guarantee that interference will not occur in a particular installation. If this
equipment does cause harmful interference to radio or television reception,
which can be determined by turning the equipment off and on, the user is
encouraged to try to correct the interference by one or more of the following
measures:
• Reorient or relocate the receiving antenna.
• Increase the separation between the equipment and receiver.
• Connect the equipment into an outlet on a circuit different from that to which
the receiver is connected.
• Consult the dealer or an experienced radio/TV technician for help.
Technical Support
The following technical resources are available for this StarTech.com product:
On-line help:
We are constantly adding new information to the Tech Support section of our web site. To
access this page, click the Tech Support link on our homepage, www.startech.com. In the
tech support section there are a number of options that can provide assistance with this
product.
Knowledge Base - This tool allows you to search for answers to common issues using
key words that describe the product and your issue.
FAQ - This tool provides quick answers to the top questions asked by our customers.
Downloads - This selection takes you to our driver download page where you can
find the latest drivers for this product.
Call StarTech.com tech support for help:
USA/Canada: 1-519-455-4931
UK/Ireland/Europe: 00-800-7827-8324
Support hours: Monday to Friday 9:00AM to 5:00PM EST (except holidays)
Warranty Information
This product is backed by a one year warranty. In addition, StarTech.com warrants its
products against defects in materials and workmanship for the periods noted,
following the initial date of purchase. During this period, the products may be
returned for repair, or replacement with equivalent products at our discretion. The
warranty covers parts and labor costs only. StarTech.com does not warrant its products
from defects or damages arising from misuse, abuse, alteration, or normal wear and
tear.
Limitation of Liability
In no event shall the liability of StarTech.com Ltd. and StarTech.com USA LLP (or their
officers, directors, employees or agents) for any damages (whether direct or indirect,
special, punitive incidental, consequential, or otherwise), loss of profits, loss of business,
or any pecuniary loss, arising out of or related to the use of the product exceed the actual
price paid for the product.
Some states do not allow the exclusion or limitation of incidental or consequential
damages. If such laws apply, the limitations or exclusions contained in this statement
may not apply to you.
7

Table of Contents
Introduction . . . . . . . . . . . . . . . . . . . . . . . . . . . . . . . . . . . . . . . . . . . . . . . . . . . . . . . . . .2
Installation . . . . . . . . . . . . . . . . . . . . . . . . . . . . . . . . . . . . . . . . . . . . . . . . . . . . . . . . . . . 3
Using Your KVM Switch with Audio/Microphone . . . . . . . . . . . . . . . . . . . . . . . . 4
Tro ubleshooting . . . . . . . . . . . . . . . . . . . . . . . . . . . . . . . . . . . . . . . . . . . . . . . . . . . . . . . 5
Technical Specifications . . . . . . . . . . . . . . . . . . . . . . . . . . . . . . . . . . . . . . . . . . . . . . . . 6
Technical Support . . . . . . . . . . . . . . . . . . . . . . . . . . . . . . . . . . . . . . . . . . . . . . . . . . . . . 7
Warranty Information . . . . . . . . . . . . . . . . . . . . . . . . . . . . . . . . . . . . . . . . . . . . . . . . . 7
1
SV221MICRA SV221MICUSB
User Ports 1 1
Computer Ports 2 2
VGA Resolution 1920 x 1440 1920 x 1440
Computer Connectors
Monitor 2 x HDB 15-pin (male) 2 x HDB 15-pin
(male)
Keyboard 2 x 6-pin Mini Din (male) 2 x 4-pin USB
Type B
Mouse 2 x 6-pin Mini Din (male)
Microphone 2 x 3.5mm Mic 2 x 3.5mm Mic
Speaker 2 x 3.5mm Audio 2 x 3.5mm Audio
Console Connectors
Monitor HDB 15-pin (female) HDB 15-pin
(female)
PS/2 Keyboard 1 x 6-pin Mini Din (female 1 x 6-pin Mini Din
(female)
PS/2 Mouse 1 x 6-pin Mini Din (female) 1 x 6-pin Mini Din
(female)
Microphone 1 x 3.5mm Stereo (female) 1 x 3.55mm Stereo
(female)
Speaker 1 x 3.5mm Stereo (female) 1 x 3.55mm Stereo
(female)
KVM Cable Length 4 x 4.5 feet (1.37 meters) 4 x 4.5 feet
(1.37 meters)
Power Power Free Power Free
Operation Operation
Operating System Compatible with all Compatible with all
operating systems operating systems
Weight 1.1lbs (0.5 kgs) 1.1lbs (0.5 kgs)
Safety Standards FCC & CE FCC & CE
6
Technical Specifications

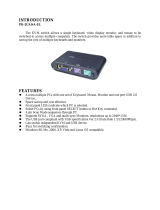
Introduction
Thank you for purchasing a StarTech.com Mini KVM switch featuring “built-on-cables”
and audio support. This ultra-compact device lets you control two computers from one
keyboard, monitor, mouse while keeping your desk space free. Your
SV211MICRA/SV221MICUSB KVM switch even lets both computers share a speaker and
microphone.
Features
2 Port Starview Mini KVM Switch (SV221MICRA)
• Compact design with unique built-on cable technology
• Automatically switch between 2 computers using the hotkey commands or at the
push of a button
• Supports MS Intellimouse, Explorer and Optical Mouse
•Designed to integrate into your existing IT infrastructure
• No additional software required
• Plug and Play support allows users to change computers without any interruptions
• Shares microphone and speakers between both connected computers
• Supports high VGA resolution of up to 1920 x 1440
•Provides error-free system booting and PS/2 keyboard and mouse emulation
•No external power source required
•Ensures secure connections using integrated KVM cables
• Compatible with all operating systems
• Backed by StarTech.com’s one year warranty
2 Port Starview USB Mini KVM Switch (SV221MICUSBA)
• Compact design with unique built-on cable technology
• Switch automatically between 2 computers using the hotkey commands or at the
push of a button
• Supports USB enabled keyboard and mouse emulation for error-free PC bootup
•Designed to integrate into your existing IT infrastructure
• No additional software required
• Plug and Play support allows users to change computers without any interruptions
• Shares microphone and speakers between both connected computers
• Supports high VGA resolution of up to 1920 x 1440
•No external power source required
•Ensures secure connections with integrated KVM cables
• Compatible with all operating systems
• Backed by StarTech.com’s one year warranty
2
5
Troubleshooting
If you are experiencing any difficulties, first make sure that all your cables are
connected to their proper ports and are firmly seated.
My SV221MICRA/SV221MICUSBA keeps switching between my computers.
The switch is likely in auto-scan mode. In auto-scan mode, the switch will toggle
between computers after a set interval and the LEDs will be flashing. To exit or
terminate Auto-scan mode, press any key on keyboard.
I can not switch between computers.
You are likely using the wrong hotkey combination. Review the chart on page 4 and
make sure you are using the Scroll Lock control key. Hotkey sequences must be
completed within 3 seconds to be valid.

Before You Begin
To ensure a quick and easy device installation, please read through this section carefully
before attempting to install the switch.
Contents
This package should contain:
•1 x 2 port (SV221MICRA/SV221MICUSBA) KVM switch
Installation
This section will guide you through the installation of your KVM with audio switch.
Please read through this section carefully and complete each step in the order listed.
Connecting Your Console
2 Port Starview Mini KVM Switch (SV221MICRA)
1. Make sure all computers that are to be connected to the KVM switch and their
peripherals are powered off.
2. Plug your VGA monitor into the blue HDB15 port on the back of the KVM switch.
3. Plug your PS/2 keyboard into the purple Mini-Din-6-port located on the front of the
KVM switch.
4. Plug your PS/2 mouse into the green Mini-Din-6-port located on the front of the
KVM switch.
5. Plug your speaker set and microphone into the colored jacks located on the front of
the KVM switch.
6. Using the built-in KVM Audio/Mic combo cables, secure the keyboard (purple),
mouse (green), and monitor(blue) connectors to the computer you want designated
as Computer 1.
7. Using the built-in KVM Audio/Mic combo cables, secure the keyboard (purple),
mouse (green), and monitor(blue) connectors to the computer you want designated
as Computer 2.
8. Power up the connected computers. Both yellow LEDs should now be lit.
Connecting Your Console
2 Port Starview USB Mini KVM Switch (SV221MICUSB)
1. Make sure all computers that are to be connected to the KVM switch and their
peripherals are powered off.
2. Plug your VGA monitor into the blue HDB15 port on the back of the KVM switch.
3. Plug your PS/2 keyboard into the purple Mini-Din-6-port located on the front of the
KVM switch.
4. Plug your PS/2 mouse into the green Mini-Din-6-port located on the front of the
KVM switch.
5. Plug your speaker set and microphone into the colored jacks located on the front of
the KVM switch.
6. Secure the USB connector to the computer you want designated as Computer 1.
7. Secure the USB connector to the computer you want designated as Computer 2.
8. Power up the connected computers. Both yellow LEDs should now be lit.
4
3
Using Your KVM Switch with Audio/Microphone
The LED on the front of the switch indicates which computer is active. You can
scroll between computers by either pressing the push-button on the front of the
switch or by using a hotkey command. A hotkey command is a short sequence of
keystrokes beginning with the Scroll Lock keystroke followed by another keystroke.
NOTE: Do not use the number pad for hotkey combinations.
Selecting a Computer
Auto-scan Mode
Auto-scan mode will be suspended if the switch detects any keyboard or mouse
activity. When the activity ceases, auto-scan will resume. The auto-scan default
setting is 5 seconds.
Command Hotkey sequence
Start auto-scan Scroll Lock + Scroll Lock + ‘S’
End auto-scan Press any key on keyboard
Command Hotkey sequence
Select computer 1 Scroll Lock + Scroll Lock + 1
Select computer 2 Scroll Lock + Scroll Lock + 2
Select the active Audio/Mic Scroll Lock + Scroll Lock + (Fx)
(Fx is a function key) and x=1~2 for Audio Mic channel number
Scroll between powered-on Scroll Lock + Scroll Lock + Up/Down arrow
computers
Console Mouse/Keyboard Scroll Lock + Scroll Lock + ‘End’
Reset
(only for PS/2 interface)
Bind the PC & Audio/Mic Scroll Lock + Scroll Lock + ‘Q’
Switching
Unbind the PC & Audio/Mic Scroll Lock + Scroll Lock + ‘W’
Switching
/