
LCD Projection TV
HD-TV
Operating instructions
© 2006 Sony Corporation
,,%.
WEGA ENGINE_

Owner's Record
The modeland serialnumbers arclocated attilelWU"ol theTV. Record
these numbers in tilespaces pro_ided below. Relcr 1olhem whenexer
you c_llupon your Sony dealerregarding this product.
Model No.
Serial No.
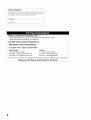
I_'rl L't_11"i[_
Please contact Sony directly if you:
• Have questions on the use of your television after reading your manual
• Experience difficulty operating your television
Contact Sony Customer Support at:
http://www.sony.com/tvsu pport
or to speak with a support representative:
United States Canada
1-800-222-SONY (7669) 1-877_899-SONY (7669)
8:00 AM - 10:00 PM (EST) Men - Fri 8:00 AM - 6:00 PM (Eastern)
10:30 AM - 7:15 PM (EST) Sat - Sun 8:00 AM - 5:00 PM (Western)
Sony will work to resolve your questions more quickly than your retailer or place of purchase.
Please Do Not Return the Product to the Store
2

WARNING
To reduce tile risk ol tire or electric shock, do not expose this apparatus to
rain or ii]oistule.
This symbol is inlended to alert the u_r to tile presence
of uninsulated "dangerous voltage" within the
product's enclosure that may be of sufficient
magnitude to constitule a risk of eleclric shock lo
persons.
This symbol is intended to alert the u_r 1otile presence
of impoltant operating and mainlenance (selvicing)
instructions in the lileralure accompanying the
appliance.
Tile apparatus shall nol be exposed to dripping or splashing and no ohjecls
filled with liquids, such as vases, shall be placed on the apparatus.
CAUTION
To pl'e_ent electric shock, do not use this polarized AC phlg with an
extension cord, recvptacle or other outlet unless tile hlades can be fiflly
inserted to prevent blade exposure.
Note on Caption Vision
This TV pro_ ides display ol TV closed captioning ill accordance wilh
§15.119 of tile FCC rules.
NOTIFICATION
This equipnlent has been tested and lound to comply with tile limits lot a
Class B digital device, pursuant to Part 15 ol tile FCC Rules. These limits
am designed to provide reasonable prolection against harnlfifl inlerl)mnce
illa msidenlial instzdlalion. This equipnlenl generates, uses and can radiate
radio flequency energy and, ifnol installed and used in accordance with the
Jnstrucliolls_ may cause harnlllll interlcrcncc to radio colnlnunicaih)ns.
However, there is no guarantee that interlcmnce will nol occur in a
particular inslallation. If this equipment does cause harmhd interllrmnce 1o
radio or televiskm reception, which can be detemlined by turning the
equipment off and on, tile user is encouraged to try 1o correcl file
interlPrcnce by one or more of the fi)llowing measures:
[] Reorienl or mlocale tile receiving antenna.
[] Incm_se tile separatkm belween tile equipment and receiver.
[] Connecl tile equipment inlo an outlel on a circuil dillerenl fl'om thai
1o which tile receiver is connected.
[] Consull lhe dealer or an experienced radio/TV technician k)r help.
Pcrsuant 1oFCC regulations, you arc cautioned thai any changes or
modifications not expressly approved ill lhis nlanual coukl void your
authorily lo operale this equipment.
Safety
[] Opel'ale tile TV only on 120 V AC.
[] The plug is designed, fi)r salety purposes, lo fil into tile wall outlet
only one way. If you are unable to insert lhe plug hdly inlo tile outlet,
conlact your dealer.
[] If ally liquid or solid object should l,dl inside file cabineL unplug tile
TV inmlediately and have il checked by qualified service personnel
belorc operaling il fimher.
[] If you will not be using tile TV lot _veral days, disconnect lhe power
by pulling the plug i(selE Never pull on the coM.
[] For details concerning salPty precautions, see "hnportanl Sal_ly
lnslrtlclions" on page 5.
Installing
[] Tile TV should be inslalled near an easily accessible power outlet.
[] To prcvenl internal heat buildup, do not block tile _enlilalion
openings.
[] Do not install tile TV in a hot or humid place, or in a place subject to
excessive dust or mechanical vibration.
[] Avoid operating tile TV at lelnperaturcs below 41 °F (5°C).
[] If tile TV is transported directly flom a cold to a warm location, or if
tile roonl tenlperalure changes suddenly, tile picture lnay be blurred
or show poor color due to lllOislurc condensation. In Ihis cgise_ please
wait a lew hours to ]el lhe nloisl/ire evaporale befiwe lurning on tile
TV.
[] To obtain file besl picture, do nol expo_ the screen to direct
ilhmlinalion or direct sunlight. 11is recommended to use spot lighting
directed down hom tile ceiling or to cover tile windows thai lace tile
screen with opaque drapery, fi is desirable to install tile TV in a roonl
where file floor and walls are not of a reflective nlateriah
[] See pages 13 and 14lor nlore infi)rmalion on tile installation.
CAUTION
Use tile lollowing Sony appliance(s) only with tile fi)llowing TV STAND.
KI)F-5(IE2(100
KI)F-42E2(XX) KI)F-46E2(XRl
KI)F-55E2(XX)
}dO N SU-RGllS SU-RG12S SU-RGI2L
.....{{¢¢0
Use with other TV STAND may cause instability and possibly resul( ill
illjuly,
To Customers
Sufl]cient expertise is required lot installing tile specilied producL Be sure
tO s/ibc,.)ntritct tile instldhltion to Solly dealers or licensed contractors lind
pay adequale atlenlion to salcty during lhe installation.
(Continued)
3

For Customers in the United States
This product contains mercury. Disposal ol this product may be regul_lted
il sold in tile United States. For disposal or recycling int_rm_aion, please
contact your local authorities or the Electronics Industries Alliance
(http://www.eiae.org).
Note
Tiffs digitul television is capuble ol receiving ml_dog basic and digitul basic
tele_ ision i_rogramming by direcl connection to +tcable systcnl providing
such programming. Cert+lin prenfiunl, ad_ anced and interactive digital
cable sel_]ices such _lS _,ideo-on-delllalld_ _1 cable operators ellh_lllced
progr_m_guide mid dntu-enilanced television selvices nluy require the use
of a set-top box. For more inl_rnl+ttion call your local cuble operator+
Tiffs television includes a QAM denlodulator wlfich should allow you to
recei_e unscrambled digital cable television programming via subscription
service to a cable service provider. Availability of digital cable television
progr_mmfing in your areadependson the type ot programming and signal
prmided by your cable service provider,
Trademark Information
TruSurround XT, SRS and the (_)+ symbol are trademarks oISRS Labs,
lnc. TruSurround XT tecllnology is incorporated under license fl:om SRS
Labs, Inc.
Licensed by BBE Sound, Inc. under one or more of the lollowing US
patents: 5510752, 5736897. BBE and BBE symbol are registered
trademarks of BBE Sound. Inc.
Macintosh is a trademark licensed to Apple Computer, lnc., registered in
tile U.S.A and other countries.
Blu-ray Disc is a trademark.
WEGA, Grand WEGA, Steady Sound, Digital Reality' Creation and
CineMotion are registered trademarks of Sony Corporution.
DD _ This TV is manufactured under license fiom Dolby
Laboratories, "Dolby" and the double-D symbol are
D | G | T A L trademarksofDolbyLaboratories.
I--i rrl| yb,s+++orpor +,+bDe, nit,.....
Multimedia Interlace (HDMU M)teclmology.
HDML tl_e HDMI logo and High-Definition Multimedia lntcrlilce are
trademarks or registered trademarks of HDMI Licensing LLC.
4

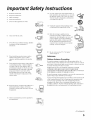
Important Safety Instructions
I ) Read these instluctions.
2) Keep tiles instructions.
3) Heed all warnings.
4) Follow all instl uctions,
5) Do not u_ Ibis apparatus near water.
12) Use only with the cart, stand, tripod, bracket, or
table specified by file manul, tcturer, or sold with
file apparzmlS. When a cart is u_d, use caution
when nloving tile carl!apparatus combin_Jlkm 1o
avoid injul T fl'om tip-over,
6) Clean only with dly clotll.
Do not block any ventilatkm openings, hlstall ill _:'-_'_27;__*
accoMance with the nmnufacturer's _ i
instructions,
13) Unplug rids apparatus during lighming storlns
or when unused lbr long periods of time.
14) RelPr all servicing to qualified service
personnel. Servicing is required when file
apparatus has been damaged in any way, sucll
as power-supply cord or phlg is damaged,
lktuid Ires been spilled or objects have bdlen
into lhe apparalus, lhe apparatus has been
exposed to rain or moisture, does not operale
normally, (51:has been dropped.
Do not inslall near any heat sources such as
radialors, beat regislers, sloves, or other
apparalus (inchlding amplifiers) lhal produce
beat.
Do not deleal tile salPly purpose of the polarized
or grounding-lype plug. A polarized phlg has
two blades wiltl one wider lfian file olher. A
grounding type plug has lwo blades and a third
grounding prong. The wide blade or file fllird
prong are provided Ior your s_dcty. If the
provided phlg does nol fit into your oullel,
consult an electrician lot replacement of the
obsolele oul]el,
I0) Protect lhe power cord from being walked on or
pinched particularly at plugs, convenience
receptacles, and the point where they exit fiom
tile apparatus.
_.L>
[] Be sure to obselve tile TV's "For SalEty"
section on page 6,
Antennas
Outdoor Antenna Grounding
It all outdoor alltenna is installed, follow tile precautions below. All
ouldoor antenna system sllould not be located ill the vicinity of overllead
power lines or other electric lighl (51power circuits, or wllere it can COllie
ill COlllacl wilh sucll power lines or circuils.
WHEN INSTALLING AN OUTDOOR ANTENNA SYSTEM.
EXTREME CARE SHOULD BE TAKEN TO KEEP FROM
CONTACTING SUCH POWER LINES OR CIRCUITS AS CONTACT
WITH THEM IS ALMOST INVARIABLY FATAL.
Be sure lhe antelllla systelll is grounded so as 1o provide some proteclioll
againsl voltage surges and buill-up static charges.
Section 8lI/of the Nalional Electrical Code (NEC) in USA and Seclion 54
ol the Canadian Electrical Code in Callada provkles hllornlation wilh
respect to proper groulldillg oI file mast alld supporthlg slruclure,
grounding ol the lead-in wire to an antenna discharge unit, size of
groullding COllduclors, location of alltenna discharge UlliH connect]oil to
grounding electrodes, and requirelnenls lor tile grounding eleclrode.
I 1) Only tl_ attachnlents/accessolies specified by
tile iilanulacture r.
(Continued)
5

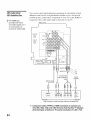
Antenna Grounding According to the NEC
Relcr to section 54-300 of Panadiml Electrical Pode lor Antenna
Grounding.
t<g <___
Antenna lead-in wire
Ground clam/_
i_ _ _ _//" Antenna lead-in wire
| Elect_rica_ -- _u- / (NEC Section 810-20)
| service
| equipment .... ,_. Grounding conductors
..... •_[_//_ (NEC section 810-21)
_ Ground clamps
--,-.s,--..__ _ Power service grounding
NEC: National electrode system (NEC Art
Electrical Code 280 Part H)
Cleaning
[_ Cleafl the r_ar cover al_a of rhe TV regularly. Dust in the rear cover
mea may cause a problem with the cooling system of tile TV set.
[] Clean lhe cabinel ol tile TV with a dry soft
F0
cloth. To relnove dust lboln the screen, wipe il N _ _v'_l
gently witl/a sofi clotll. Stubborn slai..........y be_'_J I I _._
relnoved with a cloth slightly daml)ened with _v:2211::::5_ tl I
sollllion of lnild soap alld warm water. Ne_, er
use strong solvents such as thinner or benzine lor cleaning. If the
picture becomes (lark aller using the TV lor a king period of time. il
may be necessary lo clean tile inside of the TV. Consull qualified
service personnel.
[] Unplug tile AC power cord when cleaning tills unil. Cleaning Ibis
unil wilh a plugged AC power cord may result in electric shock.
On Contamination on the Screen Surface
Tile screen surl, Lcchas a special coaling to reduce reflections. To prcvenl
screen damage, clean tile screen as lhllows:
[] Clean tile screen with a soft clotll.
[] To remove hard contamination, use a clolh moislened wilh a
solution of mild delergenl and water. [)4)not spray cleaning solution
directly onto the TV. It should only be sprayed 1omoislen llle
cleaning clolh.
[] Do not use any type of abrasive pad, alkaline cleaner, acid cleaner,
scouring powder, chemical cloth, or solvent such as alcohol,
benzene or thinner, ;isthese lnay scralc]l the screen's coating.
Service
Damage Requiring Service
Do not altelnpl to servicersthe set b)'')otu_ll since"opening_ I_
tile cabinel may ex I oe y4u tl danger_ i1_ '4Itage 4r 4ther _/_ ,_ _,
hazards. I_ _
Unl)lug the set h'oln lhe wall outlet and relier servicing to [_
qualified selvice personnel.
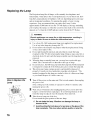
Replacement Parts
_'tlell replacement parts are requilwl, be SUlVthe set, ice technician
cerlifies in writing lhal he has used replacement paris specified by the
ii/anul_lcnlr_2rlhal have lhe same characterislics as tile original parts.
Unauthorized substitutions may result illfire, eleclric shock or other
hazards.
See "Replacing the Laml)" on page 76.
For Safety
Be Careful When Moving the
TV
When you place tile TV in position, be carelul
IIOI tO drop it on yo/ir Loot or Lingers.
Watch your looling while inslalling lhe TV.
Carry the TV in the Specified
Manner
II you carry tile TV in a lnanner other than tile
specilied rammer and withoul tile specified number
4)1persons, il may drop anda serious injury may be
caused. Be sure to lolh)w tile instructions
mentioned below.
[] Carry tile TV wilh lhe specified number of persons (see page 13).
[] Hold tile TV tigla/y when canting it.
[] Belhre carlTing the TV, disconnect any accessories or cables.
About the TV
Although lhe TV is made with high-precision lechnology, black dots may
appear or bright poinls ol light (red. blue, or green) may appear conslantly
on tile screen. This is a Stlucmral property ol tile panel and is not a detect.
Installation ,,
E] It'direct sunli=ht or other strong illmnination shines on tile screen,
par t of the screen may appear white due to reflections/?vm behin d
the screen. This is a structural property of the TV.
Do not expose the screen to direct illumination or direct sunlight,
[] Tile picture quality may be allbctcd by your viewing position. For
file best picture quality, install your TV according n)
"Recomnlended Viewing Area" on page 15.
[] When installing your TV against a wall, keep it at least 4 inches ( 10
cm) away lrom tile wall.
Projection Lamp
[] Your TV uses a projection lamp as its ligla source. II is time to
replace tile lamp wilh a new one (nol supplied) when:
• tile message, "Pl'_iection lamp is nearing end of lili:. Please
replace tile ]amp?'appeared on tile screen,
• lhe lamp replacenlent indicator on lbe lronl panel blinks in red.
• screen ilnages becolne dark,
• no image appears on tile display aller prolonged u_e.
[] In rare insnmces, tile bulb may pop inside the lamp unit, but the lamp
unil is designed lo contain all of broken glass piecesinside lbe lamp
unit. (See "Replacing the Lamp" on page 76 0
E] When the lamp eventually burns out, you may hear a noticeable pop
sound. This is normal and is inhm_nt in this type of lamp.
Cooling Fan
This TV u_s a cooling l,m. You may hear tile noise of l,m running,
depending on tile placclnent 4)1your TV. Tile noise may be nlore noticeable
during tile nigla or when tile background noise level is low.
Disposal of Used Batteries
To prowl're our enx,'ironll/ent, dispose o| used biU_elies accordhlg to your
local laws or regulations.
6

Welcome ................................................................ 9
Package Contents ............................................ 9
Features ........................................................... 9
Enjoying Your TV ................................................ 11
Notes on the TV ............................................. 11
Screen ............................................................ 11
Indicators ....................................................... 12
Projection Lamp ............................................. 12
Installing the TV .................................................. 13
Carrying Your TV ........................................... 13
Take Precaution during Installation ................ 13
Preventing the TV from Toppling Over .......... 14
When Installing Your TV against a Wall ......... 14
Recommended Viewing Area ........................ 15
TV Controls and Connectors ............................. 16
Front Panel .................................................... 16
Side and Rear Panel ...................................... 18
Overview .............................................................. 20
Making Video and Audio Connections ........... 20
About Using HDMI to DVI Adapter ................. 21
About Using S VIDEO .................................... 21
Basic Connections ............................................. 22
Cable System and/or VHF/UHF Antenna
System ........................................................... 23
HD Cable Box/
HD Satellite Box ............................................. 24
Equipment with DVI Connection .................... 25
Satellite Receiver and Cable/Antenna ........... 26
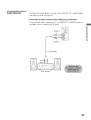
Equipment with Digital Audio (Optical) ........... 27
Setting Up the Channel List ............................... 28
Using Initial Setup .......................................... 28
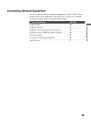
Connecting Optional Equipment ....................... 29
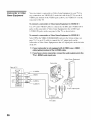
VCR and Cable .............................................. 30
VCR and Cable Box ....................................... 31
DVD Player with Component
Video Connectors .......................................... 33
DVD Player with
S VIDEO and Audio Connectors .................... 34
Personal Computer ....................................... 35
Camcorder or Video Game Equipment ......... 36
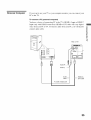
Audio Receiver .............................................. 37
Overview ............................................................. 38
Inserting Batteries into the Remote Control ... 38
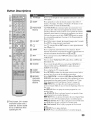
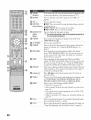
Button Descriptions ........................................... 39
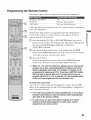
Programming the Remote Control ................... 41
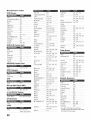
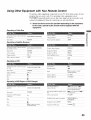
Using Other Equipment with Your Remote
Control ......................................................... 43
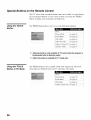
Special Buttons on the Remote Control .......... 46
Using the TOOLS Button .............................. 46
Using the TOOLS Button in PC Mode ........... 46
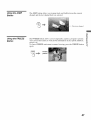
Using the JUMP Button ................................. 47
Using the FREEZE Button ............................ 47
Using the GUIDE Button ............................... 48
Using the WIDE Button ................................. 49
Using the WIDE Button in PC Mode ............. 50
Using the WIDE Button in PC Mode continued.
51
Overview of MENU ............................................. 52
Navigating and Selecting Items ........................ 54
Using External Inputs in MENU ........................ 54
Using Favorites in MENU .................................. 54
Using Cable in MENU ........................................ 55
Using Antenna in MENU .................................... 55
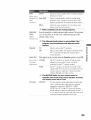
Using Settings in MENU .................................... 56
Overview ............................................................. 57
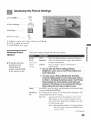
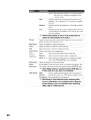
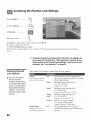
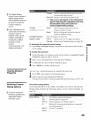
Accessing the Picture Settings ........................ 59
Selecting Picture Options .............................. 59
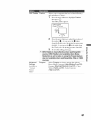
Accessing the Sound Settings ......................... 62
Selecting Sound Options ............................... 62
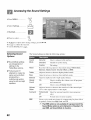
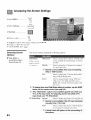
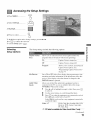
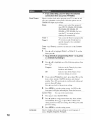
Accessing the Screen Settings ........................ 64
Selecting Screen Options .............................. 64
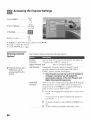
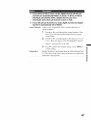
Accessing the Channel Settings ...................... 66
Selecting Channel Options ............................ 66
Accessing the Parental Lock Settings ............. 68
7

Selecting Parental Lock Options .................... 68
Viewing Blocked Programs ............................ 69
Selecting Custom Rating Options .................. 69
Accessing the Setup Settings ........................... 71
Selecting Setup Options ................................ 71
Programming Caption Vision (CC) ................. 74
Overview .............................................................. 75
Contacting Sony ................................................. 75
Replacing the Lamp ............................................ 76
How to Replace the Lamp .............................. 76
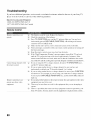
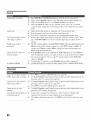
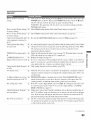
Troubleshooting ................................................. 80
Remote Control .............................................. 80
Picture ............................................................ 81
Sound ............................................................. 82
Channels ........................................................ 82
General .......................................................... 83
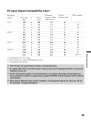
PC Input Signal Compatibility Chart ................. 85
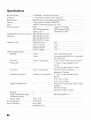
Specifications .................................................... 86
Index .................................................................... 88
8

Welcome
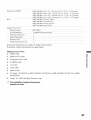
Package Contents
Thank you for purchasing this Sony's biD LCD projection TV. This manual
is for models KDF-42E2000 (US model only), KDF-46E2000, KDF-
50E2000 and KDF-55E2000.
Along with your new TV, the packing box contains a remote control and two
AA (R6) batteries. See page 87 for the complete list of packaging contents.
!
Features
Some of the features that you will enjoy with your new TV include:
[] WEGA Engine: Delivers superb picture quality from any video source
by minimizing the signal deterioration caused by digital-to-analog
conversion and stabilizing the signal processing. This engine features
unique Sony technology, including:
• DRC ® (Digital Reality Creation)-MF Vl: Unlike conventional
line doublers, the DRC Multifunction feature replaces the signal's
NTSC waveform with the near-HD equivalent by digital mapping
processing. The DRC Palette option lets you customize the level of
detail (Reality) and smoothness (Clarity).
[] Integrated HDTV: You can watch digital televised programs and enjoy
the improved audio/video quality offered by these programs.
[] Advanced Iris: Automatically detects the brightness of the screen. By
adjusting the iris shutter, this feature can provide you with the best
contrast and brightness from one scene to the next for your TV viewing.
[] MENU: Sony's unique user interface provides easy access to useful TV
functions such as external inputs (switch among connected
equipments), favorite channels (create a list of your favorite channels),
cable channels (view cable channels), antenna channels (view antenna
channels) or to customize your TV settings.
[] Wide Screen Mode: Allows you to watch 4:3 normal broadcasts in
wide screen mode (16:9 aspect ratio).
[] CineMotion®: Using the reverse 3-2 pull down technology, the
CineMotion feature provides smoother picture movement when phtying
back movies or other video sources on film.
[] Parental Control: Downloadable digital rating and V-Chip technology
allows parents to block unsuitable programming from younger viewers.
[] HDMI (High-Definition Multimedia Interface) Inputs: Provide an
uncompressed, all-digital audio/video interface between this TV and
any HDMI-equipped audio/video component, such as a set-top box,
Blu-ray Disc TM player, DVD player, and A/V receiver. Your personal
(Continued)
9

computer can be connected to this TV with HDMI Input (see page 35).
HDMI supports enhanced, or high-definition video, plus two-channel
digital audio.
[] Component Video Inputs: Offers a high-quality video for DVD (480p,
480i) and digital set-top box (1080i, 720p, 480p, 480i) connections.
[] S VIDEO Inputs: Provides a high-quality image from connected
equipment.
[] Favorite Channels: Allows you to navigate a list of up to 16 favorite
channels without leaving the current channel.
[] Steady Sound®: Equalizes volume levels so there is consistent output
between programs and commercials.
10

Enjoying Your TV
Notes on the TV
To enjoy your TV for years to come and maintain its original picture quality,
you should perform periodic maintenance.
To enjoy clear picture
[] Prevent sunlight or other light sources fiom shining directly onto the
screen. _.
[] The screen surface is easily scratched. Do not rub, touch, or tap it with .._
sharp or abrasive objects (see "On Contamination on the Screen r=
".,I
Surface" on page 6). _:
When not using the TV for a long period of time
[] Unplug the AC power cord fi'om the outlet if you anticipate not using
the TV for more than a week.
When turning off the power
[] The cooling fan will continue to operate for about two minutes. Allow
several minutes before unplugging from the outlet or switching the
breaker off.
moisture condensation
If your TV is moved directly from a cold to a warm location or is placed
in a humid room, or if the room temperature changes suddenly, the
picture may blur or show poor color This is caused by moisture
condensation on the lenses inside. Wait a few hours to let the moisture
evaporate before turning on the TV. When the condensation has
evaporated, the picture will return to normal.
On
[]
Screen
To minimize reflection, the screen surface has a special coating.
Inappropriate cleaning methods could damage the screen surface. Special
care is required.
Cleaning the Screen Surface
Dust and din on the screen can affect the picture quality. To dust off the
screen use a soft cloth. Be sure to follow the cleaning instruction on page 6
for stubborn stains and dirt.
Temporary Image Retention
When high contrast non-moving images such as station logos and channel
numbers are displayed for a long period of time, there may be some image
retention on the screen. This is only a temporary condition. Turning off the
power for a while or letting the TV run on another channel will eliminate the
image retention.
11

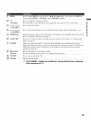
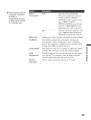
Indicators
Indicators
The indicators show the current status of your TV. If there is a change in the
condition or a problem with the TV. the indicators will flash or light up in
the manner described below to let you know that it requires your attention.
POWER flashing green : The lamp for the light source is preparing to turn
on. When it is ready, the green indicator stays on.
red : The lamp door or the lamp is not securely attached.
The red indicator will continue to flash in intervals of three
blinks at a time until the lamp door or the lamp is placed
correctly. When the lamp door or the lamp is securely
attached, the TV will turn on with green indicator.
LAMP indicator The proiection lamp has burned out. Replace it with new
flashes one (see page 76).
TIMER indicator is When one of the timers is set, the orange indicator will
lit remain lit (will not flash) even when the TV is turned oft'.
Projection Lamp Your TV uses a projection lamp as its light source. As with any lamp, it has a
lifespan and needs to be replaced when the Lamp indicator flashes or the
screen becomes darker. Your TV also has a function to display a message,
"Projection lamp is nearing end of life. Please replace the lamp." to let you
know that the lamp has reached its expected lifespan. Note the following:
[] After turning on your TV. it may take a while (l minuteorless) before
the picture appears.
[] When the projection lamp wears out, the screen goes dark. Replace the
lamp with a new Sony XL-2400 replacement lamp (not supplied).
[] After lamp is replaced, please set the "Lamp Replacement" option in the
Setup Settings (see page 76 and 73).
_ The light emitted from the lamp is quite bright when your TVis in
use. To avoid eye discomfort or injury , dO not look into the light
housing when the power is on.
12

Installing the TV
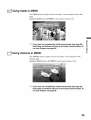
Carrying Your TV
Carrying tile TV requires at least two people. Do not hold by tile pedestal or
the front panel of the TV. Doing so may cause these parts to break off.
Do not grasp the pedestal
or the front panel of the TV
When moving the TV, place one hand in the hole on the lower portion of the
TV while glasping the top with the other hand, as shown in the illustration
below.
KDF-42/46E2000 KDF-50/55E2000
"d
If you have connected cables and cords, be sure to unplug theln before
moving the TV.
Take Precaution
during Installation
To ensure tile safety of children and tile TV. keep children away fiom tile TV
during installation. Climbing on or pushing the TV or its stand may cause it
to fall and damage the TV.
13

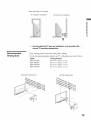
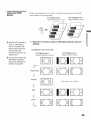
Preventing the TV
from Toppling Over
As a protective measure, secure tile TV as follows.
Using the TV stand with support belts
[] Sony strongly recommends using the TV stand SU-RGI IS for KDF-
42E2000)/SU-RG 12S (for KDF-46E2000)/SU-RG 12L (for KDF-
50/55E2000) with a support belt designed for your TV.
When using the SU.RGi1S (for KDF-42E2000)/SU.FIG12S (for KDF-
46E2000)/SUrRG12L (for KDF-50/55E2000) stand for your TV, you
must use the support belt.
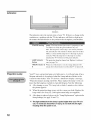
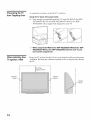
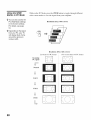
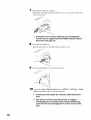
When Instalfing Your
TV against a Wall
Keep your TV at least 4 inches ( 10 cm) away fiom tile wall to provide proper
ventilation. Blocking the ventilation opening of the cooling fan may damage
the TV.
4 inches
OOcm)
12 inches
(approx. 30cm)
4inches
(lOcm)
4 inches
(10cm)
14

Never install the TV as follows
Air circulation is blocked
Air blown into cooling fan.
Ttt
,_ Do not install the TV near any ventilation, as it may affect the
normal TV operating temperature.
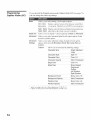
Recommended
Viewing Area
Your viewing position may affect tile picture quality.
For the best picture quality, install your TV within the areas shown below.
Model Viewing distance
KDF-42E2000 rain. 5.9 ft. (approx. 1.8 m)
KDF-46E2000 rain. 6.2 tl. (approx. 1.9 m)
KDF-50E2000 rain. 6.6 ft. (approx. 2.0 m)
KDF-55E2000 rain. 6.8 tl. (approx. 2.1 ha)
Horizontal Viewing Area
15

TV Controls and Connectors
Front Panel
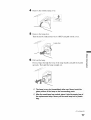
To open the panel
) the
panel door just under the "PUSH OPEN" mark.
J
PUSH OPEN TIMER LAMP POWER [] POWER
16

[] MENU Press to display MENU to activate the M-
, I*, ,_, II, and tl' buttons. Press again to exit MENU to
activate tile TV/VIDEO. - VOLUME + and- CHANNEL+ buttons.
[] =_=_ Press to confirm the selection or setting.
TV/VIDEO Press repeatedly to cycle through tile video equipment connected to the TV's video inputs.
[] 4,--,*, Press to adjust tile volume.
- VOLUME +
[] 41,-- tl_ Press to scan through channels. To scan quickly through channels, press and hold either - or +.
- CHANNEL +
[] TIMER LED When lit in orange, indicates one of the timers is set. When itis set, this LED will remain lit even if
the TV is turned off. For details, see page 72.
[] LAMP LED Flashes in red when the lamp for the light source has burned out. For details, see "Replacing the
Lamp" on page 76.
[] POWER Lights up in green when the TV is turned on. If the LED blinks in red continuously, this may
indicate the display unit needs servicing (see contacting Sony information on page 2). When the red
LED blinks only three times, the lamp door of the lamp unit or the lamp itself is not securely
attached (see page 78).
[] [] Infrared Receives IR signals from the remote control.
Receiver Do not put anything near the sensor, as its function may be affected.
[] POWER Press to turn on and off the TV.
[] Speaker Outputs the audio signal.
'f_ The CHANNEL + button has a tactile dot. Use the tactile dot as a reference
when operating the TV.
_o
"4
17

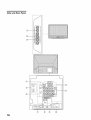
Side and Rear Panel
_q
,vJ._ =
z
_5
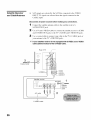
18

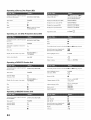
[] HD/DVD IN 2 Connects to your equipment's component video (YPBPIQ output jacks. Component video
(1080i/720p/ provides better picture quality than the S VIDEO ([_I of rear panel) or the composite video
480p/480i) ([_ of rear panel) connections (see page 19).When Auto is selected for the Video 2
(Component) option in the Setup settings, the component video fimction will be the dethult
stream when present (see page 73).
[] VIDEO IN 2 Connects to the composite video output jack on your camcorder or other video eqnipment.
il_ connecting eomposiie video io viDEoiN 2; sure to Select Video2
(Component) to Off in the Setup settings to activate both audio and video
function for composite connection (see page 73).
...........
[] AUDIO IN 2 Connects to the audio (L/R) output jacks of your equipment such as camcorder or other video
L (MONO)/N equipment which you want an easy access.
[] VIDEO IN 1 Connects to the S VIDEO outpnt jack of your VCR or other video equipment that has
S VIDEO S VIDEO. S VIDEO provides better picture quality than the composite video ([_]).
[] VHF/UHF RF input that connects to your cable and VHF/UHF antenna signal.
CABLE
[] VIDEO IN 1/3 Connects to the composite video and audio output jacks on your VCR or other video
VIDEO/ equipment. A third composite video and audio (VIDEO 2) is located on the left side panel of
L (MONO)- the TV.
AUDIO-R
[] DIGITAL AUDIO Connects to the optical audio input of a digital audio component that is PCM/Dolby Digital
(OPTICAL) OUT compatible.
PCM/DOLBY*
DIGITAL
[] HDMI IN6 HDMI (High-Definition Multimedia Interface) provides an uncompressed, all-digital
HDMI/ audio/video interface between this TV and any HDMI-eqnipped audio/video equipment, such
R-AUDIO-L as a set-top box, Blu-ray Disc player, DVD player, A/V receiver as well as PC. HDMI supports
enhanced, or high-definition video, plus two-channel digital audio. You can also connect a
DVI-equipped device to your TV by using an HDMI-to-DVI cable.
[] HDMI IN 7 When HDMI to DVI cable is used to connect your equipment for video, be sure to use audio
cable I_r the sound. See page 35 l\_r connecting to your personal computer.
[] Service Port For service use only.
[] AUDIO OUT Connects to the left and right audio input jacks of your audio or video equipment. Yon can use
(VAR/FIX) L/R these outputs to listen to your TV's audio through your stereo system.
[] HD/DVD IN 4/5 Connects to your equipment's component video (YPI3PIQ and audio (L/R)jacks. Component
(1080i/720p/ video provides better pictnre quality than the S VIDEO ([]) or the composite video ([])
480p/480i)/ connections.
L-AUDIO-R
* Manulactured under license from Dolby Laboratories. "Dolby" mid the double-D symbol are trademarks ol Dolby Laboratories.
5"
"-.I
19

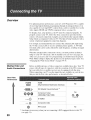
Overview
For optimum picture performance, your new LCD Projection TV is capable
of receiving high definition programming through its integrated tuner. It is
also capable of receiving HDTV content from a cable or satellite box via the
video inputs (HDM[ and YPBPR component video; see page 24).
To display clear, crisp pictures, your TV must be connected properly. To
properly connect your TV, follow the basic connections provided in this
section. Advanced connection examples are provided in the separate Quick
Setup Guide accompanied with your TV. The Quick Setup Guide provides a
variety of optional equipment connection diagrams.
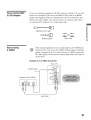
It is strongly recommended that you connect the antenna/cable input using
the 75-ohm coaxial cable to receive optimum picture quality. A 300-ohm
twin lead cable can be easily affected by radio frequency, resulting in signal
deterioration.
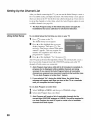
When the antenna/cable connection is done, you must perform an Initial
Setup so your TV will create a list of channels you can view (see page 28).
After you can receive and view proglamming you should select the proper
Wide Mode setting to display the picture in your preferred aspect ratio. See
"Changing the Wide Screen Mode" on pages 49-51.
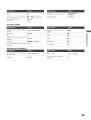
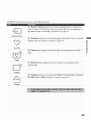
Making Video and
Audio Connections
Below are different types of video connectors available these days. Your TV
comes with all types of connectors with the exception of the DVI connector
but your cable box or satellite receiver may be equipped with this type.
When connecting your TV. use the inputs that are available on your devices
that provide the best video performance, as described below.
Best Video
Performance
H_m_ HDMI
No
(High-Definition Multimedia Interface)
©_ DVI (Digital Visual Interface) ¢
............................................................................................................. Yes
@ @ @ Component video
¥ PB P0 (480i/480p/720p/1080i) @ @
.......................................... L-AUDIO-R
sv,oEo_ S VIDEO
..... @ Composite video
RF/Coaxial No
* An adapter is necessary when you are connecting a DVl-equipped device to this TV
(see page 21).
2O
Page is loading ...
Page is loading ...
Page is loading ...
Page is loading ...
Page is loading ...
Page is loading ...
Page is loading ...
Page is loading ...
Page is loading ...
Page is loading ...
Page is loading ...
Page is loading ...
Page is loading ...
Page is loading ...
Page is loading ...
Page is loading ...
Page is loading ...
Page is loading ...
Page is loading ...
Page is loading ...
Page is loading ...
Page is loading ...
Page is loading ...
Page is loading ...
Page is loading ...
Page is loading ...
Page is loading ...
Page is loading ...
Page is loading ...
Page is loading ...
Page is loading ...
Page is loading ...
Page is loading ...
Page is loading ...
Page is loading ...
Page is loading ...
Page is loading ...
Page is loading ...
Page is loading ...
Page is loading ...
Page is loading ...
Page is loading ...
Page is loading ...
Page is loading ...
Page is loading ...
Page is loading ...
Page is loading ...
Page is loading ...
Page is loading ...
Page is loading ...
Page is loading ...
Page is loading ...
Page is loading ...
Page is loading ...
Page is loading ...
Page is loading ...
Page is loading ...
Page is loading ...
Page is loading ...
Page is loading ...
Page is loading ...
Page is loading ...
Page is loading ...
Page is loading ...
Page is loading ...
Page is loading ...
Page is loading ...
Page is loading ...
Page is loading ...
Page is loading ...
-
 1
1
-
 2
2
-
 3
3
-
 4
4
-
 5
5
-
 6
6
-
 7
7
-
 8
8
-
 9
9
-
 10
10
-
 11
11
-
 12
12
-
 13
13
-
 14
14
-
 15
15
-
 16
16
-
 17
17
-
 18
18
-
 19
19
-
 20
20
-
 21
21
-
 22
22
-
 23
23
-
 24
24
-
 25
25
-
 26
26
-
 27
27
-
 28
28
-
 29
29
-
 30
30
-
 31
31
-
 32
32
-
 33
33
-
 34
34
-
 35
35
-
 36
36
-
 37
37
-
 38
38
-
 39
39
-
 40
40
-
 41
41
-
 42
42
-
 43
43
-
 44
44
-
 45
45
-
 46
46
-
 47
47
-
 48
48
-
 49
49
-
 50
50
-
 51
51
-
 52
52
-
 53
53
-
 54
54
-
 55
55
-
 56
56
-
 57
57
-
 58
58
-
 59
59
-
 60
60
-
 61
61
-
 62
62
-
 63
63
-
 64
64
-
 65
65
-
 66
66
-
 67
67
-
 68
68
-
 69
69
-
 70
70
-
 71
71
-
 72
72
-
 73
73
-
 74
74
-
 75
75
-
 76
76
-
 77
77
-
 78
78
-
 79
79
-
 80
80
-
 81
81
-
 82
82
-
 83
83
-
 84
84
-
 85
85
-
 86
86
-
 87
87
-
 88
88
-
 89
89
-
 90
90


Ask a question and I''ll find the answer in the document
Finding information in a document is now easier with AI
Related papers
Other documents
-
Dynex DX-LTDVD22-09 User manual
-
AOC L42H831 User manual
-
ProScan Proscan PLDV321300 User manual
-
CyberHome CH-DVD 300 User guide
-
 ARIO HC3269 User manual
-
Uniden TL42WRA-B User manual
-
-
 Olevia LT32HVM Series User manual
-
 Olevia LT32HVM Series User manual
-
RCA L42WD22 User manual


