Page is loading ...

revised 25MAY2018
READ ALL INSTRUCTIONS BEFORE USE OF THE CHANGING TABLE, ADD-ON
CHANGING UNIT, OR CONTOUR CHANGING PAD.
WARNING!
!
LISEZ TOUTES LES INSTRUCTIONS AVANT D’UTILISER LA TABLE À LANGER, L’UNITÉ
COMPLÉMENTAIRE OU LE COUSSIN À LANGER AVEC CONTOUR.
AVERTISSEMENT!
!
Dakota 4-in-1 Crib and Changer Combo Assembly Instructions
Ensemble de lit de bébé 4 en 1 Manuel d’assemblage
et de table à langer Dakota
Item# 14991
1

* Tools Needed (not included)
* Outils requis (non inclus)
Phillips screwdriver
Tournevis cruciforme
* You will need two people to
assemble this crib and Changer
Combo.
* Deux personnes sont nécessaires pour
assembler ce lit et de table à langer.
Thank you for purchasing a Carter’s nursery product! To ensure safe use of your product, please
follow these assembly instructions closely. If you are missing parts or have any questions, please
visit our website at www.themdbfamily.com/support.
For assembly, use the Allen wrench if it is included in the hardware box. We also recommend
using a Phillips head screwdriver (not included) to complete assembly. Please do not substitute
parts or use power screwdrivers. Our pieces are made from natural woods. Due to the nature of
wood, some variation in color, grain, or texture is to be expected.
We hope you and your growing family enjoy our product.
With thanks,
Carter’s by DaVinci
Nous vous remercions de votre achat d’un produit pour tout-petits Carter’s! Pour assurer une
utilisation sans risque du produit, veuillez suivre attentivement ces directives d’assemblage. Si des
pièces manquent ou si vous avez des questions, veuillez visiter notre site Web à l’adresse
www.themdbfamily.com/support.
Pour l’assemblage, utilisez la clé Allen si c’est fournie dans la boîte de quincaillerie. Nous vous
recommandons aussi d’utiliser un tournevis à tête cruciforme (non fourni) pour terminer
l’assemblage. Veuillez ne pas remplacer les pièces par des pièces similaires ni utiliser de tournevis
électriques. Nos pièces sont faites de bois naturels. De par sa nature, le bois peut présenter des
variations de couleur, de grain ou de texture.
Nous espérons que vous et votre famille grandissante aimerez notre produit.
Un grand merci,
Carter’s by DaVinci
2

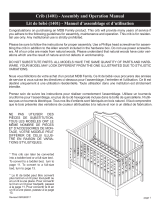
PARTS • PIÈCES
Not to Scale/Pas à l'échelle
B. Front Panel
B. Panneau avant
A. Back Panel
A. Panneau arrière
C. Left Side Panel
C. Panneau latéral gauche
E. Middle Panel
E. Panneau cent
D. Right Side Panel
D. Panneau latéral
droit
F. Left Front Post
F. Pied avant gauche
G. Left Rear Post
G. Pied arrière gauche
H. Middle Rear Post
H. Pied arrière du milieu
I. Mattress Support IV
I. Support du matelas IV
J. Front Bottom Rail
J. Traverse avant inférieure
L. Dresser Middle Bar (2)
L. Barres du milieu du bureau (2)
M. Dresser Front Bottom Bar
M. Barres antérieur
inférieures du bureau
N. Dresser Back Bottom Bar
N. Barres arrière
inférieures du bureau
O. Dresser Top
Support Rail
O. Traverse de support
du supérieures du bureau
P. Dresser Bottom
Support Rail
P. Traverse de support
du inférieur du bureau
Q. Dresser Top
Board
Q. Panneau supérieur
du bureau
R. Dresser Center Board
R. Panneau du centre
du bureau
K. Dresser Front/Back Top Bar (2)
K. Barres antérieur/arrière
supérieures du bureau (2)
3

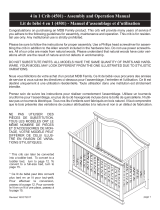
U. Pad
U. Coussin
S. Dresser Bottom Board
S. Panneau du inférieures
du bureau
T. Shelve
T. Tablettes
Y. Right Drawer Side (3)
Y. Côté droit de tiroir (3)
X. Left Drawer Side (3)
X. Côté gauche de tiroir (3)
Z. Drawer Bottom (3)
Z. Fond de tiroir (3)
W. Drawer Back (3)
W. Arrière de tiroir (3)
V. Drawer Front (3)
V. Façade de tiroir (3)
AA. Finished Drawer Front Panel (3)
AA. Façade de tiroir de finition (3)
HARDWARE • ACCESSOIRES DE MONTAGE
Bolts in Actual Size/Boulons (taille réelle)
H1. 3” Round Head Bolt with Nut (10)
H1. Boulon à tête ronde avec
écrou de 7,6 cm (3 po) (10)
H2. 2-1/4” Round Head Bolt with Nut (4)
H2. Boulon à tête ronde avec
écrou de 5,7 cm (2-1/4 po) (4)
H3. 1-1/4” Round Head Bolt (2)
H3. Boulon à tête ronde
de 3,2 cm (1-1/4 po) (2)
H4. 2-1/4” Allen Head Bolt with Nut (2)
H4. Boulon Allen de avec
écrou de 5,7 cm (2-1/4 po) (2)
4

H9. 1-1/4” Phillips head screw (24)
H9. Vis à tête cruciforme
de 3,2 cm (1-1/4 po) (24)
H15. Knob (3)
H15. Poignée (3)
H16. 1-1/2” Knob screw (3)
H16. Vis de poignée
de 3,8 cm (1-1/2 po) (3)
H14. 0.8 x 2 cm
wood dowel (6)
H14. 0.8 x 2 cm
Goujon de bois (6)
H18. Safety Strap
H18. Sangle de sûreté
H17. 5/8” Round Head Screw (2)
H17. Vis à tête ronde de
1,6 cm (5/8 po) (2)
H13. 0.8 x 3.5 cm
Wood Dowel (17)
H13. 0.8 x 3,5 cm
Goujons en bois (17)
H5. 1-3/4” Allen Head Bolt (8)
H5. Boulon Allen de 4,4 cm (1-3/4 po) (8)
H19. Allen wrench
H19. Clef Allen
H12. 1 x 3.5 cm Wood Dowel (6)
H12. 1 x 3,5 cm Goujons en bois (6)
H10. 1” Phillips headscrew (12)
H10. Vis à tête cruciforme
de 2,5 cm (1 po) (12)
H7. Washer (4)
H7. Rondelle (4)
H6. 3/4” Allen Head Bolt (4)
H6. Boulon Allen de 1,9 cm (3/4 po) (4)
H8. Lock Washer (30)
H8. Rondelle de blocage (30)
H11. Metal pins (4)
H11. Cheville de
métal (4)
5

ASSEMBLY INSTRUCTIONS • INSTRUCTIONS D’ASSEMBLAGE
1
H3
H3
H13
H3
E
H
H13
H13
H13
H8
H8
H8
H12
H12
!
2
N
O
P
H13H13
H13
H13
H13
H13
H13
H13
K
K
H13
H13
H13
H13
M
H13
H13
H13
6

E
M
N
K
K
P
H1
H1
H1
H1
H4
!
H1
H4
(Back)
(Arrière)
(Front)
(Avant)
H8
H8
H8
H8
H8
H8
H8
H
3
4
O
L
L
E
(Back)
(Arrière)
(Front)
(Avant)
7

5
6
Q
E
Q
R
P
K
K
(Back)
(Arrière)
(Front)
(Avant)
S
E
N
P
(Back)
(Arrière)
(Front)
(Avant)
8

H11
H11
H11
H11
H11
E
Q
D
(Back)
(Arrière)
(Front)
(Avant)
7
H4
H1
Q
R
E
D
(Back)
(Arrière)
(Front)
(Avant)
H1
H1
H1
H1
H4
!
H8
H8
H8
H8
H8
H8
H8
8
9

9
T
(Back)
(Arrière)
(Front)
(Avant)
H5
H8
F
G
C
H8
H5
H8
H5
H8
H5
H8
H5
H12
H12
!
10
10

F
C
A
H8
H2
H8
H2
H8H2
11
12
H8
H2
H8
H2
H12
!
H8 H2
H12
!
A
E
11

I
UPPER SIDE
Do not overtighten the bolts.
Ne pas trop serrer les boulons.
13
* Make sure the mattress support IV (I) is installed properly.
THE FLAT SIDE UP.
* Make sure the smattress support IV (I) is level.
* S’assurer que le support du matelas IV (I) est bien installé LE CÔTÉ PLAT
VERS LE HAUT.
* S’assurer que le support du matelas IV (I) est de niveau.
I
H6
H8
H7
A
!
0-1 yrs old
0-1 ans
1-2 yrs old
1-2 ans
E
F
C
H8
H6
H8
H6
H8
H6
H8
H6
12

14
15
B
H12
H12
H12H12
H12
J
H1 H8
H1H8
H8
H5
H8
H5
H8
H5
H8
H5
B
J
F
E
H8
H5
H8
H1
13

* Make sure the safety
strap goes over the
pad. Adjust the length
of the safety strap. Test
the locking mechanism
by sliding the male con-
nector into the female
connector and locking
them together. Recheck
all connections.
* S’assurer que la sangle
de sûreté passe sur le
coussin. Régler la
longueur de la sangle de
sûreté. Essayer le
mécanisme de blocage en
glissant le connecteur
mâle dans le connecteur
femelle pour les verrouill-
er ensemble. Revérifier
tous les raccords.
Y
X
H9
H9
V
DRAWER ASSEMBLY INSTRUCTIONS
INSTRUCTIONS D'ASSEMBLAGE DES TIROIRS
17
17a
16
H18
H18
H17
U
14

17b
17c
W
Z
H9
H9
17d
H10
H10
H14
H14
H10
H10
AA
H15
H16
H16
AA
H15
V
Z
15

* This crib can later be converted into a toddler
bed or a full-size bed. To convert to a toddler
bed, turn to page 23. To convert to a full-size
bed, turn to page 26.
* Ce lit de bébé peut être converti plus tard en un lit
pour tout-petit. Pour effectuer la conversion, passez
à la page 23. Pour convertir le lit en un lit à une
place, passez à la page 26.
18
The recommended maximum weight of
the occupant is 30 lbs on changing table.
Le poids maximal recommandé de l’occu-
pant de cette table est de 13,6 kg (30 lb).
GARDER CE MANUEL EN LIEU SÛR POUR
UN USAGE ULTÉRIEUR.
Procéder à une nouvelle vérification des vis
et des boulons pour vous assurer qu’ils sont
bien fixés. Ne pas trop serrer.
Avant d'utiliser le lit de bébé, lire tous les
avertissements inscrits sur le feuillet.
KEEP THIS MANUAL IN A SAFE PLACE
FOR FUTURE REFERENCE.
Recheck all screws and bolts to be sure
they are fastened securely. Do not over-
tighten.
Before using your crib, please read all
cautionary statements on the insert sheet.
Finish
Terminé
16

CAUTION: ANY MATTRESS USED IN THIS CRIB MUST BE AT LEAST 27 1/4 INCHES (69CM)
BY 51 5/8 INCHES (131CM) WITH A THICKNESS NOT EXCEEDING 6 INCHES (15CM).
Please refer to the label (sample below) on the inside face
of the headboard. Record the model/ item number and serial
number of your crib, the name of the store where you made
the purchase, the date of purchase and the wood finish in
the box to the lower right.
WE WILL ASK YOU FOR YOUR SERIAL NUMBER FOR ALL
WARRANTY AND REPLACEMENT PART REQUESTS. PLEASE
REFER TO THE LAST PAGE OF THIS INSTRUCTION SHEET FOR
WARRANTY INFORMATION. KEEP THIS MANUAL FOR FUTURE
REFERENCE.
Please read the Caution and Warning
Statements insert before using your crib.
SAMPLE LABEL
THIS PRODUCT CONFORMS TO THE
APPLICABLE REGULATIONS OF THE
CONSUMER PRODUCTS SAFETY COMMISSION.
Numéro du
modèle/produit
Numéro
de série
Date de
fabrication
Numéro de modèle :
Numéro de série :
Magasin :
Date d’achat :
Finition :
SPÉCIMEN D’ÉTIQUETTE
www.themdbfamily.com
www.themdbfamily.com
CAUTION: ANY MATTRESS USED IN THIS CRIB
MUST BE AT LEAST 27 1/4 INCHES (69CM) BY
51 5/8 INCHES (131CM) WITH A THICKNESS
NOT EXCEEDING 6 INCHES (15CM).
ATTENTION : TOUT MATELAS UTILISÉ DANS CE LIT DOIT MESURER AU MOINS 69 CM
(27 1/4 POUCES) PAR 131 CM (51 5/8 POUCES) ET AVOIR UNE ÉPAISSEUR NE
DÉPASSANT PAS 15 CM (6 POUCES).
ATTENTION : TOUT MATELAS UTILISÉ DANS CE
LIT DOIT MESURER AU MOINS 69 CM (27 1/4
POUCES) PAR 131 CM (51 5/8 POUCES) ET AVOIR
UNE ÉPAISSEUR NE DÉPASSANT PAS 15 CM (6
POUCES).
Veuillez consulter l’étiquette (spécimen ci-dessous) sur la
face intérieure de la tête de lit. Inscrivez le numéro de modèle
ou d’article et le numéro de série du lit, le nom du magasin où
vous l’avez acheté, la date de l’achat et le fini du bois dans la
case de droite.
NOUS VOUS DEMANDERONS LE NUMÉRO DE SÉRIE LORS DE
TOUTE DEMANDE DE GARANTIE ET DE PIÈCE DE RECHANGE.
CONSULTEZ LA DERNIÈRE PAGE DE CE MANUEL D’INSTRUC-
TION POUR DES RENSEIGNEMENTS SUR LA GARANTIE. CON-
SERVEZ CE MANUEL POUR UN USAGE ULTÉRIEUR.
CE PRODUIT EST CONFORME AUX
RÈGLEMENTS EN VIGUEUR DE LA
CONSUMER PRODUCTS SAFETY
COMMISSION.
Veuillez lire le feuillet de mises en garde et
d’avertissements avant l’utilisation de ce lit.
17

WARNING:
Failure to follow these warnings and
the assembly instructions could result
in serious injury or death.
READ ALL INSTRUCTIONS BEFORE ASSEMBLING
CRIB. KEEP THE MANUAL FOR FUTURE USE.
WARNING:
Parents should ensure a safe environment for the child by checking regularly, before
placing the child in the product, that every component is properly and securely in place.
Please do NOT remove any wood screws
in the normal disassembly of the crib.
WARNING:
• DO NOT use this crib if you cannot exactly follow the accompanying instructions.
• Infants can suffocate on soft bedding. Never add a pillow or comforter. Never place additional padding under an infant.
• To reduce the risk of SIDS, pediatricians recommend healthy infants be placed on their backs to sleep, unless
otherwise advised by your physician.
• Strangulation Hazard: Strings can cause strangulation! DO NOT place items with a string around a child’s neck, such as
hood strings or pacifier cords. DO NOT place cords, straps, or similar items that could become wound around the child’s
neck in or near this crib. DO NOT suspend strings over a crib or attach strings to toys.
• To help prevent strangulation tighten all fasteners. A child can trap parts of the body or clothing on loose fasteners.
• DO NOT place a crib near a window where cords from blinds or drapes may strangle a child. DO NOT place this crib
near a window or a patio door where a child could reach the cord of a blind or curtain and be strangled.
• Fall Hazard: When a child is able to pull to a standing position, set the mattress to the lowest position and remove
bumper pads, large toys and other objects that could serve as steps for climbing out.
• DO NOT use this crib if the child is able to climb out unaided or is taller than 35 in. (89cm).
• Check this product for damaged hardware, loose joints, loose bolts or other fasteners, missing parts or sharp edges
before and after assembly and frequently during use. Securely tighten loose bolts and other fasteners. DO NOT use crib
if any parts are missing, damaged or broken. DO NOT substitute parts. Contact THE MDB FAMILY for replacement parts
and instructional literature if needed.
• DO NOT use a water mattress with this crib.
• For cribs equipped with teething rails, replace teething rail if damaged, cracked or loose.
• If refinishing, use a non-toxic finish specified for children’s products.
• Never use plastic shipping bags or other plastic films as mattress covers because they can cause suffocation.
• Infants can suffocate in gaps between crib sides when used with a mattress that is too small.
• Follow warnings on all products in a crib.
• Ensure that the sides are properly latched or locked in place when the crib is occupied.
• The mattress used with this crib should not be more than 15cm thick and should be of such length with width that the
gap between the mattress and the sides of the crib is no more than 3cm when the mattress is pushed into the corner
of the crib.
18

N’enlever AUCUNE vis à bois lors du
démontage normal du lit de bébé.
AVERTISSEMENT :
AVERTISSEMENT :
Le non respect des avertissements et directives d’as-
semblage peut entraîner de graves blessures ou la
mort.
LIRE TOUTES LES INSTRUCTIONS AVANT D’ASSEMBLER LE LIT.
CONSERVER CE MANUEL POUR UN USAGE ULTÉRIEUR.
AVERTISSEMENT :
Avant de placer l’enfant dans ce lit, les parents doivent s’assurer que son
environnement est sécuritaire en vérifiant régulièrement que toutes les composantes
sont correctement fixées.
• NE PAS utiliser ce lit de bébé si vous n’êtes pas en mesure de suivre les instructions qui l’accompagnent.
• Les nourrissons peuvent s’étouffer avec des accessoires de literie souples. Ne jamais ajouter un oreiller ou un édredon.
Ne jamais placer un coussin supplémentaire sous un nourrisson.
• Pour réduire les risques de SMSN, les pédiatres recommandent de placer les nourrissons en bonne santé sur le dos
pour dormir, sauf indication contraire de votre médecin.
• Risque de strangulation: Les cordons peuvent causer un étranglement! NE PAS placer un objet muni d’une ficelle
autour du cou de l’enfant, tels que les cordons d’un capuchon ou d’une sucette. Ne fixer au lit aucun cordon, ni ruban ou
objet semblable pouvant s’enrouler autour du cou de l’enfant, ni à proximité du lit. NE PAS suspendre de ficelles au-des-
sus du lit, ni en attacher aux jouets.
• Pour éviter tout risque d’étranglement, vérifier le serrage des pièces. Un enfant peut coincer une partie de son corps ou
ses vêtements entre des pièces mal serrées.
• NE PAS placer un lit de bébé près d’une fenêtre où les cordons des stores ou des rideaux pourraient étrangler l’enfant.
NE PAS placer ce lit de bébé près d’une fenêtre ou d’une porte-fenêtre où l’enfant pourrait atteindre le cordon des stores
ou des rideaux et s’étrangler.
• Risque de chute: Lorsque l’enfant est capable de se tenir debout, régler le matelas à la position inférieure et enlever les
coussins de contour, les grands jouets et tout autre objet dont l’enfant pourrait se servir pour sortir du lit.
• NE PAS utiliser ce lit si l’enfant est capable d’en sortir sans aide ou mesure plus de 89 cm (35 po).
• Vérifier que le produit ne comporte pas de pièce endommagée ni joint, boulon ou élément desserré, pièce manquante
ou arête tranchante avant et après l’assemblage et fréquemment pendant l’utilisation. Serrer fermement les boulons
lâches et autres pièces de fixation. NE PAS utiliser le lit si des pièces sont manquantes, endommagées ou brisées. NE
PAS UTILISER DES PIÈCES DE SUBSTITUTION. Communiquer avec THE MDB FAMILY pour obtenir des pièces de
rechange et des instructions.
• NE PAS utiliser un matelas d’eau dans ce lit de bébé.
• Pour les lits de bébé munis de barreaux de dentition, remplacer tout barreau de dentition endommagé, fendu ou lâche.
• Si la finition de ce meuble doit être refaite, utiliser un fini non toxique conçu pour les meubles pour enfants.
• Ne jamais utiliser des plastiques d’emballage ni toute autre pellicule de plastique pour recouvrir le matelas car ils
présentent un risque de suffocation.
• Les nourrissons peuvent s’étouffer en glissant dans l’espace entre le matelas et les côtés du lit si le matelas est trop petit.
• Suivre les avertissements de tous les produits placés dans un lit de bébé.
• S’assurer que les côtés sont correctement verrouillés lorsque le lit est occupé.
• Le matelas utilisé dans ce lit ne doit pas avoir plus 15 cm d’épaisseur et sa longueur et sa largeur ne doivent pas
laisser un espace de plus de 3 cm entre celui-ci et les côtés lorsqu’il est poussé dans un coin du lit.
19

To prevent death or
serious injury, always
keep child within arm’s
reach. Never leave child
unattended and always
use restraining system.
ONE YEAR LIMITED WARRANTY:
We will replace any missing parts at the time
of purchase or any defective item within a
one year period from the date of original
purchase. Please keep your receipt so that
we may process your warranty request. This
warranty only covers new units with original
packaging and ownership, and is not trans-
ferable. It does not cover any used, second-
hand or demo models.
This warranty does not cover any damaged
or defective parts that result from installation
and assembly, normal wear and tear, abuse,
negligence, improper use or alteration to the
finish, design, and hardware. The specific
legal rights of this warranty may vary from
state to state. Some states do not allow any
exclusion or limitation of incidental damag-
es. Some states do not allow limitation on
how long an implied warranty lasts.
WARNING!
FALL HAZARD
TO PREVENT DEATH OR SERIOUS
INJURY, ALWAYS KEEP CHILD WITHIN
ARM’S REACH.
WARNING:
READ ALL INSTRUCTIONS BEFORE ASSEMBLING THIS
PRODUCT. KEEP THE MANUAL FOR FUTURE USE.
WARNING!
FALL HAZARD
Registering your product is even easier than
before. You can register your product on our
website at :
www.themdbfamily.com/registrations
IF YOU WOULD LIKE TO ORDER
REPLACEMENT OR MISSING
PARTS
PLEASE VISIT US AT:
WWW.THEMDBFAMILY.COM/SUPPORT
OR YOU CAN CONTACT US BY MAIL:
THE MDB FAMILY
855 WASHINGTON BLVD.
MONTEBELLO, CA 90640
Storage:
Pine woods exchange moisture with the air adjust-
ing to major changes in room temperature and
humidity. Therefore, it is best to place your furniture
away from heating or air-conditioning vents.
Sunlight is not friendly to solid wood furniture and
prolonged direct exposure to harsh sunlight can
discolor the finish. Be careful not to place your furni-
ture in direct sunlight for extended periods of time. As
with all your fine furniture, blot up spills immediately.
•
•
Care and Cleaning:
Do not scratch or chip the finish. Do not use abra-
sive chemicals for cleaning. Clean with mild soap on
a soft rag. Rinse and dry thoroughly. If you ever
refinish this furniture, be sure to use only a non-toxic
finish specified for children’s products. If you choose
to refinish this furniture, the warranty will be voided.
•
• FALL HAZARD: Children have suffered serious injuries
after falling from changing tables. Falls can happen quickly.
• STAY in arm’s reach of your child.
• SUFFOCATION HAZARD: Babies have suffocated while
sleeping in changing area. Changing area are not designed
for safe sleep.
• NEVER allow baby to sleep in changing area.
• Always secure this pad to the changing surface (removable
or stationary changing tray) by placing the pad within the
boundaries of the tray. See instructions.
• The pad is to be used on a surface that is level, stable and
structurally sound with a minimum surface dimension of
27” by 16”.
• Read all instructions before use of the changing table.
• Do not use changing table if it is damaged or broken.
• This product is not intended to be used as a changing table
without adult supervision. Use of the product without this
may result in death or serious injury to your child from falling.
Follow all instructions on attaching and using the changing
table.
• Only use the pad provided by MDB FAMILY.
• The maximum weight of the child for which the changing
table is intended is 30 lbs.
• Stop using this changing table when the child is able to sit
up or roll over.
• As with all infant and baby furniture, it is important to check
fasteners, screws, and bolts periodically for tightness.
Parents should ensure a safe environment for their child by
checking the furniture regularly before placing the child in the
product.
• When using this product, always secure the child with the
safety strip.
20
/