Black & Decker NHT518 Owner's manual
- Category
- Power hedge trimmers
- Type
- Owner's manual
This manual is also suitable for

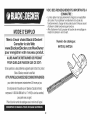
HEDGETRIMMER
iNSTRUCTiONMANUAL
KEY iNFORMATiON YOU SHOULD KNOW:
• BATTERY SHIPS FROM THE FACTORY WITHOUT A FULL
CHARGE. For optimal performance and runtime charge battery
for 9 hours before attempting to use your trimmer/edger.
• To operate the trimmer, the lock off button must be pushed
forward.
Thank you for choosing Black & Decker! Go to /
www.Blackand Decker.com/NewOwner /
to register your new product. 1
PLEASE READ BEFORE RETURNING
THIS PRODUCT FOR ANY REASON:
Ifyouhaveaquestionorexperienceaproblem
withyourBlack&Deckerpurchase,goto
HTTP:/,_VWW.BLACKANDDECKER.COM/INSTANTANSWERS
forinstantanswers24hoursaday.
Ifyoucan'tfindtheanswerordonothaveaccesstotheinternet,
call1-800-544-6986from8a.m.to5p.m.ESTNon.-- Fri.tospeak
withanagent.Pleasehavethecatalognumberavailablewhenyoucall.
SAVETHiSMANUALFORFUTUREREFERENCE.
VEAELESPANOLEHLACOHTRAPORTADA.
POURLEFRANOAiS,VOiRLACOUVERTUREARRIERE.
INSTRUCTIVODEOPERACION CENTROSDE SERVICIOY
POLZA DEGARANTA.ADVERTENClA: LEASEESTE
INSTRUCTIVOANTES DE USAR ELPRODUCTO.
Catalog Numbers
NHT518, NHT524

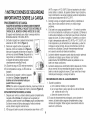
z WARNING: important Safety
Warnings and instructions
TO REDUCE RISK OF INJURY:
• Read all instructions before operating product. Failure to follow all
instructions listed below may result in electric shock, fire and or
serious injury.
• Save these instructions and review frequently prior to use and in
instructing others.
• Keep long hair and loose clothing away from openings and moving
parts.
/k
WA_"{N | N{,,_: When using electric gardening
appliances, basic safety precautions should always be followed to
reduce risk of fire, electric shock, and personal injury, including the
following.
SAFETY GUiDELiNES - DEFiNiTiONS
Itis important for you to read and understand this manual. The
information it contains relates to protecting YOUR SAFETY and
PREVENTING PROBLEMS. The symbols below are used to help
y_u recognize this information.
DANGER: Indicates an imminently hazardous situation which, if
not avoided, will result in death or serious injury.
Z'_WARNING: Indicates a potentially hazardous situation which, if not
avoided, could result in death or serious injury.
Z_CAUTION: Indicates a potentially hazardous situation which, if not
avoided, may result in minor or moderate injury.
CAUTION: Used without the safety alert symbol indicates a
potentially hazardous situation which, if not avoided, may result in
property damage.
GENERALSAFETYWARNINGSAND
iNSTRUCTiONSFORALL TOOLS
• READ and understand all instructions.
• A BATTERY OPERATED UNIT with integral batteries or a separate
battery pack must be recharged only with the specified charger for
the battery. Acharger that may be suitable for one type of battery
may create a risk of fire when used with another battery.
• USE BATTERY OPERATED UNIT ONLY with specifically
designated battery pack. Use of any other batteries may create a
risk of fire.
• AVOID accidental starting. Be sure switch is in the locked or off
position before inserting battery pack. Carrying units with your
finger on the switch or inserting the battery pack into a unit with the
switch on invites accidents.
• DO NOT use unit if switch does not turn it on or off. A unit that
cannot be controlled with the switch is dangerous and must be
repaired.
• DISCONNECT battery pack from unit or place the switch in the
locked or off position before making any adjustments, changing
accessories, or storing the unit. Such preventative safety
measures reduce the risk of starting the unit accidentally.
• AVOID DANGEROUS ENVIRONMENT =Do not use or charge
hedge trimmers in damp or wet locations.
• DO NOT USE OR CHARGE battery operated hedge trimmer in
rain.
• DO NOT OPERATE hedge trimmer in gaseous or explosive
atmospheres. Motors in these tools normally spark, and the sparks
might ignite fumes.
• KEEP CHILDREN AWAY =All visitors should be kept at a safe
distance from the work area.
• DRESS PROPERLY =Don't wear loose clothing or jewelry. They
can be caught in moving parts. Use of rubber gloves and
substantial footwear is recommended when working outdoors.
Wear protective hair covering to contain long hair.

• ALWAYSWEAREYEPROTECTION- Wearsafetyglassesor
gogglesatalltimeswhenthisunitisinuse.Alsousefaceordust
mask.SafetyglassesareavailableatextracostatyourlocalBlack&
DeckerServiceCenterorauthorizedservicefacility.
• USERIGHTAPPLIANCE-Donotuseapplianceforanyjobexcept
thatforwhichitisintended.
• AVOIDUNINTENTIONALSTARTING-Don'tcarryhedgetrimmer
hfingeronswitch.
DANGER:Riskofcut.Keephandsawayfromblades.Keep
bothhandsonhandleswhenpowerison.
• DONOTATTEMPTtoremovecutmaterialorholdmaterialtobecut
whenbladesaremoving.Makesurebatteryisremovedwhen
clearingjammedmaterialfromblades.Donotgrasptheexposed
cutting blades or cutting edges when picking up or holding the
hedge trimmer.
± CAUTION: B,adesmaycoastafterturnoff
± CAUTION: NEVER use guard as a handle.Never
grasptheunitby theguard.Failuretoheed thiswarningcan result
inseriouspersonalinjury.
• DON'T FORCE HEDGETRIMMER - Itwilt do the job better and with
less likelihood of a risk of injury at the rate for which it was
desiqned.
± DANGER:. bladejamsonanye,ectr ca,cordor
line, DO NOT TOUCH THE BLADE! IT CAN BECOME
ELECTRICALLY LIVE AND VERY DANGEROUS. Release the unit
in the safest manner possible. Disconnect the damaged electrical
cord or line from the power source. Ifpossible, do so safely. If in
doubt, call an electrician or the electrical contractor for assistance.
Failure to heed this Danger will result in serious personal injury and
possibly death.
• DON'T OVERREACH - Keep proper footing and balance at all
times.
• STAY ALERT - Watch what you are doing. Use common sense. Do
not operate hedge trimmer when you are tired.
• STORE IDLE HEDGE TRIMMER INDOORS - When not in use,
hedge trimmer should be stored indoors in a dry and high or locked-
up place-out of reach of children.
• MAINTAIN HEDGE TRIMMER WITH CARE =Keep cutting edge sharp
and clean for best performance and to reduce the risk of injury. Follow
instructions for lubricating. Keep handles dry, clean andfree from oil and
grease.
CAUTION: Donotatanyt me,etbrakefluids,
gasoline, petroleum based products, penetrating oils, etc., come in
contact with plastic parts. They contain chemicals that can damage,
weaken or destroy plastic.
• CHECK DAMAGED PARTS - If damage to trimmer occurs, before
further use of the hedge trimmer, a guard or other part that is
damaged should be carefully checked to determine that it will
operate properly and perform its intended function. Check for
alignment of moving parts, binding of moving parts, breakage of
parts, mounting and any other condition that may affect its
operation. A guard or other part that is damaged should be properly
repaired or replaced by an authorized service center unless otherwise
indicated elsewhere in this manual.
• REMOVE BATTERY before servicing, cleaning or removing material
from the hedge trimmer. Remove battery from your hedge trimmer
and carry by the front handle when not in use.
• EXERCISE CARE in handling batteries in order not to short the
battery with conducting materials such as rings, bracelets and
keys. The battery or conductor may overheat and cause burns.
• DO NOT OPEN OR MUTILATE the batteries. Released
electrolyte is corrosive and may cause damage to the eyes or skin.
It may be toxic if swallowed.
• GROUND FAULT CIRCUIT INTERRUPTER (GFCl) protection
should be provided on the circuit(s) or outlet(s) to be used for the
hedge trimmer. Receptacles are available having built-in GFCI
protection and may be used for this measure of safety.

zk
WARNING: To reduce the risk of electrical shock;
do not expose to rain, do not use on wet surfaces. Store indoors.
SAVE THESE INSTRUCTIONS
/k
WVl'_il=_|_lil|_ll_:Some dust created by this product
contains chemicals known to the State of California to cause cancer,
birth defects or other reproductive harm. Some examples of these
chemicals are:
• compounds in fertilizers
• compounds in insecticides, herbicides and pesticides
, arsenic and chromium from chemically treated lumber
To reduce your exposure to these chemicals, wear approved safety
equipment such as dust masks that are specially designed to filter out
microscopic particles.
The label on your tool may include the following symbols.
V................ volts A .................... amperes
Hz.............. hertz W .................. watts
min ............ minutes ,,_ .................. alternating current
- - - .......... direct current no .................. no load speed
[] .............. Class II Construction _ .................. earthing terminal
z_ ............ safety alert symbol
.../min ............ revolutions
per minute
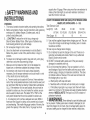
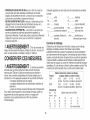
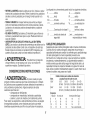
Extension Cord
Make sure your extension cord is in good condition. When using an
extension cord be sure it is heavy enough to carry the current your
product will draw. An undersized extension cord will cause a drop in
line voltage resulting in toss of power and overheating. The following
table shows the correct size to use depending on cord length and
nameplate ampere rating. Ifin doubt, use the next heavier gauge.
The smaller the gauge number, the heavier the cord.
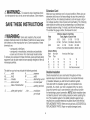
Minimum Gagefor Cord Sets
Volts Total Length of Cord in Feet
120V 0-25 26-50 51-100 101-150
(0-7,6m) (7,6-15,2m)(15,2-30,4m)(30,4-45,7m)
240V 0-50 51-100 101-200 201-300
(0-15,2m)(15,2-30,4m)(30,4-60,9m)(60,9-91,4m)
Ampere Rating
More Not more American Wire Gage
Than Than
0 6 18 16 16 14
6 10 18 16 14 12
10 12 16 16 14 12
12 16 14 12 Not Recommended
Double insulation
Double insulated tools are constructed throughout with two
separate layers of electrical insulation or one double thickness
of insulation between you and the tool's electrical system.
Tools built with this insulation system are not intended to be
grounded. As a result, your tool is equipped with a two prong
plug which permits you to use extension cords without concern
for maintaining a ground connection. NOTE: Double insulation does
not take the place of normal safety precautions when operating this
toot. The insulation system is for added protection against injury
resulting from a possible electrical insulation failure within the toot.
REPLACEMENT PARTS: When servicing all tools, USE IDENTICAL
REPLACEMENT PARTS. Repair or replace damaged cords.

important Safety instructions for Battery
Chargers
SAVETHESEINSTRUCTIONS:This manual contains important safety
instructions for battery chargers.
Before using charger, read aft instructions and cautionary markings
on charger, battery pack, and product using battery pack.
_ Jgt ivR&_ W#_ l l _ _
WA_"_ N | N _,_ : Shock hazard. Do not allow any liquid to
get inside charger.
Z_OAUTION: Bum hazard. Toreduce the risk of injury, charge only
Black & Decker batteries. Other types of batteries may burst causing
l:z_rSonalinjury and damage.
CAUTION: Under certain conditions, with the charger plugged into
the power supply, the charger can be shorted by foreign material.
Foreign materials of aconductive nature such as, but not limited to,
steel wool, aluminum foil, or any buildup of metallic particles should be
kept away from charger cavities. Always unplug the charger from the
power supply when there is no battery pack in the cavity. Unplug
charger before attempting to clean.
The charger supplied with this product is intended to be
plugged in such that it is correctly orientated in a vertical or
floor mount position.
z WARNING:
DO NOT attempt to charge the battery pack with any
chargers other than the ones listed in this manual. The charger
and battery pack are specifically designed to work together.
These chargers are not intended for any uses other than
charging Black&Decker rechargeable batteries. Any other uses
may result in risk of fire, electric shock or electrocution.
Do not expose charger to rain or snow.
Pull by plug rather than cord when disconnecting charger.
This will reduce risk of damage to electric plug and cord.
Make sure that cord is located so that it will not be stepped
on, tripped over, or otherwise subjected to damage or stress.
Do not use an extension cord unless it is absolutely
necessary. Use of improper extension cord could result in risk of
fire, electric shock, or electrocution.
An extension cord must have adequate wire size (AWG or
American Wire Gauge) for safety. The smaller the gauge number
of the wire, the greater the capacity of the cable, that is 16 gauge
has more capacity than 18 gauge. When using more than one
extension to make up the total length, be sure each individual
extension contains at least the minimum wire size.
Do not place any object on top of charger or place the
charger on a soft surface that might block the ventilation slots
and result in excessive internal heat. PEacethe charger in a
position away from any heat source. The charger is ventilated
through slots in the top and the sides of the housing.
Do not mount charger on wall or permanently affix charger to
any surface. The charger is intended to use on a flat, stable
surface (i.e., table top, bench top).
Do not operate charger with damaged cord or plug -- have
them replaced immediately.
Do not operate charger if it has received a sharp blow, been
dropped, or otherwise damaged in any way. Take it to an
authorized service center.
Do not disassemble charger; take it to an authorized service
center when service or repair is required. Incorrect reassembly
may result in a risk of electric shock, electrocution or fire.
Disconnect the charger from the outlet before attempting any
cleaning. This will reduce the risk of electric shock. Removing
the battery pack will not reduce this risk.
NEVER attempt to connect 2 chargers together.
The charger is designed to operate on standard household
electrical power (120 Volts). Do not attempt to use it on any
other voltage.

zLSAFETYWARNINGSAND
INSTRUCTIONS
CHARGING
1. This manual contains important safety and operating instructions.
2. Before using battery charger, read all instructions and cautionary
markings on (1) battery charger, (2) battery pack, and (3)
product using battery pack.
3. Z_ CAUTION: To reduce the risk of injury, charge only
Black & Decker Battery Packs. Other types of batteries may
burst causing personal injury and damage.
4. Do not expose charger to rain or snow.
5. Use of an attachment not recommended or sold by Black &
Decker may result in a risk of fire, electric shock, or injury to
persons.
6. To reduce risk of damage to electric plug and cord, pull by plug
rather than cord when disconnecting charger.
7. Make sure cord is located so that it will not be stepped on,
tripped over, or otherwise subjected to damage or stress.
8. An extension cord should not be used unless absolutely
necessary. Use of improper extension cord could result in a risk
of fire, electric shock or electrocution.
a. Two-wire cords can be used with 2-wire or 3-wire extension
cords. Only round jacketed extension cords should be used, and
we recommend that they be listed by Underwriters Laboratories
(U.L.). If the extension is to be used outside, the cord must be
suitable for outdoor use. Any cord marked for outdoor use can
also be used for indoor work. The letters "W" or "WA" on the
cord jacket indicate that the cord is suitable for outdoor use.
b. An extension cord must have adequate wire size (AWG or
American Wire Gauge) for safety, and to prevent loss of power
and overheating. The smaller the gauge number of the wire, the
greater the capacity of the cable; that is, 16 gauge has more
capacity than 18 gauge. When using more than one extension to
make up the total length, be sure each extension contains at
least the minimum wire size.
CHART FOR MINIMUM WIRE SIZE (AWG) OF EXTENSION CORDS
NAMEPLATE RATING AMPS- 0 - 10.0
Total Extension Cord
Length (ft) 0-25 26-50 51-100 101-150
(0-7,6m) (7,6-15,2m) (15,2-30,4m) (30,4-45,7m)
Wire Gauge 18 16 16 14
9. Use only the supplied charger when charging your unit. The use
of any other charger could damage the battery pack or create a
hazardous condition.
10. Use only one charger when charging.
11. Do not attempt to open the charger or the unit. There are no
customer serviceable parts inside. Return to any authorized
Black & Decker service center.
12. DO NOT incinerate battery packs even if they are severely
damaged or completely worn out.
13. Do not incinerate the batteries. They can explode in a fire. A
small leakage of liquid from the battery cells may occur under
extreme usage, charging or temperature conditions. This does
not indicate a failure. However, if the outer seal is broken and
this leakage gets on your skin:
a. Wash quickly with soap and water.
b. Neutralize with a mild acid such as lemon juice or vinegar.
c. If the battery liquid gets in your eyes, flush them with clean
water for a minimum of 10 minutes and seek immediate medical
attention. MEDICAL NOTE: The liquid is a 25-35% solution of
potassium hydroxide.
zL
WA_"{ N | Nq[,,_ : Never attempt to open the battery pack
for any reason. If battery pack case is cracked or damaged, do not
insert into charger. Do not crush, drop or damage battery pack. Do
not use a battery pack or charger that has received a sharp blow,

beendropped,runoverordamagedinanyway(i.e.,piercedwitha
nail,hitwithahammer,steppedon).Damagedbatterypacksshould
bereturnedtoservicecenterforrecycling.
Z_CAUTION:Whennotin use, place tool on its side on a stable
surface where it will not cause a tripping or falling hazard. Some
tools with large battery packs will stand upright but may be easily
knocked over.
Battery Cap Information
A battery storage and carrying cap is provided for use whenever the
battery is out of the toot or charger. Remove cap before placing
battery in charger or tool.
Ax
_lr'_ |_ | |_ll _1: Fire hazard. Do not store or carry
battery so that metal objects can contact exposed battery
terminals. For example, do not place battery in aprons, pockets, tool
boxes, product kit boxes, drawers, etc., with loose nails, screws,
keys, etc. Transporting batteries can possibly cause fires if the
battery terminals inadvertently come in contact with conductive
materials such as keys, coins, hand tools and the like. The US
Department of Transportation Hazardous Material Regulations (HMR)
actually prohibit transporting batteries in commerce or on airplanes
(i.e., packed in suitcases and carry-on luggage) UNLESS they are
properly protected from short circuits. So when transporting individual
batteries, make sure that the battery terminals are protected and well
insulated from materials that could contact them and cause a short
circuit.
IMPOF ANTCHARGINGSAFETY
INSTRUCTIONS
CHARGING PROCEDURE
THE BATTERY PACK IS NOT FULLY CHARGED AT THE
FACTORY. CHARGE BATTERY PACK FOR AT LEAST 9 HOURS
BEFORE USE.
The charger is designed to use standard household 120 volt 60 Hz
power.
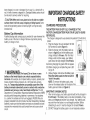
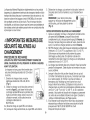
1. Plug the charger into any standard 120 Volt
60 Hz electrical outlet (figure 1}.
2. Slide the charger onto the battery pack as
shown in figure 2 and let the battery pack
charge initially for 9 hours. After the initial
charge, under normal usage, your battery
pack should be fully charged in 6 to 9 hours.
2a) During charging the green LED will appear.
2b) When charging is complete the green LED
will go off.
3. Unplug charger, and remove the battery pack.
Place the battery pack into the tool until it
"clicks" into place.
NOTE: To remove the battery pack, press
down on the release button on the back of the
battery pack and slide out (figure 3).
IMPORTANT CHARGING NOTES
1. After normal usage, your battery pack should be fully charged in
6 to 9 hours. If the battery pack is run-down completely, it may
take up to 9 hours to become fully charged. Your battery pack
was sent from the factory in an uncharged condition. Before
attempting to use it, it must be charged for at least 9 hours.
2. DO NOT charge the battery pack in an air temperature below

+40°F(+4.5°C),orabove+105°F(+40.5°C).Thisisimportantand
wiltpreventseriousdamagetothebatterypack.Longestlifeand
bestperformancecanbeobtainedifbatterypackischarged
whenairtemperatureisabout75°F(24°C).
3. Whilecharging,thechargermayhumandbecomewarmto
touch.Thisisanormalconditionanddoesnotindicatea
problem.
4. Ifthebatterypackdoesnotchargeproperly--(1)Checkcurrent
atreceptaclebyplugginginalamporotherappliance.(2)Check
toseeifreceptacleisconnectedtoalightswitchwhichturns
poweroffwhenyouturnoutthelights.(3)Movechargerand
batterypacktoasurroundingairtemperatureof40°F(+4.5°C)to
105°F(+40.5°C).(4)IfthereceptacleandtemperatureareOK,
andyoudonotgetpropercharging,takeorsendthebattery
packandchargertoyourlocalBlack&Deckerservicecenter.
SeeToolsElectricinyellowpages.
5. Thebatterypackshouldberechargedwhenitfailstoproduce
sufficientpoweronjobswhichwereeasilydonepreviously.DO
NOTCONTINUEusingunitwithitsbatterypackinadepleted
condition.
6. Thebatterypackwiltreachoptimumperformanceafterbeing
cycled5timesduringnormalusage.Thereisnoneedtorunthe
batterypackdowncompletelybeforerecharging.Normalusage
isthebestmethodofdischargingandrechargingthebattery
pack.
STORAGE RECOMMENDATION
1. Store tool:
a.) with the battery pack removed and on the charger.
b.) ina place that iscool anddry away from directsunlightand excess
heator cold.
c.) out of the reach of children.
2. For prolonged storage such as over the winter, the battery pack
should be fully charged and then removed from the charger. It
should be charged again just prior to use.
LEAVING THE BATTERY PACK IN THE CHARGER
It is OK to leave battery packs on charge for long periods of time. The
charger has a maintenance mode which gives the battery pack
enough charge to stay "topped off". Ifhowever, the tool is not
expected to be needed for more than 30 days, unplug the charger
and store battery pack in a coot, dry location. NOTE: A battery pack
will lose its charge when kept off of the charger. Ifthe battery pack
has not been kept on maintenance charge, it may need to be
recharged before use. A battery pack may also lose its charge if left in
a charger that is not plugged into an appropriate AC source.
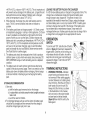
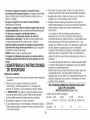
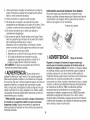
OPERATION
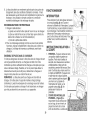
SWITCH
Toturn the unit "ON", slide the lock off button,
shown in figure 4, forward and, squeeze the
trigger switch. Once the unit is running, you
may release the lock off button. In order to
keep the unit running you must continue to
squeeze the trigger. To turn the unit "OFF",
release the trigger.
TRiMMiNG iNSTRUCTiONS
1. WORKING POSiTiON - Maintain
proper footing and balance and do
not overreach. Wear safety goggles,
non-skid footwear and rubber gloves
when trimming. Hold the unit firmly in
both hands and turn the unit ON.
Always hold the trimmer, as shown
in the illustrations in this manual,
with one hand on the switch handle
and one hand on the bail handle.
(figure 5} Never hold the unit by the
blade guard.
i:_.._

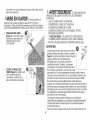
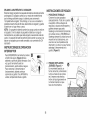
2. TRIMMING NEW GROWTH -
(Figure 6) A wide, sweeping
motion, feeding the blade teeth
through the twigs is most
effective. A slight downward tilt
of the blade, in the direction of
motion gives the best cutting.
4,,
CAUTION: DO not cut stems greater than 3/4 inch
(19mm). Use the trimmer only for cutting normal shrubbery around
houses and buildings.
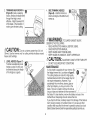
3.
LEVEL HEDGES (Figure 7) -
To obtain exceptionally level
hedges a piece of string can
be stretched along the length
of the hedge as a guide.
4. SIDE TRIMMING HEDGES
(Figure 8) - Hold the trimmer as
shown and begin at the bottom and
sweep up.
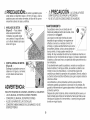
z WARNING: TOGUARDAGAINSTINJURY,
OBSERVE THE FOLLOWING:
READ INSTRUCTION MANUAL BEFORE USING.
SAVE INSTRUCTION MANUAL.
KEEP HANDS AWAY FROM BLADES.
KEEP HANDS ON HANDLES. DON'T OVERREACH.
-±CAUTION: BLADEMAYCOASTAFTERTURNOFF.
DO NOT USE UNDER WET CONDITIONS
MAINTENANCE
Avinyl sheath is supplied with your trimmer. Slip
the hedge trimmer into it, as shown in figure 9,
The cutting blades are made from high quality,
hardened steel and with normal usage, they will
not require resharpening. However, if you
accidentally hit a wire fence, stones, glass or
other hard objects, you may put a nick in the
blade. There is no need to remove this nick as
long as it does not interfere with the movement of
the blade. Ifit does interfere, remove the battery and use a fine
toothed file or sharpening stone to remove the nick.
If you drop the trimmer, carefully inspect it for damage. If the blade is
bent, housing cracked, or handles broken or if you see any other
condition that may affect the trimmer's operation contact your local
Black& DeckerServiceCenter forrepairsbefore puttingitback into use.

Fertilizersandothergardenchemicalscontainagentswhichgreatly
acceleratethecorrosionofmetals.Donotstoretheunitonor
adjacenttofertilizersorchemicals.
Withthebatteryremoved,useonlymildsoapandadampclothto
cleantheunit.Neverletanyliquidgetinsidetheunit;neverimmerse
anypartoftheunitintoaliquid.
Preventthebladesfromrustingbyapplyingafilmoflightmachine
oilaftercleaning.
4,,
WARNING: DoNOTusethehedge trimmerwith
any type of accessory or attachment. Such usage might be
hazardous.
Service Information
Whether you need technical advice, repair, or genuine factory
replacement parts, contact the Black & Decker location nearest you.
To find your local service location, refer to the yellow page directory
under "Toots-Electric" or call: 1-800-544-6986 or visit
www.blackanddecker.com.
iMPORTANT
To assure product SAFETY and RELIABILITY, repairs, maintenance
and adjustment should be performed by authorized service centers
or other qualified service organizations, always using identical
replacement parts.
Battery Recycling and the RBRC TM Seal i'%_"X,
The RBRC TM (Rechargeabte Battery Recycling
Corporation) Seat on the nickel-cadmium battery (or
battery pack) indicates that the costs to recycle the
battery (or battery pack) at the end of its useful life have
already been paid by Black & Decker. In some areas, it is illegal to
place spent nickel-cadmium batteries in the trash or municipal solid
waste stream and the RBRC program provides an environmentally
conscious alternative.
RBRC in cooperation with Black & Decker and other battery users,
has established programs in the United States and Canada to
10
facilitate the collection of spent nickel-cadmium batteries. Help
protect our environment and conserve natural resources by
returning the spent nickel-cadmium battery to an authorized
Black & Decker service center or to your local retailer for recycling.
You may also contact your local recycling center for information on
where to drop off the spent battery, or call 1-800-8-BATTERY.
Full Two -Year Home Use Warranty
Black & Decker (U.S.) Inc. warrants this product for two years
against any defects in material or workmanship. The defective
product will be replaced or repaired at no charge in either of two ways:
The first, which will result in exchanges only, is to return the product
to the retailer from whom it was purchased (provided that the store
is a participating retailer). Returns should be made within the time
period of the retailer's policy for exchanges (usually 30 to 90 days
after the sale). Proof of purchase may be required. Please check
with the retailer for their specific return policy regarding returns that
are beyond the time set for exchanges.
The second option is to take or send the product (prepaid) to a
Black & Decker owned or authorized Service Center for repair or
replacement at our option. Proof of purchase may be required.
Black & Decker owned and authorized service centers are listed
under "Tools-Electric" in the yellow pages of the phone directory.
This warranty does not apply to accessories. This warranty gives
you specific legal rights and you may have other rights which vary
from state to state. Should you have any questions, contact the
manager of your nearest Black & Decker Service Center. This
product is not intended for commercial use.
FREE WARNING LABEL REPLACEMENT: Ifyour warning labels
become illegible or are missing, call 1-800-544-6986 for a free
replacement.
LATIN AMERICA: This warranty does not apply to products sold in
Latin America. For products sold in Latin America, check country
specific warranty information contained in the packaging, call the
local company or see the website for warranty information.

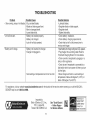
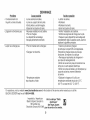
TROUBLESHOOTING
Problem
• Slow running, noisy or hot blades.
• Unit wilt not start.
• Battery won't charge.
Possible Cause
• Dry, corroded blades.
• Blades or blade support bent.
• Bent or damaged teeth.
• Loose blade bolts.
Battery not installed properly.
• Battery not charged.
• Lock off not fully operated.
Battery not inserted into charger.
Charger not plugged in.
Surrounding air temperature too hot or too cold.
Possible Solution
• Lubricate blades.
• Straighten blade or blade support.
• Straighten teeth.
• Tighten blade bolts.
• Check battery installation.
• Check battery charging requirements.
• Check that lock off is fully forward prior to
movinq main trigger.
• Insertbatteryintocharger untilgreenLED appears.
• Plug charger into a working outlet. Refer to
"Important Charging Notes" for more details.
• Check current at receptacle by plugging in a
lamp or other appliance.
• Check to see if receptacle is connected to a
light switch which turns power off when you turn
out the lights.
• Move charger and tool to a surrounding air
temperature of above 40 degree F (4.5°C) or
below 105 degree F (+40.5°C).
For assistance, visit our website www.blackanddecker.com for the location of the service center nearest you or call the BLACK &
DECKER help line at 1-800-544-6986.
Imported by
Black & Decker (U.S.) Inc.,
701 E. Joppa Rd.
Towson, MD 21286 U.S.A.
11
See 'Tools-Electric' [-_
- Yellow Pages -
for Service & Sales
Powered by an
ENERGY STAR_>
qualified battery
charger for a
better environment
Page is loading ...
Page is loading ...
Page is loading ...
Page is loading ...
Page is loading ...
Page is loading ...
Page is loading ...
Page is loading ...
Page is loading ...
Page is loading ...
Page is loading ...
Page is loading ...
Page is loading ...
Page is loading ...
Page is loading ...
Page is loading ...
Page is loading ...
Page is loading ...
Page is loading ...
Page is loading ...
Page is loading ...
Page is loading ...
Page is loading ...
Page is loading ...
Page is loading ...
Page is loading ...

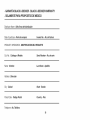
• GARANTiA BLACK & DECKER • BLACK & DECKER WARRANTY
. SOLAMENTE PARA PROPOSITOS DE MEXICO
Distributor Name. Sello firma del distribuidor
Date of purchase. Fecha de compra Invoice No. • No. de factura
PRODUCT INFOMATION •IDENTIFICAClON DEL PRODUCTO
Cat. No.. Catalogo d Modelo Serial Number. No. de serie
Name. Nombre Last Name •Apellido
Address. Direccidn
City. Ciudad State •Estado
Postal Code. Cddigo Postal Country. Pais
Telephone. No. Tel6fono
38
Page is loading ...

Cat. Nos. NHT518, NHT524
Copyright @ 2011 Black & Decker
Form No. 90577042
40
June 2011
Printed in China
-
 1
1
-
 2
2
-
 3
3
-
 4
4
-
 5
5
-
 6
6
-
 7
7
-
 8
8
-
 9
9
-
 10
10
-
 11
11
-
 12
12
-
 13
13
-
 14
14
-
 15
15
-
 16
16
-
 17
17
-
 18
18
-
 19
19
-
 20
20
-
 21
21
-
 22
22
-
 23
23
-
 24
24
-
 25
25
-
 26
26
-
 27
27
-
 28
28
-
 29
29
-
 30
30
-
 31
31
-
 32
32
-
 33
33
-
 34
34
-
 35
35
-
 36
36
-
 37
37
-
 38
38
-
 39
39
-
 40
40


Black & Decker NHT518 Owner's manual
- Category
- Power hedge trimmers
- Type
- Owner's manual
- This manual is also suitable for
Ask a question and I''ll find the answer in the document
Finding information in a document is now easier with AI
in other languages
Related papers
-
Black & Decker LHT2220B User manual
-
Black & Decker NHT518 Owner's manual
-
-
-
-
-
-
-
Black and Decker LHT2220 TYPE 1 Owner's manual
-
Other documents
-
BLACK DECKER LHT2240C User manual
-
-
-
-
-
BLACK DECKER BEHT150 User guide
-
-
-
DeWalt DCMPH566 User manual
-
DeWalt DCMHT563 User manual