Page is loading ...

REMOVEPACKINGMATERIAL
Cut the straps on the carton and lift the carton off the dryer.
Remove the dryer from the carton base.
Check the dryer drum for all of the components shown here.
Literature Pack
Drying Rack
(Not on all models)
CHECKAND CONNECTVENTING
.
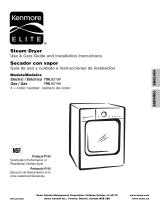
Check the length of the exhaust vent. It MUST NOT be longer than the
lengths shown in the chart below. If it is too long, have it repaired or
vented elsewhere.
2. Connect the dryer exhaust to the home exhaust system with rigid or
semi-rigid metal duct. DO NOT USE vinyl or foil duct for connecting
the dryer. Make the transition as short as possible for best results.
3. Check the exhaust hood on the outside wall. Make sure it is not
damaged and that it is clear of lint buildup. Make sure the damper is
working properly.
4. Check the exhaust for lint buildup or damage. Make sure the duct is
clean and in good condition.
5. Use care when positioning the dryer in its final location. Check the
transition duct to make sure it is not crushed or kinked.
Wall Cap Type
Recommended
(10.2 cm)
(10.2 cm)
Number of
90i Elbows
o
1
2
3
4
Max. Length of 4-In. Dia.
Rigid Metal Duct
6,5ft. (19.8 m)
5,5ft. (16.8 m)
47 ft. (13.7 m)
36 ft. (11.0 m)
28 ft. (8.,5 m)
Only for Short-Run Installations
(6.35 cm)
o
1
2
3
4
5,5ft. (16.8 m)
47 ft. (13.7 m)
41 ft. (12.,5 m)
30 ft. (9.1 m)
22 ft. (6.7 m)
CONNECT POWER CORD
For gas dryers only.
For electric dryers proceed to step #3b on the right.
Plug the dryer into a 120 VAC, 60Hz
grounded 3-prong outlet.
For electric dryers only.
For gas dryers proceed to step #3a on the left.
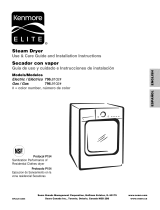
FOUR-WIRE POWER CORD CONNECTION
(REQUIRED in all new construction after Jan 1, 1996)
\
Block
,-'- UL-Listed
Strain Relief
_ UL_tcI4Wire
/,
Remove the terminal block access cover on the upper back of the
dryer. Install a UL-listed strain relief into the power
cord through-hole. Then insert a UL-listed, 30 A, 240 V, 4-wire, #10
AWG (minimum) copper conductor power cord through the strain
relief.
Hot _ Neutral
Transfer the Dryer's ground wire (white) from behind the green
ground screw to the center screw of the terminal block. Attach the
two hot leads of the power cord to the outer terminal block screws.
Attach the center lead of the power cord to the center terminal
block screw. Attach the power cord green ground wire to the green
ground screw.
Tighten all screws securely, then tighten the strain relief and
reattach the terminal block cover
THREE-WIRE POWER CORD CONNECTION
(NOT permitted in new construction after Jan 1, 1996)
Remove the terminal block access cover on the upper back of the
dryer. Install a UL-listed strain relief into the power cord
through-hole. Then insert a UL-listed, 30 A, 240 V, 3-wire, #10
AWG (minimum) copper conductor power cord through the strain
relief.
Hot _ Neutral
(Black)
Ground Screw
I//lll
White wire from
dryer harness
Attach the two hot leads of the power cord to the outer terminal
block screws. Attach the center lead of the power cord to the center
terminal block screw. Connect the external ground (if allowed by
local codes) to the green ground screw.
Tighten all screws securely, then tighten the strain relief and
reattach the terminal block cover.
Connect power cord to the matching receptacle in the laundry
room.
CONNECT GAS SUPPLY
For gas models only.
1. Connect the dryer to your laundry room's gas supply using a new
flexible stainless steel connector with a 3/8"NPT fitting. Never reuse
an old flex connector.
2. Securely tighten all connections between the dryer and the laundry
room's gas supply. Turn on the gas supply and check all
connections for leaks with a non-corrosive leak detection fluid.
3/8" NPT Gas 1/8" NPT Pipe Plug
Connection
AGA/CSA-Certified Gas Supply
Stainless Steel Shutoff Valve
Flexible Connector
LEVELTHE DRYER
Once the dryer is in its final position, adjust the dryer feet to level the
machine using a level for accuracy.
Use an adjustable wrench to turn the leveling feet.
Turn clockwise to raise the dryer and counterclockwise to lower the
dryer. Use a level to check both directions.
NOTE: Check for proper foot adjustment by rocking the dryer
diagonally each direction. Adjust the feet again if necessary.
Do not extend the feet farther than necessary to level the dryer.
HEATERCHECK
Perform the following steps to check heater
operation after removing the literature pack and any
other objects from the drum.
1. Close the door and press the POWER button to turn on the
controls.
2. Rotate the CYCLE SELECTOR KNOB to select a heated cycle,
such as NORMAL.
3. Press the START/PAUSE button to start the cycle. After
approximately one minute, open the door and check for heat. If
no heat is felt after approximately 2 minutes, consult the
troubleshooting section of the owner's manual.
FINALCHECKS
Use the following checklist to make sure you have
completed all of the installation steps.
INSTALLATION STEP
1 -- REMOVE PACKING MATERIAL
2 -- CHECK AND CONNECT VENTING
3 -- CONNECT POWER CORD
4 -- CONNECTGAS SUPPLY(Forgas modelsonly)
5 -- LEVEL THE DRYER
6 -- HEATER CHECK
O
/
/
O
O
,/
bz_
I
Hinge Screw
O
O O
Steam Water
Feeder ONLY
For accessory installation instructions, consult the installation
instructions included with each accessory.
LP CONVERSION KIT - 4948EL4002C
SIDE VENT KIT - D26 49670
* Test for proper operation by running the dryer through a complete cycle.
* Please consult your owner's manual for complete details.
P/No.:MHK61888712

RETIRARELMATERIALDE EMBALAJE
Corte las cintas que rodean el cart6n y levante el cart6n de la
secadora. Retire la secadora de la base de cart6n.
Compruebe que todos los componentes que aquf se muestran se
incluyen en el tambor de la secadora.
Documentaci6n
Rejilla de secado
(depende del modelo)
COMPROBARYCONECTARELSISTEMADEVENTILACION
1. Compruebe la Iongitud del conducto de salida de aire. NO debera ser
superior a las longitudes mostradas en el siguiente diagrama. Si es
demasiado largo, acdrtelo o realice la salida de aire por otro lugar.
2. Conecte la salida de aire de la secadora al sistema de salida de aire
de su hogar con conductos metalicos rigidos o semirigidos. NO
UTILICE conductos de vinilo o de aluminio para conectar la secadora.
Para obtener un resultado 6ptimo, la Iongitud del conducto debera ser
Io mas corta posible.
3. Compruebe la campana de salida situada en la pared exterior.
Asegerese de que no este estropeada y que este limpia de pelusas.
Compruebe que el regulador funciona correctamente.
4. Revise si el tubo esta sucio o estropeado. Asegerese de que el
conducto este limpio yen buen estado.
Tipo tapa de pared
Recomendada
(10,2 cm) (10,2 cm)
NQmero de
codos de 90°
o
1
2
3
4
Longitudm_.x.delconductomet#,lico
rigidode4pulgadasdedi_.metro
19,8 m (65 pies)
55 ft. (16.8 m)
47 ft. (13.7 m)
36 ft. (11.O m)
28 ft. (8.5 m)
Unicamente para instalaciones
de corto recorrido
635c
(21/2 puigadas)
o
1
2
3
4
55 ft. (16.8 m)
47 ft. (13.7 m)
41 ft. (12.5 m)
30 ft. (9.1 m)
22 ft. (6.7 m)
CONNECTAR ELCABLEDE ALIMENTACION
S61o para secadoras a gas.
Pare las secadoras el6ctricas, confin0e con el
paso #3b a la derecha
Enchufe la secadora a una toma de
pared de tres clavijas de 120 VCA,
60 Hz y salida a tierra.
$61o para secadoras a gas.
©
Para las secadoras a gas, continOe con el paso
#3a a la izquierda
CONEXION DEL CABLE EL#CTRICO DE CUATRO HILOS
(OBLIGATORIOentodaslasconstruccionesnuevasapartirdel1deenerode1996)
_ Bloque de _'
_ terminales
ll_il clasificacion UL
_" Ctrbal_iidec_lnimctn_fCcl°nion UL
• ' ..., ..
Retire la tapa de acceso al bloque de terminales situada arriba
en la parte posterior de la secadora. Instale la abrazadera de
cable con certificaci6n UL en el orificio para el cable de
alimentaci6n. A continuaci6n, inserte el cable de alimentaci6n
de 4 hilos de cobre, 240 V, 30 A, #10 AWG (mfnimo) con
certificaci6n UL, a traves de la abrazadera.
Active Neutro
(negro),
/I1/11
Cable de alimentaci6n
Dirija el hilo de masa de la secadora (blanco) por detras del tornillo
de tierra verde hasta el tornillo central de bloque de terminales.
Conecte los dos hilos de corriente del cable de alimentaci6n a los
tornillos exteriores del bloque de terminales. Conecte el hilo central
del cable de alimentaci6n al tornillo central del bloque de
terminales.
Conecte el hilo de tierra de color verde del cable de alimentaci6n
altornillo de tierra de color verde.
Apriete bien todos los tornillos y, a continuaci6n, apriete la
abrazadera y vuelva a colocar la cubierta del bloque de terminales.
____ CONEXION DEL CABLE ELI_CTRICO DE TRES HILOS
(NOpermitidoenlasconstruccionesnuevasapartirdel1deenerode1996)
Retire la tapa de acceso al bloque de terminales situada arriba en la parte
posterior de la secadora. Instale la abrazadera de cable con certificaci6n
UL en el orificio para el cable de alimentaci6n. A continuaci6n, inserte el
cable de alimentaci6n de 3 hilos de cobre, 240 V, 30 A, #10 AWG (minimo)
con certificaci6n UL, a traves de la abrazadera.
Activo
Neutro
Conecte los dos hilos de corriente del cable de alimentaci6n a los
tornillos exteriores del bloque de terminales. Conecte el hilo central
del cable de alimentaci6n al tornillo central del bloque de
terminales. Conecte el hilo de tierra externo (si la normativa local Io
permite) al tornillo de tierra de color verde.
Apriete bien todos los tornillos y, a continuaci6n, apriete la
abrazadera y vuelva a colocar la cubierta del bloque de terminales.
Conecte el cable de alimentaci6n a la toma correspondiente del
avadero.
CONECTAR ELSUMINISTRO DE GAS
$61o para los modelos a gas.
1. Conecte la secadora a la valvula de suministro de gas de la
lavanderfa con un conector nuevo de acero inoxidable flexible de
3/8 NPT. Nunca utilice un conector flexible usado.
2. Apriete bien todas las conexiones entre la secadora y la valvula de
suministro de gas de la lavanderfa. Abra la valvula de gas y
compruebe todas las conexiones por si hubiera alguna fuga con
ayuda de un Ifquido no corrosive para la detecci6n de fugas.
©
Conexi6n ___
de 3/8,, d_Ta _ Boquilla de conexi6n
de 1/8" NPT
Conector flexible de \ Va.lvula de suministro
acero inoxidable con de gas
certificaci6n AGA/CSA
NIVELAR LA SECADORA
Una vez que la secadora este en su posici6n final, utilice un nivelador
y ajuste las patas para nivelarla de forma precisa.
Utilice una Ilave inglesa para girar la pata niveladora. Gire las patas
hacia la derecha para elevar la secadora, y hacia derecha para elevar
la secadora, y hacia la izquierda para bajarla. Utilice un nivelador
para ajustar la secadora y que quede nivelada en ambas direcciones.
Para nivelar la secadora, NO extienda las patas mas de Io necesario.
COMPROBACION DELCALEFACTOR
Lleve a cabo estos pasos para comprobar el
funcionamiento del calefactor despues de extraer la
documentaci6n y cualquier otro objeto del tambor.
1. Cierre la puerta y pulse el bot6n de encendido/apagado para
activar los controles.
2. Gire el mando de selecci6n del ciclo para elegir un ciclo con
calor, per ejemplo, el ciclo NORMAL.
3. Pulse el bot6n START/PAUSE (Poner en marcha/Pausa) para
iniciar el ciclo. Cuando transcurra aproximadamente un minute,
abra la puerta y compruebe si el tambor esta caliente. Si no hay
calor cuando transcurran 2 minutos aproximadamente, consulte
la secci6n de soluci6n de problemas del Manual del propietario.
COMPROBACIONES FINALES
Utilice esta lista de comprobaci6n para asegurarse de
que ha realizado redes los pasos de la instalaci6n.
•_ PASO DE INSTALACION
1- RETIRAR EL MATERIAL DE EMBALAJE
2 - COMPROBARYCONECTARELSlSTEMADEVENTILACIQN
3 - CONECTAR EL CABLE DE ALIMENTAClON
4 - CONECTARELSUMINISTRODEGAS(s61olosmodelosagas)
5 - NIVELAR LA SECADORA
6 - COMPROBACION DEL CALEFACTOR
O
_P
/
O reinstall
O
0
O
Alimentador SOLO agua
de vapor corriente
Para conocer las instrucciones de instalaci6n de los accesorios,
consulte las instrucciones que se incluyen en cada accesorio.
KIT DE CONVERSION LP i 4948EL4002C
KIT DE VENTILACION LATERAL -- D26 49670
R ealizar una prueba de funcionamiento de un ciclo completo para
comprobar que la secadora funciona correctamente.
* Consulte el Manual del propietario para obtener mas informaci6n.
P/No.:MHK61888712
/