Fujitsu CA07077-B055 User manual

Category
External hard drives
Type
User manual
1/1
HandyDrive Users Guide
We
m
a
k
e
you
rd
a
t
a
p
o
r
ta
bl
e
Copyright and Trademarks
Copyright® 2007 FUJITSU LIMITED
This document and all materials contained herein are subject to copyright. This document may not be copied, in
whole or in part, without the written consent of FUJITSU LIMITED.
Fujitsu is a trademark of FUJITSU LIMITED. All other companies and product names mentioned in this
document are trademarks of their respective companies.
2/2
1. Name of Each Part
USB connector
Connect the USB cable that is supplied with this product. At connection, open the cover as indicated
by the arrow.
Power connector
Connect the bus power assist cable that is supplied with this product or the optional HandyDrive AC
adaptor.
At connection, open the cover as indicated by the arrow.
2. Power saving function
This product automatically stops disk rotation of the hard disk drive when the drive is not
accessed for about 11 minutes continuously. This function is called a Power save
function.
The Power save state is recovered to the normal state automatically when read/write
operation from/to the drive starts.
The Power save function may not run while the software that constantly reads the hard
disk state is running.
ON (bright) Idle
ON (dim) Read and Write
Blinking Read and Write
Blinking at a fixed
interval
Power save
Power/Operation Light
In “blinking” the brightness of the Power/Operation Light
may vary at display.
1
2
3
3/3
3. Operating Procedure on a Windows PC
When using on a Windows Vista, Windows XP, 2000, or Me PC
Connection to the PC
1. Connect the USB cable (mini-B connector) to the USB connector of the
HandyDrive.
2. Connect the USB cable (A connector) to the USB connector of the main
unit of the PC.
Please wait until [Your new hardware is installed and ready to use.] is
displayed when you connect for the first time.
3. Select [My Computer] from the [Start] menu.
For Windows Vista, select [Computer].
4. Operating is normal if the icon of HandyDrive is displayed.
(The right icon is an example of Windows Vista.)
This product does not support Windows 98 (including Windows 98 Second Edition)
4/4
When using on a Windows Vista, Windows XP, 2000, or Me PC
Disconnect from the PC
1. Left-click the icon displayed in the task tray.
Left-click the [
] in case of Windows Vista.
Left-click the [ ] in case of Windows XP/ 2000/ Me.
2. Left-click the menu which is displayed as below. *
In case of Windows Vista: [Safely remove USB Mass Storage Device - Drive(F:)]
In case of Windows XP: [Safely remove USB Mass Storage Device - Drive(F:)]
In case of Windows 2000: [Stop USB Mass Storage Device - Drive(F:)]
In case of Windows Me: [Stop USB Disk - Drive(F:)]
The display may be different depending on the PC you are using.
If you share the Trash and there are any remaining files, you may not be able to remove the device.
Empty the Trash and remove again.
3. Left-click the close button [ ] at the top right corner in case of Windows Vista and Windows XP
and [OK] in case of Windows 2000/Me when the message below is displayed.
In case of Windows Vista:
In case of Windows XP:
In case of Windows 2000:
In case of Windows Me:
5/5
When using on a Windows Vista, Windows XP, 2000, or Me PC
Reformatting the HandyDrive
All the data inside the HandyDrive is erased when reformat is executed.
Please backup the necessary data.
This product is formatted in FAT32 format at the factory. You can use without change when using a Windows
PC.
When saving a file of the size exceeding 4GB, HandyDrive must be reformatted to the NTFS format in advance.
The NTFS Format is supported by Windows Vista, Windows XP, and Windows 2000 Professional.
Procedure for reformatting to the NTFS format
For users of Windows XP and Windows 2000
1. Log in to the system with the account that belongs to “Administrators”.
2. Open [My Computer].
3. Right-click the icon of the HandyDrive and select [Format].
4. Select NTFS from [File System] when using Windows 2000.
Only NTFS can be selected on Windows XP.
5. Click [Start] button to start reformat.
For users of Windows Vista
1. Log in to the personal computer.
2. Open [Computer].
3. Right-click the icon of the HandyDrive and select [Format].
4. Enter the Administrator password on the User Account Control screen and click on the [OK] button.
5. Check that the file system is set to NTFS (Default) and click on the [Start] button.
6. Click on the [OK] button for WARNING. Formatting starts.
6/6
4. Operating Procedure on a Macintosh PC
In Mac OS X 10.1 or Mac OS X 10.2, the drive icon is not displayed under the formatting at the factory.
Applicable characters are different between Mac OS and Windows. If you write a file name that is not compatible with FAT32 and use this
product in the default setting on Mac OS, it may not be read correctly.
After reformatting it to the Mac OS Extended Format by following the below procedure, it can also be used on other Macintosh computers.
When using on a Mac OS X 10.1
Please first reformat for Mac
All the data inside the HandyDrive is erased when reformat is executed.
Please backup the necessary data.
1. Start the Mac OS.
Log in with the administrator account.
Start the Mac OS without connecting the product. Connect the product at step 3.
2. Remove all USB devices other than this product.
(Remove the drives besides the FireWire drive used for the start-up when using drives connected by FireWire.)
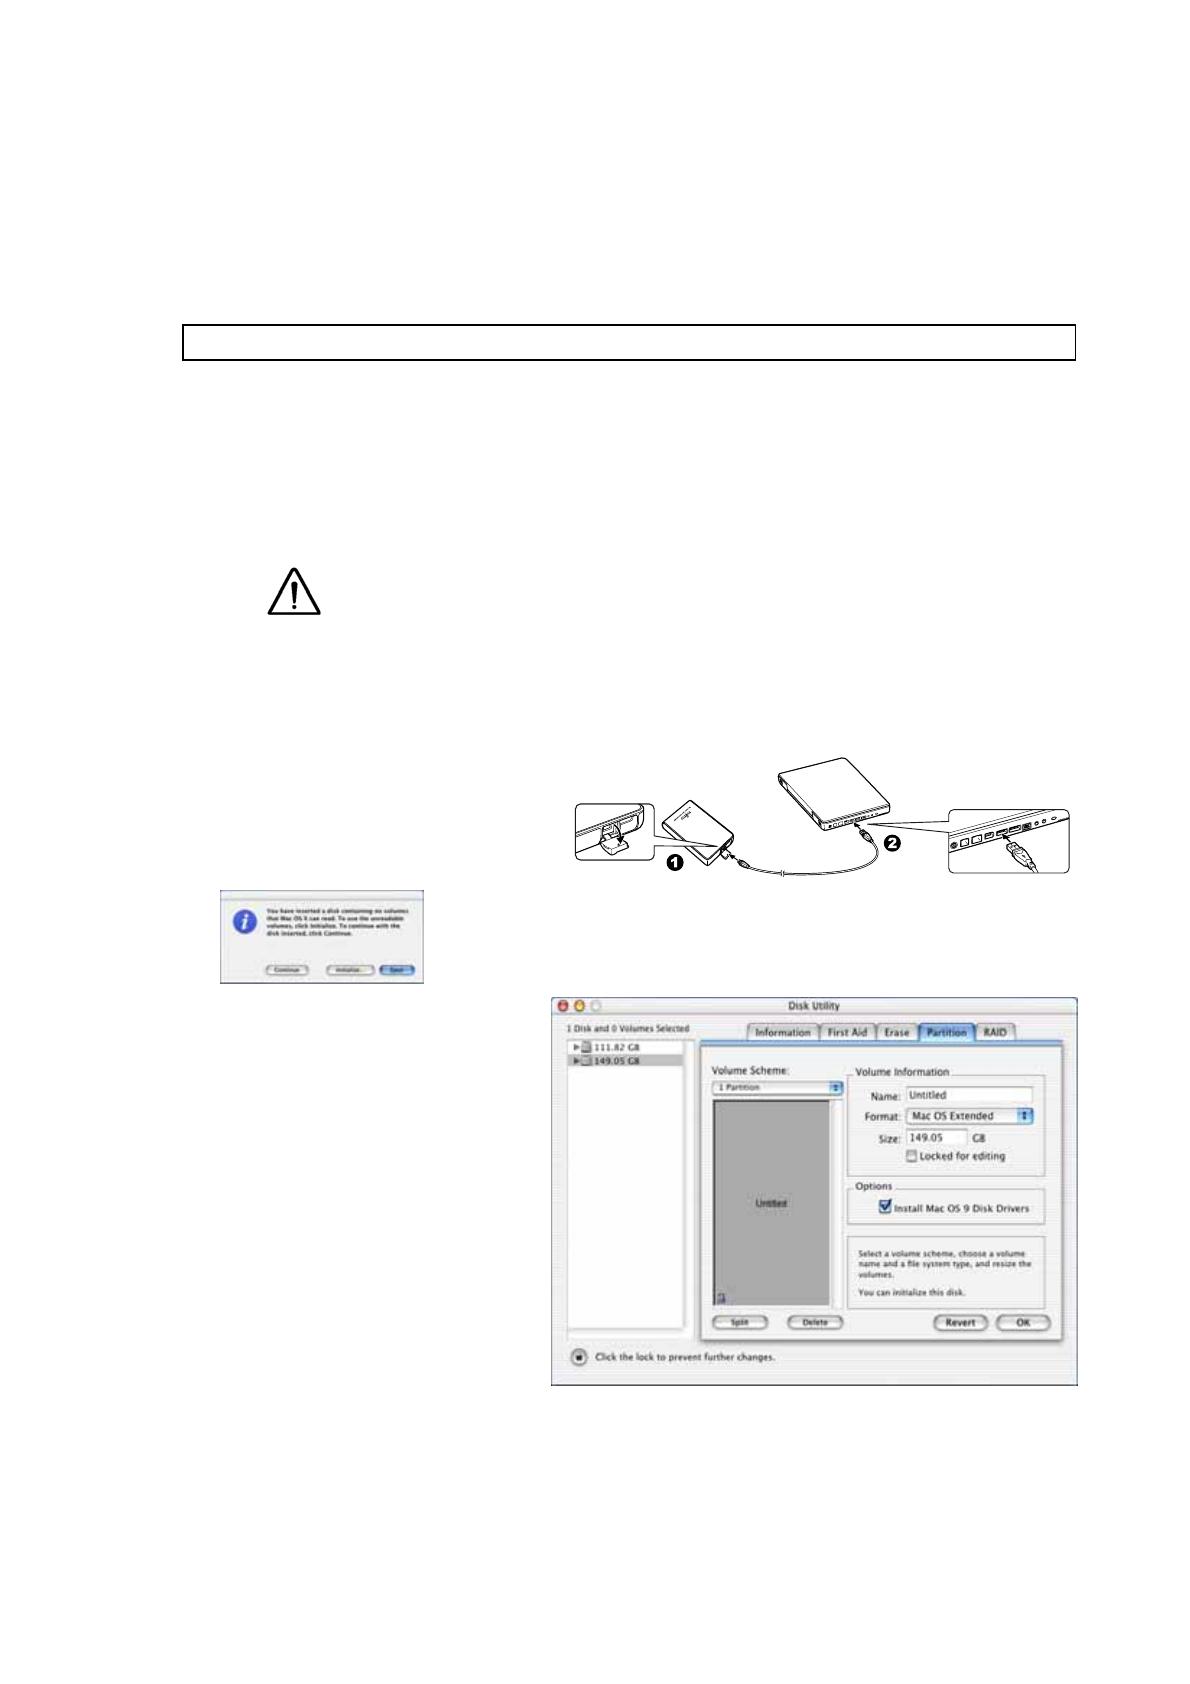
3. Connect the HandyDrive.
1. Connect the USB cable (mini-B connector) to the
USB connector of the HandyDrive.
2. Connect the USB cable (A connector)
to the USB connector of the main unit of the PC.
4. Wait until the following screen is displayed.
It takes several minutes to display the screen.
5. Click the [Initialize...] button. Disk Utility starts.
6. Select this product in the Disk Utility screen.
7. Click the [Partition] tab.
8. Set for initialization.
[Volume Scheme] 1 Partition
[Format] Mac OS Extended
9. Click [OK].
10. Click [Partition] button on the following screen.
Initialization starts.
This product does not support Macintosh of Mac OS 9 and earlier versions.
This screen is only an example. The display contents vary according
to the Macintosh that is used.
7/7
11. Confirm that the icon is added to the desktop
after the completion of the format.
12. Close the Disk Utility.
Connection Procedure
Connection to the Macintosh
This product can be connected anytime. Connect by following step 3.
Disconnecting the HandyDrive from the Macintosh
1. Drag-and-drop the icon of the HandyDrive displayed on the desktop to the Trash.
2. Confirm that the icon of HandyDrive has disappeared.
3. Check that the Power/Operation Light is not blinking.
4. Disconnect the USB cable.
The volume name is not set.
Click the volume name
of the icon and reset it.
It cannot be removed during
the operation of the file.
Remove after finishing the
Operation of the file.
8/8
When using on a Mac OS X 10.2
Please first reformat for Mac
All the data inside the HandyDrive is erased when reformat is executed.
Please backup the necessary data.
1. Start the Mac OS without connecting the product. Connect the product at step 5.
Log in with the administrator account.
2. Remove all USB devices other than this product.
(Remove the drives besides the FireWire drive used for the start-up when using drives connected by FireWire.)
3. Double-click the icon of the start-up disk (Macintosh HD).
4. Double-click in the order of [Applications] [Utilities] [Disk Utility].
5. Connect the HandyDrive.
1. Connect the USB cable (mini-B connector) to the USB connector of the HandyDrive.
2. Connect the USB cable (A connector) to the USB connector of the main unit of the PC.
6. Select this product in the Disk Utility screen.
It may take some time until this product is
displayed.
7. Click the [Partition] tab.
8. Set for initialization.
[Volume Scheme] 1 Partition
[Format] Mac OS Extended
9. Click the [Partition] button.
10. Click [Partition] button on the following screen.
Initialization starts.
11. Confirm that the icon is added to the desktop
after the completion of the format.
12. Close the Disk Utility.
This screen is only an example. The display contents vary according
to the Macintosh that is used.
9/9
Connecting the HandyDrive to Macintosh
1. Connect the USB cable (mini-B connector) to the USB connector of the HandyDrive.
2. Connect the USB cable (A connector) to the USB connector of the main unit of the PC.
3. Wait until the HandyDrive drive is displayed.
Disconnecting the HandyDrive from Macintosh
1. Drop the HandyDrive icon to the Trash.
It cannot be removed during the operation of the file.
Remove after finishing the Operation of the file.
2. Confirm that the icon of HandyDrive has disappeared.
3. Check that the Power/Operation Light is not blinking.
4. Disconnect the USB cable.
10/10
When using on a Mac OS X 10.3
Please first reformat for Mac
All the data inside the HandyDrive is erased when reformat is executed.
Please backup the necessary data.
1. Remove all USB devices other than this product.
(Remove the drives besides the FireWire drive used for the start-up when using drives connected by FireWire.)
2. Start the Mac OS without connecting the HandyDrive. Connect the HandyDrive at step 5.
Log in to the Mac OS.
3. Double-click the icon of the start-up disk (Macintosh HD).
4. Double-click in the order of [Applications] [Utilities] [Disk Utility].
5. Connect the HandyDrive.
1. Connect the USB cable (mini-B connector) to the USB connector of the HandyDrive.
2. Connect the USB cable (A connector) to the USB connector of the main unit of the PC.
6. Select this product in the Disk Utility screen.
It may take some time until this product is
displayed.
7. Click the [Partition] tab.
8. Set for initialization.
[Volume Scheme] 1 Partition
[Format] Mac OS Extended
9. Click the [Partition] button.
10. Click [Partition] button on the following screen.
Initialization starts.
11. Confirm that the icon is added to the desktop
after the completion of the format.
12. Close the Disk Utility.
This screen is only an example. The display contents vary according
to the Macintosh that is used.
11/11
Connecting the HandyDrive to Macintosh
1. Connect the USB cable (mini-B connector) to the USB connector of the HandyDrive.
2. Connect the USB cable (A connector) to the USB connector of the main unit of the PC.
3. Wait until the HandyDrive drive is displayed.
Disconnecting the HandyDrive from Macintosh
1. Drop the HandyDrive icon to the Trash.
It cannot be removed during the operation of the file.
Remove after finishing the Operation of the file.
2. Confirm that the icon of HandyDrive has disappeared.
3. Check that the Power/Operation Light is not blinking.
4. Disconnect the USB cable.
12/12
When using on a Mac OS X 10.4
Please first reformat for Mac
All the data inside the HandyDrive is erased when reformat is executed.
Please backup the necessary data.
1. Remove the USB connections other than this product.
(Remove the drives besides the FireWire drive used for the start-up when using drives connected by FireWire.)
2. Start the Mac OS without connecting the HandyDrive. Connect the HandyDrive at step 5.
Log in to the Mac OS.
3. Double-click the icon of the start-up disk (Macintosh HD).
4. Double-click in the order of [Applications] [Utilities] [Disk Utility].
5. Connect the HandyDrive.
1. Connect the USB cable (mini-B connector) to the USB connector of the HandyDrive.
2. Connect the USB cable (A connector) to the USB connector of the main unit of the PC.
6. Select this product in the Disk Utility screen.
It may take some time until this product is
displayed.
7. Select the [Partition] tab and click the
[Options...] button.
Select [Apple Partition Map] on the
following screen and click the [OK] button.
8. Set for initialization.
[Volume Scheme] 1 Partition
[Format] Mac OS Extended
9. Click the [Partition] button.
10. Click the [Partition] button.
Initialization starts.
11. Confirm that the icon is added to the desktop
after the completion of the format.
12. Close the Disk Utility.
This screen is only an example. The display contents vary according
to the Macintosh that is used.
13/13
Connecting the HandyDrive to Macintosh
1. Connect the USB cable (mini-B connector) to the USB connector of the HandyDrive.
2. Connect the USB cable (A connector) to the USB connector of the main unit of the PC.
3. Wait until the HandyDrive drive is displayed.
Disconnecting the HandyDrive from Macintosh
1. Drag-and-drop the icon of the HandyDrive displayed on the desktop to the Trash.
It cannot be removed during the operation of the file.
Remove after finishing the operation of the file.
2. Confirm that the icon of HandyDrive has disappeared.
3. Check that the Power/Operation Light is not blinking.
4. Disconnect the USB cable.
  • Page 1 1
  • Page 2 2
  • Page 3 3
  • Page 4 4
  • Page 5 5
  • Page 6 6
  • Page 7 7
  • Page 8 8
  • Page 9 9
  • Page 10 10
  • Page 11 11
  • Page 12 12
  • Page 13 13

Fujitsu CA07077-B055 User manual

Category
External hard drives
Type
User manual

Ask a question and I''ll find the answer in the document

Finding information in a document is now easier with AI