Page is loading ...

P 1.
ISSUE 1
MAY 2022
Installation Instruction for
Composite Doorset
1. Before removing the existing doorset , carefully inspect your new doorset to ensure the contents are correct
and for any damage and check the sizes are correct for the opening.
IMPORTANT: Claims for damage cannot be reported after the doorset has been fi tted.
2. It is recommended that the door and frame are fi tted as a complete unit and using two people will make for
an easier installation.
3. After the old door has been removed ensure the door aperture is clean with all excess cement & silicone removed.
4. To fi t the cylinder, place this into the lock aperture and fi x using the long machine screw provided on the lock
side of the door.
5. To fi t the door handle, insert the spindle through the lock mechanism, the handle with the fi xing screws
should be placed on the inside of the door with the lever pushed squarely onto the spindle, repeat for the
external lever. Insert the two countersunk screws into the holes on the internal handle and tighten.
6. Measure, cut and fi t frame extension pieces to the door frame if required.
7. If fi tting with a sill ensure it has been fi xed as per manufacturers instructions and is level.
Note: sill should be on a bed of foam.
8. Offer the doorset to the opening and temporarily wedge into place, using a spirit level check the frame is
plumb and square.
9. Use packers between the frame and the brickwork, close to fi xing points to ensure the frame remains plumb
and straight during fi xing.
10. The doorset should be fi xed through the frame legs (4 each side should be suffi cient). No screws should be
fi tted through the frame head or down into the fl oor.
11. These fi xing points are for guidelines only.
Corner fi xings 150mm minimum and maximum of 250mm from external corner.
Intermediate fi xings not exceeding 600mm.
12. Use the masonry fi xing screws supplied, drill the frame legs with a 7mm HSS drill, with a 6mm masonry bit,
drill into the substrate ensuring the hole is deep enough for the fi xing. Use a Torqz T30 driver bit to fi x the
masonry fi xing into place being careful not to bow or twist the PVCu frame (the use of installation packers
behind the frame and close to the fi xing points will help with this).
13. The hinges should be adjusted to ensure an even air gap between the frame and door slab, refer to page 2
for this operation.
14. Measure and fi t any trims (not supplied) ensuring the area is clean and dust free to maintain a good bond,
then seal around the inside of the frame.
15. Clean the door as referenced in the Care and Maintenance Guide.

P 2.
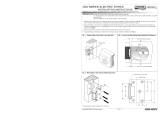
Compression Adjustment +0.5mm -0.5mm
(5mm Allen key)
Remove the top cap.
Check pin alignment via the mark on top of the pin.
If the mark is pointing towards the door sash, the adjustment is in neutral setting.
To increase compression, turn the pin so that the alignment mark is moved towards
the door frame.
To reduce compression, turn the pin so that the alignment moves away from
the frame.
Vertical Adjustment +3.0mm -0.0mm
(5mm Allen key)
Remove the bottom cap.
To raise the door sash, rotate the vertical adjustment screw clockwise. Ensure that
all other hinges are adjusted equally.
To lower the door sash, rotate the vertical adjustment screw anti-clockwise.
Ensure that all other hinges are adjusted equally.
Lateral Adjustment +2.0mm -2.0mm
(4mm Allen key)
Remove the side cover caps.
Rotate the lateral adjustment drives in the direction required. Ensure that each
pair of alignment marks are at the same point.
WARNING
It is not recommended to fully adjust ether one adjuster only or one hinge only.
Adjustments should be made gradually, aligning each pair of marks on each
hinge until the desired adjustment is achieved.
Challenger 3D Butt Hinges
Adjustment Instructions
Virtuoso Doors Limited
Beacon House, Unit 13 Follingsby Close, Gateshead, NE10 8YG
Tel: 0191 410 9333 I howdens@virtuoso-doors.co.uk
Customade Group
Part of the
Customade Group
Part of the
/