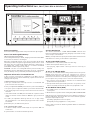
Coomber 3011 is a versatile device that combines the functionality of a cassette player, FM/VHF radio, and microphone/line input recorder. With its compact design and rechargeable battery, it's perfect for use in various settings, including schools, offices, and homes.
As a cassette player, the 3011 offers one-touch recording, cue and review functions, and auto-stop, ensuring ease of use and convenience. It also features an external loudspeaker socket, allowing you to connect external speakers for enhanced audio output.
The FM/VHF radio tuner provides access to a wide range of radio stations, and its telescopic aerial ensures optimal reception. Additionally, the device includes a 3-position switch for MW (medium wave) reception, offering further listening options.


-
 1
1
-
 2
2


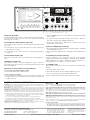
Coomber 3011 is a versatile device that combines the functionality of a cassette player, FM/VHF radio, and microphone/line input recorder. With its compact design and rechargeable battery, it's perfect for use in various settings, including schools, offices, and homes.
As a cassette player, the 3011 offers one-touch recording, cue and review functions, and auto-stop, ensuring ease of use and convenience. It also features an external loudspeaker socket, allowing you to connect external speakers for enhanced audio output.
The FM/VHF radio tuner provides access to a wide range of radio stations, and its telescopic aerial ensures optimal reception. Additionally, the device includes a 3-position switch for MW (medium wave) reception, offering further listening options.
Ask a question and I''ll find the answer in the document
Finding information in a document is now easier with AI
Related papers
Other documents
-
Activision Modern Warfare 3 47875842069 User manual
-
-
Philips AZ 1574 User manual
-
-
-
Samsung MAX-B450 User manual
-
-
Samsung MAX-B550 User manual
-
Marantz Home Theater System SR5005 User manual
-