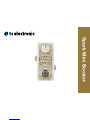
TC Electronic SPARK User manual
- Category
- Supplementary music equipment
- Type
- User manual
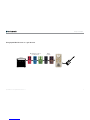
TC Electronic SPARK is an awesome and versatile tool that can be used in more ways than just one.
- Punch it in from time to time when you need a volume boost.
- Punch it in from time to time when you need a gain boost.
- Leave it on all the time to get the best out of your tube amp.
Understanding the difference between scenarios 1 and 2 is essential when working with TC Electronic SPARK.
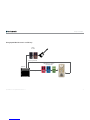
When playing with a distortion pedal or an overdriven amp, you know how turning down the volume knob on your guitar cleans up your guitar sound?
“I want a volume boost!”
Awesome! Then you want to place TC Electronic SPARK after your distortion pedal(s).
TC Electronic SPARK is an awesome and versatile tool that can be used in more ways than just one.
- Punch it in from time to time when you need a volume boost.
- Punch it in from time to time when you need a gain boost.
- Leave it on all the time to get the best out of your tube amp.
Understanding the difference between scenarios 1 and 2 is essential when working with TC Electronic SPARK.
When playing with a distortion pedal or an overdriven amp, you know how turning down the volume knob on your guitar cleans up your guitar sound?
“I want a volume boost!”
Awesome! Then you want to place TC Electronic SPARK after your distortion pedal(s).


-
 1
1
-
 2
2
-
 3
3
-
 4
4
-
 5
5
-
 6
6
-
 7
7
-
 8
8
-
 9
9
-
 10
10
-
 11
11
-
 12
12
-
 13
13
-
 14
14
-
 15
15


TC Electronic SPARK User manual
- Category
- Supplementary music equipment
- Type
- User manual
TC Electronic SPARK is an awesome and versatile tool that can be used in more ways than just one.
- Punch it in from time to time when you need a volume boost.
- Punch it in from time to time when you need a gain boost.
- Leave it on all the time to get the best out of your tube amp.
Understanding the difference between scenarios 1 and 2 is essential when working with TC Electronic SPARK.
When playing with a distortion pedal or an overdriven amp, you know how turning down the volume knob on your guitar cleans up your guitar sound?
“I want a volume boost!”
Awesome! Then you want to place TC Electronic SPARK after your distortion pedal(s).
Ask a question and I''ll find the answer in the document
Finding information in a document is now easier with AI
Related papers
-
TC Electronic Spark Mini Booster Quick start guide
-
-
TC Electronic Hall of Fame mini Reverb Instructions Manual
-
TC Electronic PIPELINE TAP TREMOLO User manual
-
TC Electronic MIMIQ DOUBLER Owner's manual
-
TC Electronic HALL OF FAME REVERB Owner's manual
-
TC Electronic BodyRez User manual
Other documents
-
Fulltone Catalyst CT-1 User manual
-
 JHS Pedals MILK User guide
-
Zoom B3 Operating instructions
-
 Positive Grid BIAS DISTORTION User manual
-
 Fractal Axe-Fx ULTRA User manual
-
Boss KATANA-Artist MkII Owner's manual
-
 Radial Engineering radial pz-pre User manual
-
 JHS Pedals MFF User manual
-
-
Boss KATANA-100/212 Owner's manual


