Page is loading ...

Owner’s Manual
1111 W. 35th Street Chicago, IL 60609 USA
Customer Support: (773) 869-1234 • www.tripplite.com
Important Safety Instructions 2
Quick Installation 3
Basic Operation 5
Storage and Service 8
Español
Copyright © 2006 Tripp Lite. All rights reserved. SmartPro®is a trademark of Tripp Lite
SmartPro®SLT
Intelligent, Line-Interactive UPS System
• 220/230/240V Pure Sine Wave Input/Output
Not suitable for mobile applications.
9
Battery Replacement 8
Français 17
Optional Installation 4
Deutsch 25
PyccŞèé 33
200603172 93-2443 SmartPro update OM.qxd 5/16/2006 3:15 PM Page 1

2
Important Safety Instructions
SAVE THESE INSTRUCTIONS
This manual contains important instructions that should be followed during the installation, operation
and storage of all Tripp Lite UPS Systems. Failure to heed these warnings will void your warranty.
UPS Location Warnings
• Use caution when lifting UPS.
• Install your UPS indoors, away from excess moisture or heat, dust or direct sunlight.
• For best performance, the ambient temperature near your UPS should be between 0° C and
40° C (between 32° F and 104° F).
• Leave adequate space around all sides of the UPS for proper ventilation. Do not obstruct its
vents or fan openings.
UPS Connection Warnings
• The UPS contains its own energy source (battery). The output terminals may be live even
when the UPS is not connected to an AC supply.
• Connect your UPS to a properly grounded AC power outlet. Do not modify the UPS’s plug
in a way that would eliminate the UPS’s connection to ground. Do not use adapters that
eliminate the UPS’s connection to ground.
• Do not plug your UPS into itself; this will damage the UPS and void your warranty.
• If you are connecting your UPS to a motor-powered AC generator, the generator must provide
filtered, frequency-regulated computer-grade output.
Equipment Connection Warnings
• Do not use Tripp Lite UPS Systems for life support applications in which a malfunction or
failure of a Tripp Lite UPS System could cause failure or significantly alter the performance
of a life-support device.
• Do not connect surge suppressors or extension cords to the output of your UPS. This might
overload the UPS and will void the surge suppressor and UPS warranties.
Battery Warnings
• Batteries can present a risk of electrical shock and burn from high short-circuit current.
Observe proper precautions. Do not dispose of the batteries in a fire. Do not open the UPS or
batteries. Do not short or bridge the battery terminals with any object. Unplug and turn off the
UPS before performing battery replacement. Use tools with insulated handles. There are no
user-serviceable parts inside the UPS. Battery replacement should be performed only by
authorized service personnel using the same number and type of batteries (sealed Lead-Acid).
The batteries are recyclable. Refer to your local codes for disposal requirements. Tripp Lite
offers a complete line of UPS System Replacement Battery Cartridges (R.B.C.). Visit Tripp
Lite on the Web at www.tripplite.com to locate the specific replacement battery for your UPS.
200603172 93-2443 SmartPro update OM.qxd 5/16/2006 3:15 PM Page 2

3
230V
220V
240V
230V
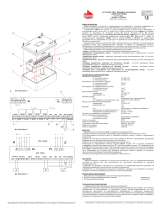
Quick Installation
With the UPS disconnected from
utility power, use a small tool to
set the Voltage Dip Switches to
match your input voltage. (All
models are preset to the 230V
setting.)
Insert a user-supplied power cord
(with country-specific plug) into
the UPS System's AC input
receptacle. Plug the cord into
an AC wall outlet.
NOTE! after you plug the UPS into a live AC outlet,
the UPS (in “Standby” mode) will automatically
charge its batteries,* but will not supply power to its
outlets until it is turned ON.
* The BATTERY CHARGE LED will be the only LED illuminated.
Find one of the power cords that
came with the UPS. Insert the
cord’s female plug into
computer’s AC input. Insert the
cord’s male plug into any UPS
female output receptacle.
Plug your equipment into the UPS.
Plug your equipment into the UPS. Repeat Step 3
above using the additional power cord(s) that came
with the UPS.
Note: Additional interconnection cords (C13 to
C14) are available from Tripp Lite. Call 773-869-
1234 (Part # P004-006).
Your UPS is designed to support computer equipment only. You will
overload the UPS if the total VA ratings for all the equipment you
connect exceeds UPS output capacity. To find your equipment’s VA
ratings, look on their nameplates. If the equipment is listed in amps,
multiply the number of amps by 240 to determine VA. (Example:
1 amp × 240 = 240 VA). If you are unsure if you have overloaded your
UPS's outlets, see “OUTPUT LOAD LEVEL” LED description.
Turn the UPS ON.
Press and hold the “ON/OFF/STANDBY” button for
one second. The alarm will beep once briefly after one
second has passed. Release the button.
1
1
2
5
3
4
5
2
3
4
240V
230V
220V
230V
SMX750SLT SMX1050SLT &
SMX1500SLT
200603172 93-2443 SmartPro update OM.qxd 5/16/2006 3:15 PM Page 3

Optional Installation
These connections are optional. Your UPS will function
properly without these connections.
USB and RS-232 Serial
Communications
Use the included USB cable (see ) and/or DB9 serial
cable (see ) to connect the communication port on
your computer to the communication port of your
UPS. Install on your computer the Tripp Lite
PowerAlert Software appropriate to your computer’s
operating system.
Telephone/Network Protection Jacks
Your UPS has jacks that protect against surges over a
telephone line or a network dataline. Using telephone
or network data cables, connect your wall jack to the
UPS jack marked “IN.” Connect your equipment to
the UPS jack marked “OUT.” Make sure the
equipment you connect to the UPS's jacks is also
protected against surges on the AC line.
Not compatible with PoE (Power Over Ethernet) applications.
1b
1a
4
1b
1a
2
1
2
200603172 93-2443 SmartPro update OM.qxd 5/16/2006 3:15 PM Page 4

5
“ON/OFF/STANDBY” Button
• To turn the UPS ON: with the UPS plugged into a live AC wall outlet*, press
and hold the “ON/OFF/STANDBY” button for one second.** Release the
button. If utility power is absent, you can “cold-start” the UPS (i.e.: turn it ON
and supply power for a limited time from its batteries***) by pressing and
holding the “ON/OFF/STANDBY” button for one second.**
• To turn the UPS OFF: with the UPS ON and receiving utility power, press
and hold the “ON/OFF/STANDBY” button for one second.** Then unplug
the UPS from the wall outlet. The UPS will be completely OFF.
* After you plug the UPS into a live AC outlet, the UPS (in ”Standby” mode) will automatically charge
its batteries, but will not supply power to its outlets until it is turned ON. ** The alarm will beep once
briefly after the indicated interval has passed. *** If fully charged.
“MUTE/TEST” Button
To Silence (or “Mute”) UPS Alarms: briefly press and release the
MUTE/TEST button.*
To Run a Self-Test: with your UPS plugged in and turned ON, press and hold
the MUTE/TEST button. Continue holding the button until the alarm beeps sev-
eral times and the UPS performs a self test. See “Results of a Self-Test” below.
Note: you can leave connected equipment on during a self-test. Your UPS, how-
ever, will not perform a self-test if the UPS is not turned on (see
“ON/OFF/STANDBY” Button description).
CAUTION! Do not unplug your UPS to test its batteries. This will remove
safe electrical grounding and may introduce a damaging surge into your
network connections.
Results of a Self-Test: The test will last approximately 10 seconds as the
UPS switches to battery to test its load capacity and battery charge.
• If the “OUTPUT LOAD LEVEL” LED remains lit red and the alarm
continues to sound after the test, the UPS’s outlets are overloaded. To
clear the overload, unplug some of your equipment and run the self-test
repeatedly until the “OUTPUT LOAD LEVEL” LED is no longer lit red
and the alarm is no longer sounding.
CAUTION! Any overload that is not corrected by the user immedi-
ately following a self-test may cause the UPS to shut down and cease
supplying output power in the event of a blackout or brownout.
• If the “BATTERY WARNING” LED remains lit and the alarm continues
to sound after the test, the UPS batteries need to be recharged or
replaced. Allow the UPS to recharge continuously for 12 hours, and
repeat the self-test. If the LED remains lit, contact Tripp Lite for service.
If your UPS requires battery replacement, visit www.tripplite.com to
locate the specific Tripp Lite replacement battery for your UPS.
* The alarm will beep once briefly after the indicated interval has passed.
Basic Operation
Buttons (Front Panel)
200603172 93-2443 SmartPro update OM.qxd 5/16/2006 3:15 PM Page 5

Basic Operation
continued
Indicator Lights (Front Panel)
All Indicator Light descriptions apply when the UPS is plugged into a wall
outlet and turned ON.
“POWER” LED: this green LED lights continuously when the UPS is ON and
supplying connected equipment with AC power from a utility source. The LED
flashes and an alarm sounds (4 short beeps followed by a pause) to indicate the
UPS is operating from its internal batteries during a blackout or severe
brownout. If the blackout or severe brownout is prolonged, you should save
files and shut down your equipment since internal battery power will eventual-
ly be depleted. See “BATTERY CHARGE” LED description below.
“VOLTAGE CORRECTION” LED: this green LED lights continuously
whenever the UPS is automatically correcting high or low AC voltage on the
utility line without the assistance of battery power. The UPS will also emit a
slight clicking noise. These are normal, automatic operations of the UPS, no
action is required on your part.
“OUTPUT LOAD LEVEL” LEDs: the LEDs indicate the approximate elec-
trical load of equipment connected to the UPS's AC outlets. They will turn from
green (light load) to yellow (medium load) to red (overload). If the LED is red
(either illuminated continuously or flashing), clear the overload immediately by
unplugging some of your equipment from the outlets until the LED changes
from red to yellow (or green). CAUTION! Any overload that is not corrected
by the user immediately may cause the UPS to shut down and cease supplying
output power in the event of a blackout or brownout.
“BATTERY CHARGE” LEDs: when the UPS is operating from utility power,
the LEDs indicate the approximate charge state of the UPS's internal batteries:
red indicates the batteries are beginning to charge; yellow indicates the batter-
ies are roughly midway through charging; and green indicates the batteries are
fully charged. When the UPS is operating from battery power during a blackout
or severe brownout, the LEDs indicate the approximate amount of energy
(ultimately affecting runtime) which the UPS’s batteries will provide: red indi-
cates a low level of energy; yellow indicates a medium level of energy; and
green indicates a high level of energy. Since the runtime performance of all UPS
batteries will gradually deplete over time, it is recommended that you periodi-
cally perform a self-test (see MUTE/TEST Button description) to determine the
energy level of your UPS batteries BEFORE a blackout or severe brownout
occurs. During a prolonged blackout or severe brownout, you should save files
and shut down your equipment since battery power will eventually be depleted.
When the red LED illuminates and an alarm sounds continuously, it indicates
the UPS's batteries are nearly out of power and UPS shutdown is imminent.
“BATTERY WARNING” LED: this LED lights red and an alarm sounds
intermittently after you initiate a self test (See “MUTE/TEST” Button descrip-
tion) to indicate the UPS batteries need to be recharged or replaced. Allow the
UPS to recharge continuously for 12 hours, and repeat the self-test. If the LED
continues to light, contact Tripp Lite for service. If your UPS requires battery
replacement, visit www.tripplite.com to locate the specific Tripp Lite replace-
ment battery for your UPS.
6
200603172 93-2443 SmartPro update OM.qxd 5/16/2006 3:15 PM Page 6

7
Basic Operation
continued
Other UPS Features (Rear Panel)
AC Receptacles: Your UPS features IEC-320-C13 outlets. These output
receptacles provide your connected equipment with AC line power during
normal operation and battery power during blackouts and brownouts. The UPS
protects equipment connected to these receptacles against damaging surges and
line noise.
Communications Ports (USB or RS-232): These ports connect your UPS to
any workstation or server. Use with Tripp Lite’s PowerAlert Software and
included cables to enable your computer to automatically save open files and
shut down equipment during a blackout. Also use PowerAlert Software to mon-
itor a wide variety of AC line power and UPS operating conditions. Consult
your PowerAlert Software manual or contact Tripp Lite Customer Support for
more information. See “USB and RS-232 Serial Communications” in the
“Optional Installation” section for installation instructions.
Telephone/Network Protection Jacks: These jacks protect your equipment
against surges over a telephone/network data line. Connecting your equipment
to these jacks is optional. Your UPS will work properly without this connection.
Not compatible with PoE (Power Over Ethernet) applications.
Voltage DIP Switches: These switches enable the UPS to be set to match
actual input voltage. If the Voltage DIP Switches are set above or below input
voltage, the UPS will treat the input as a continuous overvoltage or undervolt-
age condition, and will automatically adjust input voltage to match the Voltage
DIP Switch setting. This will cause constant, unnecessary wear on the UPS.
Note: The Voltage DIP Switches must be set with the UPS turned OFF and
disconnected from utility power. If the switches are set while the UPS is
connected to utility power, the setting will not take effect.
Accessory Slot: Remove the small cover panel from this slot to install option-
al accessories to remotely monitor and control your UPS. Refer to your acces-
sory’s manual for installation instructions. Contact Tripp Lite Customer
Support at (773) 869-1234 for more information, including a list of available
SNMP, network management and connectivity products.
Input Breaker (SMX1500SLT): Protect your electrical circuit from overcur-
rent draw from the UPS load. If this breaker trips, remove some of the load,
then reset by pressing the breaker in.
Fan: The fan cools the UPS's internal components. It operates only when the
UPS is in battery backup mode, is charging its batteries or is carrying a heavy
electrical load.
230V
220V
240V
230V
240V
230V
220V
230V
200603172 93-2443 SmartPro update OM.qxd 5/16/2006 3:15 PM Page 7

8
Storage and Service
Storage
Before storing your UPS, turn it completely OFF: with the UPS ON and receiving utility power,
press and hold the “ON/OFF/STANDBY” button for one second (an alarm will beep once briefly
after the interval has passed); then, unplug the UPS from the wall outlet. If you store your UPS for
an extended period of time, recharge the UPS batteries once every three months: plug the UPS into
a wall outlet; allow it to charge for 12 hours; and then unplug it and place it back in storage. Note:
after you plug the UPS in, it will automatically begin charging its batteries; however, it will not sup-
ply power to its outlets (see Quick Installation section). If you leave your UPS batteries discharged
for an extended period of time, they will suffer a permanent loss of capacity.
Service
Before returning your UPS for service, follow these steps:
1. Review the installation and operation instructions in this manual to ensure that the service
problem does not originate from a misreading of the instructions. Also, check that the UPS
System’s circuit breaker(s) are not tripped. This is the most common cause of service inquiries
which can be easily remedied by following the resetting instructions in this manual.
2. If the problem continues, do not contact or return the UPS to the dealer. Instead, call Tripp Lite
at (773) 869-1233. A service technician will ask for the UPS's model number, serial number
and purchase date and will attempt to correct the problem over the phone.
3. If the problem requires service, the technician will issue you a Returned Material Authorization
(RMA) number, which is required for service. If you require packaging, the technician can
arrange to send you proper packaging. Securely pack the UPS to avoid damage during ship-
ping. Do not use Styrofoam beads for packaging. Any damages (direct, indirect, special, inci-
dental or consequential) to the UPS incurred during shipment to Tripp Lite or an authorized
Tripp Lite service center is not covered under warranty. UPS Systems shipped to Tripp Lite or
an authorized Tripp Lite service center must have transportation charges prepaid. Mark the
RMA number on the outside of the package. If the UPS System is within the 2-year warranty
period, enclose a copy of your sales receipt. Return the UPS for service using an insured car-
rier to the address given to you by the Tripp Lite service technician.
Battery Replacement
Battery Replacement Door: Under normal conditions, the original battery in your UPS will last
several years. Battery replacement should be performed only by qualified service personnel. Refer
to “Battery Warnings” in the Safety section. Should your UPS require battery
replacement, visit Tripp Lite on the Web at www.tripplite.com/support/bat-
tery/index.cfm to locate the specific replacement battery for your UPS.
Carefully pull the front panel away from the UPS.
Place front panel on top of the unit. Remove the battery support bar.
Remove old batteries.
Carefully pull the batteries from the UPS and disconnect them.
Connect new batteries.
Connect the new batteries in exactly the same manner as the old ones: pos-
itive (red) connectors together and negative (black) connectors together.
Carefully push batteries back into the UPS.
Reassemble UPS.
Reinstall the battery support bar and replace the front panel.
1
2
3
1
2
3
4
Regulatory Compliance Identification Numbers
For the purpose of regulatory compliance certifications and identification, your Tripp Lite product has been assigned a
unique series number. The series number can be found on the product nameplate label, along with all required approval
markings and information. When requesting compliance information for this product, always refer to the series number.
The series number should not be confused with the marking name or model number of the product.
This product designed and engineered in the USA.
Note on Labeling
Two symbols are used on the label.
V~ : AC Voltage
V : DC Voltage
200603172 93-2443 SmartPro update OM.qxd 5/16/2006 3:15 PM Page 8

Manual del propietario
1111 W. 35th Street Chicago, IL 60609 USA
Soporte al cliente: (773) 869-1234 • www.tripplite.com
Instrucciones de seguridad importantes 10
Instalación rápida 11
Operación básica 13
Almacenamiento y servicio 16
English
Copyright © 2006 Tripp Lite. Todos los derechos reservados. SmartPro®es una marca comercial registrada de Tripp Lite.
1
Reemplazo de batería 16
Instalación opcional 12
SmartPro®SLT
Sistema de UPS, Inteligentes y Interactivos en Línea
• 220/230/240V entrada/salida de onda sinusoidal
No conveniente para los usos móviles.
Français 17
Deutsch 25
PyccŞèé 33
200603172 93-2443 SmartPro update OM.qxd 5/16/2006 3:15 PM Page 9

10
Instrucciones de seguridad importantes
GUARDE ESTAS INSTRUCCIONES
Este manual contiene importantes instrucciones que deben seguirse durante la instalación, operación y el
almacenamiento de todos los UPS de Tripp Lite. La no observancia de estas advertencias anulará su garantía.
Advertencias sobre la ubicación del UPS
• Tenga cuidado al levantar el UPS.
• Instale su UPS bajo techo, lejos de la humedad, el calor, el polvo o la luz solar directa.
• Para un mejor funcionamiento, la temperatura ambiente cerca de su UPS debe estar entre 0° C y 40° C
(32° F - 104° F)
• Deje una cantidad adecuada de espacio alrededor de todos los lados del UPS para sua adecuada
ventilación. No obstruya sus respiraderos ni las aberturas de ventilación.
Advertencias sobre la conexión del UPS
• El UPS contiene su propia fuente de energía (batería) Los terminales de salida pueden estar con energía
incluso cuando el UPS no está conectado a un suministro de corriente alterna.
• Conecte su UPS a una toma de CA puesta a tierra apropiadamente. No modifique el enchufe del UPS en
ninguna forma que elimine su conexión a tierra. No use adaptadores que eliminen la conexión del UPS a tierra.
• No conecte el UPS a si mismo ya que podría dañarse y anular la garantía.
• Si va a conectar su UPS a un generador de corriente alterna accionado por un motor, el generador debe
suministrar una salida filtrada, con regulación por frecuencia grado computadora.
Advertencias sobre la conexión de equipos
• No utilice sistemas UPS de Tripp Lite para aplicaciones de soporte de vida en las que un funcionamiento
defectuoso o una falla del UPS pudiera causar un mal funcionamiento o una alteración importante en el
funcionamiento de un dispositivo de soporte de vida.
• No conecte supresores de sobretensiones ni cordones de extensión a la salida de su UPS. Esto puede
sobrecargarlo y anular su garantía y la del supresor de sobretensiones.
Advertencias sobre la batería
• Las baterías presentan un peligro de choque eléctrico y quemaduras debido a las altas corrientes de corto-
circuito. Observe las precauciones apropiadas. No deseche las baterías en un incinerador. No abra el UPS
ni las baterías. No ponga los terminales de la batería en corto o en puente con ningún objeto. Apague y
desconecte el UPS antes de reemplazar la batería. Use herramientas con mangos aislados. No hay piezas
que el usuario pueda reparar dentro del UPS. El reemplazo de baterías debe ser realizado solamente por
personal de servicio autorizado usando el mismo número y tipo de baterías (plomo-ácido, selladas). Las
baterías son reciclables. Consulte la reglamentación local para los requisitos de disposición de desechos.
Tripp Lite ofrece una línea completa de cartuchos de reemplazo de batería para UPS (R.B.C.) Visite la
página web de Tripp Lite en www.tripplite.com para localizar la batería de reemplazo específica para su
UPS.
200603172 93-2443 SmartPro update OM.qxd 5/16/2006 3:15 PM Page 10

11
Instalación rápida
Con el no-break desconectado de la
energía de la red, use una herramienta
pequeña para ajustar el conmutador DIP
de voltaje de modo que coincida con su
voltaje de entrada (El no-break está
prefijado a un valor de 230 V).
Introduzca un cordón de alimentación
suministrado por el usuario (con un
enchufe específico del país) en una
toma de entrada de CA del UPS.
Enchufe el cordón en una toma
de corriente alterna de la red.
NOTA! Después de conectar el UPS en una toma de corri-
ente alterna con energía, el equipo (en modo “Standby”)
cargará automáticamente sus baterías,* pero no suminis-
trará energía a sus salidas hasta que sea encendido.
* El único diodo o indicador iluminado sera el de recargo de batería.
Busque uno de los cables eléctricos
quevienen con el UPS. Inserte el
enchufehembra en la toma eléctrica de
entradaC.A.del ordenador.Inserte el
enchufemacho en cualquiera de los
receptácu-los de salida del UPS.
Enchufe su equipo en el UPS.
Repita el procedimiento 3 mencionado arriba usando los-
demás cables eléctricos que se adjuntaron con el UPS.
Su UPS ha sido diseñado para apoyar su equipo de ordenadoressolamente. Usted
sobrecargará el UPS si el total del índice de losvoltios/ amperios para todo el
equipo excede la capacidad de salidadel UPS (ver especificaciones). Para
averiguar el índice devoltios/amperios de su equipo, búsquelos en la placa del
fabricante.Siel equipo está enumerado en amperios, multiplique el número deam-
perios por 240 para determinar los voltios/amperios (Por ejemplo:1 amp x 240
= 240 voltios/amperios). Si no está seguro de habersobrecargado las tomas eléc-
tricas del UPS, vea la descripción sobreel indicador “NIVELDE SOBRECAR-
GADE SALIDA”.
Encienda el UPS.
Presione y mantenga presionado el botón “ON/OFF/
STANDBY”(Encendido/Apagado/Reserva) durante un
segundo. La alar-ma emitirá un pitido brevemente después de
pasado unsegundo. Suelte el botón.
1
2
3
4
5
230V
220V
240V
230V
1
5
2
3
4
240V
230V
220V
230V
SMX750SLT SMX1050SLT &
SMX1500SLT
200603172 93-2443 SmartPro update OM.qxd 5/16/2006 3:15 PM Page 11

12
Instalación opcional
Estas conexiones son opcionales. Su UPS funcionará correcta-
mente sin ellas.
Comunicaciones USB y serie RS-232
(todos los modelos)
Use el cable USB incluido (vea ) y/o el cable serie DB9
(vea ) para conectar el puerto de comunicaciones de su
computadora al puerto de comunicaciones de su UPS. Instale
en su computadora el software PowerAlert de Tripp Lite
apropiado para su sistema operativo.
Teléfono/gatos de conexión de red
Su UPS tiene conectores que lo protegen contra sobreten-
siones en la línea telefónica. Usando cordones adecuados
para teléfono o para red, conecte su conector de pared al
conector del UPS marcado “IN.” Cerciórese el equipo que
usted conecta a los gatos de UPS se protege también contra
oleadas en la línea de C.A.
No compatible con aplicaciones PoE (Energía sobre Ethernet).
1b
1a
1
2
1b
1a
2
200603172 93-2443 SmartPro update OM.qxd 5/16/2006 3:15 PM Page 12

13
Botón "ON/OFF/STANDBY" (Encendido/Apagado/Reserva)
• Para encender el UPS: Con el UPS conectado en una toma de CA con energía*, presione
y mantenga presionado el botón "ON/OFF/STANDBY" (Encendido/Apagado/Reserva)
por un segundo.** Suelte el botón. Si no hay energía de la red, puede "arrancar en frío" el
UPS (es decir, encenderlo y suministrar energía de sus baterías por un tiempo limitado***)
presionando y manteniendo presionado el botón "ON/OFF/STANDBY" (Encendido/
Apagado/Reserva) durante un segundo.**
• Para apagar el UPS: Con el UPS encendido y recibiendo energía de la red, presione y
mantenga presionado el botón "ON/OFF/STANDBY" (Encendido/Apagado/Reserva)
durante un segundo.** Luego desconecte el UPS de la toma de corriente. El UPS se
apagará.
* Después de conectar el UPS en una toma de CA con energía, el equipo (en modo "Standby") cargará automática-
mente sus baterías, pero no suministrará energía a sus salidas hasta que sea encendido. ** La alarma emitirá un piti-
do brevemente después de pasado el intervalo indicado. *** Si está completamente cargada.
Botón "MUTE/TEST" (SILENCIO/PRUEBA)
Para silenciar las alarmas UPS: Presione brevemente el botón MUTE/TEST (SILEN-
CIO/PRUEBA) y luego suéltelo.
Para ejecutar una auto-prueba: Con su UPS conectado y encendido, presione y mantenga
presionado el botón MUTE/TEST (Silencio/Prueba) por dos segundos.*Siga presionando el
botón hasta que la alarma suene varias veces y el UPS realice una auto-prueba. Vea
"Resultados de una auto-prueba" más abajo. Nota: Puede dejar equipos conectados durante
una auto-prueba. Sin embargo, el UPS, no realizará una auto-prueba si no está encendido
(vea la descripción del Botón "ON/OFF/STANDBY").
¡PRECAUCIÓN! No desconecte su UPS para probar sus baterías. Esto eliminaría la
conexión de seguridad a tierra y podría introducir una sobretensión dañina en sus
conexiones de red.
Resultados de una auto-prueba: La prueba durará cerca de 10 segundos mientras el
UPS conmuta a batería para probar su capacidad de carga y la recarga de la batería.
• Si el LED "OUTPUT LOAD LEVEL" (NIVEL DE CARGA DE SALIDA) per-
manece encendido rojo y la alarma continúa sonando después de la prueba, las sal-
idas del UPS están sobrecargadas. Para eliminar la sobrecarga, desconecte algo de
su equipo y ejecute la auto-prueba repetidamente hasta que el LED ya no esté
encendido rojo y la alarma ya no esté sonando.
¡PRECAUCIÓN! Cualquier sobrecarga que no sea corregida por el usuario
inmediatamente después de una auto-prueba puede causar que el UPS se
apague y deje de suministrar energía de salida en el caso de una falla del ser-
vicio eléctrico o una baja de voltaje.
• Si el LED "BATTERY WARNING" (ADVERTENCIA DE BATERÍA) sigue
encendido y la alarma continúa sonando después de la prueba, las baterías del UPS
deben recargarse o reemplazarse. Permita que el UPS se recargue continuamente
por 12 horas y repita la auto-prueba. Si el LED permanece encendido, contacte con
Tripp Lite para obtener servicio. Si su UPS requiere el reemplazo de su batería,
visite www.tripplite.com para localizar la batería de reemplazo Tripp Lite especí-
fica para su UPS.
* La alarma emitirá un pitido brevemente después de pasado el intervalo indicado.
Operación básica
Botones (Panel frontal)
200603172 93-2443 SmartPro update OM.qxd 5/16/2006 3:15 PM Page 13

14
14
Operación básica
(continúa)
Luces indicadoras (Panel frontal)
Todas las descripciones de luces indicadoras se aplican cuando el UPS está conectado en
un tomacorriente y encendido.
LED “POWER” (ALIMENTACIÓN): Este LED verde se enciende permanentemente
cuando el UPS está encendido y proporcionando energía de CA al equipo conectado desde
el suministro de red. El LED destella y una alarma suena (4 pitidos cortos seguidos de una
pausa) para indicar que el UPS está operando con sus baterías internas durante una falla
del servicio eléctrico o una severa baja de voltaje. Si la falla o la baja de voltaje es muy
prolongada, debe guardar sus archivos y apagar su equipo ya que la energía de la batería
interna finalmente se agotará. Vea la descripción del LED “BATTERY CHARGE”
(CARGA DE BATERÍA)
LED “VOLTAGE CORRECTION” (CORRECCIÓN DE VOLTAJE): Este LED
verde se enciende en forma permanente cuando el UPS está corrigiendo automáticamente
el voltaje de CA alto o bajo en la línea de la red sin la ayuda de energía de baterías. El
UPS también emitirá un ligero clic. Estas son operaciones normales y automáticas del
UPS y no requieren de ninguna acción de su parte.
LED “OUTPUT LOAD LEVEL” (NIVEL DE CARGA DE SALIDA): Este LED mul-
ticolor indica la carga eléctrica aproximada del equipo conectado a las salidas de CA del
UPS. Se encenderá desde verde (carga ligera) a amarillo (carga media) y a rojo (sobre-
carga) Si el LED está rojo (ya sea iluminado permanentemente o destellando), elimine la
sobrecarga de inmediato desconectando algo de su equipo de las salidas hasta que el LED
cambie de rojo a amarillo (o verde). ¡PRECAUCIÓN! Cualquier sobrecarga que no sea
corregida por el usuario inmediatamente puede causar que el UPS se apague y deje de
suministrar energía de salida en el caso de un falla del servicio eléctrico o una baja de voltaje.
LED “BATTERY CHARGE” (CARGA DE BATERÍA): Cuando el UPS opera con la
energía de la red, este LED indica el estado aproximado de carga de las baterías internas
del UPS; el rojo indica que las baterías están comenzando a cargarse; el amarillo indica
que las baterías están aproximadamente a media recarga; y el verde indica que las baterías
están totalmente cargadas. Cuando el UPS opera con energía de las baterías durante una
falla del servicio eléctrico o una baja de voltaje severa, este LED indica la cantidad aprox-
imada de energía (que a fin de cuentas afecta el tiempo de respaldo) que proporcionarán
las baterías del UPS; el rojo indica un bajo nivel de energía, el amarillo un nivel mediano
y el verde un nivel alto de energía. Ya que el rendimiento del tiempo de respaldo de todas
las baterías del UPS se reducirá gradualmente, se recomienda realizar una auto-prueba
periódicamente (vea la descripción del botón MUTE/TEST (SILENCIO/PRUEBA)) para
determinar el nivel de energía de las baterías de su UPS ANTES de que ocurra una falla
del servicio eléctrico o una baja de voltaje severa. Durante una falla prolongada o una severa
baja de voltaje, debe guardar sus archivos y apagar su equipo ya que la energía de baterías
se agotará finalmente. Cuando el LED se enciende rojo y una alarma suena en forma continua,
indica que las baterías del UPS están casi sin energía y es inminente que el UPS se apague.
LED “BATTERY WARNING” (ADVERTENCIA DE BATERÍA): Este LED se
enciende rojo y una alarma suena en forma intermitente después de iniciar una auto-prueba
(vea la descripción del botón “MUTE/TEST” (SILENCIO/PRUEBA)) para indicar que
las baterías del UPS deben ser recargadas o reemplazadas. Permita que el UPS se recargue
continuamente por 12 horas y repita la auto-prueba. Si el LED sigue encendido, contacte
con Tripp Lite para que le brinden servicio. Si su UPS requiere el reemplazo de su batería,
visite www.tripplite.com para localizar la batería de reemplazo Tripp Lite específica para
su UPS.
200603172 93-2443 SmartPro update OM.qxd 5/16/2006 3:15 PM Page 14

15
Operación básica
(continúa)
Otras funciones del UPS (Panel posterior)
Tomas de CA: Su UPS tiene salidas IEC-320-C13. Estas salidas proporcionan energía de la
línea de corrientealterna a suequipo conectado durante operación normal, y energía de baterías
durante fallasdel servicioeléctrico y bajas de voltaje. El UPS protege al equipo conectado a
estas tomas contrasobretensiones perjudiciales y ruido en la línea.
Puertos de comunicaciones (USB o RS-232): Estos puertos conectan su UPS a
cualquier estación de trabajo o servidor. Úselos con el software PowerAlert de Tripp Lite
y los cables incluidos para permitir que su computadora guarde automáticamente los
archivos abiertos y apague el equipo durante una falla del servicio eléctrico. También utilice
PowerAlert para vigilar una amplia variedad de condiciones de operación de la energía de
la línea de CA y del UPS. Consulte su manual de PowerAlert o contacte con el Soporte
al cliente de Tripp Lite para mayor información. Consulte “Comunicaciones USB y serie
RS-232” en la sección “Instalación opcional” para obtener la información sobre las
instrucciones de instalación.
Conectores de protección teléfono/red: Estos conectores protegen su equipo contra
sobretensiones a través de de teléfono/datos de red. La conexión de su equipo con estos
conectores es opcional. Su UPS funcionará correctamente sin esta conexión.
No compatible con aplicaciones PoE (Energía sobre Ethernet).
Conmutadores DIP de voltaje: Estos conmutadores le permiten fijar el no-break para
que coincida con el voltaje de entrada real. Si los conmutadores DIP de voltaje se fijan
por encima o por debajo del voltaje de entrada, el no-break interpretará la entrada como
un sobrevoltaje permanente o como una condición de bajo voltaje, y ajustará automática-
mente el voltaje de entrada para que coincida con el ajuste del conmutador DIP de volta-
je. Esto puede causar un desgaste constante e innecesario en el no-break.
Nota: Los conmutadores DIP de voltaje deben fijarse con el no-break apagado
(OFF) y desconectado de la alimentación de la red. Si los conmutadores se fijan
mientras el no-break está conectado para utilizar energía, el ajuste no entrará en
efecto.
Ranura auxiliar: Retire el pequeño panel de cubierta de esta ranura para instalar los
accesorios opcionales para vigilancia y control de su UPS en forma remota. Consulte el
manual de sus accesorios para instrucciones de instalación. Contacte con el Soporte al
cliente de Tripp Lite al (773) 869-1234 para mayor información, incluyendo una lista de
productos disponibles para SNMP, administración de red y conectividad.
Interruptor automático (SMX1500SLT): Protegen su circuito eléctrico contra sobrecar-
ga al UPS. Si uno de estos interruptores dispara, retire algo de carga y restablézcalo pre-
sionando el interruptor.
Ventilador: El ventilador enfría los componentes internos del UPS. Sólo opera cuando el
UPS está en modo de respaldo de batería, durante la carga de sus baterías o lleva una
carga pesada de electrical.
230V
220V
240V
230V
240V
230V
220V
230V
200603172 93-2443 SmartPro update OM.qxd 5/16/2006 3:15 PM Page 15

16
Almacenamiento y servicio
Almacenamiento
Antes de almacenar su UPS, apáguelo: Con el UPS encendido y recibiendo energía de la red, presione y man-
tenga presionado el botón “ON/OFF/STANDBY” (Encendido/Apagado/Reserva) por un segundo (una alarma
emitirá un pitido brevemente después de dicho intervalo); luego, desconecte el UPS del tomacorriente de pared.
Si va a almacenar su UPS por un tiempo prolongado, debe recargar sus baterías cada tres meses; para hacerlo,
conecte el UPS en un tomacorriente y deje que las baterías se carguen por 12 horas y luego desconecte el UPS
y guárdelo nuevamente. Nota: Después de conectar su UPS, automáticamente comenzará a cargar sus baterías,
pero no suministrará energía a sus salidas (vea la sección Instalación rápida) Si deja descargadas las baterías del
UPS durante un tiempo prolongado, sufrirán una pérdida de capacidad permanente.
Servicio
Antes de enviar su UPS para que le presten servicio, siga los siguientes pasos:
1. Verifique las instrucciones de instalación y operación en este manual para asegurarse que el problema de
servicio no sea causado por una mala interpretación de las instrucciones. Además, verifique que los inter-
ruptores automáticos del UPS no hayan sido disparados. Esta es la causa más común de pedidos de servicio
que pueden ser solucionados fácilmente siguiendo las instrucciones de restablecimiento en este manual.
2. Si el problema continúa, no contacte con el distribuidor ni devuelva el UPS. En su lugar, llame a Tripp Lite
al (773) 869-1233. Un técnico de servicio le pedirá el modelo, número de serie y fecha de compra del UPS
y tratará de resolver el problema a través del teléfono.
3. Si el problema requiere servicio, el técnico le emitirá un número de Autorización de devolución de mercadería
(RMA), necesario para que le presten servicio. Si requiere embalaje, el técnico puede hacer arreglos para
que le envíen el embalaje adecuado. Empaque el UPS firmemente para evitar daños durante el despacho. No
use camas de Styrofoam para embalaje. Cualquier daño (directo, indirecto, especial, accidental o resultante)
al UPS producido durante el despacho a Tripp Lite o a un centro autorizado de servicio Tripp Lite no está
cubierto por la garantía. Los sistemas UPS enviados a Tripp Lite o a algún centro de servicio autorizado de
Tripp Lite deben tener los cargos de transporte prepagados. Marque el número RMA en la parte externa del
paquete embalado. Si el UPS está dentro del período de garantía de 2 años, adjunte una copia de su recibo
de compra. Devuelva el UPS para servicio a la dirección dada por el técnico de Tripp Lite utilizando un
transportista asegurado.
Reemplazo de batería
Puerta de reemplazo de la batería: En condiciones normales, las baterías originales de este sistema UPS tienen
varios años de vida útil. Sólo deberá reemplazar la batería personal técnico calificado. Véase “Advertencias
sobre las baterías”, en la sección sobre seguridad. Si requiere reemplazar la batería de su
UPS, visite Tripp Lite en la web en www.tripplite.com/support/battery/index.cfm para
localizar la batería de reemplazo específica para su UPS.
Tire cuidadosamente del panel frontal, hacia afuera y
retirándolo del UPS.
Coloque el panel frontal en la parte superior del UPS. Desbloquee y baje la puerta
de la batería.
Quite las baterías viejas.
Tire con cuidado de las baterías del UPS y los desconecta.
Conecte las nuevas baterías
Conecte las nuevas baterías en la misma forma que las antiguas, es decir, conectores
positivos (rojos) juntos y terminales negativos (negros) juntos. Empuje con cuidado
la espalda nueva de baterías en el UPS
Reassemble UPS.
Reemplace la barra de apoyo de batería y el entrepaño anterior.
1
2
3
1
2
3
4
Cumplimiento de las normas de los números de identificación
Para fines de identificación y certificación del cumplimiento de las normas, su producto Tripp Lite tiene asignado un número de serie único. Puede
encontrar el número de serie en la etiqueta de la placa de identificación del producto, junto con los símbolos de aprobación e información requeri-
dos. Al solicitar información sobre el cumplimiento de las normas para este producto, siempre mencione el número de serie. El número de serie
no debe ser confundido con el nombre de identificación ni con el número de modelo del producto.
Este producto ha sido creado y diseqado en EE.UU.
Nota sobre el rotulado
Se usan dos símbolos en la etiqueta.
V~ : Voltaje CA
V : Voltaje CC
200603172 93-2443 SmartPro update OM.qxd 5/16/2006 3:15 PM Page 16

Manuel du propriétaire
1111 W. 35th Street Chicago, IL 60609 É.-U.
Service à la clientèle (773) 869-1234 • www.tripplite.com
Directives de sécurité importantes 18
Installation rapide 19
Fonctionnement de base 21
Entreposage et service 24
English
Copyright © 2006 Tripp Lite. Tous droits réservés. SmartPro® est une marque de commerce enregistrée de Tripp Lite.
1
Remplacement de batterie 24
Español 9
Installation en option 20
SmartPro®SLT
Systémes UPS intelligent, en attente active
• 220/230/240V entrée/sortie onde sinusoïdale
Non approprié aux applications mobiles.
Deutsch 25
PyccŞèé 33
200603172 93-2443 SmartPro update OM.qxd 5/16/2006 3:15 PM Page 17

Directives de sécurité importantes
CONSERVER CES DIRECTIVES
Ce manuel contient des directives importantes que vous devez respecter durant l'installation, l'utilisation et l'en-
treposage de tous les systèmes UPS Tripp Lite. Ne pas tenir compte de ces mises en garde entraînera l'annulation
de la garantie.
Mises en garde : Emplacement de l'UPS
• Faire attention en soulevant l'UPS.
• Installer votre UPS à l'intérieur, à l'abri de l'humidité ou de la chaleur excessives, de la poussière et de la
lumière directe du soleil.
• Pour une meilleure performance, la température ambiante autour de votre UPS doit se situer entre 0° C et
40° C (entre 32° F et 104° F).
• Maintenez un dégagement adéquat autour de l'UPS pour garantir une bonne circulation d'air. Ne pas
obstruer ses évents ou ses ouvertures de ventilateur.
Mises en garde : Connexions de l'UPS
• L'UPS comprend sa propre source d'énergie (batterie). Les bornes de sortie pourraient être alimentées
même quand l'UPS n'est pas branché sur le secteur.
• Brancher votre UPS directement à une prise de secteur correctement mise à la terre. Ne pas modifier la
fiche de l'UPS en éliminant la mise à la terre de sa connexion. Ne pas utiliser d'adaptateur qui élimine la
mise à la terre de la connexion de l'UPS.
• Ne pas brancher l'UPS sur lui-même; cela l'endommagera et annulera votre garantie.
• Si vous branchez votre UPS sur une génératrice c.a., celle-ci doit fournir une sortie filtrée et à fréquence
régulée adéquate pour ordinateur.
Mises en garde : Connexion d'équipement
• Ne pas utiliser les systèmes UPS Tripp Lite dans les applications médicales de survie où un mauvais
fonctionnement ou une panne d'un système UPS Tripp Lite peuvent entraîner une panne de l'équipement
médical de survie ou altérer sa performance de façon importante.
• Ne pas brancher d'éliminateurs de surtension ou de cordon prolongateur à la sortie de votre UPS. Cela
pourrait surcharger l'UPS et annuler les garantie de l'éliminateur de surtension et de l'UPS.
Mises en garde : Batterie
• Les batteries peuvent présenter un risque de choc électrique et brûlures dues au courant élevé de court-
circuit. Prenez les précautions nécessaires. Ne pas jeter les batteries au feu. Ne pas ouvrir l'UPS ou les
batteries.Ne pas établir de court-circuit ou de pont entre les bornes de la batterie avec un quelconque
objet. Débrancher et éteindre l'UPS avant de remplacer la batterie. Utiliser des outils avec des poignées
isolées. Aucune pièce interne de l'UPS ne peut être réparée par l'utilisateur. Seul le personnel de service
autorisé peut remplacer les batteries par des batteries du même numéro et du même type (batterie sans
entretien). Les batteries sont recyclables. Consulter les codes locaux pour les exigences d'élimination des
déchets. Tripp Lite offre une gamme complète de cartouches de batterie de remplacement de système UPS
(R.B.C.). Rendez visite à Tripp Lite sur le Web à www.tripplite.com pour trouver la batterie de
remplacement spécifique pour votre UPS.
18
200603172 93-2443 SmartPro update OM.qxd 5/16/2006 3:15 PM Page 18

19
Installation rapide
L'onduleur UPS étant déconnecté du
courant de secteur, utiliser un petit outil
pour régler les commutateurs DIP de
tension à votre tension d'entrée
(l'onduleur est préréglé à 230 v.)
Brancher un cordon d'alimentation
fourni par l'utilisateur (avec une fiche
spécifique au pays) dans la prise
d'entrée CA de l'onduleur. Brancher le
cordon dans une prise murale CA.
REMARQUE! Après le branchement de l'UPS dans une
prise de secteur, l'UPS (en mode " Standby [attente] ")
mettra automatiquement ses batteries en charge, * mais
ne fournira pas de courant à ses prises tant qu'il ne sera
pas mis sur ON.
* Le Voyant DEL BATTERY CHARGE (charge de la batterie) sera le seul voy-
ant alluméé.
Trouver l'un des cordons d'alimenta-
tionaccompagnant le système d'alimen-
tationcontinue sans coupure. Insérer
laprise femelle du cordon dans l'entrée
CAde l'ordinateur.Insérer la prise mâle
ducordon dans l'une quelconque des
fich-es femelles de sortie du système
d'ali-mentation continue sans coupure.
Brancher votre équipement au
systèmed'alimentation continue sans
coupure.
Brancher votre équipement au système d'alimentation con-
tinuesans coupure. Répéter la procédure 3 ci-dessus en util-
isantle(s) cordons(s) accompagnant le système d'alimenta-
tion con-tinue sans coupure.
Votre système d'alimentation continue sans coupure est conçu poursupporter un
équipement informatique uniquement. Vous surchargerezle système d'alimenta-
tion continue sans coupure si les valeurs nomi-nales VApour tout l'équipement
que vous connectez dépasse laCapacité de Sortie du système d'alimentation con-
tinue sans coupure(voir Spécifications). Pour trouver les valeurs nominales VAde
votreéquipement, consulter leurs plaques d'identification. Si l'équipementest
indiqué en amps, multiplier le nombre de amps par 240 pour déter-miner la VA.
(Exemple : 1 amp x 240 = 240 VA). Si vous ne savez passi vous avez surchargé
les sorties du système d'alimentation continuesans coupure, voir la description de
la LED « NIVEAU DE CHARGEDE SORTIE ».
Mettre le système d'alimentation
continue sans coupure sous tension.
Appuyer sur le bouton “ ON/OFF/STANDBY” et le main-
tenir pendant une seconde. L'alarme bippera une fois briève-
ment après une seconde. Relâcher le bouton.
1
2
3
4
5
230V
220V
240V
230V
1
5
2
3
4
240V
230V
220V
230V
SMX750SLT SMX1050SLT &
SMX1500SLT
200603172 93-2443 SmartPro update OM.qxd 5/16/2006 3:15 PM Page 19

20
Installation en option
Ces connexions sont optionnelles. Votre UPS fonctionnera cor-
rectement sans ces connexions.
Ports de communication de série USB
et RS-232 (tous les modèles)
Utiliser le câble USB inclus (voir ) et/ou le câble de série
DB9 (voir ) pour brancher le port de communication de
votre ordinateur au port de communication de votre UPS.
Installer sur votre ordinateur le logiciel PowerAlert de Tripp Lite
approprié au système d'opération de votre ordinateur.
Téléphoner/Crics de Protection
de Réseau
Votre UPS est doté de prises qui protègent des surtensions de
lignes téléphoniques. Avec les fils de téléphone ou fils
réseaux appropriés, branchez votre prise murale à la prise
UPS marquée “IN” (entrée). Assurer que l'équipement que
vous connectez aux crics d'UPS est aussi protégé contre bon-
dit sur la ligne de courant alternatif.
Non compatible avec les ports Ethernet alimentés en courant.
1b
1a
1
2
1b
1a
2
200603172 93-2443 SmartPro update OM.qxd 5/16/2006 3:15 PM Page 20
/