AEG Electrolux COMPETENCE KB9800E User manual

Category
Ovens
Type
User manual

This manual is also suitable for

KB9800E
User manual Electric built-in oven
Dear Customer
Thank you for choosing one of our high-quality products.
With this appliance you will experience the perfect combination of functional
design and cutting edge technology.
Convince yourself that our appliances are engineered to deliver the best
performance and control - indeed we are setting the highest standards of
excellence.
In addition to this you find environmental and energy saving aspects as an integral
part of our products.
To ensure optimal and regular performance of your appliance please read this
instruction manual carefully. It will enable you to navigate all processes perfectly
and most efficiently. To refer to this manual any time you need to, we recommend
you to keep it in a safe place. And please pass it to any future owner of the appliance.
We wish you much joy with your new appliance.
The following symbols are used in this user manual:
Important information concerning your personal safety and information on how
to avoid damaging the appliance.
General information and tips
Environmental information
2
Contents
Operating instructions 6
Safety information 6
Electrical safety 6
Children's safety 6
Safety during use 6
How to avoid damage to the appliance 7
Description of the appliance 8
General view 8
Control panel 9
Oven layout 9
Accessories Oven 10
Before using for the first time 10
Setting and changing the time 10
Cleaning for the first time 11
Getting to know the appliance 12
Operating the oven 12
The electronic oven controls 12
The display field 12
The control panel 13
Selecting the oven function 14
Changing the oven temperature 14
Thermometer symbol 14
Changing the oven function 15
Switching the oven off 15
Fast Warm Up 15
Oven Functions 16
Inserting the oven shelf and baking tray 16
Grease filter Inserting/Removing the 17
Additional functions 17
Baking and Roasting Programmes 17
Memory function 18
Clock functions 19
Countdown 20
Cook Time 21
Contents
3
315 7850 13-D-30062007
End Time 22
Cook Time and End Time combined 23
Other functions 24
Switching off the display 24
Child safety device 25
Button Beep 26
The oven's automatic switch-off 26
Usage, Tables and Tips 26
Baking 26
General instructions 27
Baking Table 28
Tips on baking 30
Bakes and Gratins Table 31
Frozen Ready Meals Table 31
Roasting 32
Roasting Table 32
Low temperature cooking 34
Low Temperature Cooking Table 34
Single economy grill 35
Grilling Table 35
Rotitherm Roasting 36
Oven function: Rotitherm Roasting 36
Defrosting 36
Defrosting Table 36
Drying 37
Making preserves 37
Preserves table 38
Programmed recipes 39
LEMON SPONGE CAKE 1000 G 39
QUARK MANDARIN SLICE 40
WHITE BREAD 600-800 G 41
ROLLS 40 G EACH (12-16) 42
PIZZA 42
QUICHE LORRAINE 43
POTATO GRATIN 44
FISH FILLET 45
SADDLE OF VEAL 45
LASAGNE 46
4
Contents
ROAST PORK 47
CHICKEN 1200 G 47
Cleaning and care 48
The outside of the appliance 48
Oven interior 48
Oven interior 49
Oven roof with catalytic self-cleaning surface 49
Accessories 49
Grease filter 50
Side rails 50
Removing the side rails 50
Replacing the side rails 51
Oven lighting 51
Oven door 52
Removing the oven door from its hinges 53
Hanging the oven door back on its hinges 53
What to do if... 54
Installation instructions 55
Safety information for the installer 55
Disposal 60
Guarantee/Customer Service 60
GREAT BRITAIN & IRELAND 60
European Guarantee 62
www.electrolux.com 63
Service 65
Subject to change without notice
Contents
5
315 7850 13-D-30062007
Operating instructions
Safety information
Important safety instructions
Read carefully and keep for future use.
Electrical safety
This appliance must only be connected by a qualified installation engineer.
In the event of a fault or damage to the appliance: Take the fuses out or switch
off.
Repairs to the appliance must only be carried out by qualified service en-
gineers. Considerable danger may result from improper repairs. If repairs
become necessary, please contact our Customer Care Department or your dealer.
Children's safety
Never leave children unsupervised while the appliance is operating.
This appliance is fitted with a child safety device.
Safety during use
This appliance should be used only for normal domestic cooking, roasting and
baking of food.
Be careful if connecting electrical appliances to sockets near to this appliance.
Electrical leads must not be caught under the hot oven door.
Warning: Risk of burns! The interior surfaces of the oven become very hot
during use.
If you use ingredients containing alcohol in the oven, a slightly flammable mix-
ture of alcohol and air may ensue. In this case, be careful when opening the
door. Do not handle any sources of heat, sparks or naked flames when doing so.
People (including children), who because of their physical, sensory or mental
capabilities or their inexperience or ignorance, are not able to use the appliance
safely, should not use this appliance without supervision by or instruction from
a responsible person.
6
Safety information
Information on acrylamides
According to the latest scientific studies, intensive browning of food, especially in
products containing starch, can constitute a health risk due to acrylamides. There-
fore we recommend cooking at the lowest possible temperatures and not browning
foods too much.
How to avoid damage to the appliance
Do not line the oven with aluminium foil and do not place baking trays, pots,
etc. on the oven floor, as the heat that builds up will damage the oven enamel.
Fruit juices dripping from the baking tray will leave stains, which you will not
be able to remove. For very moist cakes, use a deep tray.
Do not put any strain on the oven door when open.
Never pour water directly into the oven when it is hot. This could cause damage
to and discoloration of the enamel.
Rough handling, especially around the edges of the front panel, can cause the
glass to break.
Do not store any flammable materials inside the oven. These could ignite when
the oven is switched on.
Do not store any moist foods inside the oven. This could cause damage to the
enamel.
Do not leave dishes uncovered in the oven after switching off the cooling fan.
Moisture may form inside the oven or on the glass door and also get onto the
units.
Information on the oven enamel
Changes to the colour of the oven's enamel surface as a result of use do not affect
the appliance's operation. correct use. They therefore do not constitute a defect in
terms of warranty law.
Safety information
7
Description of the appliance
General view
1
2
3
1 Control panel
2 Door handle
3 Full glass door
8
Description of the appliance
Control panel
1
2
1 Oven displays
2 Oven functions buttons
Oven layout
1
2
3
4
5
6
1
2
3
4
1 Grill heating element
Description of the appliance
9
2 Oven lighting
3 Grease filter
4 Rear wall heating element fan
5 Side rails, removable
6 Oven shelf levels
Accessories Oven
Oven shelf
For cookware, cake tins, roasts and grilling
food.
Baking tray
For cakes and biscuits.
Before using for the first time
Setting and changing the time
The oven only operates when the time has been set.
When the appliance has been connected to
the electrical supply or when there has been
a power cut, the symbol for the time
automatically flashes.
1. To change a time that has already been
set, press the clock functions button
repeatedly until the symbol for the time
flashes.
10
Before using for the first time
2. Using the or button, set the
current time.
After approx. 5 seconds, the flashing stops
and the clock displays the time set.
The appliance is now ready to use.
The time can only be modified, if the child
safety device is deactivated, none of the clock
functions Countdown
, Cook Time or
End Time
and none of the oven functions
are set.
Cleaning for the first time
Before you use the appliance for the first time, you should clean it thoroughly.
Do not use any sharp or abrasive cleaning tools or materials. These could damage
the surface.
For metal fronts, use normal commercially available cleaning agents.
1. Open the oven door.
The lighting in the oven is switched on.
2. Remove all accessories and side rails and clean with a warm solution of water
and washing-up liquid.
3. Also wipe the oven out with a warm solution of water and washing-up liquid
and then dry it.
4. Wipe the front of the appliance with a damp cloth.
Before using for the first time
11
Getting to know the appliance
The appliance can be operated in test mode to test or demonstrate all operating
steps. The oven does not heat up.
Test mode Switching on
1.
Switch the appliance off using the On/Off
button
.
2. Press and hold the Baking/Roasting Pro-
grammes buttons
and at the same
time until a signal sounds and "d" lights
up in the display.
Switching test mode off
1.
Switch the appliance off using the On/Off
button
.
2. Press and hold the Baking/Roasting Programmes buttons
and at the
same time until a signal sounds and "d" goes out in the display.
Operating the oven
The electronic oven controls
The display field
1
2
3
456
1 Memory: P / Test: d
12
Operating the oven Oven Operation
2 Temperature/Time
3 Clock functions/Operating time
4 Thermometer symbol
5 Baking/Roasting Programmes
6 Oven functions
The control panel
1
2 3
6
5 4
1 On/Off
2 Baking/Roasting Programmes
3 button +/-
4 Clock functions
5 Fast heating
6 Oven function selection
General instructions
Always switch appliance on first by pressing the On/Off button
.
When the selected function is lit, the oven begins to heat up or the time set
begins to count down.
When the selected temperature is reached, a signal sounds.
Operating the oven Oven Operation
13
The oven light is switched on as soon as an oven function is started or the oven
door is opened.
The oven light goes off after 10 minutes when the door is open and the appliance
switched off.
Switch the appliance off using the On/Off button
.
Selecting the oven function
1. Switch the appliance on using the On/Off button .
2. Press the
or button repeatedly
until the desired oven function ap-
pears.
A suggested temperature appears in
the temperature display.
If the suggested temperature is not
changed within approx. 5 seconds, the
oven begins to heat up.
Changing the oven temperature
Press the or button to raise or lower
the temperature.
The setting changes in 5 °C steps.
Thermometer symbol
The slowly rising thermometer symbol indicates how far the oven has heated
up.
The three segments of the thermometer symbol
flashing one after the other
show that Fast Warm Up is on.
14
Operating the oven Oven Operation
Changing the oven function
To change the oven function, press the
or button repeatedly until the desired
oven function is displayed.
Switching the oven off
Switch the appliance off using the On/Off
button
.
Cooling fan
The fan switches on automatically to keep the
appliance surfaces cool. When the oven is
switched off, the fan continues to run to cool
the appliance down and then switches itself
off.
Fast Warm Up
After an oven function has been selected, the empty oven can be pre-heated in a
relatively short time using the additional function Fast Warm Up.
CAUTION!
Please do not put the food to be cooked into the oven, until Fast Warm Up is
completed and the oven is operating using the desired function.
1. Set desired oven function. If necessary, change the suggested temperature.
2. Press the Fast Warm Up button
. The symbol lights up. When the bars
flash one after the other it shows that Fast Warm Up is operating.
When the temperature set is reached, the bars of the heat indicator are lit. A signal
sounds. The symbol
goes out.
The oven now continues heating according to the pre-set oven function and
temperature. You can now place the food in the oven.
Operating the oven Oven Operation
15
Oven Functions
Oven function Application
Ventitherm ® Fan
Operated Cooking
For roasting and baking on up to two oven levels at the
same time.
Rotitherm Roasting For roasting larger pieces of meat or poultry on one oven
level. The function is also suitable for gratinating and
browning the top of dishes.
Single Economy Grill For grilling flat foodstuffs and for toasting.
Defrost/Drying For defrosting and drying herbs, fruit or vegetables.
Low Temperature
Cooking
For preparing particularly tender, succulent roasts.
Inserting the oven shelf and baking tray
Shelf runner safety and anti-tip device
To increase shelf runner safety, all insertable components have a small curved
indentation at the bottom on the right and left-hand edge.
Always insert insertable components so that this indentation is at the back of the
oven interior. This indentation is also important for preventing the insertable com-
ponents from tipping.
Baking tray Inserting the :
Push the baking tray between the guide bars
of the selected oven level.
16
Operating the oven Oven Operation
Oven shelf
Insert the oven shelf so that the feet point
downwards.
Push the oven shelf between the guide bars
of the selected oven level.
The high rim around the oven shelf is an
additional device to prevent cookware from
slipping off.
Grease filter Inserting/Removing the
Only use the grease filter when roasting
to protect the rear heating elements from fat
splashes.
Inserting the grease filter
Hold the grease filter by the tab and insert
the two mounts downwards into the open-
ing on the rear wall of the oven (fan open-
ing).
Removing the grease filter
Hold the grease filter by the tab, unhook it
and lift out.
Additional functions
Baking and Roasting Programmes
Use the pre-set recipes for this function.
Selecting a programme
Operating the oven Oven Operation
17
1. Switch the oven on using the On/Off
button
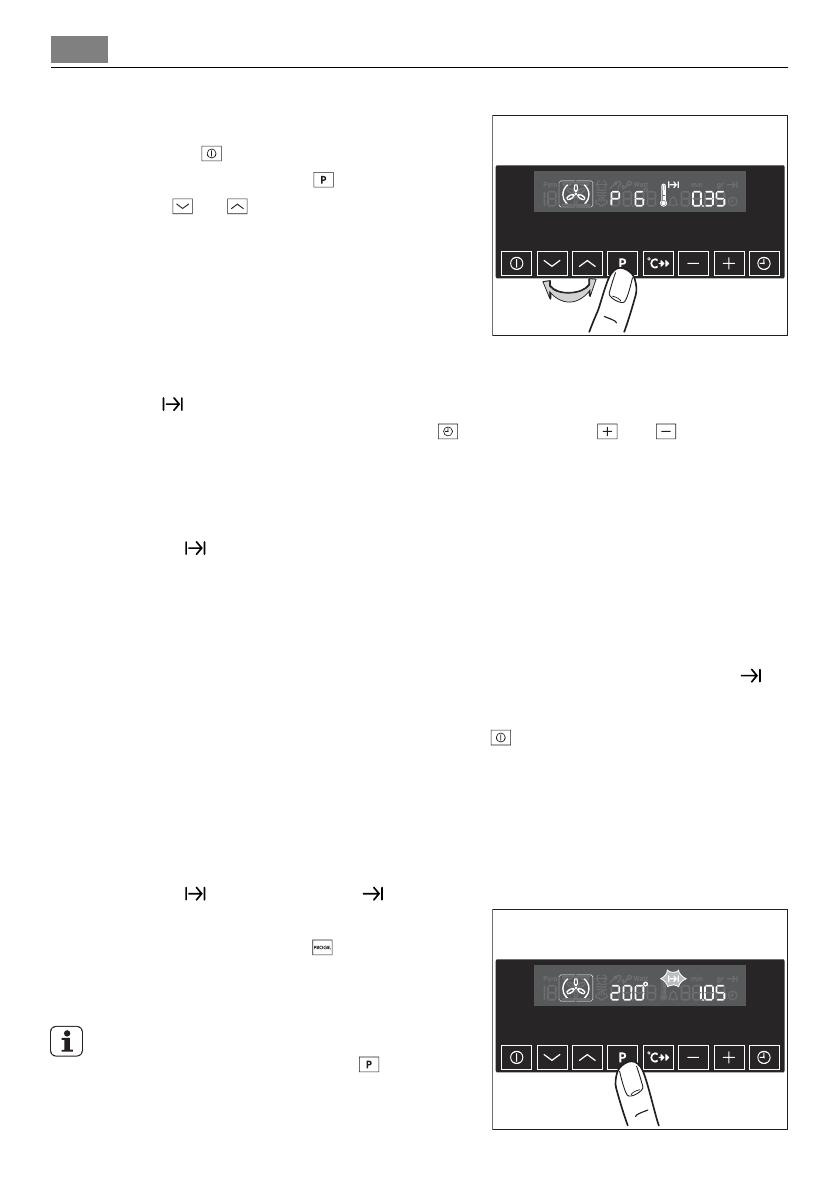
. Press the Baking/Roasting
Programmes button
,then press
the
or button repeatedly, until
the desired programme appears in
the display (P1 to P12).
The symbol for the corresponding
oven function appears in the func-
tion display.
The cooking time appears in the clock display, the symbol for Cook Time
lights up.
Press the clock functions button
, then press the or button to
change the cook time.
After approx. 5 seconds, the oven switches itself on.
2. When the time has elapsed, a signal sounds for 2 minutes. The symbol for Cook
Time
flashes.
The oven switches itself off.
3. The signal can be stopped by pressing any button.
Delaying the start
The start of the cooking time can be delayed (see Clock Functions End Time
).
Ending cooking time early
Switch the oven off using the On/Off button
.
Memory function
The Memory function can be used to save one setting which is used very frequently.
1. Set oven function, temperature and, if necessary, the clock functions Cook
Time
and/or End Time .
2. Press and hold the Baking/Roasting
Programmes button
for approx. 2
seconds until a signal sounds. The
setting is saved.
To save another setting, press the Baking/
Roasting Programmes button
for ap-
prox. 2 seconds. The previously saved set-
ting is replaced by the new one.
18
Operating the oven Oven Operation
Starting the Memory function
1. Switch the oven on using the On/Off but-
ton
.
2. Use the Baking/Roasting Programmes
button
to call up the saved setting.
Clock functions
1
2
3
4
5
6
1 Clock functions
2 Clock displays
3 Time
4 Cook Time/End Time/Operating Time
5 Clock functions
6 Selector buttons
Countdown
To set a countdown. When it has counted down, a signal sounds.
Operating the oven Oven Operation
19
This function has no effect on the operation of the oven.
Cook Time
To set how long the oven is to operate.
End Time
For setting when the oven is to switch itself off again.
Time
To set, change or find out the time (see section Before using for the first time)
General instructions
After a clock function has been selected, the corresponding symbol flashes for
about 5 seconds. During this period, the desired times can be set or modified
using the
or button.
When the desired time has been set, the symbol continues to flash for approx.
5 seconds. After this the symbol lights up. The set Countdown
begins to count
down.
The time set for Cook Time
and End Time begins to count down after the
selected function starts.
Countdown
1. Press the clock functions button
repeatedly until the symbol for
Countdown
flashes.
20
Operating the oven Oven Operation
  • Page 1 1
  • Page 2 2
  • Page 3 3
  • Page 4 4
  • Page 5 5
  • Page 6 6
  • Page 7 7
  • Page 8 8
  • Page 9 9
  • Page 10 10
  • Page 11 11
  • Page 12 12
  • Page 13 13
  • Page 14 14
  • Page 15 15
  • Page 16 16
  • Page 17 17
  • Page 18 18
  • Page 19 19
  • Page 20 20
  • Page 21 21
  • Page 22 22
  • Page 23 23
  • Page 24 24
  • Page 25 25
  • Page 26 26
  • Page 27 27
  • Page 28 28
  • Page 29 29
  • Page 30 30
  • Page 31 31
  • Page 32 32
  • Page 33 33
  • Page 34 34
  • Page 35 35
  • Page 36 36
  • Page 37 37
  • Page 38 38
  • Page 39 39
  • Page 40 40
  • Page 41 41
  • Page 42 42
  • Page 43 43
  • Page 44 44
  • Page 45 45
  • Page 46 46
  • Page 47 47
  • Page 48 48
  • Page 49 49
  • Page 50 50
  • Page 51 51
  • Page 52 52
  • Page 53 53
  • Page 54 54
  • Page 55 55
  • Page 56 56
  • Page 57 57
  • Page 58 58
  • Page 59 59
  • Page 60 60
  • Page 61 61
  • Page 62 62
  • Page 63 63
  • Page 64 64
  • Page 65 65
  • Page 66 66
  • Page 67 67
  • Page 68 68

AEG Electrolux COMPETENCE KB9800E User manual

Category
Ovens
Type
User manual
This manual is also suitable for

Ask a question and I''ll find the answer in the document

Finding information in a document is now easier with AI