Whirlpool AMW 503/IX User guide
- Category
- Microwaves
- Type
- User guide
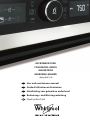
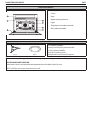
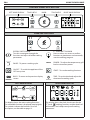
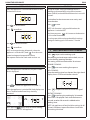
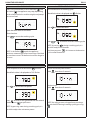
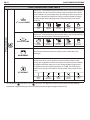
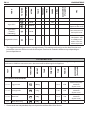
Whirlpool AMW 503/IX microwave offers a range of features to simplify your cooking. It has a user-friendly control panel with knob and touch interface, allowing for precise selection of cooking functions, power levels, and duration. The microwave also includes pre-programmed settings for various food categories, making it easy to cook a variety of meals. Additionally, it has a defrost function for quickly and safely thawing frozen foods.
Whirlpool AMW 503/IX microwave offers a range of features to simplify your cooking. It has a user-friendly control panel with knob and touch interface, allowing for precise selection of cooking functions, power levels, and duration. The microwave also includes pre-programmed settings for various food categories, making it easy to cook a variety of meals. Additionally, it has a defrost function for quickly and safely thawing frozen foods.


-
 1
1
-
 2
2
-
 3
3
-
 4
4
-
 5
5
-
 6
6
-
 7
7
-
 8
8
-
 9
9
-
 10
10
-
 11
11
-
 12
12
-
 13
13
-
 14
14
-
 15
15
-
 16
16
-
 17
17
-
 18
18
-
 19
19
-
 20
20


Whirlpool AMW 503/IX User guide
- Category
- Microwaves
- Type
- User guide
Whirlpool AMW 503/IX microwave offers a range of features to simplify your cooking. It has a user-friendly control panel with knob and touch interface, allowing for precise selection of cooking functions, power levels, and duration. The microwave also includes pre-programmed settings for various food categories, making it easy to cook a variety of meals. Additionally, it has a defrost function for quickly and safely thawing frozen foods.
Ask a question and I''ll find the answer in the document
Finding information in a document is now easier with AI
Related papers
-
Whirlpool AMW 494 IX User guide
-
-
Whirlpool EMDK7 CT638 PT Safety guide
-
Whirlpool AMW 503/IX User guide
-
-
-
-
Whirlpool AMW 506/SD User guide
-
-
