Page is loading ...
Page is loading ...
Page is loading ...

4
INHALT
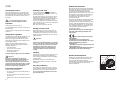
Warnungen und wichtige Hinweise . . . . . . . . . . . . . . . . . . . . . . . . . . . . . . . . . . . . . . . . . . . . . . . . . . . . . . . .2
Hinweise zur Verpackungsentsorgung . . . . . . . . . . . . . . . . . . . . . . . . . . . . . . . . . . . . . . . . . . . . . . . . . . . . .3
Gebrauch / Reinigung der Innenteile - Inbetriebnahme - Temperaturregelung - Hinweise zum richtigen . . .
KŸhlen - Einfrieren von frischen Lebensmitteln - Aufbewahrung der TiefkŸhlkost - EiswŸrfelbereitung - . . . . .
Auftauen . . . . . . . . . . . . . . . . . . . . . . . . . . . . . . . . . . . . . . . . . . . . . . . . . . . . . . . . . . . . . . . . . . . . . . . . . . . . . . .5
Gebrauch / Hšhenverstellbare Abstellregale - Hšhenverstellung der TŸrablage . . . . . . . . . . . . . . . . . . . . . . .6
Tips - Tips fŸr KŸhlen - Tips fŸr das Einfrieren - Tips fŸr TiefkŸhlkost . . . . . . . . . . . . . . . . . . . . . . . . . . . . . . .7
Wartung / RegelmŠ§ige Reinigung - Stillstandzeiten - Innenbeleuchtung . . . . . . . . . . . . . . . . . . . . . . . . . . . .8
Wartung / Abtauen - Stšrungen . . . . . . . . . . . . . . . . . . . . . . . . . . . . . . . . . . . . . . . . . . . . . . . . . . . . . . . . . . . .9
Teschnische Daten / Installation / Aufstellung . . . . . . . . . . . . . . . . . . . . . . . . . . . . . . . . . . . . . . . . . . . . . . . .10
Installation / Elektrischer Anschlu§ - Hintere AbstandstŸcke . . . . . . . . . . . . . . . . . . . . . . . . . . . . . . . . . . . . .11
Installation / TŸranschlagwechsel - Anschlagwechsel VerdampferfachtŸr . . . . . . . . . . . . . . . . . . . . . . . . . . . .12
61
D737
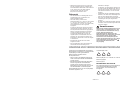
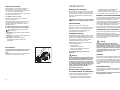
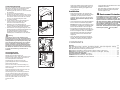
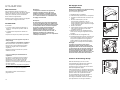
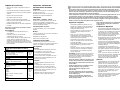
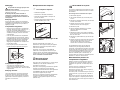
Door reversibility
1. Unplug the appliance from the power supply
before carrying out the below-mentioned
operations.
2. pull off the ventilation grille (D) which is clipped
into place;
3. remove the bottom hinge (E) by unscrewing its
fixing screws;
4. Remove the door by releasing it from the top
hinge pin (5).
5. Remove the pin (5) from the top hinge , then
mount these on the opposite side, after having
removed the plugs which must be refitted on the
other side.
6. Replace the door.
7. reassemble the lower hinge (E) on the opposite
side, using the screws previously removed; slide
the hole cover (F) out of the ventilation grille (D)
by pushing it in the direction of the arrow and
reassemble it on the opposite side;
8. refit the ventilation grille (D), clipping it into
place.
9. Dismantle the handle and reassemble it on the
opposite side. Cover the holes left open with the
plugs contained in the documentation pack.
Warning:
After having reversed the opening direction of
the doors check that all the screws are properly
tightened and that the magnetic seal adheres to
the cabinet. If the ambient temperature is cold
(i.e. in Winter), the gasket may not fit perfectly to
the cabinet. In that case, wait for the natural
fitting of the gasket or accelerate this process by
heating up the part involved with a normal
hairdrier.
5
D548
E
F
D
F
F
F
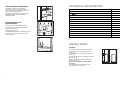
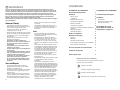
Inner door reversal
Using a screwdriver release bracket (1) by pressing
on the internal spring and withdraw it from its seat
together with the door;
1. remove plug (2) and fit it in the hole left open on
the opposite side;
2. turn the door through 180¡, remove the bracket
(1) and refit it on the opposite side.
3. Refit the door and insert the top pin and bottom
bracket (1), pushing it into place.
4. To ensure correct storage of food, the door is
fitted with a simple spring device which holds it in
the open position until it is properly closed.
PR140
1
2
180°
Page is loading ...

6
D338
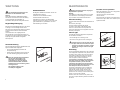
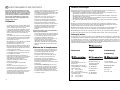
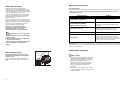
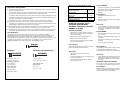
Hšhenverstellbare Abstellregale
Der Abstand zwischen den verschiedenen
Abstellregalen kann je nach Wunsch geŠndert
werden. Dazu die Regale herausnehmen und auf
das gewŸnschte Niveau einsetzen.
Zur besseren Raumnutzung kšnnen die vorderen
Halbteile der Ablagen auf die rŸckwŠrtigen
hinaufgelegt werden.
Hšhenverstellung der
InnentŸrablagen
Zur Einlagerung von Lebensmittel-Packungen
verschiedener Grš§e, sind die Abstellregale der
InnentŸr hšhenverstellbar.
Hierzu wie folgt vorgehen:
das Abstellregal stufenweise in Pfeilrichtung drŸcken
bis es frei wird; dann in der gewŸnschten Hšhe
wieder anbringen.
PR261
PR263
59
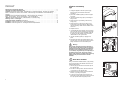
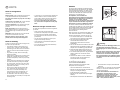
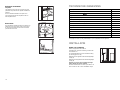
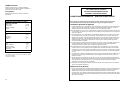
INSTALLATION
Location
The appliance should be installed well away from
sources of heat such as radiators, boilers, direct
sunlight etc.
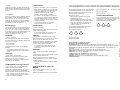
For safety reasons, minimum ventilation must be as
shown in Fig.
Appliance positioned under overhanging kitchen wall
units (see Fig. A).
Appliance positioned without overhanging kitchen
wall units (see Fig. B).
Attention: keep ventilation openings clear of
obstruction.
Two adjustable feet at the cabinet base allow
accurate levelling of the appliance.
100 mm10 mm
10 mm
A
B
NP006
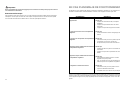
TECHNICAL INFORMATION
Energy Efficiency class A
199
17
0,52
190
2
14
1400
595
600
Net Fridge Capacity lt.
Energy Consumption kWh/24h
Energy Consumption kWh/year
Freezing Capacity kg
Rising time h
Net Capacity lt.
Dimensions mm
High
Width
Depth
The technical infomation are situated in the rating plate on the internal left side of the appliance .

7
Tips fŸr das Einfrieren
FŸr ein einwandfreies Einfrieren der Lebensmittel
geben wir folgende RatschlŠge:
¥ Das Gefriervermšgen des Gefrierabteils (in 24
Std.) kann auf dem Typenschild abgelesen
werden.
¥ Der Gefriervorgang dauert ca. 24 Stunden. In
dieser Zeit sollte keine zusŠtzliche Ware in das
Gefrierabteil eingelegt werden.
¥ Nur erstklassige, frische und gut gesŠuberte
Produkte einfrieren.
¥ Die Nahrungsmittel vor dem Einfrieren in kleine
Portionen einteilen, damit der Gefriervorgang
beschleunigt wird; dies ermšglicht das spŠtere
Auftauen von kleineren Portionen.
¥ Die Lebensmittel in Alu- oder PolyŠthylenfolien
luftdicht verpacken.
¥ Es soll vermieden werden, da§ die
einzufrierenden Lebensmittel mit den bereits
eingefrorenen in BerŸhrung kommen, um eine
WŠrmeŸbertragung an diese zu verhindern.
¥ Es ist zu beachten, da§ mageres Fleisch besser
und lŠnger haltbar ist. Fetthaltiges Fleisch hat
eine geringere Lagerzeit. Ferner reduziert Salz
die Haltbarkeitsdauer.
¥ Speiseeis, direkt aus dem Gefrierfach
genommen, kann KŠlte-Brandwunden
TIPS
Tips fŸr das KŸhlen
Nachstehend einige praktische RatschlŠge:
Fleisch (alle Sorten) in Plastikfolie einpacken und
auf die Glasplatte, die sich Ÿber der GemŸseschale
(Ÿber den GemŸseschalen) befindet, legen.
In dieser Lage kann das Fleisch lŠngstens 1-2
Tage aufbewahrt werden.
Gekochte Nahrungsmittel, kalte Platten, usw.
zugedeckt aufbewahren. Sie kšnnen auf jeden
beliebigen Rost gelegt werden.
Obst und GemŸse: nach vorherigem SŠubern und
Waschen in der GemŸseschale (in den
GemŸseschalen) aufbewahren.
Butter und KŠse: in speziellen BehŠltern aufbe-
wahren oder in Alu- bzw. Plastikfolie einpacken, um
den Kontakt mit der Luft zu vermeiden.
Milch in Flaschen: gut verschlossen auf die Konsol
der InnentŸr stellen.
Wenn Bananen, Kartoffeln, Zwiebeln und
Knoblauch nicht verpackt sind, sollen sie nicht
in den KŸhlschrank gegeben werden.
verursachen.
¥ Es ist empfehlenswert, auf der Verpackung das
Einfrierdatum zu notieren, damit die
Aufbewahrungszeit eingehalten werden kann.
¥ Auf der InnentŸr oder in einer Tabelle (falls diese
mitgeliefert wurde) sind einige Tier- und
Lebensmittelsymbole mit der in Monaten
(Zahlen) angegebenen Aufbewahrungsdauer
angebracht, die Ihnendie Haltbarkeit vom
Moment des Einfrierens an anzeigt.
¥ Es sollten keine kohlensŠurehaltigen
GetrŠnke in das Gefrierfach eingestellt
werden, da sie explodieren kšnnen.
Tips fŸr TiefkŸhlkost
Um optimale Leistungen des GerŠtes zu erhalten,
sich vergewissern,
¥ da§ die TiefkŸhlkost beim VerkŠufer gut
aufbewahrt wurde
¥ da§ der Transport vom VerkŠufer zum
Verbraucher in kurzer Zeit erfolgt.
¥ TŸr so wenig wie mšglich šffnen und nicht offen
lassen.
¥ Einmal aufgetaute Lebensmittel verderben
schnell und kšnnen kein ein zweites Mal
eingefroren werden.
¥ Das Haltbarkeitsdatum auf der
TiefkŸhlkostverpackung sollte nicht Ÿberschritten
werden.
58
CUSTOMER SERVICE AND SPARE PARTS
If the appliance is not functioning properly, check
that:
¥ the plug is firmly in the wall socket and the mains
power switch is on;
¥ there is an electricity supply (find out by plugging
in another appliance);
¥ the thermostat knob is in the correct position.
¥ If there are water drops on the bottom of the
cabinet, check that the defrost water drain
opening is not obstructed (see ÒDefrostingÓ
section).
¥ If your appliance is still not working properly after
making the above checks, contact the nearest
service centre.
To obtain fast service, it is essential that when you
apply for it you specify the model and serial number
of your appliance which can be found on the
guarantee certificate or on the rating plate located
inside the appliance, on the bottom left-hand side.
PR151
1. pull out the plug from the wall socket or turn the
thermostat knob to the ÇOÈ setting;
2. remove any stored food, wrap it in several layers
of newspaper and put it in a cool place;
3. leave the door open, place a basin on the top
shelf of the refrigerator compartment, under the
drain hole, remove the plug as shown in figure;
4. when defrosting is completed, dry the interior
thoroughly; refit the plug;
5. turn the thermostat knob back to the required
setting or replace the plug in the power socket;
6. after two or three hours, reload the previously
removed food into the compartment.
Important:
Never use sharp metal tools to scrape off frost
from the evaporator as you could damage it.
Do not use a maechanical device or any artificial
means to speed up the thawing process other
than those recommended by the manufacturer.
A temperature rise of the frozen food packs,
during defrosting, may shorten their safe
storage life.

8
WARTUNG
Vor jeder Reinigungsarbeit immer den
Netzstecker aus der Steckdose ziehen.
Achtung
Dieses GerŠt enthŠlt im KŠltekreislauf Kohlen-
wasserstoff. Aus diesem Grund darf die Wartung
und das NachfŸllen aussschlie§lich von
autorisiertem Fachpersonal durchgefŸhrt werden.
RegelmŠ§ige Reinigung
Benutzen Sie nie MetallgegenstŠnde um das GerŠt
zu reinigen, da es beschŠdigt werden kšnnte.
Den Innenraum mit lauwarmem Wasser und Natron
und die lackierten Teile mit einem Poliermittel
reinigen.
Gut nachwaschen und sorgfŠltig trocknen.
Den Kondensator und den Motorkompressor mit
einer BŸrste oder einem Staubsauger reinigen. Dies
begŸnstigt den guten Betrieb mit folglicher
Stromersparnis.
Stillstandszeiten
Bei lŠngerem Stillstand des GerŠtes, mŸssen Sie
folgenderma§en vorgehen:
den Stecker aus der Steckdose ziehen;
alle Lebensmittel herausnehmen;
GerŠt abtauen, Innenraum und Zubehšrteile
reinigen; die TŸren offen lassen, um im Innern eine
gute Luftzirkulation zu gewŠhrleisten und somit
Geruchsbildung zu vermeiden.
Innenbeleuchtung
Die Innenbeleuchtungslampe im KŸhlabteil ist durch
folgende Arbeitsschritte zugŠnglich:
¥ Lšsen Sie die Befestigungsschraube der
Lampenabdeckung.
¥ Heben Sie den beweglichen Teil ab, indem Sie
wie in der Abbildung gezeigt darauf drŸcken.
Sollte sich die Beleuchtung beim …ffnen
der TŸre nicht einschalten, ist zu
ŸberprŸfen, ob die GlŸhbirne fest
eingeschraubt ist; wenn die Stšrung
dennoch bestehen bleibt, die defekte
GlŸhbirne durch eine neue Birne gleicher
Leistung ersetzen.
Die maximale Leistung ist am
Leuchtkšrper angegeben.
D411
57
Defrosting
Frost is automatically eliminated from the evaporator
of the refrigerator compartment every time the motor
compressor stops, during normal use. The defrost
water drains out through a trough into a special
container at the back of the appliance, over the
motor compressor, where it evaporates.
It is important to periodically clean the defrost
water drain hole in the middle of the refrigerator
compartment channel to prevent the water
overflowing and dripping onto the food inside.
Use the special cleaner provided, which you will
find already inserted into the drain hole.
The freezer compartment, however, will become
progressively covered with frost. This should be
removed with a plastic scraper, whenever the
thickness of the frost exceeds 4 mm. During this
operation it is not necessary to switch off the power
supply or to remove the foodstuffs.
However, when the ice becomes very thick on the
inner liner, complete defrosting should be carried out
as follows:
D037
MAINTENANCE
Unplug the appliance before carrying out
any maintenance operation.
Warning
This appliance contains hydrocarbons in its cooling
unit; maintenance and recharging must therefore
only be carried out by authorized technicians.
Periodic cleaning
Clean the inside with warm water and bicarbonate of
soda.
Rinse and dry thoroughly.
Clean the condenser (black grill) and the
compressor at the back of the appliance with a
brush or a vacuum cleaner. This operation will
improve the performance of the appliance and save
electricity consumption.
Periods of non-operation
When the appliance is not in use for long periods,
take the following precautions:
remove the plug from the wall socket;
remove all food;
defrost and clean the interior and all accessories;
leave the door ajar to allow air to circulate to prevent
unpleasant smells.
Interior light
The light bulb inside the refrigerator compartment
can be reached as follows:
- unscrew the light cover securing screw.
- unhook the moving part as shown in the figure.
If the light does not come on when the door
is open, check that it is screwed into place
properly. If it still does not light up, change
the bulb. The rating is shown on the light
bulb cover.
D411

9
ST…RUNGEN
Falls das GerŠt Stšrungen aufweisen sollte,
ŸberprŸfen Sie zuerst folgendes:
¥ Steckt der Netzstecker in der Steckdose?
¥ Befindet sich der Hauptschalter der elektrischen
Anlage in der richtigen Stellung?
¥ Ist die Stromzufuhr unterbrochen?
¥ Befindet sich der Thermostatknopf in richtiger
Stellung?
¥ WasserpfŸtze auf dem Boden des KŸhlfaches:
¥ Abtauwasserloch verstopft? (siehe Abschnitt
ÒAbtauenÓ)
Sollten Sie nach o.e. PrŸfungen zu keinem Resultat
kommen, so wenden Sie sich bitte an unseren
nŠchsten Kundendienst.
Um ein rasches Beheben des Schadens zu
ermšglichen, ist es beim Anruf an den
Kundendienst notwendig, die Modell- und
Seriennummer anzugeben, die Sie dem
Garantieschein oder dem Typenschild (Ð linke
Seite Ð unten) entnehmen kšnnen.
Abtauen
Die sich auf dem Verdampfer des KŸhlschrankes
bildende Reifschicht taut jedesmal in den Stillstand-
zeiten des Motorkompressors von selbst ab. Das
Tauwasser lŠuft durch eine Rinne in eine Plastik-
schale auf der RŸckseite des GerŠtes (Ÿber dem
Kompressor) und verdunstet dort.
Wir empfehlen, das in der Mitte der
Abtauwasserrinne des KŸhlraumes befindliche
Ablaufloch fŸr das Abtauwasser regelmŠ§ig zu
reinigen, um zu vermeiden, da§ das
Abtauwasser auf die eingelagerten Lebensmittel
tropft. Verwenden Sie den dafŸr vorgesehenen
Reiniger,der sich schon im Ablaufloch befindet.
Die sich im Gefrierfach bildende Reifschicht soll,
sobald diese eine StŠrke von 4 mm erreicht hat, mit
einem Plastikschaber abgekratzt werden. WŠhrend
dieses Vorganges ist es nicht nštig, das GerŠt
auszuschalten und die Nahrungsmittel
herauszunehmen.
Wenn sich jedoch eine dicke Eisschicht bildet, mu§
man vollkommen abtauen. Um ein vollstŠndiges
Abtauen durchzufŸhren, geht man wie folgt vor:
1. Den Thermostatknopf auf ÇOÈ einstellen oder
den Stecker aus der Steckdose herausziehen.
2. Die eventuell im Frosterfach liegenden
Lebensmittel herausnehmen, sie in
Zeitungspapier einwickeln und sehr kŸhl
aufbewahren.
3. Die TŸr offen lassenund ein GefŠ§ auf der ersten
Ablage direkt unter das Ablaufloch stellen. Den
Stšpsel wie in der Abbildung gezeigt abheben.
4. Nach beendetem Abtauproze§ das Fach gut
trocknen und den Stšpsel wieder einstecken.
5. Den Thermostatknopf wieder in die gewŸnschte
Stellung drehen bzw. den Stecker wieder
einstecken.
6. Nachdem das GerŠt fŸr 2-3 Std. in Betrieb
genommen wurde, kšnnen tiefgefrorene
Lebensmittel darin zurŸckgelegt
D037
PR151
Achtung:
Benutzen Sie niemals MetallgegenstŠnde, um
die Reifschicht abzukratzen, damit eine
BeschŠdigungen des GerŠtes vermieden werden
kann.
Benutzen Sie kein mechanisches oder anderes
Mittel fŸr einen schnelleren Abtauproze§ mit
Ausnahme der vom Hersteller empfohlenen.
Ein Temperaturanstieg der TiefkŸhlkost wŠhrend
des Abtauens kšnnte die Aufbewahrungsdauer
verkŸrzen.
56
HINTS
Hints for refrigeration
Useful hints:
Meat (all types): wrap in polythene bags and place
on the glass shelf above the vegetable drawer.
For safety, store in this way only one or two days
at the most.
Cooked foods, cold dishes, etc..: these should be
covered and may be placed on any shelf.
Fruit and vegetables: these should be thoroughly
cleaned and placed in the special drawer(s)
provided.
Butter and cheese: these should be placed in
special airtight containers or wrapped in aluminium
foil or polythene bags to exclude as much air as
possible.
Milk bottles: these should have a cap and should
be stored in the bottle rack on the door.
Bananas, potatoes, onions and garlic, if not
packed, must not be kept in the refrigerator.
Hints for freezing
To help you make the most of the freezing process,
here are some important hints:
¥ the maximum quantity of food which can be
frozen in 24 hrs. is shown on the rating plate;
¥ the freezing process takes 24 hours. No further
food to be frozen should be added during this
period;
¥ only freeze top quality, fresh and thoroughly
cleaned, foodstuffs;
¥ prepare food in small portions to enable it to be
rapidly and completely frozen and to make it
possible subsequently to thaw only the quantity
required;
¥ wrap up the food in aluminium foil or polythene
and make sure that the packages are airtight;
¥ do not allow fresh, unfrozen food to touch food
which is already frozen, thus avoiding a rise in
temperature of the latter;
¥ lean foods store better and longer than fatty
ones; salt reduces the storage life of food;
¥ water ices, if consumed immediately after
removal from the freezer compartment, can
possibly cause the skin to be freeze burnt;
¥ it is advisable to show the freezing-in date on
each individual pack to enable you to keep tab of
the storage time;
¥ on the inner door or special card (if supplied) you
will find sketches of various animals and food
types together with the recommended storage
time (in months) from the time of freezing;
¥ do not put carbonated liquids (fizzy drinks,
etc.) in the freezer compartment as they may
burst.
Hints for storage of frozen food
To obtain the best performance from this appliance,
you should:
¥ make sure that the commercially frozen
foodstuffs were adequately stored by the retailer;
¥ be sure that frozen foodstuffs are transferred
from the foodstore to the freezer in the shortest
possible time;
¥ not open the door frequently or leave it open
longer than absolutely necessary.
¥ Once defrosted, food deteriorates rapidly and
cannot be refrozen.
¥ Do not exceed the storage period indicated by
the food manufacturer.

10
INSTALLATION
Aufstellung
Das GerŠt sollte nicht in der NŠhe von
WŠrmequellen wie Heizkšrpern oder …fen
aufgestellt und vor direkter Sonneneinstrahlung
geschŸtzt werden. Aus GrŸnden der Sicherheit mu§
eine MindestbelŸftung gesichert sein, wie aus der
Abb. hervorgeht.
Anordnung des GerŠtes unter den OberschrŠnken
der KŸche (siehe Abb. A).
Anordnung des GerŠtes ohne OberschrŠnke der
KŸche (siehe Abb. B).
Achtung: Die Ventilations - …ffnungen mŸssen
immer saubergehalten werden.
Die Nivellierung erfolgt durch Drehen der am
Unterteil des GerŠtes angebrachten
Nivellierf٤chen.
100 mm10 mm
10 mm
A
B
NP006
TECHNISCHE DATEN
Euro- Effizenz-Klasse A
199
17
0,52
190
2
14
1400
595
600
Nutzinhalt des KŸhlschrankes in Liter
Energieverbrauch in kWh/24h
Energieverbrauch in kWh/Jahr
Gefrierleistung kg/24h
Lagerzeit bei Stšrung -18¡/-9¡C in h
Nutzinhalt des Faches in Liter
Abmessungen des GerŠtes in mm
Hšhe
Breite
Tiefe
Die Technische Daten kšnnen Sie auf dem Typschild feststellen. Das Typschild befindet sich links unten an der
Seitewand.
55
Positioning the door shelves
To permit storage of food packages of various sizes,
the door shelves can be placed at different heights.
To make these adjustments proceed as follows:
Gradually pull the shelf in the direction of the arrows
until it comes free, then reposition as required.
D338
Movable shelves
The walls of the refrigerator are equipped with a
series of runners so that the shelves can be
positioned as desired.
For better use of space, the front half-shelves can lie
over the rear ones.
PR261
PR263

11
Elektrischer Anschlu§
Bevor Sie den Stecker in die Steckdose einstecken,
ŸberprŸfen Sie bitte, da§ die auf dem Typenschild
des GerŠtes angegebene Spannung sowie
Frequenz mit dem Anschlu§wert des Hauses
Ÿbereinstimmen. Eine Abweichung von ±6% von der
Nominalspannung ist zulŠssig. FŸr die Anpassung
des GerŠtes an andere Spannungen mu§ ein
Spartransformator angemessener Leistung
vorgeschaltet werden.
Das GerŠt mu§ unbedingt vorschriftsmŠ§ig geerdet
werden. Zu diesem Zweck ist der Stecker des
Speisekabels mit dem dafŸr vorgesehenen Kontakt
versehen. Sollte die Netzleitung im Haus nicht mit
einer Erdleitung versehen sein, so mu§ das GerŠt
an eine getrennte Erdleitung vorschriftsmŠ§ig und
unter Hinzuziehung eines Fachmanns
angeschlossen werden.
Die Erzeugerfirma lehnt jede Verantwortung ab,
falls diese UnfallverhŸtungsvorschrift nicht
beachtet wird.
Dieses GerŠt entspricht der folgende
EWG Richtlinie:
- 87/308 EWG vom 2.6.87 (Deutschland-
AusfŸhrung) bzw. der …VE-Richtlinie Nr. F 61/84
(…sterreich-AusfŸhrung) bezŸglich
Funkentstšrung.
- 73/23 EWG vom 19/02/73 (Niederspannung) und
folgende €nderungen;
- 89/336 EWG vom 03/05/89 (Elektromagnetische
VertrŠglichkeit) und folgende €nderungen.
Hintere AbstandsstŸcke
Im Beipack sind 2 DistanzstŸcke enthalten, die an
der GerŠte-RŸckseite montiert werden mŸssen.
Lšsen Sie dazu etwas die Schrauben der
GehŠuseabdeckung. Schieben Sie das DistanzstŸck
unter den Schraubenkopf und ziehen Sie die
Schraube wieder fest.
PR153
54
Fresh food refrigeration
To obtain the best performance:
¥ do not store warm food or evaporating liquids in
the refrigerator;
¥ do cover or wrap the food, particularly if it has a
strong flavour.
¥ Position food so that air can circulate freely round
it.
Cleaning the interior
Before using the appliance for the first time, wash
the interior and all internal accessories with luke-
warm water and some neutral soap so as to remove
the typical smell of a brand-new product, then dry
thoroughly.
Do not use detergents or abrasive
powders, as these will damage the finish.
Temperature regulation
The temperature is automatically regulated and can
be increased to achieve a higher temperature
(warmer) by rotating the thermostat knob toward
lower settings or reduced (colder) rotating the knob
towards higher settings.
However, the exact setting should be chosen
keeping in mind that the temperature inside the
refrigerator depends on:
¥ room temperature;
¥ how often the door is opened;
¥ the quantity of food stored;
¥ location of appliance.
A medium setting is generally the most suitable.
Important
If the ambient temperature is high or the
appliance is fully loaded, and the appliance is
set to the lowest temperatures, it may run
continuously causing frost to form on the rear
wall. In this case the dial must be set to a higher
temperature to allow automatic defrosting and
therefore reduced energy consumption.
USE
Operation
Insert the plug into the wall socket.
Turn the thermostat knob ,clockwise, beyond the ÒOÓ
(STOP) position.
To stop operation, simply turn the thermostat knob to
position ÒOÓ.
Freezing fresh food
The 4-star compartment is suitable for
long term storage of commercially frozen food, and
for freezing fresh food.
To freeze fresh foods It is not necessary to change
the setting of the thermostatknob. However, for a
quicker freezing operation, turn the thermostat knob
to the coldest setting; but remeber that, in this
condition, the refrigerator compartment temperature
might drop below 0¡C. If this occurs reset thermostat
knob to a warmer setting.
Place the food to be frozen on the shelf.
Ice-cube production
This appliance is equipped with one or more trays
for the production of ice-cubes. Fill these trays with
water, then put them in the freezer compartment.
Do not use metallic instruments to remove the
trays from the freezer.
Thawing
Deep-frozen or frozen food, prior to being used, can
be thawed in the refrigerator compartment or at
room temperature, depending on the time available
for this operation.
Small pieces may even be cooked still frozen,
directly from the freezer: in this case, cooking will
take longer.
Storage of frozen food
When first starting-up or after a period out of use,
before putting the products in the compartment let
the appliance run at least two hours on the coldest
setting, then turn the thermostat knob to the normal
operating position.
Important
In the event of accidental defrosting, for example
due to a power failure, if the power has been off
for longer that the value shown in the technical
characteristics chart under Òrising timeÓ, the
defrosted food must be consumed quickly or
cooked immediately and then refrozen (after
cooling).

12
D737
5
D548
TŸranschlagwechsel
Bevor Sie nachstehende ArbeitsvorgŠnge durchfŸhren,
Netzstecker unbedingt aus der Steckdose ziehen!
Den Wechsel auf folgende Weise ausfŸhren:
1. EntlŸftungsgitter (D) abnehmen. Unteres Scharnier
(E) abnehmen;
2. TŸr vom oberen Stift (5) abnehmen.
3. Nachdem Sie die Stšpseln entternt haben, die auf
der gegenŸberliegenden Seite wieder einzu-setzen
sind, nehmen Sie den oberen Stift und montieren
Sie ihn an der gegenŸberliegenden Seite.
4. TŸr wieder einsetzen.
5. Unteres Scharnier (E) auf gegenŸberliegende
TŸrseite montieren und mittels der vorher
entnommenen Schrauben befestigen.
6. Abdeckung (F) vom EntlŸftungsgitter (D)
herausschieben und auf gegenŸberliegende Seite
montieren. EntlŸftungsgitter wieder einsetzen.
7. Griffe abnehmen und auf gegeŸberliegenden Seite
befestigen. Mit einem Senkstift die Plastikstšpsel auf
der gegenŸberliegenden Seite des Griffes
durchlšchern. Mit dem im Beipack enthaltenen
Plastikstšpseln, die freibliebenen Lšcher abdecken.
Achtung
Vergewissern Sie sich nach AusfŸhrung des
Anschlagwechsels der TŸren, da§ alle Schrauben
fest angezogen sind und ŸberprŸfen Sie auch, ob
die Magnetdichtung am Mšbel perfekt anliegt. Bei
einer niedrigen Raumtemperatur (z.B. im Winter)
kann es vorkommen, dass die Dichtung nicht
perfekt am Schrank haftet. Die Wiederherstellung
der Dichtung erfolgt automatisch nach gewisser
Zeit. Wollen Sie aber diesen Prozess beschleunige,
so genšgt es die Dichtung mit einem Fšn zu
erwŠrmen.
E
F
D
F
F
F
Anschlagwechsel
VerdampferfachtŸr
Mit Hilfe eines Schraubenziehers den
ScharniertrŠger (1) lšsen. Dazu auf die innere Feder
drŸcken und den ScharniertrŠger gemeinsam mit
der VerdampferfachtŸr herausziehen;
den Blindstopfen (2) entfernen und auf der
gegenŸberliegenden Seite in der freibleibenden
…ffnung wieder einsetzen;
die TŸr um 180¡ drehen, den ScharniertrŠger (1)
abnehmen und auf der gegenŸberliegend en Seite
wieder anbringen;
die VerdampferfachtŸr wieder montieren; dazu den
oberen Scharnierstift und den unteren
ScharniertrŠger (1) bis zur Einrastung eindrŸcken.
Um eine optimale Lagerung der Lebensmittel zu
garantieren, ist die VerdampferfachtŸr mit einem
einfachen Federmechanismus ausgestattet, durch
die die TŸr gešffnet bleibt, bis sie nicht fest
geschlossen wird.
PR140
1
2
180°
53
CONTENTS
Warnings . . . . . . . . . . . . . . . . . . . . . . . . . . . . . . . . . . . . . . . . . . . . . . . . . . . . . . . . . . . . . . . . . . . . . . . .52
Use / Cleaning the interior - Operation - Temperature regulation - Fresh food refrigeration - Freezing .
fresh food - Storage of frozen food - Thawing - Ice-cube production . . . . . . . . . . . . . . . . . . . . . . . . . . . .54
Use / Movable shelves -Positioning the door shelves . . . . . . . . . . . . . . . . . . . . . . . . . . . . . . . . . . . . . . .55
Hints / Hints for refrigeration - Hints for freezing - Hints for storage of frozen food . . . . . . . . . . . . . . . .56
Maintenance / Periodic cleaning - Periods of no operation - Interior light - Defrosting . . . . . . . . . . . . . .57
Customer service and spare parts . . . . . . . . . . . . . . . . . . . . . . . . . . . . . . . . . . . . . . . . . . . . . . . . . . . .58
Technical information / Installation - Location . . . . . . . . . . . . . . . . . . . . . . . . . . . . . . . . . . . . . . . . . . .59
Installation/ Electrical connection - Rear spacers . . . . . . . . . . . . . . . . . . . . . . . . . . . . . . . . . . . . . . . . . .60
Installation/ Door Reversibility- Inner Door Reversal . . . . . . . . . . . . . . . . . . . . . . . . . . . . . . . . . . . . . . .61
speed up the thawing process other than those
recommended by the manufacturer. Never use
metal objects for cleaning your appliance as it
may get damaged.
Installation
¥ During normal operation, the condenser and
compressor at the back of the appliance heat up
considerably. For safety reasons, minimum
ventilation must be as shown in the instructions.
Attention: keep ventilation openings clear of
obstruction.
¥ Care must be taken to ensure that the appliance
does not stand on the electrical supply cable.
Important: if the supply cord is damaged, it must
be replaced by a special cord or assembly availa-
ble from the manufacturer or its service agent.
¥ If the appliance is transported horizontally, it is
possible that the oil contained in the compressor
flows in the refrigerant circuit. It is advisable to
wait at least two hours before connecting the
appliance to allow the oil to flow back in the
compressor.
¥ There are working parts in this product which
heat up. Always ensure that there is adequate
ventilation as a failure to do this will result in
component failure and possible food loss. See
installation instructions.
¥ Parts which heat up should not be exposed.
Wherever possible the back of the product
should be against a wall.
Environment Protection
This appliance does not contain gasses which
could damage the ozone layer, in either its
refrigerant circuit or insulation materials. The
appliance shall not be discarded together with
the urban refuse and rubbish. Avoid damaging
the cooling unit, especially at the rear near the
heat exchanger. Information on your local
disposal sites may be obtained from municipal
authorities. The materials used on this appliance
marked by the symbol are recyclable.

13
SOMMAIRE
A lÕattention de lÕutilisateur
Avertissements importants 14
Utilisation 16
Mise en service 16
Le thermostat 16
Emplacement des denrŽes 17
Compartiment rŽfrigŽrateur 17
ElŽments modulables 18
Compartiment congŽlateur 19
Conservation des produits surgelŽs et congelŽs du
commerce 19
Fabrication des gla•ons 19
DŽmoulage des gla•ons 19
Guide de congelation 20
Entretien et nettoyage 29
DŽgivrage 29
Nettoyage 30
Remplacement de lÕampoule 30
En cas dÕabsence prolongŽe ou de non-utilisation 30
En cas dÕarr•t de fonctionnement 30
En cas dÕanomalie de fonctionnement 31
Conditions de garantie 32
Service apr•s vente 32
A lÕattention de lÕinstallateur
CaractŽristiques techniques 33
Installation 33
Emplacement 33
Fixation des entretoises arri•re 33
Branchement Žlectrique 34
RŽversibilitŽ de la porte 35
RŽversibilitŽ du portillon du
compartiment congŽlateur 35
Comment lire votre notice dÕutilisation ?
Les symboles suivants vous guideront tout au long de la
lecture de votre notice dÕutilisation.
Instructions de sŽcuritŽ
Description dÕopŽrations Žtape par Žtape
Conseils et recommandations
Informations liŽes ˆ la protection de lÕenvironnement
☞
52
WARNINGS
It is most important that this instruction book should be retained with the appliance for future
reference. Should the appliance be sold or transferred to another owner, or should you move house
and leave the appliance, always ensure that the book is supplied with the appliance in order that the
new owner can be acquainted with the functioning of the appliance and the relevant warnings.
If this appliance featuring magnetic door seals is to replace an older appliance having a spring lock
(latch) on the door or lid, be sure to make that spring lock unusable before you discard the old
appliance. This will prevent it from becoming a death-trap for a child.
These warnings are provided in the interest of safety. You must read them carefully before installing or
using the appliance.
General Safety
¥ This appliance is designed to be operated by
adults. Children should not be allowed to tamper
with the controls or play with the product.
¥ It is dangerous to alter the specifications or
modify this product in any way.
¥ Before any cleaning or maintenance work is carried
out, be sure to switch off and unplug the appliance.
¥ This appliance is heavy. Care should be taken
when moving it
¥ Ice lollies can cause frost burns if consumed
straight from the appliance.
¥ Take utmost care when handling your
appliance so as not to cause any damages to
the cooling unit with consequent possible
fluid leakages.
¥ The appliance must not be located close to
radiators or gas cookers.
¥ Avoid prolonged exposure of the appliance to
direct sunlight.
¥ There must be adequate ventilation round the
back of the appliance and any damage to the
refrigerant circuit must be avoided.
¥ For freezers only (except built-in models): an
ideal location is the cellar or basement.
¥ Do not use other electrical appliances (such
as ice cream makers) inside of refrigerating
appliances.
Service/Repair
¥ Any electrical work required to install this
appliance should be carried out by a qualified
electrician or competent person
¥ This product should be serviced by an authorized
Service Centre, and only genuine spare parts
should be used.
¥ Under no circumstances should you attempt to
repair the appliance yourself. Repairs carried out
by inexperienced persons may cause injury or
more serious malfunctioning. Refer to your local
Service Centre, and always insist on genuine
spare parts.
¥ This appliance contains hydrocarbons in its
cooling unit; maintenance and recharging must
therefore only be carried out by authorized
technicians.
Use
¥ The domestic refrigerators and freezers are
designed to be used specifically for the storage
of edible foodstuffs only.
¥ Best performance is obtained with ambient
temperature between +18¡C and +43¡C (class
T); +18¡C and +38¡C (class ST); +16¡C and
+32¡C (class N); +10¡C and +32¡C (class SN).
The class of your appliance is shown on its rating
plate.
Warning: when the ambient temperature is not
included within the range indicated for the class
of this appliance, the following instructions must
be observed: when the ambient temperature
drops below the minimum level, the storage
temperature in the freezer compartment cannot
be guaranteed; therefore it is advisable to use
the food stored as soon as possible.
¥ Frozen food must not be re-frozen once it has
been thawed out.
¥ ManufacturersÕ storage recommendations should
be strictly adhered to. Refer to relevant
instructions.
¥ The inner lining of the appliance consists of
channels through which the refrigerant passes. If
these should be punctured this would damage the
appliance beyond repair and cause food loss. DO
NOT USE SHARP INSTRUMENTS to scrape off
frost or ice. Frost may be removed by using a
plastic scraper. Under no circumstances should
solid ice be forced off the liner. Solid ice should be
allowed to thaw when defrosting the appliance.
¥ Do not place carbonated or fizzy drinks in the
freezer as it creates pressure on the container,
which may cause it to explode, resulting in
damage to the appliance. Do not use a
mechanical device or any artificial means to
Page is loading ...
Page is loading ...
Page is loading ...
Page is loading ...
Page is loading ...
Page is loading ...
Page is loading ...
Page is loading ...
Page is loading ...
Page is loading ...
Page is loading ...
Page is loading ...
Page is loading ...
Page is loading ...
Page is loading ...
Page is loading ...
Page is loading ...
Page is loading ...
Page is loading ...
-
 1
1
-
 2
2
-
 3
3
-
 4
4
-
 5
5
-
 6
6
-
 7
7
-
 8
8
-
 9
9
-
 10
10
-
 11
11
-
 12
12
-
 13
13
-
 14
14
-
 15
15
-
 16
16
-
 17
17
-
 18
18
-
 19
19
-
 20
20
-
 21
21
-
 22
22
-
 23
23
-
 24
24
-
 25
25
-
 26
26
-
 27
27
-
 28
28
-
 29
29
-
 30
30
-
 31
31
-
 32
32


Zanussi ZA23N User manual
- Type
- User manual
Ask a question and I''ll find the answer in the document
Finding information in a document is now easier with AI
in other languages
- français: Zanussi ZA23N Manuel utilisateur
- Deutsch: Zanussi ZA23N Benutzerhandbuch
- Nederlands: Zanussi ZA23N Handleiding
