
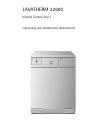
LAVATHERM 32600
Vented Tumble Dryer
Operating and Installation Instructions

2
Dear customer,
Please read these operating instructions through carefully, before using
the appliance.
Please ensure you fully understand the safety instructions on the first
pages of these operating instructions! Retain this instruction book for
future reference, and pass on to any future owners.
1
The warning triangle and/or the key words (Warning!, Caution!,
Important!), emphasize information which is important for your safety
or the correct functioning of the appliance. It is essential that this
information is observed.
0 This symbol guides you step by step when operating the appliance.
3
This symbol gives additional information and practical tips on using the
appliance.
2
Tips and information about the economical and environmentally
friendly use of the machine are marked with the clover symbol.
If you require assistance or advice on your appliance, please contact
our Customer Care Department by letter or telephone:
Customer Care Department
AEG Domestic Appliances
55-77 High Street
Slough
Berkshire SL 1 1DZ
Tel: 08705 350350
P
r
i
nte
d
on env
i
ronmenta
ll
y
f
r
i
en
dl
y paper ...
Whoever thinks ecologically also acts ecologically.

3
Contents
Important Safety Information . . . . . . . . . . . . . . . . . . . . . . . . . . . . . . . . . . . . 5
General Safety . . . . . . . . . . . . . . . . . . . . . . . . . . . . . . . . . . . . . . . . . . . . . . . . . . 5
Child Safety . . . . . . . . . . . . . . . . . . . . . . . . . . . . . . . . . . . . . . . . . . . . . . . . . . . . 6
For the installer - Safety information . . . . . . . . . . . . . . . . . . . . . . . . . . . . . 7
Technical data . . . . . . . . . . . . . . . . . . . . . . . . . . . . . . . . . . . . . . . . . . . . . . . . . 8
Electrical Connection . . . . . . . . . . . . . . . . . . . . . . . . . . . . . . . . . . . . . . . . . . . 9
Site Preparation . . . . . . . . . . . . . . . . . . . . . . . . . . . . . . . . . . . . . . . . . . . . . . . . 11
Venting . . . . . . . . . . . . . . . . . . . . . . . . . . . . . . . . . . . . . . . . . . . . . . . . . . . . . . . . 12
Venting through a Vent Hose . . . . . . . . . . . . . . . . . . . . . . . . . . . . . . . . . . . 13
Venting without a Vent Hose . . . . . . . . . . . . . . . . . . . . . . . . . . . . . . . . . . . 14
General Information . . . . . . . . . . . . . . . . . . . . . . . . . . . . . . . . . . . . . . . . . . . . 15
Disposal . . . . . . . . . . . . . . . . . . . . . . . . . . . . . . . . . . . . . . . . . . . . . . . . . . . . . . . 15
Packaging . . . . . . . . . . . . . . . . . . . . . . . . . . . . . . . . . . . . . . . . . . . . . . . . . . . . . . 15
Tumble Dryer . . . . . . . . . . . . . . . . . . . . . . . . . . . . . . . . . . . . . . . . . . . . . . . . . . . 15
Environmental protection tips . . . . . . . . . . . . . . . . . . . . . . . . . . . . . . . . . . . 16
Description of the appliance . . . . . . . . . . . . . . . . . . . . . . . . . . . . . . . . . . . . . 18
Front view . . . . . . . . . . . . . . . . . . . . . . . . . . . . . . . . . . . . . . . . . . . . . . . . . . . . . . 18
Control panel . . . . . . . . . . . . . . . . . . . . . . . . . . . . . . . . . . . . . . . . . . . . . . . . . . . 19
Programme selector . . . . . . . . . . . . . . . . . . . . . . . . . . . . . . . . . . . . . . . . . . . . . 20
Programme selector as progress indicator . . . . . . . . . . . . . . . . . . . . . . . . 20
Before using the appliance for the first time . . . . . . . . . . . . . . . . . . . . . . 20
Brief operating instructions . . . . . . . . . . . . . . . . . . . . . . . . . . . . . . . . . . . . . 21
Drying . . . . . . . . . . . . . . . . . . . . . . . . . . . . . . . . . . . . . . . . . . . . . . . . . . . . . . . . . 22
Prepare the laundry . . . . . . . . . . . . . . . . . . . . . . . . . . . . . . . . . . . . . . . . . . . . . . 22
Open the door . . . . . . . . . . . . . . . . . . . . . . . . . . . . . . . . . . . . . . . . . . . . . . . . . . 22
Load the laundry . . . . . . . . . . . . . . . . . . . . . . . . . . . . . . . . . . . . . . . . . . . . . . . . 22
Select the drying programme . . . . . . . . . . . . . . . . . . . . . . . . . . . . . . . . . . . . . . 22
Start the drying programme . . . . . . . . . . . . . . . . . . . . . . . . . . . . . . . . . . . . . . . 23
Removing laundry or loading laundry when necessary . . . . . . . . . . . . . . . . . 24
End of the drying process . . . . . . . . . . . . . . . . . . . . . . . . . . . . . . . . . . . . . . . . . 24
Removing the laundry . . . . . . . . . . . . . . . . . . . . . . . . . . . . . . . . . . . . . . . . . . . . 24
Switch-off the dryer . . . . . . . . . . . . . . . . . . . . . . . . . . . . . . . . . . . . . . . . . . . . . 24
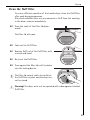
Clean the fluff filter . . . . . . . . . . . . . . . . . . . . . . . . . . . . . . . . . . . . . . . . . . . . . 25

Contents
4
Programme tables . . . . . . . . . . . . . . . . . . . . . . . . . . . . . . . . . . . . . . . . . . . . . . 26
A small glossary of textile information . . . . . . . . . . . . . . . . . . . . . . . . . . . . 27
Care symbols . . . . . . . . . . . . . . . . . . . . . . . . . . . . . . . . . . . . . . . . . . . . . . . . . . . 27
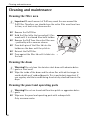
Cleaning and maintenance . . . . . . . . . . . . . . . . . . . . . . . . . . . . . . . . . . . . . . 28
Cleaning the filter area . . . . . . . . . . . . . . . . . . . . . . . . . . . . . . . . . . . . . . . . . . . 28
Cleaning the drum . . . . . . . . . . . . . . . . . . . . . . . . . . . . . . . . . . . . . . . . . . . . . . . 28
Cleaning the panel and operating parts . . . . . . . . . . . . . . . . . . . . . . . . . . . . . 28
Something not working? . . . . . . . . . . . . . . . . . . . . . . . . . . . . . . . . . . . . . . . . 29
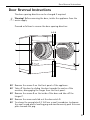
Door Reversal Instructions . . . . . . . . . . . . . . . . . . . . . . . . . . . . . . . . . . . . . . . 31
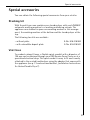
Special accessories . . . . . . . . . . . . . . . . . . . . . . . . . . . . . . . . . . . . . . . . . . . . . . 33
Stacking kit . . . . . . . . . . . . . . . . . . . . . . . . . . . . . . . . . . . . . . . . . . . . . . . . . . . . 33
Vent hose . . . . . . . . . . . . . . . . . . . . . . . . . . . . . . . . . . . . . . . . . . . . . . . . . . . . . . 33
Guarantee Conditions . . . . . . . . . . . . . . . . . . . . . . . . . . . . . . . . . . . . . . . . . . . 34
Service & Spare Parts . . . . . . . . . . . . . . . . . . . . . . . . . . . . . . . . . . . . . . . . . . . 36
Index . . . . . . . . . . . . . . . . . . . . . . . . . . . . . . . . . . . . . . . . . . . . . . . . . . . . . . . . . . 37

Important Safety Information
5
1 Important Safety Information
Your safety is of paramount importance, please ensure you read these
warnings before installing or using the appliance. If you are unsure
about any of the meanings of these warnings, contact the Customer
Care Department.
General Safety
• Any electrical work required to install this appliance should be
carried out by a qualified electrician or competent person.
• Please follow the safety instructions in the installation section of this
instruction book.
• This appliance is designed to dry normal domestic laundry. If the
appliance is used for any other purpose or is incorrectly used, the
manufacturer accepts no liability for any damages which may result.
• Switch off the appliance and isolate from the mains supply before
carrying out any maintenance or cleaning work.
• Never operate the appliance if the mains cable is damaged or if the
control panel, work top or base area are damaged allowing internal
components to be accessible.
• Do not spray the tumble dryer with water.
• Do not dry textiles which have been treated with flammable cleaning
agents and solvents.
• Clothes or articles of laundry which are dripping wet should not be
placed in the dryer. Only load well-spun laundry.
• Laundry items containing sponge rubber or rubber-like materials
must be not be dried in the tumble dryer.
• If the drying cycle is interrupted, the laundry or drum may be hot.
• Do not operate the appliance with a damaged filter or with no filter
at all.
• Do not overload the appliance.
• It is dangerous to alter the specifications or attempt to modify this
product in any way.
• Adaptors and extension cables must not be used. There is risk of fire
because of overheating!

Important Safety Information
6
• Do not use the mains cable to pull the plug out of the socket.
• Repairs to the appliance should only be carried out by qualified per-
sonnel. Repairs carried out by inexperienced persons may cause injury
or serious malfunction. Contact your local AEG Service Force Centre
for repair.
• Washing that is in poor condition (heavily worn) and items with loose
fillings (cushions) that could break open must not be dried or aired.
There is a risk of fire!
• Washing with rigid components (foot mats) will cover the air slots;
the slots will also be covered if the drum is overfilled. Observe the
maximum load of 5 kg. There is a risk of overheating which could
cause a fire!
• Only dry washing that does not contain any explosive objects (fire
lighters, spray cans). There is a risk of fire or an explosion!
• In the case of washer / dryer tower combinations, do not place any
objects on the dryer during use as they could drop down.
Child Safety
• The appliance is designed to be operated by adults. Children should
not be allowed to tamper with the controls or play with the appli-
ance.
• Pets and children have been known to climb into tumble dryers.
Please check the drum before use.
• Keep all packaging away from children.
• When disposing of the appliance, cut off the mains cable and destroy
the plug. Disable the door catch to prevent young children being
trapped inside.

For the installer - Safety information
7
For the installer - Safety information
• Check the appliance for transportation damage before installation.
• Any electrical work required to install this appliance should be carried
out by a qualified electrician or competent person.
• This tumble dryer is designed to be vented through to the open air. It
should have its own ventilation system which should not be joined
with any other ventilation system connected to any other appliance.
• The dryer must not be vented into a chimney, or flue pipe designed to
carry the exhaust from a fuel burning heating appliance.
• If the tumble dryer is installed next to a fuel burning stove, a heat
insulation non-flammable pad must be inserted between the fuel
burning stove and the tumble dryer: (dimensions 85 x 57 cm).
• If the dryer is installed in a room with a fuel burning heating appli-
ance, consult your local Corgi registered installer.
• The tumble dryer should not be installed in situations which may be
subject to freezing temperatures.
• The installation site must be well ventilated.
• Ensure the appliance does not stand on the electrical supply cable.
• If the machine is situated on carpeted floor, please adjust the feet in
order to allow air to circulate freely.
• The tumble dryer must be level.
• Observe the safety precautions in the operating instructions for your
dryer.
• Air is drawn in through vents at the rear and front of this appliance.
Therefore, keep the area around the appliance clear.

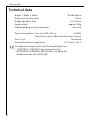
Technical data
8
Technical data
Height x Width x Depth 85x60x60cm
Depth with the door open 117cm
Height adjustable from 1.0/–0.4cm
Empty weight approx. 40kg
Load (depending on the programme) max. 5kg
Power consumption in acc. with IEC 1121 s.e. 3.4kWh
(5 kg Cotton, spun at 800 revolutions per minute)
Area of use Household
Permissible ambient temperature +5°C up to +35°C
;
This appliance complies with the following EC directives:
– 73/23/EEC of 19/2/1973 ’Low voltage directive’
– 89/336/EEC of 3/5/1989 ’EMC directive’ including the
Modification directive 92/31/EEC

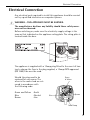
Electrical Connection
9
Electrical Connection
Any electrical work required to install this appliance should be carried
out by a qualified electrician or competent person.
1
WARNING - THIS APPLIANCE MUST BE EARTHED.
The manufacturer declines any liability should these safety meas-
ures not be observed.
Before switching on, make sure the electricity supply voltage is the
same as that indicated on the appliance rating plate. The rating plate is
located inside the door.
The appliance is supplied with a 13amp plug fitted. In the event of hav-
ing to change the fuse in the plug supplied, a 13amp ASTA approved
(BS 1362) fuse must be used.
Should the plug need to be
replaced for any reason. The
wires in the mains lead are col-
oured in accordance with
the following code:
Green and Yellow : Earth
Blue : Neutral
Brown : Live
Blue
Green
& Yellow
Brown
Cord Clamp

Electrical Connection
10
• The wire coloured green and yellow must be connected to the termi-
nal marked with the letter “E“ or by the earth symbol or coloured
green and yellow
• The wire coloured blue must be connected to the terminal “N“ or col-
oured black.
• The wire coloured brown must be connected to the terminal marked
“L“ or coloured red.
• Upon completion there must not be cut, or stray strands of wire
present and the cord clamp must be secure over the outer sheath.
1
WARNING: A cut off plug inserted into a 13 amp socket is a serious
safety (shock) hazard. Ensure that the cut off plug is disposed of
safely.
Permanent connection
In the case of a permanent connection it is necessary that you install a
double pole switch between the appliance and the electricity supply
(mains), with a minimum gap of 3 mm between the switch contacts
and of a type suitable for the required load in compliance with the cur-
rent electrical regulations.
The switch must not break the yellow and green earth cable at any
point.

Site Preparation
11
Site Preparation
• The installation surface must be clean and dry.
• Do not install on a deep pile carpet.
• If the appliance is installed next to a heat source (e. g. cooking appli-
ance), a heat insulation pad (85 x 57 cm) must be placed between the
washing machine and the heat source.
• Do not install the appliance where the temperature may fall below
freezing or rise above 35°C.
• Please ensure that when the appliance is installed it is easily
accessible for the engineer in the event of a breakdown.
Levelling the Appliance
The appliance must be levelled using the adjustable feet. Use a
screwdriver to adjust to the feet until the appliance is level.

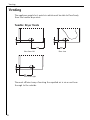
Venting
12
Venting
The appliance expels hot, moist air which must be able to flow freely
from the tumble dryer vent.
Tumble Dryer Vents
The most efficient way of venting the expelled air is via a vent hose
through to the outside.
View from left
View from right
Rear view

Venting
13
Venting through a Vent Hose
The vent hose expelling the hot air should be 100 mm diameter and no
longer than 4 meters. Avoid bends in the vent hose as this will reduce
the air flow. The maximum length of the vent hose may be:
4 meters with 0 bends, or
2 meters with 2 bends.
If the vent hose is to be permanently installed to the outside, a wall
vent kit or suitable cover should be used on the outside wall.
Example:
A vent hose (Part number: 647 000 010) and wall vent kit (Part number:
647 000 020) are available from your local AEG Service Force Centre.
Ensure the vent hose is not squashed. The drying efficiency of the
tumble dryer will be affected and may cause the safety cut outs to
operate.
1 Warning! The vent hose must not be connected to a flue pipe or
chimney designed to carry the exhaust from a fuel burning heating
appliance.

Venting
14
Venting without a Vent Hose
If a vent hose is not connected to the tumble dryer, the air can be
expelled into the installation room providing the following precautions
are observed.
• The vent(s) in use must be at least 30 cm from the wall or any other
object.
• Any vent less than 30 cm from a wall or other object must be closed
using the cover provided.
• The installation room must be well ventilated during the drying cycle.

General Information
15
3 General Information
• To prevent creasing do not exceed the maximum load stated in the
programme table.
• When using fabric conditioning sheets, we recommend the condi-
tioning sheet is pinned (using a safety pin) to an article of laundry
and placed in the tumble dryer.
• When using fabric conditioning sheets or drying starched washing in
the tumble dryer, it is important to clean the drum to prevent a build
up of any residues/deposits. See maintenance and cleaning section.
• Please ensure the appliance is easily accessible to an engineer after
installation.
2 Disposal
Packaging
• Dispose of the packaging material correctly. All packaging materials
are environmentally friendly and can be disposed of without any
danger to the environment.
• The external plastic covering and bags inside are made of Polyethylen
(marking >PE<).
• The padding is made of CFC free expanded polystyrene
(marking >PS<).
Tumble Dryer
When disposing of the tumble dryer.
• Cut off the mains cable and destroy the plug.
• Disable the door catch to prevent young children becoming trapped
inside.
• Use an authorised disposal site.

Environmental protection tips
16
2 Environmental protection tips
• Your laundry will become light and soft in the tumble dryer even with-
out a fabric softening agent.
• Loosen your laundry before loading it into the dryer. This helps to pre-
vent lengthy running times and creasing. Ensure your laundry is well
spun.
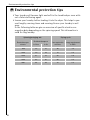
In the following table we give an overview of specific electric con-
sumption data depending on the spinning speed. This information is
valid for 5kg laundry:
Spinning/wringing out: Drying cycle:
Revolutions per
minute
Residual dampness
Time required in
minutes
Energy requirement
in kWh
in litres in %
800 3.5 70 80 3.4
1000 3.0 59 70 2.9
1200 2.7 53 65 2.6
1400 2.5 50 60 2.4
1600 2.2 44 55 2.2

Environmental protection tips
17
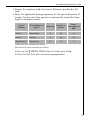
• Observe the maximum load instructions. Whenever possible, dry full
loads.
• Select the appropriate drying programme for the type and quantity of
laundry. The dryer will then operate as economically as possible. Some
typical consumption values:
• Only use the W SPECIAL CARE button for loads up to 2.5kg.
• Clean the fluff filter after every drying programme!
Type of
washing
Desired degree of
dryness
Load in kg
Duration in
minutes
Power
consumption in
kWh
Cotton
1
1) Spun with 800 revolutions per minute
Cupboard dry 5 80 3.4
Cotton
1
Hand iron 5 65 2.5
Mixed fabrics
2
2) Prespun with 1000 revolutions per minute
Cupboard dry 2.5 35 1.3

Description of the appliance
18
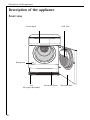
Description of the appliance
Front view
Control panel
Removable Plinth
Fluff filter
Reversible door
Rating plate
Feet
(all height-adjustable)

Description of the appliance
19
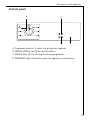
Control panel
A Programme selector: To select the drying time required
B SPECIAL CARE button W: For delicate fabrics
C START button X: For starting the drying programme
D OPERATING light: illuminates when the appliance is switched on
A
B
D
C

Before using the appliance for the first time
20
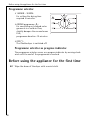
Programme selector
• 150MIN - 30MIN:
for setting the drying time
required in minutes.
• AIRING programme V:
for smoothing out creased outer
garments in a cold air flow;
slightly dampen the creased areas
first;
programme duration: 10 minutes.
• OFF Y:
The tumble dryer is switched off.
Programme selector as progress indicator
The programme selector serves as a progress indicator by moving clock-
wise until the end of the programme is reached.
Before using the appliance for the first time
0 Wipe the drum of the dryer with a moist cloth.
Page is loading ...
Page is loading ...
Page is loading ...
Page is loading ...
Page is loading ...
Page is loading ...
Page is loading ...
Page is loading ...
Page is loading ...
Page is loading ...
Page is loading ...
Page is loading ...
Page is loading ...
Page is loading ...
Page is loading ...
Page is loading ...
Page is loading ...
Page is loading ...
Page is loading ...
Page is loading ...
-
 1
1
-
 2
2
-
 3
3
-
 4
4
-
 5
5
-
 6
6
-
 7
7
-
 8
8
-
 9
9
-
 10
10
-
 11
11
-
 12
12
-
 13
13
-
 14
14
-
 15
15
-
 16
16
-
 17
17
-
 18
18
-
 19
19
-
 20
20
-
 21
21
-
 22
22
-
 23
23
-
 24
24
-
 25
25
-
 26
26
-
 27
27
-
 28
28
-
 29
29
-
 30
30
-
 31
31
-
 32
32
-
 33
33
-
 34
34
-
 35
35
-
 36
36
-
 37
37
-
 38
38
-
 39
39
-
 40
40


Ask a question and I''ll find the answer in the document
Finding information in a document is now easier with AI
Related papers
Other documents
-
Electrolux 57700 User manual
-
-
Aeg-Electrolux T35400 User manual
-
Aeg-Electrolux T36840 User manual
-
-
-
Miele T 220 User manual
-
-
-