Generation Lighting Designer Collections EC1048AI Installation guide
- Type
- Installation guide

1
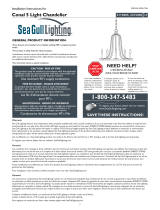
Installation Instructions for
Caroline 8 Light Chandelier
1.0
EC1048
Chandelier
EC1048
GP I :ENERAL RODUCT NFORMATION
These fixtures are intended to be installed utilizing NEC compliant junction
boxes.
This product is safety listed for damp locations.
Incandescent lamps may be dimmed with a standard incandescent dimmer.
LED lamps may be dimmed with a LED dimmer. Consult lamp manufacturer
for additional information.
This instruction shows a typical installation.
1
2
1A
3
CAUTION RISK OF FIRE-
This product must be installed in accordance with the
applicable installation code by a person familiar with the
construction and operation of the product and the hazards
involved.
Use minimum 90°c supply conductors.
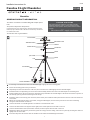
If necessary, screw the shorter end of the threaded nipple tightly onto the mounting plate.
Secure the mounting plate to the junction box.
Temporarily unscrew and remove the collar nut, then screw the screw collar tightly onto the threaded nipple.
Install the fixture arm by hooking one end to the socket assembly and the other end to the hub. Repeat for remaining arms.
Install a quick link onto the end of the chain and fixture loop. Determine the wanted height of the fixture and remove a portion of
the chain by opening a link and removing it from the top.
Install the collar nut and canopy onto the chain (in that order), then install the other quick link onto the free end of the chain and
screw collar.
Weave the cord through the chain, screw collar, canopy, threaded nipple, and out of the junction box. Trim the cord leaving
enough to make electrical connections.
Connect the fixture to a suitable ground in accordance to local electrical codes.
Connect the white fixture wire (square and/or rigid) to the neutral power line wire with a wire nut.
Connect the black fixture wire (round and/or smooth) to the hot power line wire with a wire nut.
Neatly place all the wires into the junction box, place the canopy onto the ceiling, and secure it in place by screwing the collar nut
tightly onto the screw collar.
Screw the lamps into the sockets. Refer to the label on the socket for Max Wattage information.
4
5
6
7
8
9
10
11
10
LAMP
FIXTURE ARM
CANOPY
MOUNTING PLATE
JUNCTION BOX
SCREW COLLAR
THREADED NIPPLE
COLLAR NUT
12
5
9
4
HUB
CHAIN
QUICK LINK
SOCKET ASSEMBLY
CHAIN
12
6
4

SAVETHESE INSTRUCTIONS!
7400 Linder Ave, Skokie, 160077IL
800.969.3347
www.generationlighting.com
© 2019 Generation Lighting.All rights reserved.
The "Generation Lighting" graphic is a registered trademark of
Generation Lighting. Generation Lighting reserves the right to
change specifications for product improvements without notification.
-
 1
1
-
 2
2


Generation Lighting Designer Collections EC1048AI Installation guide
- Type
- Installation guide
Ask a question and I''ll find the answer in the document
Finding information in a document is now easier with AI
Other documents
-
 Generation Lighting 3124505 Installation guide
-
 Generation Lighting 3101903 Operating instructions
-
 Generation Lighting 3113205-715 Installation guide
-
 Generation Lighting 3115806-846 User manual
-
 Generation Lighting 5151003-846 Installation guide
-
Generation Lighting 3113303 Installation guide
-
 Generation Lighting 3115905-846 Installation guide
-
Generation Lighting 3124904-846 Installation guide
-
 Generation Lighting 3139109 Operating instructions
-
 Generation Lighting 3320205-710 Operating instructions


