Page is loading ...

1200X
Microscope
Manual
WARNING:
Not suitable for children under 3
years of age. Contains functional
sharp points and edges.
Not Included
SET INCLUDES...
Microscope
Prepared Slides
Blank Slides
Slide Covers
Labels
Collection Vials
Petri Dish
Macro Viewer
Tweezers
Scissors
Needle
Stiring Rod
Scalpel
Magnifying Glass
Graduated Cylinders
Specimen Slicer
Shrimp Hatchery
Textile Vial
Yeast Vial
Sea Salt Vial
Blue Dye Vial
Light Bulb
AGE
nationalgeographic.com
Visit our website:
National Geographic’s net proceeds
support vital exploration, conservation,
research, and education programs.
1

Supervision by Adults
Read and follow the instructions, safety
rules, and rst aid information.
This microscope set is intended for chil-
dren older than age 8. Children should
only use this device under adult supervi-
sion. Never leave a child unsupervised
with this device.
Accessories in this experimental kit may
have sharp edges and tips. Please store
the device and all of its accessories and
aids out of the reach of young children
when not being used due to a risk of
injury. Warning! Not suitable for children
under 3 years of age. Contains functional
sharp points and edges.
This device contains electronic compo-
nents that are powered by batteries. Ne-
ver leave a child unsupervised with this
device. Batteries should be kept out of
children’s reach. When inserting batte-
ries, please ensure the polarity is correct.
Insert the batteries according to the dis-
played +/- information.
Danger of Fires and Explosions!
Do not expose the device to high tempera-
tures. Use only battery types recommen-
ded. Never mix old and new batteries. Re-
place all batteries at the same time. Never
mix Alkaline, standard Carbon-Zinc, and
rechargable Nickel-Cadmium batteries.
Never short circuit the device or batteries
or throw either into a re. Exposure to high
temperatures or misuse of the device can
lead to short circuits, res, or even explo-
sions. Leaking or damaged batteries can
cause injury if they come into contact with
the skin. If you need to handle such batte-
ries, please wear suitable safety gloves.
Chemicals
Any chemicals and liquids used in con-
junction with the device should be kept out
of reach of children. Do not drink any of
the chemicals contained in this set. Hands
should be washed thoroughly under run-
ning water after working with these che-
micals. In case of accidental contact with
the eyes or mouth, rinse the affected area
with water. Seek medical treatment for ail-
ments arising from contact with the che-
mical substances, and take the chemicals
with you to the doctor.
Risk of Material Damage
Never take the device apart. Please con-
sult our service center and send the device
in for repair if needed.
Do not subject the device to temperatures
exceeding 140°F.
Tips on Cleaning
Remove batteries from device before
cleaning.
Microscope Care
Clean the exterior of device with a dry
cloth. Do not use cleaning uids to avo-
id causing damage to electronic com-
ponents. Clean the lens (objective and
eyepiece) with only a soft, lint-free cloth,
like a microber cloth. Do not use exces-
sive pressure—this may scratch the lens.
Protect the device from dust and moistu-
re. Store the device in the in its original
packaging. Batteries should be removed
from the device if it will not be used for a
long period of time.
DISPOSAL
Keep packaging materials, like plastic
bags and rubber bands, away from child-
ren, as they pose a risk of suffocation.
Dispose of packaging materials as legally
required. Consult the local authority on the
matter if necessary.
DISPOSAL
Dispose of the packaging materials properly,
according to their type, such as paper or card-
board. Contact your local waste-disposal ser-
vice or environmental authority for information
on the proper disposal.
Please take the current legal regulations into
account when disposing of your device. You
can get more information on the proper dis-
posal from your local waste-disposal service
or environmental authority.
Customer Service:
Call 1-866-252-3811
1200X Microscope Manual
National Geographic’s net proceeds
support vital exploration, conservation,
research, and education programs.
2

1200X Microscope Manual
1200x
1
10
2
6
9
5
3
4
8
7
12
13
11
15
16
18
19
23
24 25
26
22
17*
20
21
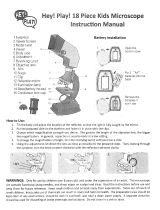
Microscope Parts:
1 Eyepiece
2 Focus Knob
3 Stage
4 Metal Stage Clips
5 Color Filter Wheel
6 Objective
7 Objective Turret (15X, 30X, 60X)
8 Illumination On/Off Switch and Mirror
9 Rubber Base and Battery Case
10 Microscope Arm
Additional Contents:
11 (5) Prepared Slides (10) Blank Slides
12 (10) Blank Slides
13 (10) Slide Covers/Labels
14 (4) Collection Vials
15 Petri Dish
16 Macro Viewer
17* Tweezers/Scissors/Needle/
Stiring Rod/Scalpel
18 Magnifying Glass
19 Graduated Cylinders
20 Specimen Slicer
21 Shrimp Hatchery
22 Textile Vial
23 Yeast Vial
24 Sea Salt Vial
25 Blue Dye Vial
26 Light Bulb
*Warning! Not suitable for children
under 3 years of age. Contains
functional sharp points.
Customer Service:
Call 1-866-252-3811
get the greatest benet from your precision in-
strument. Then try out the experiments to be-
gin your investigation of the fascinating world
around you.
How do I use my microscope?
Before you use your microscope, make sure
that the table, desk, or surface that you place
it on is stable and is not subject to vibration.
If the microscope needs to be moved, hold it
by the arm and base while carefully transfer-
ring it.
Install two “AA” batteries (not included) in
the battery box, located in the base of the
microscope. Remove the rubber base with a
screwdriver, and insert the batteries accord-
ing to the displayed +/- information. Reattach
the rubber base with the screw.
Once the microscope is in a suitable location
and the batteries are installed, check the light
source to make sure that it illuminates. Use
a microber cleaning cloth to gently wipe the
lenses off. If the stage is dirty with dust or oil,
carefully clean it off. Make sure that you only
raise and lower the stage using the focus
adjustment knob.
How do I operate the illumination?
Locate the mirror/light on the base of the
microscope. Flip the mirror/light to the on
position (with the light facing up) and the light
will illuminate. This microscope is equipped
with an incandescent light that illuminates
the specimen from below. The color lter
wheel (Fig. 5) is located in the middle of the
microscope stage (Fig. 3). The lters help
you when you are observing very bright or
clear specimens. Using these lters, you can
choose various brightness levels and colors.
This helps you better recognize the compo-
nents of colorless or transparent objects (e.g.
grains of starch, or protozoa).
How do I adjust my microscope correctly?
Place the microscope in a suitable location as
described above, and sit in a comfortable view-
ing position. Always start each observation with
the lowest magnication. Adjust the distance of
the microscope stage (Fig. 3) so that the stage
is in the lowest position, farthest away from tur-
ret head. Turn the objective turret (Fig. 7) until it
clicks into place at the lowest magnication (Ob-
jective 15X/300X). Note: Before you change the
objective setting, always make sure the micro-
scope stage (Fig. 3) is farthest away from turret
by rotating the focus knob (Fig. 2). Separating
the stage and turret by rotating the focus knob
will avoid causing damage to the specimen slide
or microscope. When starting an observation, al-
ways start with the 15X/300X objective (Fig. 7) in
the rotating head (Fig. 3).
Quick Fact — The highest magnication is
not always the best for every specimen!
Magnication Guide
Eyepiece Objective Power
300X
600X
1200X
15X
30X
60X
20X
20X
20X
14
Congratulations! You’ve chosen one
of the highest quality microscopes
available for young explorers. Read
the following instructions carefully to
National Geographic’s net proceeds
support vital exploration, conservation,
research, and education programs.
3

1200X Microscope Manual
How do I observe the specimen?
Sitting in your location with adequate illumi-
nation chosen from the color lter wheel, the
following basic rules should be observed:
Start with a simple observation at the lowest
magnication. Position the object or speci-
men in the middle of the stage under the sta-
ge clips (Fig. 4), centered over the lower light
(Fig. 8). Focus the image by rotating the fo-
cus knob (Fig. 2) until a clear image appears
in the eyepiece.
NOTE: The higher the magnication, the
more light you will require for a good image
quality.
Quick Fact - The item you want to observe
with the microscope is known as the object
or specimen.
Place the prepared slide directly under the
objective on the microscope stage (Fig. 3)
securing with the stage clips (Fig. 4). The
prepared slide should be located direct-
ly over the lower illumination (Fig. 8). Look
through the eyepiece and carefully turn the
focus knob (Fig. 2) until the image appears
clear and sharp. Now you can select a hig-
her magnication by rotating the 30X/600X
objective turret (Fig. 7). Higher levels of ma-
gnication can be achieved by turning the
objective turret (Fig. 7) to a higher setting
(600x or 1200x). Following this procedure
creates a steady increase of magnication
without overpowering the view of the object.
The following magnications should be con-
sidered: 300x, 600x, then 1200x.
Each time the magnication changes (due to
the objective change), the image sharpness
must be readjusted with the focus knob (Fig.
2). When doing this, be careful because if
you move the microscope stage too quickly,
the objective and the slide could come into
contact and cause damage to the slide or
microscope.
For transparent objects (e.g. protozoa), light
is projected by the lower light, traveling from
below the stage, through the objective and
eyepiece, and nally into your eye. This pro-
cess of light transmission is known as micro-
scopy. Many microorganisms found in water,
plant components, and the smallest animal
parts are transparent in nature. Opaque spe-
cimens, on the other hand, will need to be
prepared for viewing. Opaque specimens
can be made transparent by a process of
treatment and penetration with the correct
materials (media), or by slicing. You can read
more about creating specimens in the fol-
lowing experiment sections.
Cleaning Tips
To ensure your microscope has a long service
life. Clean the lens (objective and eyepiece)
with only a soft, lint-free cloth, like a micro-
ber cloth. Do not press down too hard while
cleaning, as this might scratch the lens. Ask
your parents to help if your microscope is re-
ally dirty. The cleaning cloth should be mois-
tened with cleaning uid and the lens wiped
clean using very little pressure. Make sure
your microscope is always protected against
dust and dirt. After use, leave it in a warm
room to dry off.
This microscope can be the gateway to a
fun, creative learning process and will open
the door to advanced knowledge of the world
around you. It will allow you to explore the va-
rious elds of science, from biology to botany
to chemistry and beyond, so have fun explo-
ring the exciting world of science.
Experiment Instructions
WARNING!
• Keep chemicals and corrosive liquids out of
the reach of children.
• Do not ingest any chemicals.
• Wash your hands thoroughly with soap un-
der running water after use.
Introduction
Here are a few tips about how to take a better
look at the wonderful world of microorganisms
and crystals. You will learn how to prepare
your object so that you can look at it with the
microscope. The numerous experiments de-
scribed should make you curious and want to
use your microscope more.
Objects to Observe
With a magnifying glass, you can look at non-
transparent (i.e. opaque) objects like small
animals, parts of plants and tissues. When
you use a magnifying glass, light falls onto
the object and is reected back through the
magnifying lens and into your eye. With
your microscope, however, you can observe
transparent objects. The light from the lamp
goes through the opening on the stage and
through your prepared specimen. Then, it
passes through the objective, the body of the
microscope, and the eyepiece , and travels
into your eye. In this way, the microscope
is only meant for observing transparent ob-
jects. Many microorganisms in water, parts of
plants, and the tiniest animal parts are natu-
rally transparent. To observe opaque objects
under the microscope, we must make them
transparent. We may make them transpa-
rent through a treatment or penetration with
the right materials (media), or by taking the
thinnest slices from them (using our hand or
a specimen slicer), and then examine them.
Below you‘ll nd out how to do this.
How to Produce Thin Specimen Slices
WARNING:
Only do this with an adult’s supervision.Ask
your parents to help you. As already men-
tioned, you need to get the thinnest slices
possible from an object so that they are
transparent and can be looked at under the
microscope. First, get a candle and place it
in an old pot, then heat it on the stovetop until
the wax becomes liquid. Now, use tweezers
to dip the object in the liquid wax a few times.
Be careful, the wax is very hot! After each
dip, allow the wax to harden before you dip
the object into the wax again. When the wax
around the object has hardened completely,
you can use the specimen slicer to cut it into
thin slices. Place these slices on a slide and
cover them with a cover slip.
The Production of Specimens
There are two basic types of specimens:
permanent specimens and short-term spe-
cimens.
Short-term Specimens
Short-term specimens are produced from
objects that you want to look at, but don’t
want to keep in your specimen collection.
These specimens are only meant to be ob-
served for a short period of time, after which
they are disposed of. For short-term speci-
mens, place the object on the slide and place
a cover slip on top of it. After looking at the
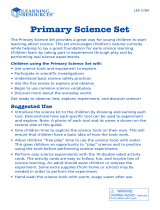
No recognizable image
No image
No light
Turn on light
Readjust focus
Start with the
lowest power objective (15X)
Center object on slide under
lowest power objective (15X)
Replace batteries
Check on/o position
Troubleshooting Table
Problem Solution
Customer Service:
Call 1-866-252-3811
National Geographic’s net proceeds
support vital exploration, conservation,
research, and education programs.
4

1200X Microscope Manual
object, clean the slide and cover slip, dispo-
sing of the specimens.. One of the secrets of
successful observation with a microscope is
the use of clean slides and cover slips. Spots
or stains will distract you when looking at an
object.
Permanent Prepared Specimens
Permanent prepared specimens are produ-
ced from objects that you would like to look
at again and again. The preparation of dry
objects (e. g. pollen or the wings of a y) can
only be done with special glue. You’ll nd
such glue at a local hobby store or online,
identied as “gum media.” Objects that con-
tain liquid must rst have the liquid taken out
of them before they can be prepared as per-
manent specimens.
How to Prepare a Dry Object
First, place the object in the middle of a clean
slide and cover it with a drop of glue (gum
media). Then place a cover slip on top of the
object and glue. Lightly press the cover slip,
so that the glue spreads to the edges. Let the
specimen harden for 2-3 days before obser-
ving it.
How to Prepare a Smear Specimen
For a smear specimen, place a drop of the
liquid to be observed (e.g. water from a pudd-
le in the forest) on the end of the slide using
a pipette. Then smear the liquid across the
slide with the help of a second slide. Before
observing, let the slides dry together for a few
minutes.
Experiments
Experiment 1:
Black - and - White Print
Objects:
1. A small piece of paper from a newspaper
with a black and white picture and some text.
2. A similar piece of paper from a magazine
with color pictures and text.
In order to observe the letters and the pictu-
res, produce a short-term slide from each ob-
ject. Now, set your microscope to the lowest
magnication to look at the specimen from
the newspaper. The letters on the newspaper
look frayed and broken, since they are prin-
ted on raw, low-quality paper. Now look at the
specimen from the magazine. The letters on
the magazine specimen look smoother and
more complete. The pictures in the newspa-
per are made up of many tiny dots, which ap-
pear slightly smudgy. The halftone dots of the
magazine picture are clearly dened.
Experiment 2:
Color Print
Objects:
1. A small piece of color - printed newspaper
2. A similar piece of paper from a magazine
Make short-term specimens from the objects
and observe them with the lowest magnica-
tion. The colored halftone dots of the newspa-
per often overlap. Sometimes, you‘ll even noti-
ce two colors in one dot. In the magazine, the
dots appear clear and rich in contrast. Look at
the different sizes of the dots.
Experiment 3:
Textile Fibers
Objects and accessories:
1. Threads from various fabrics (e.g. cotton,
linen, wool, silk, rayon, and nylon)
2. Two needles
Place each thread on a separate slide and
fray the samples using the two needles. Next,
wet the threads and cover them each with a
cover slip. Set the microscope to one of the
lower magnications. Observe each slide in
turn. Cotton bers come from a plant and look
like a at, twisted ribbon under the micro-
scope. The bers are thicker and rounder at
the edges than in the middle. Cotton bers
are basically long, collapsed tubes.
Linen bers also come from a plant, and they
are round and run in one direction. The bers
shine like silk and exhibit many bulges along
the length of the thread.
Silk comes from an animal and is made up of
solid bers that are small in diameter, in con-
trast to the hollow plant-based bers. Each
ber is smooth and even and looks like a tiny
glass tube.
The bers of the wool also come from an
animal. The surface is made of overlapping
sleeves that look broken and wavy. If pos-
sible, compare wool from different weaving
mills. In doing so, take a look at the different
appearance of the bers. Experts can deter-
mine which country the wool came from by
doing this.
Rayon is a synthetic material that is produced
by a long chemical process. All the bers
have solid, dark lines on the smooth, shiny
surface. After drying, the bers curl into the
same position. Observe the differences and
the similarities between the different types of
bers.
Experiment 4:
Table Salt
Object: Common table salt
Place a few grains of salt on a slide, and ob-
serve the salt crystals with the lowest setting
of your microscope. The crystals are tiny cu-
bes and are all the same shape.
Experiment 5:
Production of Salt Crystals
Objects and accessories:
1. Table salt
2. A graduated cylinder lled halfway with
warm water to dissolve the salt
3. Cotton thread
4. Paper clips
5. A matchstick or pencil
Add salt to the water until the salt will no
longer dissolve. You now have a saturated
salt solution. Wait until the water has cooled.
Attach a paper clip to the end of the cotton
thread. The paper clip serves as a weight.
Tie the other end of the cotton thread into
a knot around the match, and dip the end
with the paper clip in the salt solution. Place
the match horizontally on top of the test
tube, which prevents the cotton thread from
slipping all the way down into the test tube.
Now, place the tube in a warm place for 3-4
days. If you take a look at the glass after
a few days under the microscope, you can
see that a little colony of salt crystals has
formed on the cotton thread.
Experiment 6:
Raising Brine Shrimp
Accessories:
1. Shrimp eggs (at your local hobby store)
2. Sea salt
3. Hatchery
4. Yeast
Artemia salina are a species of shrimp
typically found in salt lakes, bodies of water
with a higher salinity than even the ocean.
During a drought, a salt lake can become
a hostile habitat for organisms, and entire
populations of Artemia salina sometimes
die off. During drought conditions, to ensure
that the species will repopulate the salt lake
when the drought ends, Artemia salina lay
thick-shelled eggs called winter eggs that
can survive for up to ten years in a dormant
state. Winter eggs can withstand heat, cold
and chemicals. These eggs hatch when
favorable conditions return to their ambient
environment. The eggs provided (23d) are
of this type.
Incubate Your Brine Shrimp
To hatch the shrimp, create a solution with
an appropriate salinity and temperature.
First, ll two containers with a half litre of
freshwater, and let them both stand for
Customer Service:
Call 1-866-252-3811
National Geographic’s net proceeds
support vital exploration, conservation,
research, and education programs.
5

1200X Microscope Manual
about thirty hours. Next, pour half of the
provided salt into one container and stir the
solution until the salt dissolves. Pour some of
this solution into the prawn hatchery. Place a
few eggs close to the lid. Position the hatch-
ery somewhere with plenty of light but not
in direct sunlight. The ambient temperature
should ideally hover around 77°F. As water in
the hatchery evaporates, gradually add fresh
water from the second container. After two to
three days, the eggs will hatch prawn larvae,
called nauplii.
Observe Your Brine Shrimp
The animal that hatches from the egg is
known as a nauplius larva. With the help
of a pipette, you can place a few of these
larvae on a glass slide and observe them.
The larvae will move around in the salt water
by using their hair-like appendages. Take
a few larvae from the container each day
and observe them under the microscope.
Remember to return them to their container
when you’re done observing them. In case
you’ve hatched the larvae in a hatchery, sim-
ply take off the cover of the tank and place
the tank on the stage. Depending on the
room temperature, the larvae will be mature
in 6-10 weeks. Soon, you will have raised a
whole generation of brine shrimp, which will
constantly grow in numbers.
Feed Your Brine Shrimp
Feed your brine shrimp often to keep them
alive. The best food is dry-powdered yeast.
Give the some every other day. Be careful
not to overfeed them, as doing so can cause
the water to stagnate and poison the shrimp.
If the water does begin to stagnate (you’ll
see it darkening), transfer the shrimp to a
freshwater solution.
Warning! The shrimp eggs and the shrimp
are not meant to be eaten!
Experiment 7:
Developing Bread Mold
Object: An old piece of bread
Put the bread on a slide and lightly moisten
it with water. Place the bread into a sealed
container, and keep it warm and out of harsh
light. Within a short time, black bread mold will
form. When the mold takes on a white, shiny
appearance, remove the slide from the con-
tainer and observe it with your microscope.
It will look like a complicated mass of thread,
forming the fungus body, which is called the
mycelium. Each thread is known as a hypha.
These threads, or hyphae, grow like long, slim
stacks, ending in a small, white ball, called a
sporcap. Inside the sporcap is a spore that
will eventually be released to start new colo-
nies of mold. With your microscope you can
watch this amazing transformation unfold.
Experiment 8:
Observing Stem and Root Sections
Objects:
1. A celery stalk
2. A carrot
Cut several very thin slices from the middle
of the celery (a stem) and from the middle
of the carrot (a root). Make a wet mount by
placing a drop of water on the slide. Then
put the specimen on the water-covered sli-
de, and top it with a cover slip. The water will
help support the sample. It also lls in the
space between the cover slip and the slide.
Start by viewing the specimens at the lowest
magnication and then increase the magni-
cation, for more detailed observation. What
differences are there between the stem and
the root?
Experiment 9:
Observing Cork Cells
Object: A small cork
With an adult’s supervision, cut a very thin
slice from the cork. The thinner you cut the
slice, the better you‘ll be able to observe it..
Prepare a wet mount of this cork slice as you
did with the celery and carrot in Experiment
8. When applying the cover slip over the sli-
de, the water, and the cork, make sure no
air bubbles are trapped beneath it. Begin ob-
serving the specimen with the lowest power,
and increase the magnication as desired.
The cells you see, called lenticels, are actu-
ally the air pockets that are left after the plant
material inside has died.
Experiment 10:
Observing Leaf Cells
Objects: A fresh leaf, clean and dry, without
holes or blemishes
With an adult’s supervision, cut a one-inch
-wide cross section out of the center of the
leaf, from one side of the leaf to the other.
Tightly roll that section up, starting from one
uncut edge of the leaf. The central vein of
the leaf will be in the center of the roll and not
be visible. Then cut several very thin slices
off of one end of the roll. The central vein will
be in the middle of this almost transparent
slice. You’ll be observing the cells around
that central vein. Using a droplet of water,
make a wet mount (as in Experiments 8 and
9), placing the leaf segment so that the inner
part faces up. Start with the lowest power
and gradually increase the magnication for
more detail. What do you observe about the
leaf cells?
Customer Service:
Call 1-866-252-3811
National Geographic’s net proceeds
support vital exploration, conservation,
research, and education programs.
© 2016 National Geographic Partners LLC. All
rights reserved. NATIONAL GEOGRAPHIC and
Yellow Border Design are trademarks of the
National Geographic Society, used under license.
6

© 2017 Explore Scientific®, LLC.
1010 S 48th St. Springdale, AR 72756
exploreone.com | 866.252.3811
All rights reserved. Made in China.
CONFORMS TO THE SAFETY
REQUIREMENTS OF ASTM F963
© 2017 National Geographic Partners LLC.
All rights reserved. NATIONAL GEOGRAPHIC
and Yellow Border Design are trademarks of the
National Geographic Society, used under license.
8
/